Oh, I’ve got to tell you—last year, I spent way too much time scrolling Pinterest, looking at all these perfect Halloween decorations and thinking, there’s no way I could make anything that cute. But then I stumbled onto Halloween gnome crafts, and honestly? Game changer. I know, I know—gnomes sound kinda… unexpected for Halloween, right? But trust me, they’re adorable, fun, and surprisingly easy to make. If you’ve ever felt like crafting is just too complicated or you’re worried your decorations will look like a total mess, I totally get it. I’ve been there, with glue sticking to my fingers and glitter everywhere. But the thing about these little Halloween gnome crafts is that they’re forgiving, cute, and a total crowd-pleaser. In this article, I’ll show you some simple ideas, tips, and tricks so you can make your own spooky gnome friends—without feeling overwhelmed or frustrated. Sounds doable, right?
Halloween Gnome Crafts
Halloween gnome crafts are fun, spooky decorations you can make at home. They’re perfect for adding a cute and creepy touch to your Halloween décor.
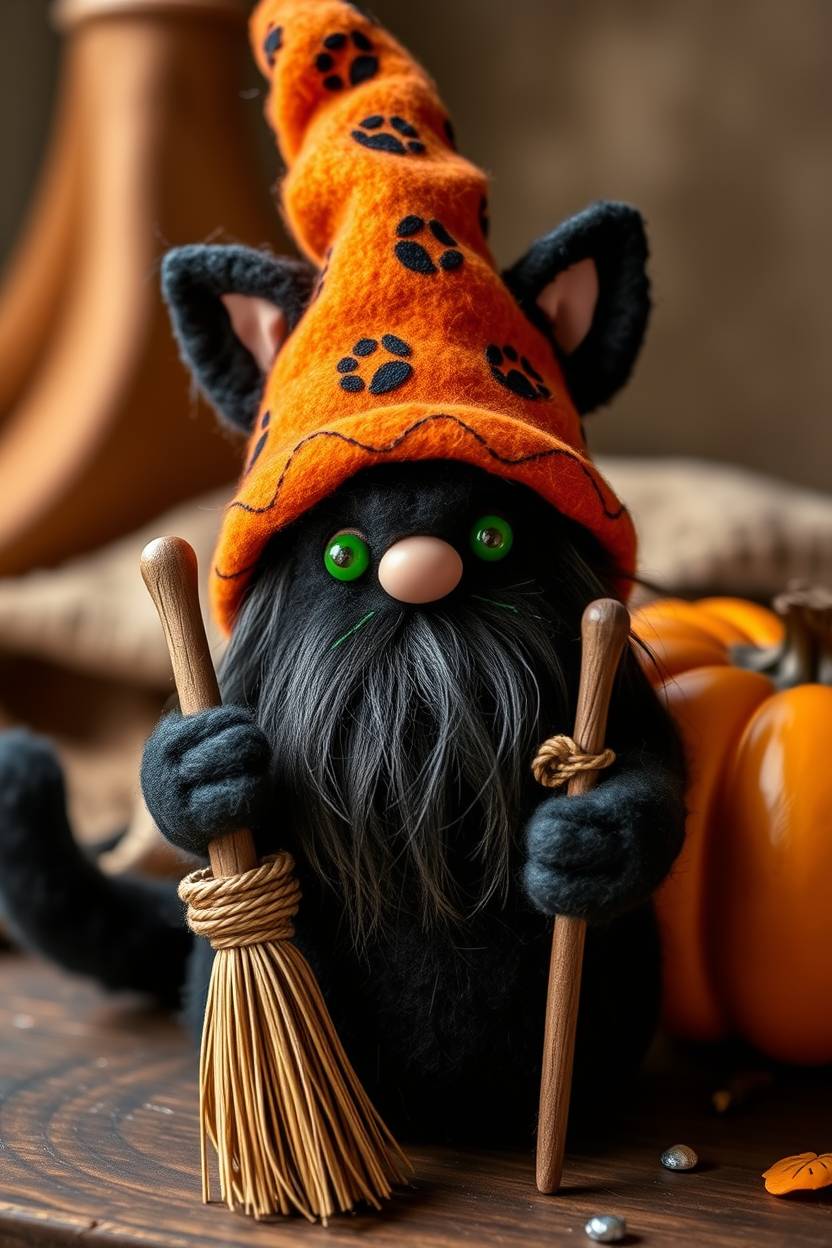
Witch Gnome
Honestly, I’ve always loved witchy vibes around Halloween, so making a Witch Gnome felt super natural. I used a tiny felt hat and painted it deep purple with gold stars—it honestly made me feel like I had a little magical buddy on my shelf. I think the key is in the details; adding a mini broomstick or a tiny cauldron really gives it that authentic feel. To be fair, my first one looked like a lopsided hat explosion, but that’s part of the charm. I also like adding little glitter touches; they make it feel magical without being over the top.
If you want to try this yourself, I’d say don’t stress about perfection. Just use felt, glue, and a bit of paint. I’ve found that tiny googly eyes or a bead nose instantly give your gnome personality. Honestly, it’s fun to mix in little accessories—tiny spell books, a mini wand—and see which one ends up being the “star” of your Halloween décor.
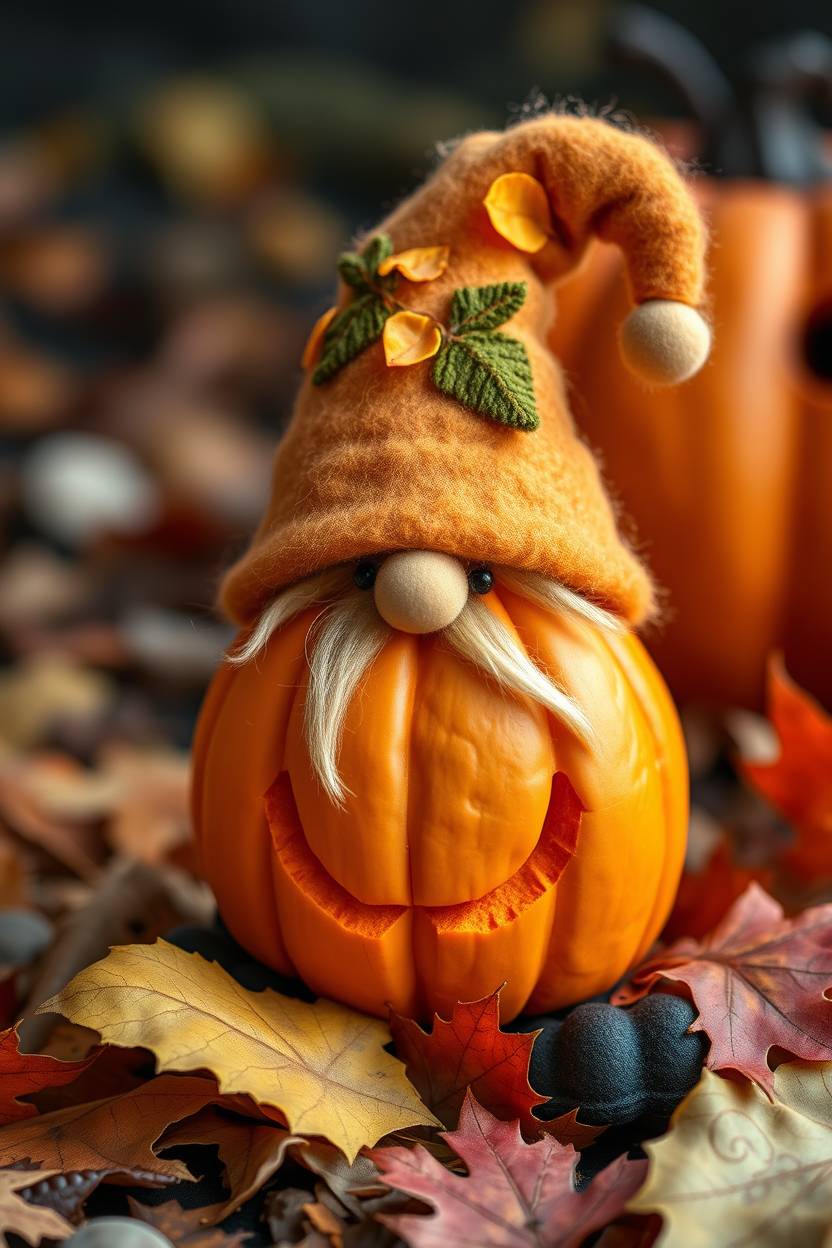
Pumpkin Gnome
I’ll admit, I’m a sucker for pumpkin-themed crafts, so Pumpkin Gnomes are my jam. I carved out a small foam pumpkin to be the gnome’s body and added a felt hat in fall colors. Honestly, I spent way too long picking the perfect shade of orange, but it was worth it. I even painted subtle smiley faces on the pumpkin like it’s shyly peeking at the world. I added tiny leaves around the hat, which I honestly think made it feel more “autumnal” than just orange and green.
For anyone making this, I’d say don’t be afraid to mix textures. Felt, foam, and even a little moss can make your pumpkin gnome look like it stepped right out of a cozy Halloween scene. To be fair, I had one where the pumpkin body was too big and my gnome looked like it was tipping over, but fixing it with some hot glue worked perfectly. You can totally experiment with hats and little pumpkin patches—it’s oddly satisfying.
Vampire Gnome
Vampire Gnomes are just too much fun. I honestly went full “dracula vibes” with a tiny black cape, painted fangs, and a little felt collar. I love that they can be cute yet slightly spooky. I’ve found that using a deep red accent for the hat or cape really makes them pop. I even added a tiny felt “blood drop” on a cupcake prop for mine—it’s silly, but it made me laugh every time I walked by.
Honestly, making these gnomes is about balancing cute and scary. To be fair, I struggled with tiny teeth at first—they kept breaking—but a little white paint solved that. I’d say focus on the cape and hat first; everything else is optional. I like using mini props like a little coffin or potion bottles, just to complete the story. In my opinion, a vampire gnome sitting on your shelf is ten times more charming than a simple pumpkin—it just has personality.
Skeleton Gnome
Skeleton Gnomes are weirdly fun to make. I used a white felt skeleton pattern on a black gnome body, and honestly, it was kind of addictive. I even tried painting bones on with a fine brush, which was messy but looked cute in the end. To be fair, my first attempt looked more like a stick figure disaster, but I learned quickly that bold lines win. I added tiny black gloves and boots to make it feel more “dressed up,” which really sold the idea.
Honestly, these are perfect for Halloween if you want a gnome that’s creepy but still approachable. I’d suggest using a mix of felt and paint; it gives that dimensional look. I’ve found adding little props—like a tiny pumpkin or candle—makes your skeleton gnome feel like part of a scene. In my opinion, they’re also great if you’re doing a gnome collection because they stand out without being too scary for kids.
Black Cat Gnome
I’ll be honest, I probably made the Black Cat Gnome ten times before I got it right. I attached a tiny black cat tail and ears to a basic gnome, and instantly it looked mischievous. I added little green eyes and whiskers, which I think really give it character. To be fair, I accidentally glued one ear upside down at first, but it somehow made him look even cuter. I also painted tiny paw prints on the hat—it’s the little details that make it fun.
Honestly, this one is all about playing with personality. I like using felt and tiny beads for eyes, but you can totally experiment with pipe cleaners for tails. I’ve found that posing your gnome with a little mini broomstick or pumpkin adds a playful Halloween vibe. In my opinion, it’s perfect if you love cats and want your décor to feel cozy yet festive.
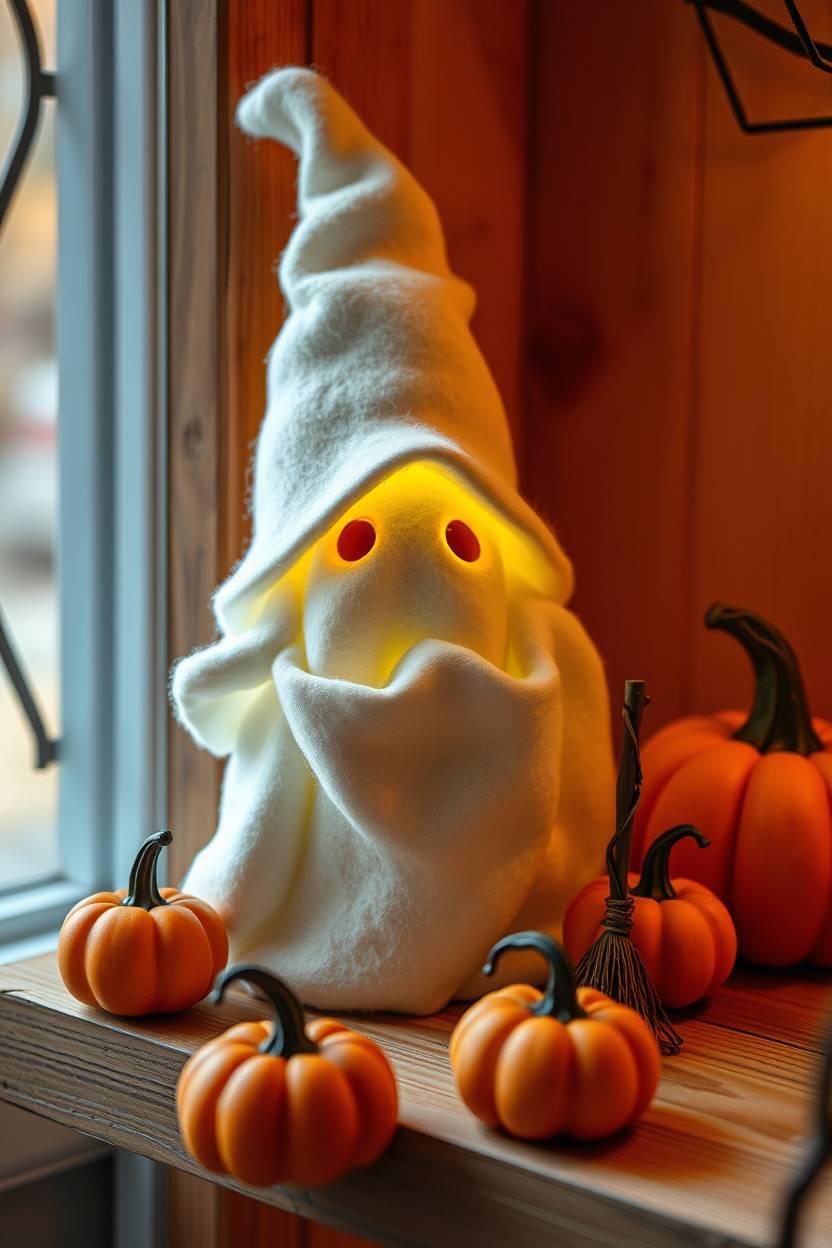
Ghost Gnome
Ghost Gnomes are honestly my favorite because they’re simple and spooky in the cutest way. I draped white felt over a standard gnome base and cut out tiny eye holes. To be fair, it looked like a little sheet monster at first, but I added a tiny hat and it instantly looked more gnome than ghost. I even experimented with glow-in-the-dark paint on the edges—it was so fun seeing it faintly glow at night.
If you want to try this, I’d say keep it simple. I’ve found using soft fabric makes it look “floating” without much effort. Adding little props like mini pumpkins or tiny broomsticks works surprisingly well. Honestly, it’s perfect if you want a quick craft that still feels festive. In my opinion, ghost gnomes are underrated—they’re easy, fun, and look cute on a shelf or porch.
Spider Gnome
Spider Gnomes are one of those crafts that make me laugh every time. I used pipe cleaners for legs and glued a tiny felt spider on the hat. Honestly, the first one had crooked legs and looked like it was having a bad day, but I kind of liked the messy look. I also added tiny googly eyes for the spider, which really made it playful instead of creepy. To be fair, it was a little tricky attaching the legs, but hot glue saved the day.
Honestly, I love this craft for its silliness. I’ve found that adding small web designs with white thread or string really sells the spider vibe. To be fair, it takes patience, but it’s oddly satisfying to see your gnome look mischievous. In my opinion, spider gnomes are perfect if you want Halloween décor that’s cute, weird, and fun to make with kids or friends.
Candy Corn Gnome
Candy Corn Gnomes are basically my happy place. I painted my gnome body in the classic candy corn colors—yellow, orange, and white—and honestly, it made me crave actual candy corn. I even tried layering felt for a textured look, which I think made it feel more “crafted” than just painted. To be fair, I messed up the color order a couple of times, but it ended up looking fun and quirky.
Honestly, this one is super kid-friendly and cheerful. I’ve found that a little tiny candy prop or a mini trick-or-treat bag really completes the idea. In my opinion, it’s perfect if you want something bright and playful that breaks up the spooky vibe. To be fair, it’s a little simple compared to vampire or skeleton gnomes, but honestly, that’s part of why I love it—it’s sweet, literal, and fun to display.
Zombie Gnome
Zombie Gnomes are hilarious to make. I painted a greenish-gray base, added a torn felt outfit, and honestly, it was fun making him look “half-eaten.” To be fair, I tried too hard on one and he looked like a mutant, but honestly, it added personality. I even glued one little arm crookedly—it’s subtle, but it screams zombie vibe. I like adding tiny props like a mini gravestone or a pumpkin; it makes him feel like part of a little Halloween story.
Honestly, if you’re into messy and silly crafts, zombie gnomes are perfect. I’ve found that a little paint splatter or tiny felt rips make them look authentically “undead.” In my opinion, they’re a hit if you want to scare friends just a little without being truly creepy. To be fair, they can be a bit fiddly, but honestly, seeing the finished gnome makes it totally worth it.
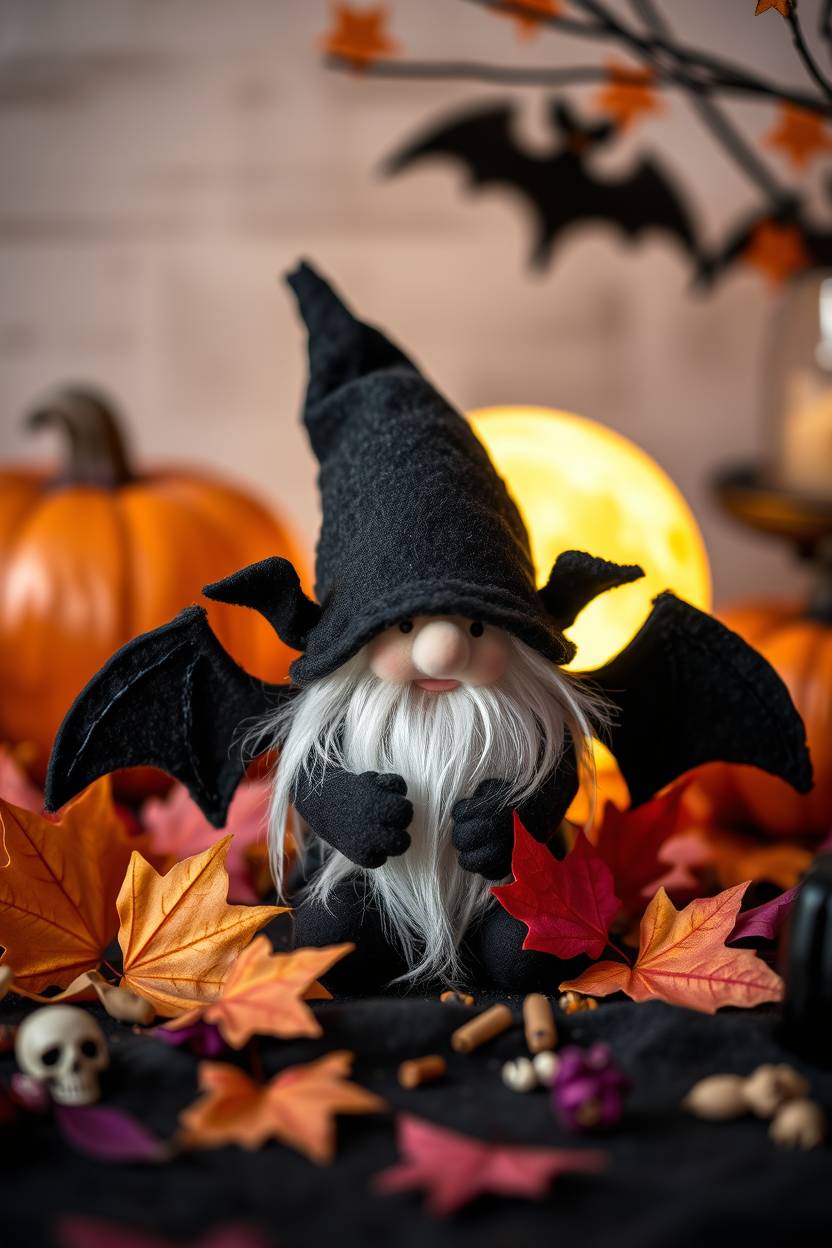
Bat Gnome
Bats are my go-to for Halloween vibes, so naturally Bat Gnomes were a must. I attached tiny felt wings and a little black hat, and honestly, it made me feel like my gnome was ready to take flight. To be fair, the wings were tricky at first—they kept flopping—but hot glue solved everything. I even painted tiny fangs for fun, though I kept it cute rather than scary. Adding a mini moon prop in the background was my favorite touch; it made him feel like he had a little nighttime scene.
Honestly, this one is fun because it combines a classic gnome with a little spooky twist. I’ve found using stiff felt for the wings works best. In my opinion, it’s great for people who love bats but want something more whimsical than scary. To be fair, they look adorable on shelves or hanging in tiny Halloween setups—it’s like your gnome got a costume makeover.
Owl Gnomes are one of my favorites because I’m a sucker for little forest creatures. I glued tiny felt wings and big googly eyes, and honestly, it made me feel like my gnome was watching over everything. To be fair, I struggled getting the wings symmetrical at first, but that gave it a quirky charm. I even painted subtle feather details on the hat and body, which made it feel more realistic without being too serious.
Honestly, I’ve found owl gnomes are perfect if you want something cute and wise-looking. Little props like a mini book or tiny branch really sell it. To be fair, they take a little patience, but honestly, I love seeing them perched on shelves. In my opinion, owl gnomes give your Halloween décor a whimsical, cozy vibe rather than just spooky, which I love.
Frankenstein Gnome
Frankenstein Gnomes are such a fun challenge. I painted a green face, added tiny bolts with beads, and honestly, it felt like creating a tiny buddy straight from a storybook. To be fair, my first one looked more like a lime blob, but a little black paint fixed it instantly. I added stitches with a fine marker, which in my opinion, really brought the gnome to life. Adding a tiny flat-top hat or ragged outfit gives it that classic Frankenstein feel.
Honestly, these are perfect if you want a mix of spooky and funny. I’ve found that small props like a mini pumpkin or tiny lightning bolt decorations add extra charm. To be fair, the bolts can be fiddly, but honestly, seeing the finished gnome makes it totally worth it. In my opinion, it’s one of the most fun gnomes to make because it’s creative and whimsical.
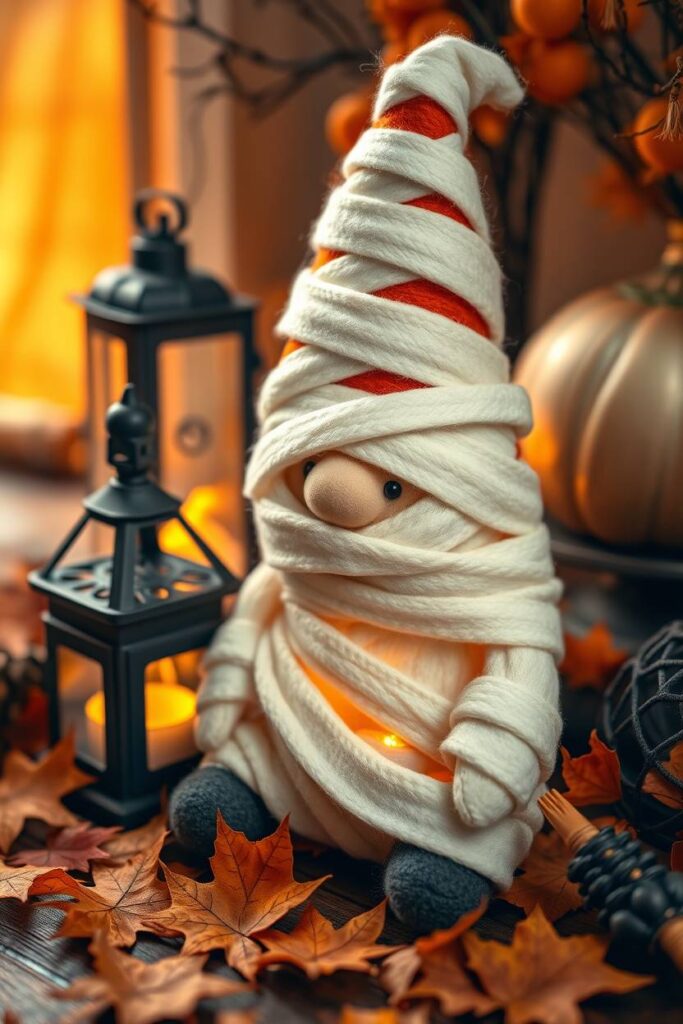
Mummy Gnome
Mummy Gnomes are honestly super fun and forgiving. I wrapped my gnome in strips of off-white felt, trying to keep it messy but cute, and honestly, it looked adorable. To be fair, I had one that ended up looking like a bandage nightmare, but honestly, it gave him character. I glued tiny googly eyes peeking out, which instantly made it feel alive rather than scary. Adding a little Halloween prop, like a mini lantern, made it feel complete.
Honestly, making a mummy gnome is all about texture. I’ve found layering strips randomly works better than trying to be neat. In my opinion, it’s perfect if you like spooky but approachable crafts. To be fair, it’s easy to make with kids, and honestly, seeing the little peeking eyes makes me laugh every time I walk by.
Haunted House Gnome
Haunted House Gnomes are probably the most dramatic ones I’ve made. I attached tiny black felt pieces to make a little haunted roof and added some painted “windows” and cobwebs. Honestly, it felt like creating a tiny spooky scene rather than just a gnome. To be fair, I struggled with the roof at first—it kept falling—but hot glue saved the day. I even added a tiny ghost or pumpkin in front, which made it feel alive.
Honestly, I’ve found these are great if you want a statement piece. They take a bit longer, but honestly, it’s fun seeing the details come together. In my opinion, haunted house gnomes are perfect for centerpiece décor because they’re whimsical, spooky, and super detailed. To be fair, it’s a bit fiddly, but worth every minute if you love Halloween crafts.
Moonlight Gnome
Moonlight Gnomes are my personal favorite for that mysterious, soft glow vibe. I painted a silvery hat with stars and added tiny glow-in-the-dark accents, and honestly, it felt magical. To be fair, my first one looked like a glitter explosion, but I refined it and it became enchanting. I even added a little mini moon prop, and honestly, it made the gnome look like it was standing under a serene Halloween night sky.
Honestly, these are perfect if you want a subtle but magical effect. I’ve found glow-in-the-dark paint and soft felt textures work best. To be fair, it takes patience to balance sparkle and soft colors, but honestly, seeing it glow at night is so worth it. In my opinion, moonlight gnomes add elegance and whimsy to your Halloween décor that no other gnome can match.
Tips for Crafting Success
Making Halloween gnomes is super fun, but a few simple tips can make your gnomes look even better and keep the crafting safe. Follow these ideas to create gnomes that are spooky, cute, and unique.
Mix textures: Combine felt, faux fur, wood, and glitter to give your gnomes a fun and interesting look.
Use Halloween colors: Stick to classic Halloween shades like orange, black, purple, and green for a festive vibe.
Keep safety in mind: When kids are crafting, supervise the use of scissors, hot glue, and other sharp tools.
Personalize each gnome: Add names, tiny props, or unique decorations to make each gnome special and one-of-a-kind.
FAQ
Are Halloween gnome crafts suitable for kids?
Yes! You can make kid-friendly versions using safe materials like felt, glue sticks, and markers. Avoid sharp tools for younger children.
How long does it take to make one gnome?
It usually takes 20–40 minutes, depending on the size and details of your gnome.
Can I use recycled materials?
Absolutely! Old fabric, scraps, buttons, or even small jars can be reused to make creative gnomes.
How can I store gnomes for next year?
Keep them in a cool, dry place, preferably in a box with soft padding to protect delicate parts like hats or beards.
Hi, I’m Victoria, an art and craft teacher at Newark City Schools, where I have the joy of working with middle school students to help them explore their creativity and develop their artistic talents. I believe that art is a powerful way for students to express themselves, and I strive to make every lesson a fun, engaging, and inspiring experience.
I created this website to share the art and craft projects, techniques, and resources that I use in my classroom, hoping to inspire both educators and young artists alike. Whether you’re a teacher looking for new ideas or a student eager to try something new, I’m excited to provide creative tools and projects that anyone can enjoy.
When I’m not in the classroom, I love experimenting with different art forms and learning new crafting techniques. My goal is to help others discover the joy of making things with their hands, and I hope my website serves as a space for everyone to explore their creative potential.