
I still remember one Valentine’s Day when I was standing in the salon, scrolling endlessly on my phone, thinking, Why is choosing nails harder than choosing an outfit? 😅 Everything felt either too basic or way too extra. If you’ve ever been there—short on time, full of ideas, and somehow still confused—I get you.
That’s exactly why Valentine’s Day Nail Ideas matter more than people admit. Your nails are that tiny detail that makes you feel put-together, even if the rest of life feels a bit messy. Maybe you want something cute but not cheesy. Romantic, but still you. Or maybe you just want nails that make you smile every time you look at your hands (totally valid, by the way).
In this article, I’m sharing Valentine’s Day Nail Ideas that actually work in real life—not just on Pinterest. Simple, stylish, and wearable. No stress, no overthinking. Just ideas you’ll actually want to try. Ready? Let’s make this fun.
Valentines Day Nails Ideas
Valentine’s Day nails are such a fun way to show a little love, even in the smallest details. From soft pinks to bold reds and cute heart designs, the right nails instantly set the mood for the day.

Classic Red Heart Nails
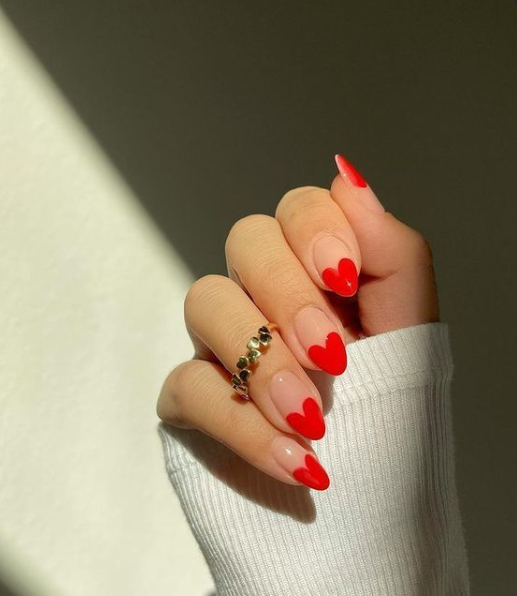
Honestly, when someone asks me what never fails for Valentine’s Day nails, I always say classic red heart nails. I’ve done these so many times on my work table, and every single time they give that instant “Valentine vibe” without trying too hard. Red just has that bold, romantic energy. I usually keep the base clean—either a soft nude or milky pink—and then add tiny red hearts. In my opinion, smaller hearts look more elegant than oversized ones, especially if you’re wearing these for more than one day.
I’ve found that you don’t need fancy tools for this either. A simple dotting tool or even a bobby pin works if your hand is steady. To be fair, the first few hearts are never perfect—and that’s okay. I actually like when they look a little handmade. Finish with a glossy top coat so the red really pops, and you’re done. It’s simple, classic, and always gets compliments.
Pink Ombre Love Nails
Pink ombre love nails are one of those designs I keep coming back to, especially when I want something soft but still romantic. I remember trying this for the first time and thinking it would be messy—but honestly, it’s more forgiving than it looks. Blending light pink into a deeper rosy shade gives such a dreamy base, and once that’s done, you can add tiny hearts or subtle shimmer if you feel like it.
What I like most about pink ombre is how wearable it is. You can go to work, college, or even a casual date, and it still feels appropriate. I’ve found that using a makeup sponge makes blending much easier. Dab gently, take your time, and don’t rush the layers. In my opinion, the magic is in sealing it properly with a good top coat so everything looks smooth and professional.
French Tips with Heart Accents
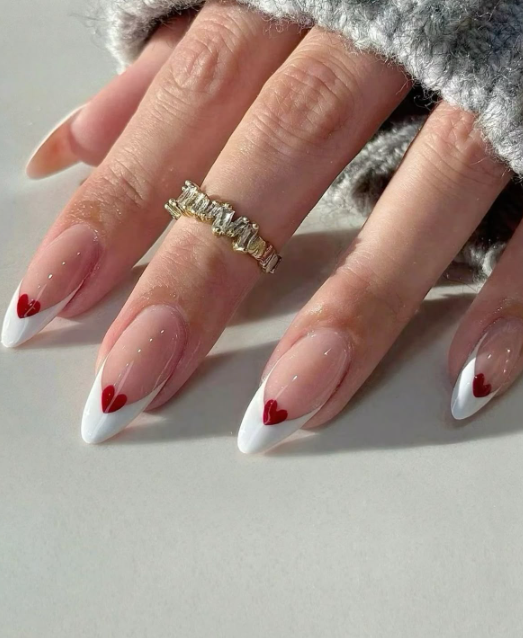
French tips with heart accents feel like a sweet twist on something we already love. I’ve always been a fan of French nails, and adding hearts just makes them Valentine-ready without going overboard. Usually, I keep the tips white or light pink and add a tiny heart near the corner or cuticle. It’s subtle, but that’s exactly why I like it.
To be fair, placement matters a lot here. I’ve learned that less is more—one heart per nail or even just on accent nails works best. You can use red, pink, or even gold for the hearts depending on your mood. I personally prefer glossy over matte for this style because it keeps the look fresh and clean. It’s perfect if you like classic designs but still want a festive touch.
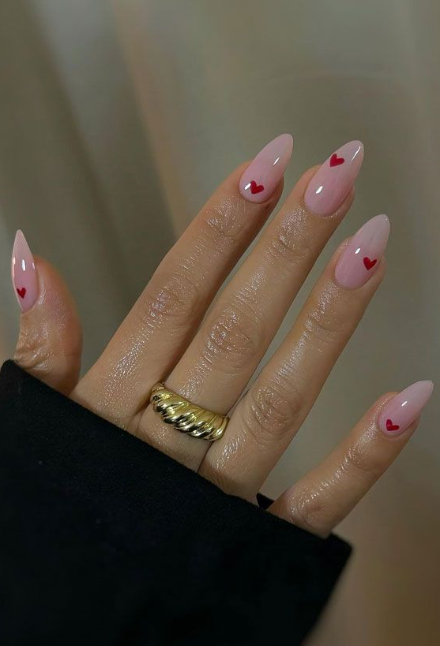
Minimal Nude Heart Nails
Minimal nude heart nails are my go-to when I want something elegant but still on theme. I’ve found that nude shades make the hands look neat and polished, and when you add tiny hearts, it feels intentional, not boring. This style works especially well if you’re not into bold colors but still want a Valentine detail.
Honestly, this design is all about precision. The hearts should be small and neat, otherwise they overpower the nude base. I usually recommend soft pink, beige, or peachy nudes depending on your skin tone. A fine brush helps a lot here. Finish with a high-shine top coat, and the result is clean, classy, and very wearable for everyday life.
Glittery Valentine Nails
Glittery Valentine nails are for those days when subtle just isn’t the mood. I love how glitter instantly makes nails feel festive, and Valentine’s Day is honestly the perfect excuse to go a little extra. I’ve done full glitter nails, glitter ombre, and even glitter accents paired with hearts. They all work—it just depends on how bold you’re feeling.
What I’ve learned over time is to balance the glitter. Too much can feel heavy, especially on shorter nails. I usually mix glitter with a solid base or keep it to accent nails. A good top coat is non-negotiable here—it smooths everything out and keeps the sparkle looking fresh. Trust me, glittery nails always catch the light and the compliments.
Pastel Love Nail Art
Pastel love nail art feels soft, playful, and honestly a little nostalgic. Whenever I use pastel shades like lavender, baby pink, mint, or peach, the whole design feels lighter and more fun. I love mixing different pastel colors on each nail and adding small hearts or love symbols on top. It’s cute without being childish, if done right.
I’ve found that pastels look best on well-prepped nails because any unevenness shows easily. Take your time with the base and apply thin layers. In my opinion, pastel designs look amazing with a glossy finish, but matte can work too if you want something modern. This style is perfect if you want Valentine nails that feel sweet and fresh.
Red and White Candy Heart Nails
Red and white candy heart nails are just pure Valentine fun. Every time I do this design, it reminds me of those little candy hearts with cute messages on them. You can keep it simple with red and white blocks or go creative by adding tiny words or symbols if you’re comfortable with detailing.
To be fair, this design needs a steady hand, especially if you’re adding text. I usually suggest keeping the words minimal or even using decals if you’re not confident. The contrast of red and white always looks crisp, and it photographs beautifully too. I’ve noticed people love this style because it’s playful and instantly recognizable as Valentine-themed.
Chrome Pink Valentine Nails
Chrome pink Valentine nails are for anyone who loves a modern, trendy look. I was skeptical the first time I tried chrome, but once I saw that mirror-like finish, I was hooked. Pink chrome, especially, feels romantic and edgy at the same time. You can keep it plain or add tiny hearts for a softer Valentine touch.
I’ve found that chrome works best on smooth nails, so filing and buffing properly really matters here. In my opinion, short to medium lengths look especially chic with chrome finishes. Seal it well, because chrome can chip if rushed. When done right, these nails look expensive and make a strong style statement.
Short Cute Heart Nails
Short cute heart nails are proof that you don’t need long nails to have fun with Valentine designs. I personally love working on short nails because they’re practical and still adorable. Tiny hearts, simple color combos, and clean finishes look amazing on shorter lengths.
Honestly, the key here is keeping things simple. Overloading short nails can make them look crowded. I usually recommend one or two accent nails with hearts and keeping the rest plain. Soft pinks, reds, and nudes work beautifully. With a glossy top coat, short heart nails look neat, fresh, and very wearable for daily life.
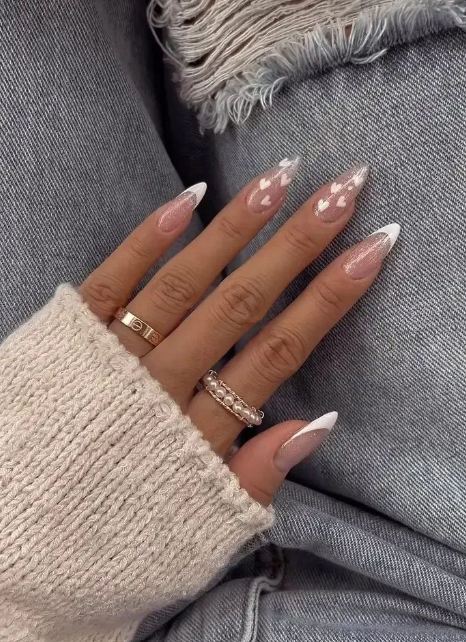
Long Coffin Valentine Nails
Long coffin Valentine nails are bold, dramatic, and honestly a little addictive. Whenever I create this style, it feels like a mini art project. The long shape gives you so much space to play with—hearts, ombre, glitter, even tiny love quotes if you want.
I’ve learned that balance is important with coffin nails. If the design is heavy, keep the colors simple. If the colors are bold, keep the art minimal. In my opinion, reds, pinks, and metallics look stunning on this shape. Make sure the nails are well-shaped and sealed, because clean edges make all the difference in a bold style like this.
Black and Red Love Nails
Black and red love nails are for anyone who likes a darker, moodier Valentine look. I’ve always loved this combo because it feels strong and confident, not overly sweet. You can do black bases with red hearts or mix both colors across the set for a striking contrast.
To be fair, black polish shows imperfections easily, so take your time with application. I’ve found that glossy black paired with bright red details looks especially powerful. This design is great if you want something different from the usual pink-heavy Valentine styles. It’s bold, stylish, and definitely stands out.
Floral Valentine Nail Design
Floral Valentine nail designs feel romantic in a soft, timeless way. I love adding tiny roses, daisies, or abstract florals to pink or nude bases. It reminds me of handwritten love letters and pressed flowers—very sentimental, honestly. You can keep the florals minimal or make them the main focus.
I’ve found that florals don’t need to be perfect to look beautiful. Loose strokes and soft colors actually add charm. In my opinion, this design works best with gentle shades like blush, white, and red accents. Finish with a glossy top coat to bring everything together. Floral nails always feel special, like you put extra love into them.
Nail Care Tips Before Valentine’s Day
Getting your nails ready before Valentine’s Day is just as important as picking the design. Well-cared-for nails make any nail art look cleaner, shinier, and more put together—and they also help your manicure last longer through all your plans.
Prepping nails for a smooth finish
-
Remove old polish completely and gently buff the nail surface
-
Wash hands and dry nails properly before applying any product
-
Apply a good base coat to prevent staining and smooth out ridges
Cuticle care and shaping
-
Soak nails in warm water to soften cuticles
-
Push cuticles back gently instead of cutting them
-
File nails in one direction to avoid breakage
Choosing the right top coat
-
Use a glossy top coat for a classic romantic shine
-
Pick a quick-dry top coat if you’re short on time
-
Reapply top coat after two days to keep nails fresh
Maintaining nails through date night
-
Avoid using nails as tools to prevent chipping
-
Carry a small nail file for quick fixes
-
Apply cuticle oil at night to keep nails healthy and polished

Hi, I’m Victoria, an art and craft teacher at Newark City Schools, where I have the joy of working with middle school students to help them explore their creativity and develop their artistic talents. I believe that art is a powerful way for students to express themselves, and I strive to make every lesson a fun, engaging, and inspiring experience.
I created this website to share the art and craft projects, techniques, and resources that I use in my classroom, hoping to inspire both educators and young artists alike. Whether you’re a teacher looking for new ideas or a student eager to try something new, I’m excited to provide creative tools and projects that anyone can enjoy.
When I’m not in the classroom, I love experimenting with different art forms and learning new crafting techniques. My goal is to help others discover the joy of making things with their hands, and I hope my website serves as a space for everyone to explore their creative potential.