
I still remember the first time I sat down with a lump of clay. I had no plan, no fancy tools… just this random urge to make something with my hands. And honestly? It felt a little awkward at first. I kept thinking, what if I mess this up? If you’re new to clay crafting, I get it. Starting something creative can feel exciting and slightly intimidating at the same time. But here’s the thing — Beginners Clay Craft Ideas are actually way simpler (and way more fun) than they look.
You don’t need to be super artistic or have years of experience. With a few easy clay projects, some basic tools, and a bit of patience, you can create cute mini planters, tiny animals, keychains, or even handmade gifts. In this guide, I’ll share simple clay craft ideas that are perfect for beginners, plus tips to make the process stress-free and enjoyable. Trust me, once you start, you won’t want to stop.
Beginners Clay Craft Ideas
If you’ve ever wanted to try something creative but didn’t know where to start, Beginners Clay Craft Ideas are honestly the perfect first step. They’re simple, fun, and such a relaxing way to make cute handmade pieces without needing any special skills.

Clay Plant Pot
Create a small decorative flower pot with clay, perfect for a mini plant or succulent.

Materials Used:
- Air-dry clay
- Rolling pin
- Sculpting tools
- Paint (optional)
Steps:
- Roll a ball of clay and flatten it into a thick disk.
- Form the edges of the disk into a circular shape.
- Carefully mold the clay into a bowl shape by pinching the sides.
- Once shaped, let the clay dry completely.
- Once dry, paint and decorate as desired.
- Place a small plant or succulent inside.
DIY Clay Earrings
Make lightweight, custom earrings that are perfect for adding a personal touch to any outfit.
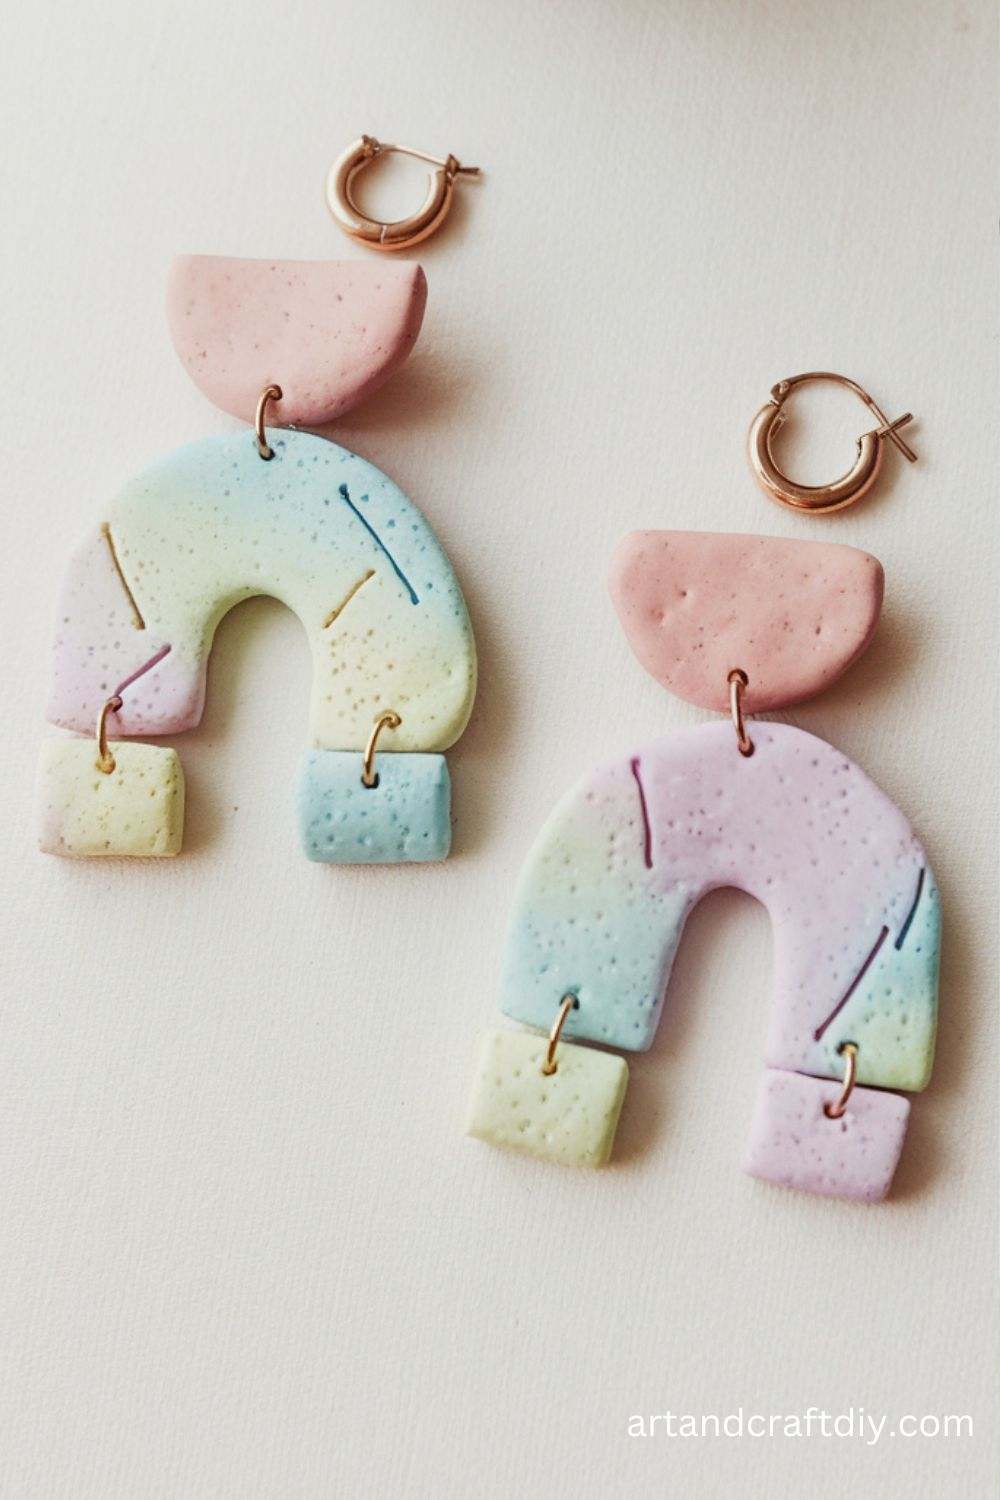
Materials Used:
- Polymer clay
- Earring hooks
- Rolling pin
- Sculpting tools
- Parchment paper
Steps:
- Roll out the polymer clay into a flat sheet.
- Use cookie cutters or a knife to cut out shapes for your earrings.
- Add any designs or textures using sculpting tools.
- Pierce holes at the top of each shape for the earring hooks.
- Bake according to clay instructions.
- Once cooled, attach earring hooks and wear your new creation!
Clay Animals
Create cute miniature animals out of clay for decoration or play.

Materials Used:
- Air-dry or polymer clay
- Sculpting tools
- Paint (optional)
Steps:
- Roll clay into balls for the body and head of the animal.
- Shape the clay into the desired animal form (cat, dog, etc.).
- Use tools to add features like eyes, ears, and limbs.
- Let the clay dry completely.
- Paint your animal with details like eyes, noses, or patterns.
DIY Clay Keychains
Design personalized keychains that make great gifts or accessories.
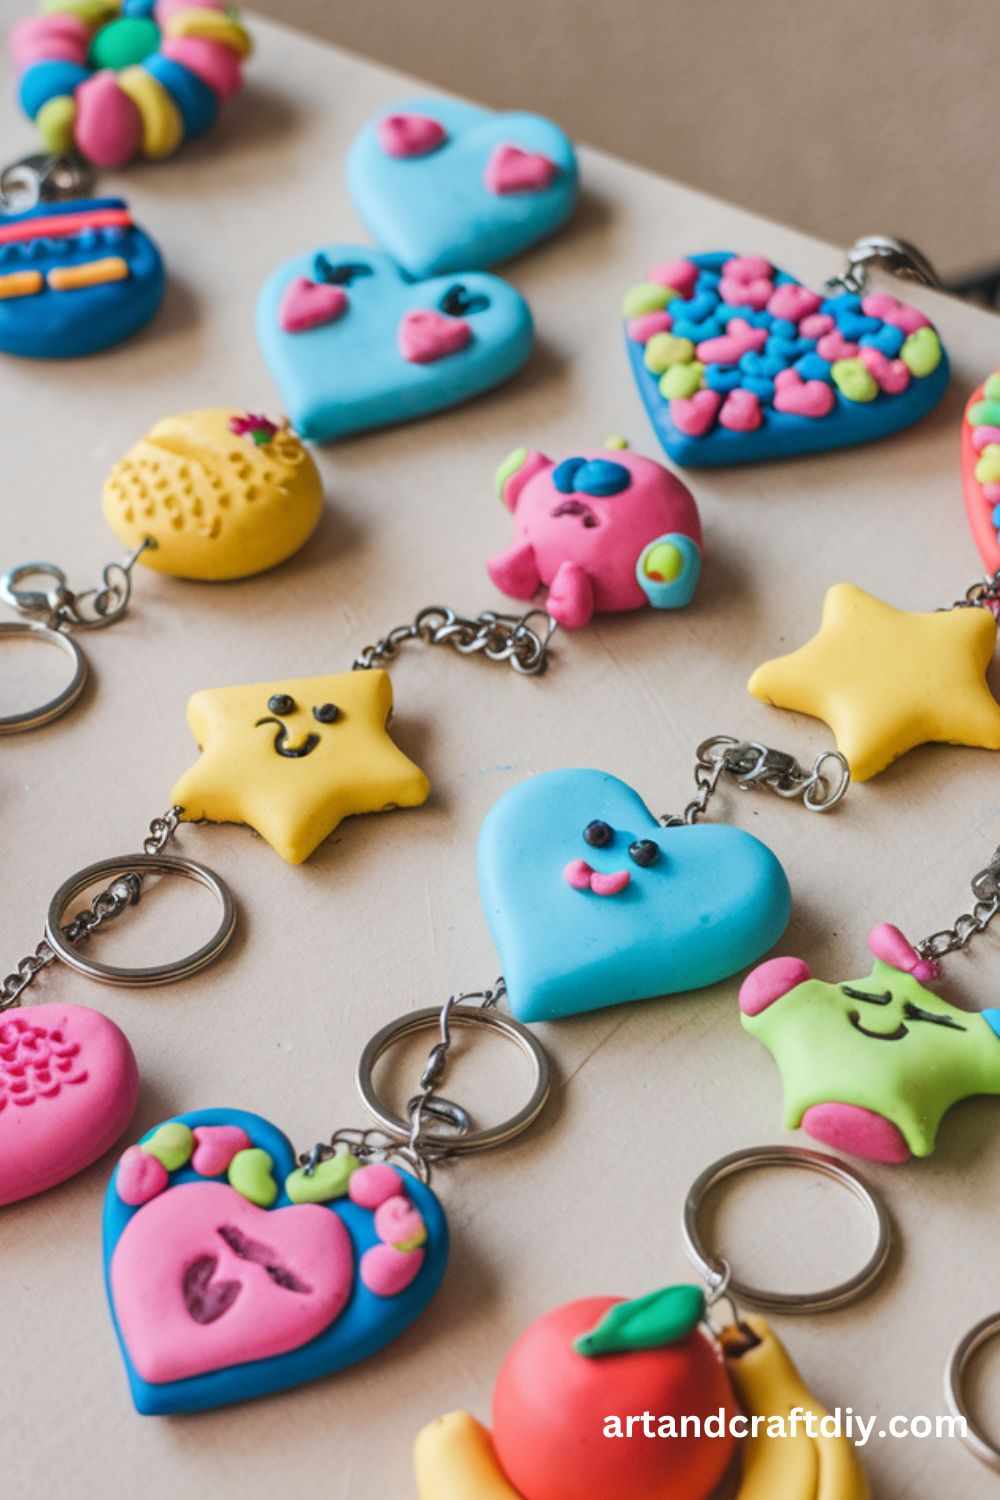
Materials Used:
- Polymer clay
- Keychain hardware
- Rolling pin
- Sculpting tools
Steps:
- Roll out a small piece of clay into a flat shape.
- Create a design (e.g., initials, shapes, or miniature objects).
- Use a tool to pierce a small hole at the top for the keychain ring.
- Bake the clay according to package instructions.
- Once cool, attach the keychain hardware.
DIY Clay Coasters
Make colorful and functional coasters for your drinks with clay.
Materials Used:
- Air-dry or polymer clay
- Rolling pin
- Cookie cutters or stencil
- Sealant (optional)
Steps:
- Roll out clay to about 1/4 inch thickness.
- Use a cookie cutter to shape the clay into circles or squares.
- Let the coasters dry, then decorate with additional clay or textures.
- Apply a sealant if desired to protect from moisture.
- Allow everything to fully set before using.
Clay Pendant
Create a custom pendant necklace by shaping clay into your favorite designs.
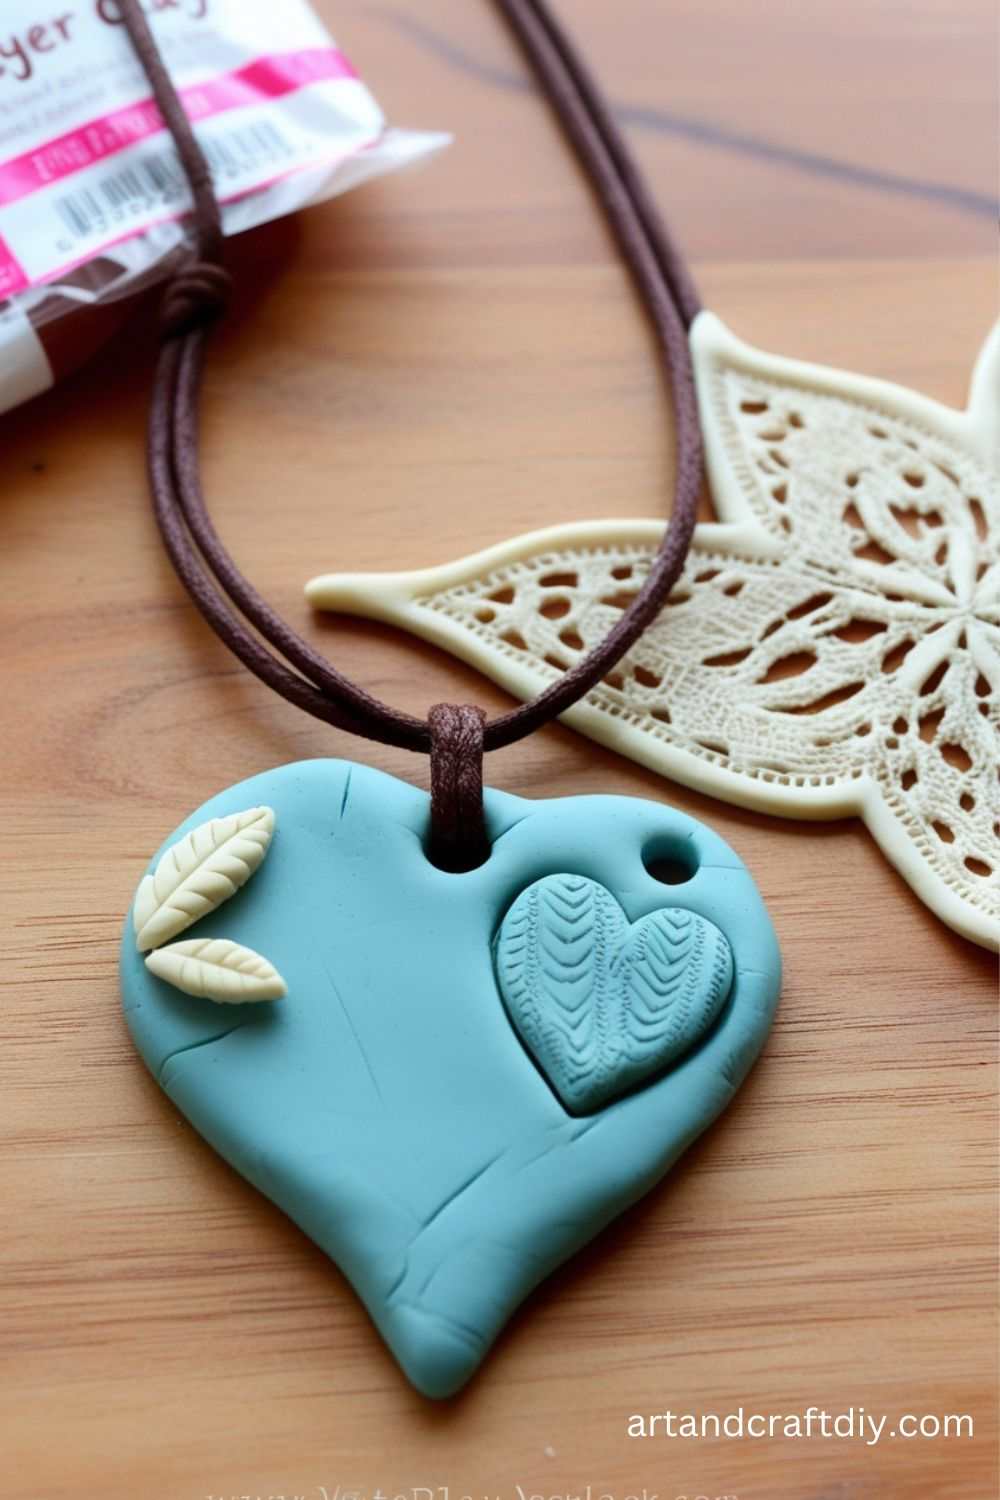
Materials Used:
- Polymer clay
- Necklace chain
- Jump rings
- Sculpting tools
Steps:
- Roll out a thin sheet of polymer clay.
- Cut out your pendant shape, such as a heart, circle, or custom design.
- Add any patterns or textures to the surface.
- Bake the clay as per the instructions.
- Once cooled, attach a jump ring and thread the pendant onto a necklace chain.
Personalized Clay Magnets
Personalize your fridge with fun and unique clay magnets.
Materials Used:
- Polymer clay
- Magnet backing
- Sculpting tools
Steps:
- Roll small amounts of clay into shapes (e.g., stars, hearts, animals).
- Sculpt details into the shapes.
- Bake the clay according to package instructions.
- Attach a small magnet to the back once the clay is cool.
- Place your clay magnets on the fridge!
Handmade Clay Jewelry Dish
Create a small, decorative dish to hold jewelry or other small items.
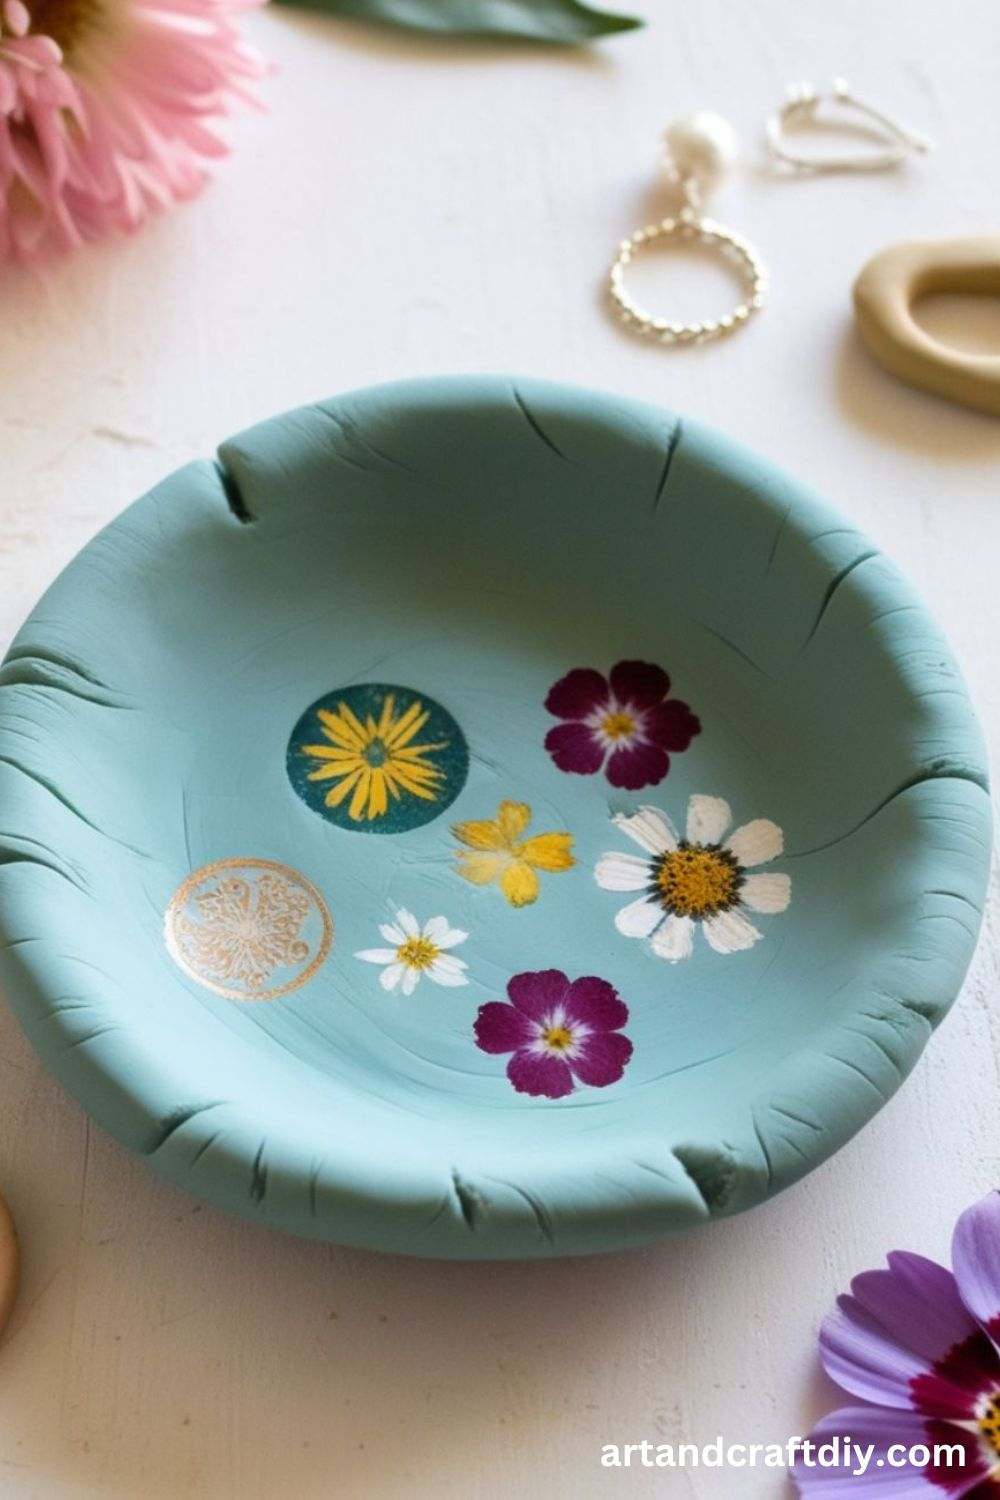
Materials Used:
- Air-dry clay
- Rolling pin
- Sculpting tools
Steps:
- Roll out clay to a thickness of about 1/4 inch.
- Cut the clay into a circle or any shape you prefer.
- Mold the edges into a shallow bowl shape by gently curving them upward.
- Let the dish dry completely.
- Decorate with paint or add textures before using it as a jewelry holder.
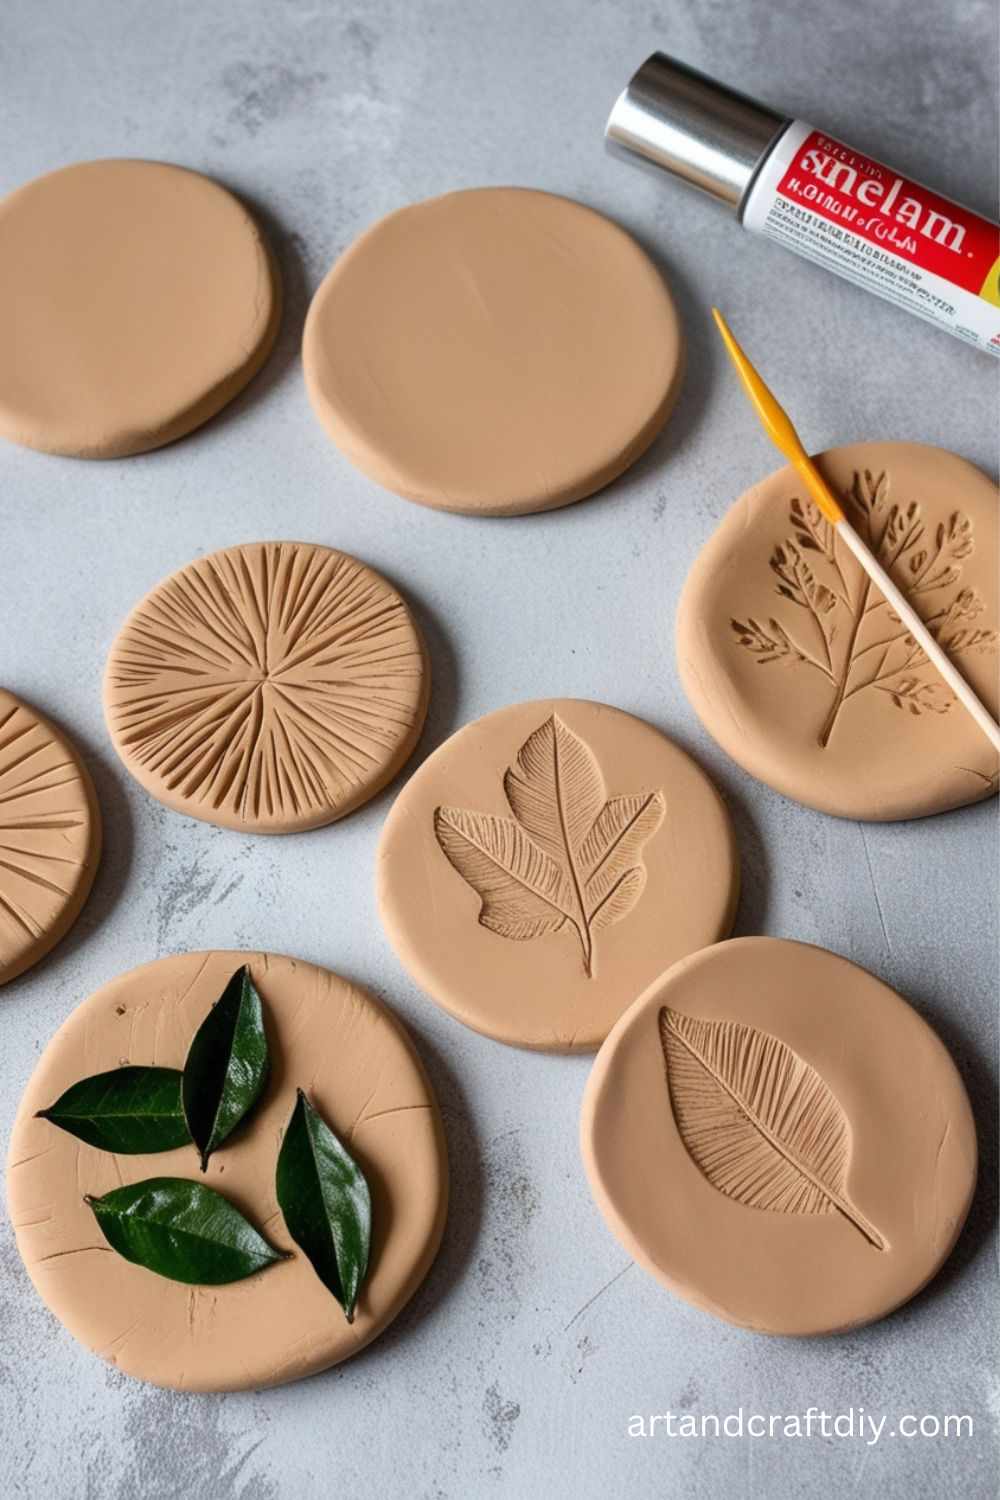
DIY Clay Wall Art
Design custom clay wall art to decorate your space.
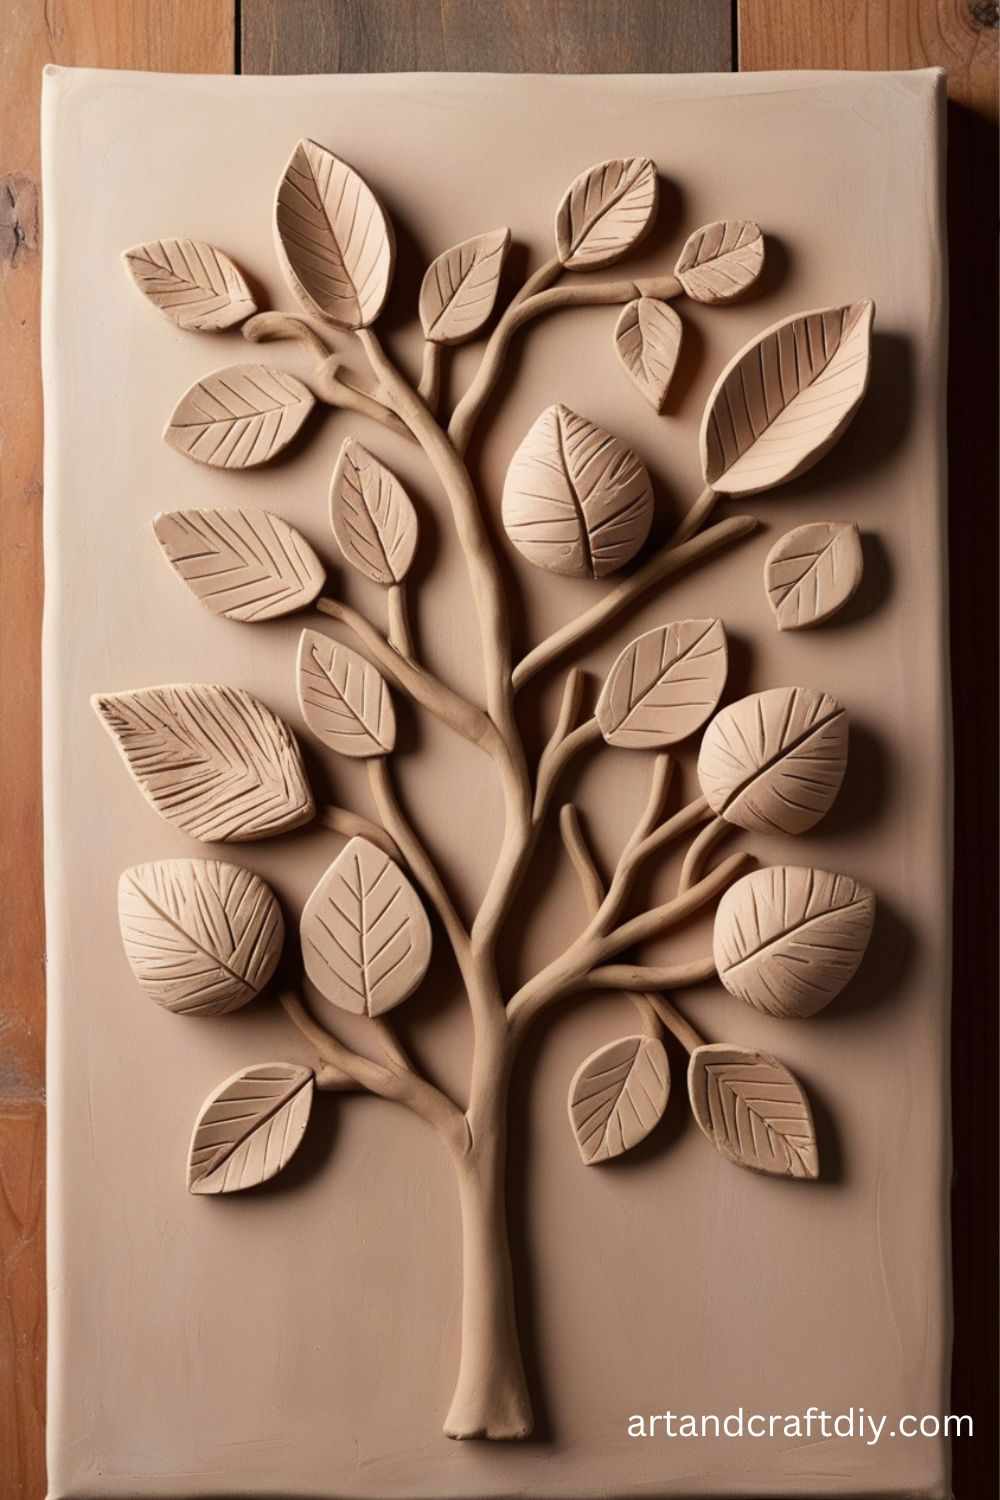
Materials Used:
- Air-dry clay
- Rolling pin
- Frame or canvas
- Paint
Steps:
- Roll out the clay and flatten it to the desired thickness.
- Cut out shapes (geometric, flowers, etc.) for your art.
- Attach the shapes to a canvas or frame.
- Let the clay dry completely.
- Once dry, paint your design to finish.
Clay Stick Animals
Make a cute animal design on a wooden stick for a whimsical décor.
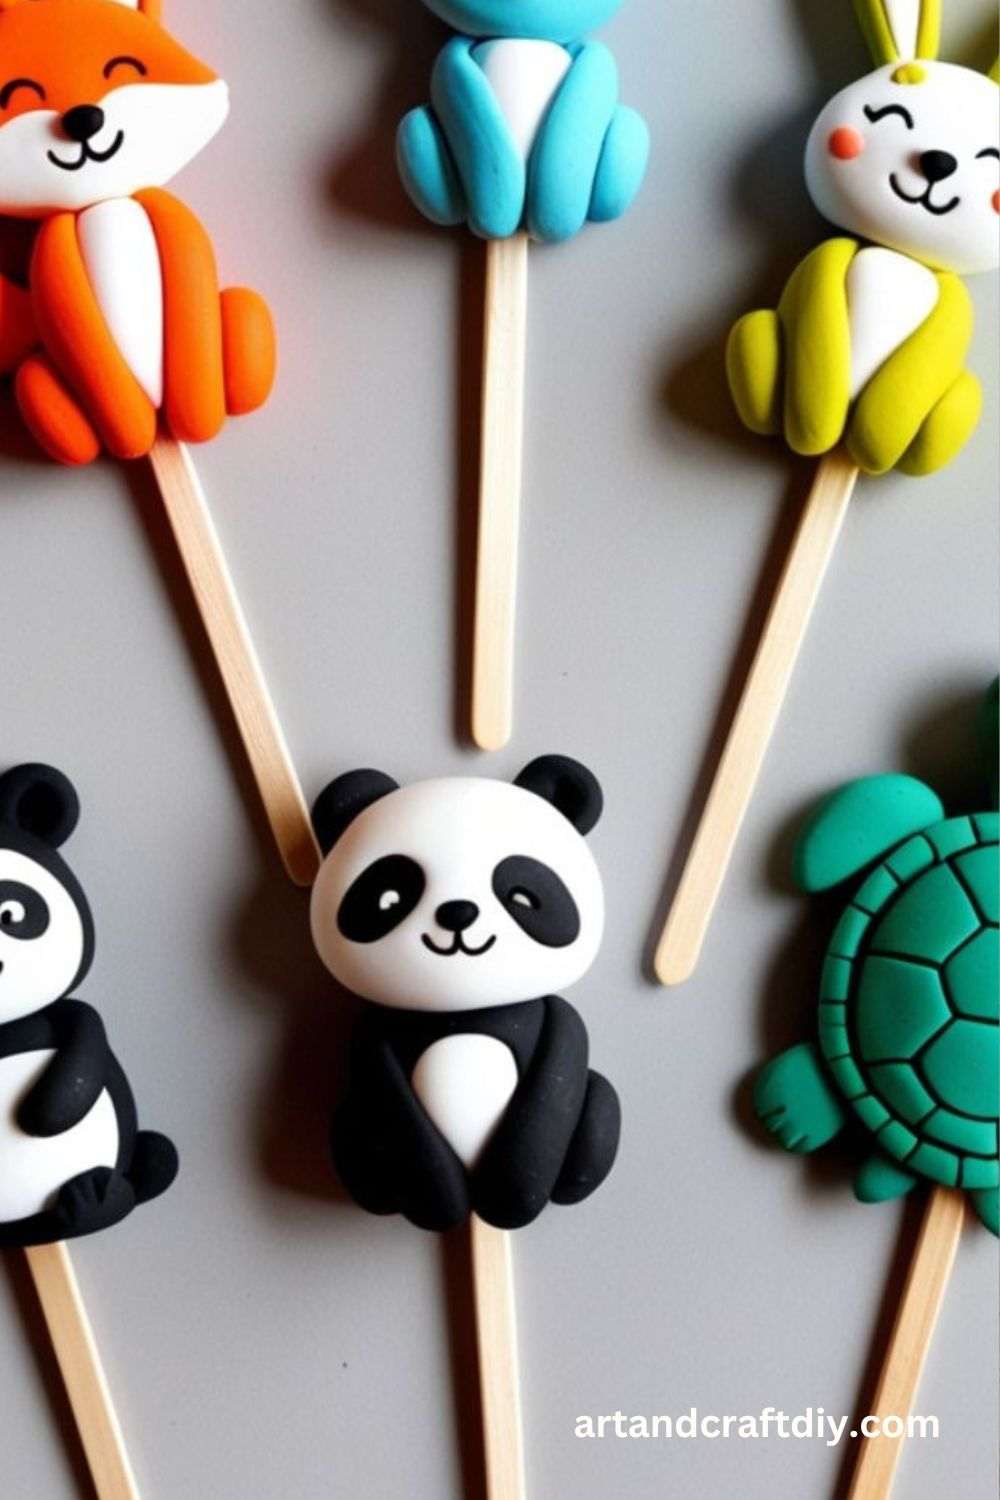
Materials Used:
- Polymer clay
- Wooden sticks
- Sculpting tools
Steps:
- Sculpt animals (e.g., birds, owls, etc.) onto the end of the wooden stick.
- Attach the clay securely to the stick by blending the edges.
- Bake according to the clay instructions.
- Once cooled, display them in a vase or as garden stakes.
Clay Cupcake Toppers
Design edible-looking clay cupcake toppers for cake decoration.
Materials Used:
- Air-dry clay
- Sculpting tools
- Paint (optional)
Steps:
- Sculpt small decorative items like flowers, animals, or food designs out of clay.
- Let them dry and paint if desired.
- Place the toppers gently on cupcakes as decorations.
Clay Snowman Figurine
Craft a cute clay snowman for the winter season.
Materials Used:
- Air-dry or polymer clay
- Sculpting tools
- Paint
Steps:
- Roll the clay into three balls of different sizes for the snowman’s body.
- Shape and stack the balls, smoothing them together.
- Add a small ball for the head and add features like eyes, a nose, and buttons.
- Decorate with tiny accessories like hats and scarves.
- Let the clay dry completely before displaying.
Clay Planter
Create a custom planter with a unique design.
Materials Used:
- Air-dry clay
- Sculpting tools
- Paint
Steps:
- Roll out the clay and create a small pot shape.
- Use tools to add textures or patterns to the surface.
- Allow the clay to dry completely.
- Paint your planter and let it dry again.
- Fill with soil and a small plant.
Clay Candlestick Holder
Design a clay candlestick holder for a rustic look.
Materials Used:
- Air-dry clay
- Rolling pin
- Sculpting tools
Steps:
- Roll out a slab of clay and form it into a flat base.
- Create a small cone shape for the candle holder.
- Attach the cone to the base, blending the edges.
- Let the clay dry completely.
- Once dry, paint or glaze it to add finishing touches.
Clay Donuts
Craft cute, miniature donuts out of clay for display or as charms.
Materials Used:
- Polymer clay
- Sculpting tools
- Paint (optional)
Steps:
- Roll clay into small balls and flatten them to form donut shapes.
- Use a tool to create the hole in the center.
- Add icing details using different colors of clay.
- Bake according to clay instructions.
- Paint or decorate the donuts as desired.
Clay Bowls
Create small, personalized bowls for storing jewelry, keys, or other small items.
Materials Used:
- Air-dry clay
- Rolling pin
- Sculpting tools
Steps:
- Roll out a slab of clay to a uniform thickness.
- Shape it into a bowl using your hands or a mold.
- Let the clay dry completely.
- Paint or decorate your bowl once dry.
Clay Butterflies
Craft delicate butterfly shapes to display or use as wall décor.
Materials Used:
- Air-dry clay
- Sculpting tools
- Paint
Steps:
- Roll the clay into a small ball and flatten it into a rounded shape for the butterfly’s wings.
- Shape and texture the wings with sculpting tools.
- Roll a small ball for the body.
- Attach the body to the wings and let everything dry.
- Paint with vibrant colors.
Clay Dinosaur Figurine
Create a fun, custom dinosaur figurine for kids or collectors.
Materials Used:
- Polymer clay
- Sculpting tools
Steps:
- Roll the clay into shapes for the dinosaur’s body, head, legs, and tail.
- Sculpt details like spikes, eyes, and textures on the body.
- Bake the clay according to instructions.
- Once cooled, paint any details.
Clay Rings
Design custom rings with clay for a personal and trendy accessory.
Materials Used:
- Polymer clay
- Ring blanks
- Sculpting tools
Steps:
- Roll out small pieces of clay into flat shapes.
- Shape them into rings by wrapping them around the ring blank.
- Bake the clay according to package instructions.
- Once cool, wear your new, handmade ring!
Clay Picture Frame
Create a decorative photo frame out of clay to hold a favorite picture.
Materials Used:
- Air-dry clay
- Sculpting tools
- Glue
Steps:
- Roll out the clay and cut it into the shape of a frame.
- Add any designs or textures to the surface.
- Allow the frame to dry completely.
- Attach a photo to the back of the frame with glue.
Clay Christmas Ornaments
Make custom ornaments for your holiday tree with clay.
Materials Used:
- Air-dry or polymer clay
- Sculpting tools
- Ribbon
Steps:
- Roll the clay into a ball and flatten it to form the base shape (e.g., stars, hearts).
- Add holiday-themed decorations like holly leaves or reindeer.
- Pierce a hole at the top for a ribbon loop.
- Let the clay dry completely and hang on your tree!
Clay Bookmark
Create unique, personalized bookmarks from clay for a functional craft.
Materials Used:
- Polymer clay
- Sculpting tools
Steps:
- Roll a thin sheet of clay into a long strip.
- Sculpt small designs or patterns along the length of the bookmark.
- Bake according to clay instructions.
- Let it cool, and your bookmark is ready for use!
Clay Cups
Create a set of miniature cups for decorative purposes.
Materials Used:
- Air-dry clay
- Sculpting tools
Steps:
- Roll out a small piece of clay into a disk.
- Shape it into a cup by curving the edges upward.
- Sculpt a handle and attach it to the cup.
- Let it dry completely before using.
Clay Phone Stand
Design a small, functional phone stand out of clay.
Materials Used:
- Air-dry clay
- Sculpting tools
Steps:
- Roll out clay and create a base that can hold the phone at an angle.
- Shape the stand to have a slight incline.
- Allow the clay to dry completely before using.
Clay Seashells
Craft detailed seashells for use in coastal-themed décor.
Materials Used:
- Polymer clay
- Sculpting tools
Steps:
- Roll out small pieces of clay into oval shapes.
- Use sculpting tools to create ridges and textures resembling seashells.
- Bake according to clay instructions.
- Paint the shells to add realistic details.
Clay Slime
Make a squishy, stress-relieving slime with clay.
Materials Used:
- Polymer clay
- Baking soda
- Contact lens solution
Steps:
- Mix the clay with baking soda and knead until smooth.
- Add contact lens solution to activate the slime.
- Knead until it reaches the desired texture.
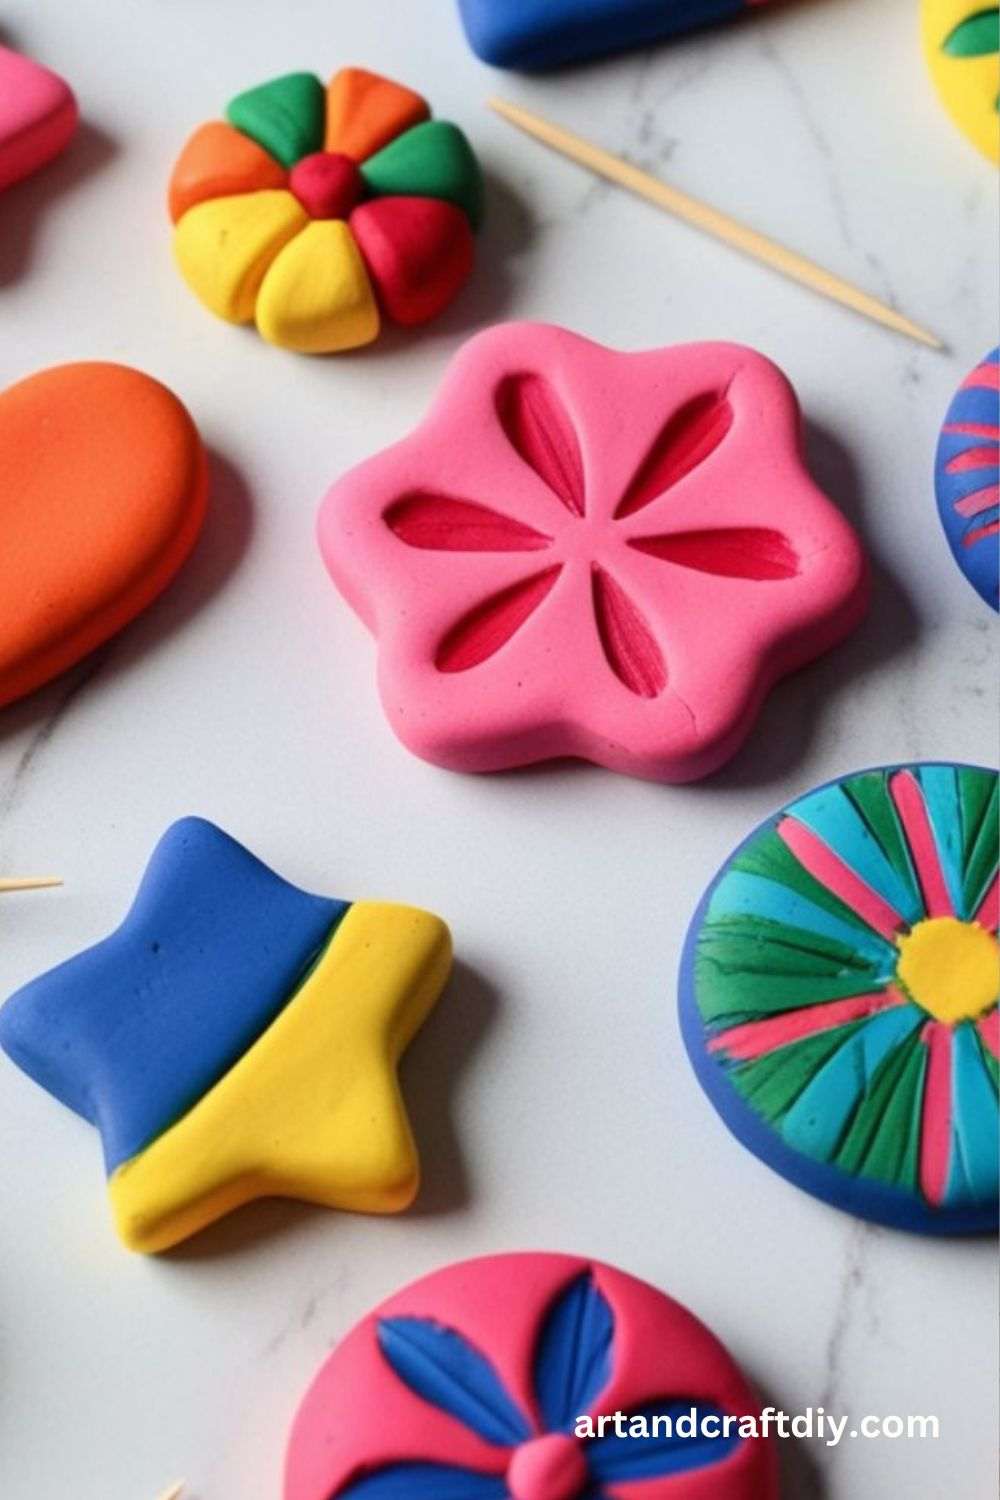
Clay Fruit Slices
Design small, realistic fruit slices that can be used as décor or jewelry.
Materials Used:
- Polymer clay
- Sculpting tools
Steps:
- Roll out different colored clay for each fruit type (e.g., orange, strawberry).
- Cut the clay into thin slices and layer them to form fruit pieces.
- Bake and paint for added realism.

Hi, I’m Victoria, an art and craft teacher at Newark City Schools, where I have the joy of working with middle school students to help them explore their creativity and develop their artistic talents. I believe that art is a powerful way for students to express themselves, and I strive to make every lesson a fun, engaging, and inspiring experience.
I created this website to share the art and craft projects, techniques, and resources that I use in my classroom, hoping to inspire both educators and young artists alike. Whether you’re a teacher looking for new ideas or a student eager to try something new, I’m excited to provide creative tools and projects that anyone can enjoy.
When I’m not in the classroom, I love experimenting with different art forms and learning new crafting techniques. My goal is to help others discover the joy of making things with their hands, and I hope my website serves as a space for everyone to explore their creative potential.