
Last year, I remember sitting with a bunch of colored paper, totally confused about what to make for Mother’s Day. I didn’t want to just buy something last-minute again… you know that feeling, right? It just feels a bit impersonal. I wanted something that actually meant something. That’s when I tried making paper flower crafts for Mother’s Day—and honestly, it turned out way better than I expected.
If you’re also wondering what to create that’s simple, affordable, and still super special, you’re in the right place. Not everyone is “crafty,” and that’s okay (I’m definitely not a pro either). But trust me, these little handmade paper flowers can say a lot more than expensive gifts.
In this article, I’ll walk you through easy, beautiful ideas you can actually make without stress—and maybe even enjoy the process a little too.
Paper Flower Crafts for Mother’s Day
Making paper flower crafts for Mother’s Day is a simple and heartfelt way to show your love without spending much. These handmade flowers may be small, but they carry big emotions your mom will truly appreciate.
Simple Paper Roses
Honestly, paper roses are where I always tell beginners to start. They look fancy, but once you get the hang of rolling paper strips, it’s surprisingly calming. I remember the first time I made them—I messed up the spiral completely, but somehow the final rose still looked cute. That’s the beauty of it, imperfections actually make them feel more real.
I usually cut a spiral from colored paper, then slowly roll it inward and glue the base. Don’t rush it. In my opinion, the slower you go, the prettier the shape turns out. You can even add a tiny green paper leaf at the bottom to make it feel more “gift-worthy” for Mother’s Day.
Tissue Paper Flowers
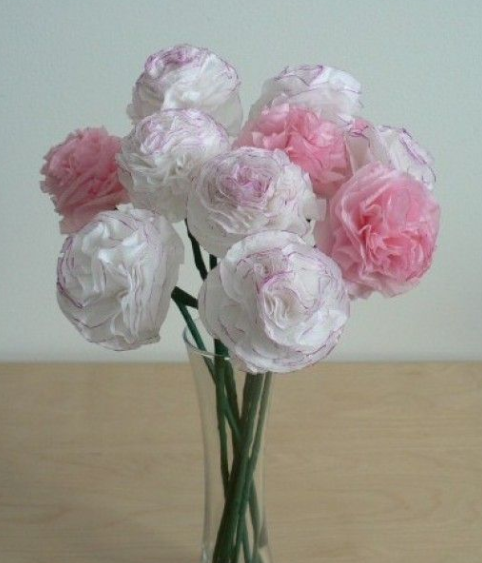
Tissue paper flowers are one of those crafts that look like you spent hours, but really didn’t. I’ve made these last-minute so many times, especially when I forgot to buy a gift (yes, guilty). They’re soft, fluffy, and honestly perfect for decorating too.
All I do is stack a few sheets, fold them accordion-style, and tie the center. Then comes the fun part—gently pulling each layer up. Be careful though, tissue tears easily (learned that the hard way). Once done, they look so full and vibrant, your mom might not even believe they’re handmade.
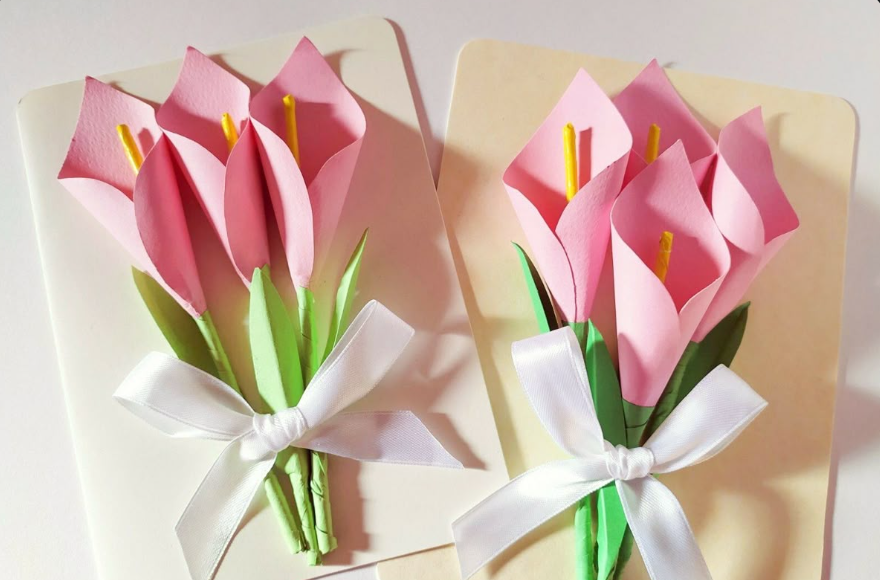
Paper Tulips
Paper tulips feel a bit more “neat and elegant” compared to other flowers. I like making these when I want something simple but still meaningful. The first time I made them, I used leftover colored sheets from school projects—and they turned out surprisingly pretty.
You just fold the paper into a tulip shape and attach it to a straw or rolled paper stem. I’ve found that pastel colors work best here. They give that soft, spring vibe which feels perfect for Mother’s Day. Plus, they don’t wilt—so your mom can keep them forever.
Handprint Paper Flowers
This one is super personal, and honestly, a little emotional too. Handprint flowers remind me of childhood crafts, and every time I make them, it feels nostalgic. It’s like giving a piece of yourself—literally.
I trace my hand on colored paper, cut it out, and use it as petals. Then I glue it around a small circle center. You can write a tiny message on each finger if you want to make it extra special. In my opinion, this is less about perfection and more about meaning.
Accordion Fold Paper Flowers
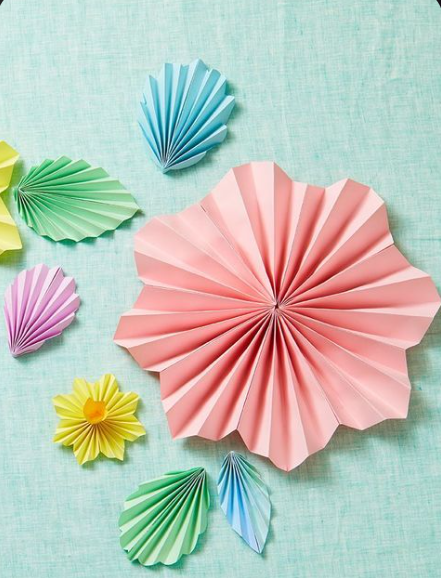
I used to think accordion flowers were complicated, but they’re actually pretty straightforward. And once you open them up, they look so satisfying—like a perfect circle every time.
Fold your paper back and forth like a fan, tie the middle, and spread it open. That’s it. I’ve found that patterned paper works really well here because it adds extra charm. Honestly, these are great if you want something quick but still eye-catching.
Paper Sunflowers
Paper sunflowers just make me happy. There’s something about their bright yellow color that instantly lifts the mood. I made a bunch of these once and stuck them on a wall—it completely changed the vibe of the room.
For this, I cut petal shapes and layer them around a brown center. Sometimes I even use textured paper for the middle to give it that “real sunflower” feel. In my opinion, these are perfect if your mom loves bold and cheerful things.
Paper Daisy Flowers
Daisies feel simple and pure, and I love that about them. They’re not too flashy, but still beautiful. I usually make these when I want something clean and classic.
I cut thin white petals and glue them around a yellow circle. It sounds basic, but arranging the petals evenly makes a big difference. I’ve found that slightly overlapping them gives a more natural look. These are great for making small bunches or even decorating a card.
Crepe Paper Carnations
Crepe paper is a game changer, honestly. The texture alone makes flowers look more realistic. The first time I used it, I was like—why didn’t I try this earlier?
For carnations, I cut strips, stretch them slightly, and then roll them up. The edges naturally create that ruffled look. It’s a bit different from regular paper, but once you get used to it, it’s super fun. In my opinion, these look the most “real” out of all paper flowers.
Paper Lily Flowers
Lilies are a bit more detailed, I won’t lie. But if you’re up for it, they turn out stunning. I remember struggling with the shape at first, but after a couple tries, it clicked.
You cut petal shapes, curl the edges slightly, and assemble them carefully. Adding tiny details like dots in the center really makes a difference. I’ve found that white or light pink works best here—it keeps that elegant lily look.
Rolled Paper Flowers
Rolled paper flowers are kind of like paper roses, but more flexible in design. I like experimenting with different shapes and sizes here. Sometimes they turn out perfect, sometimes a bit messy—but both look good.
You cut shapes (not just spirals), then roll and glue them from one end. Honestly, this is where you can get creative. Mix colors, layer different sizes, and see what happens. In my opinion, these are great when you don’t want to follow strict rules.
Paper Flower Bouquet
Making a full bouquet feels like the final step, like bringing everything together. I usually mix different flower types—roses, daisies, maybe a sunflower or two. It makes the bouquet look fuller and more interesting.
I tape or glue the stems together and wrap them in paper or even newspaper for a rustic look. I’ve found that adding a ribbon instantly makes it feel like a proper gift. Honestly, this is what I give when I want something that feels complete.
Paper Flower Greeting Card
This is probably my favorite, because it combines craft and message in one. I love how you can keep it simple or go all out depending on your mood.
I usually stick small paper flowers on the front of a card and write a personal note inside. Sometimes I add little details like leaves or tiny hearts. In my opinion, the message matters just as much as the design—so I always take a minute to write something meaningful.
Tips to Make Your Paper Flowers Look Beautiful
Making paper flowers is fun, but small details can make a big difference in how they look. With a few simple tips, your flowers can look more neat, colorful, and even realistic. You don’t need expensive materials—just a little care and creativity can make your craft stand out and feel extra special for Mother’s Day.
- Use bright and matching colors
Choose colors that look good together, like pink and white or yellow and orange. Bright colors make your flowers more attractive and eye-catching. - Add layers for a realistic look
Use multiple layers of paper petals instead of just one. This makes the flower look fuller and more like a real flower. - Use glue neatly
Apply glue carefully so it doesn’t spread outside the edges. Clean work makes your flowers look more professional and tidy. - Add small details like glitter or outlines
You can decorate petals with glitter, markers, or slight outlines. These small touches make your flowers look more beautiful and creative. - Mix different flower types
Try combining different types of paper flowers in one bouquet. This adds variety and makes your overall design look more interesting.

Hi, I’m Victoria, an art and craft teacher at Newark City Schools, where I have the joy of working with middle school students to help them explore their creativity and develop their artistic talents. I believe that art is a powerful way for students to express themselves, and I strive to make every lesson a fun, engaging, and inspiring experience.
I created this website to share the art and craft projects, techniques, and resources that I use in my classroom, hoping to inspire both educators and young artists alike. Whether you’re a teacher looking for new ideas or a student eager to try something new, I’m excited to provide creative tools and projects that anyone can enjoy.
When I’m not in the classroom, I love experimenting with different art forms and learning new crafting techniques. My goal is to help others discover the joy of making things with their hands, and I hope my website serves as a space for everyone to explore their creative potential.