
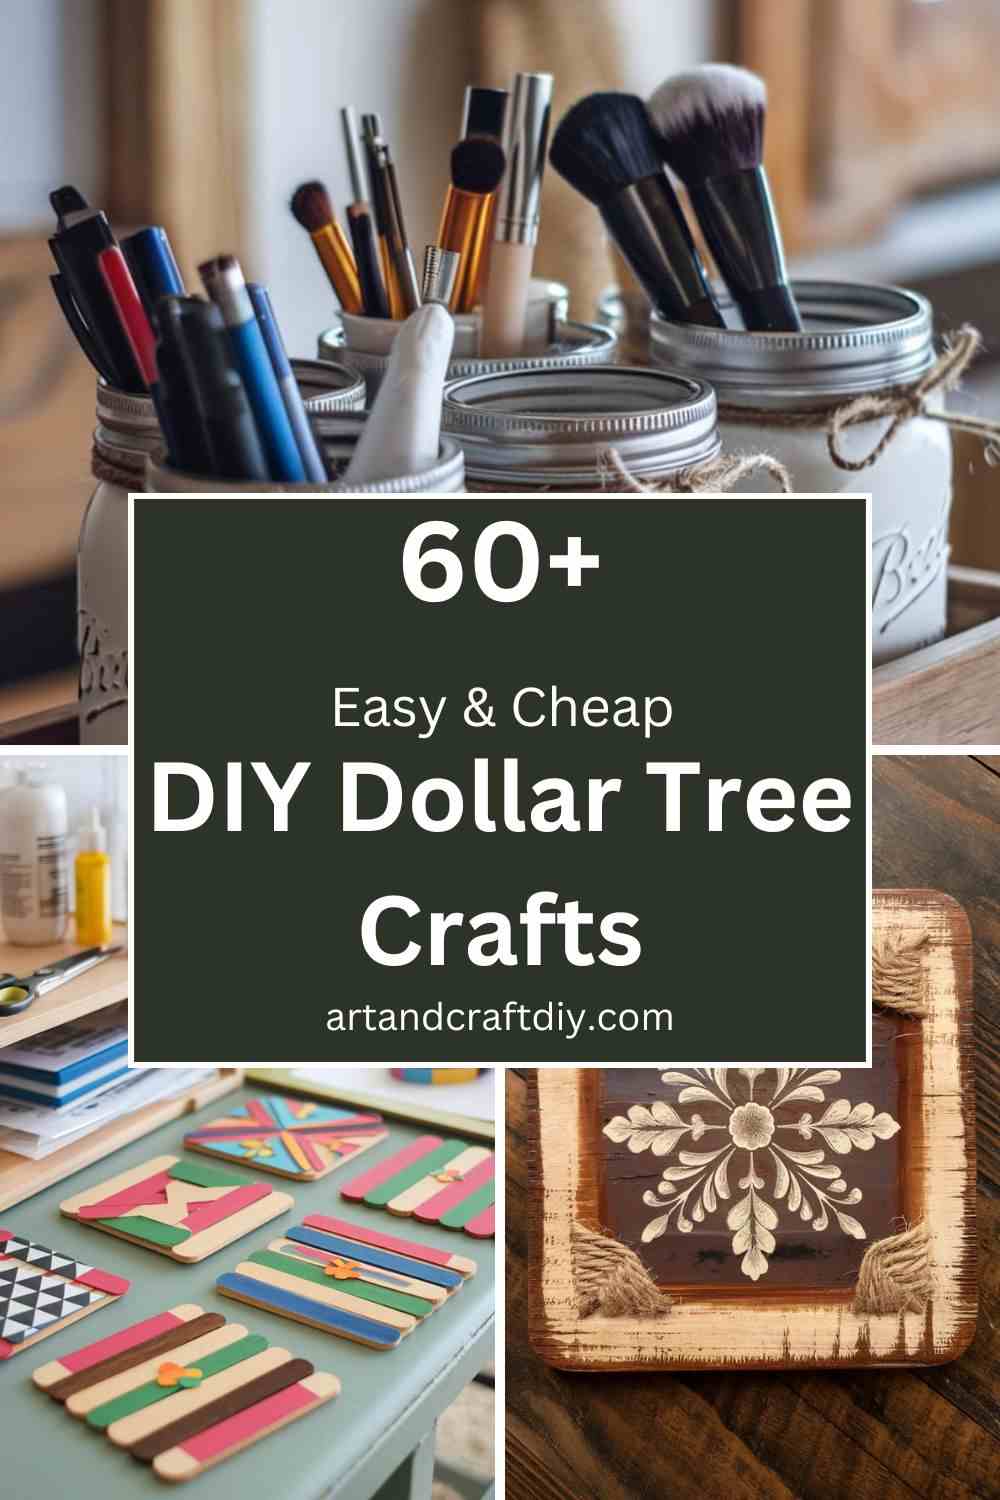
You know, the other day I walked into Dollar Tree just to “grab one thing” (famous last words, right?) and somehow left with a bag full of random craft supplies I didn’t even know I needed. Glue sticks, mason jars, a pack of twine—basically, the aisles were whispering, take me home and make something cute. If you’ve ever been there, staring at a shelf of cheap little treasures thinking, “I could totally DIY this into something amazing,” then you’re in exactly the right place.
I get it—crafting can feel overwhelming, especially if you’re worried it’ll look too complicated or cost a fortune. But here’s the good news: with DIY Dollar Tree Crafts, you don’t need a huge budget or fancy tools. In this post, I’ll walk you through simple, affordable, and seriously fun ideas that’ll make your home look charming without draining your wallet. Ready to get creative?
DIY Dollar Tree Crafts
DIY Dollar Tree Crafts are creative, budget-friendly projects that use affordable items from Dollar Tree stores to create unique and functional decorations, gifts, or home accessories.
Rope-Wrapped Vase
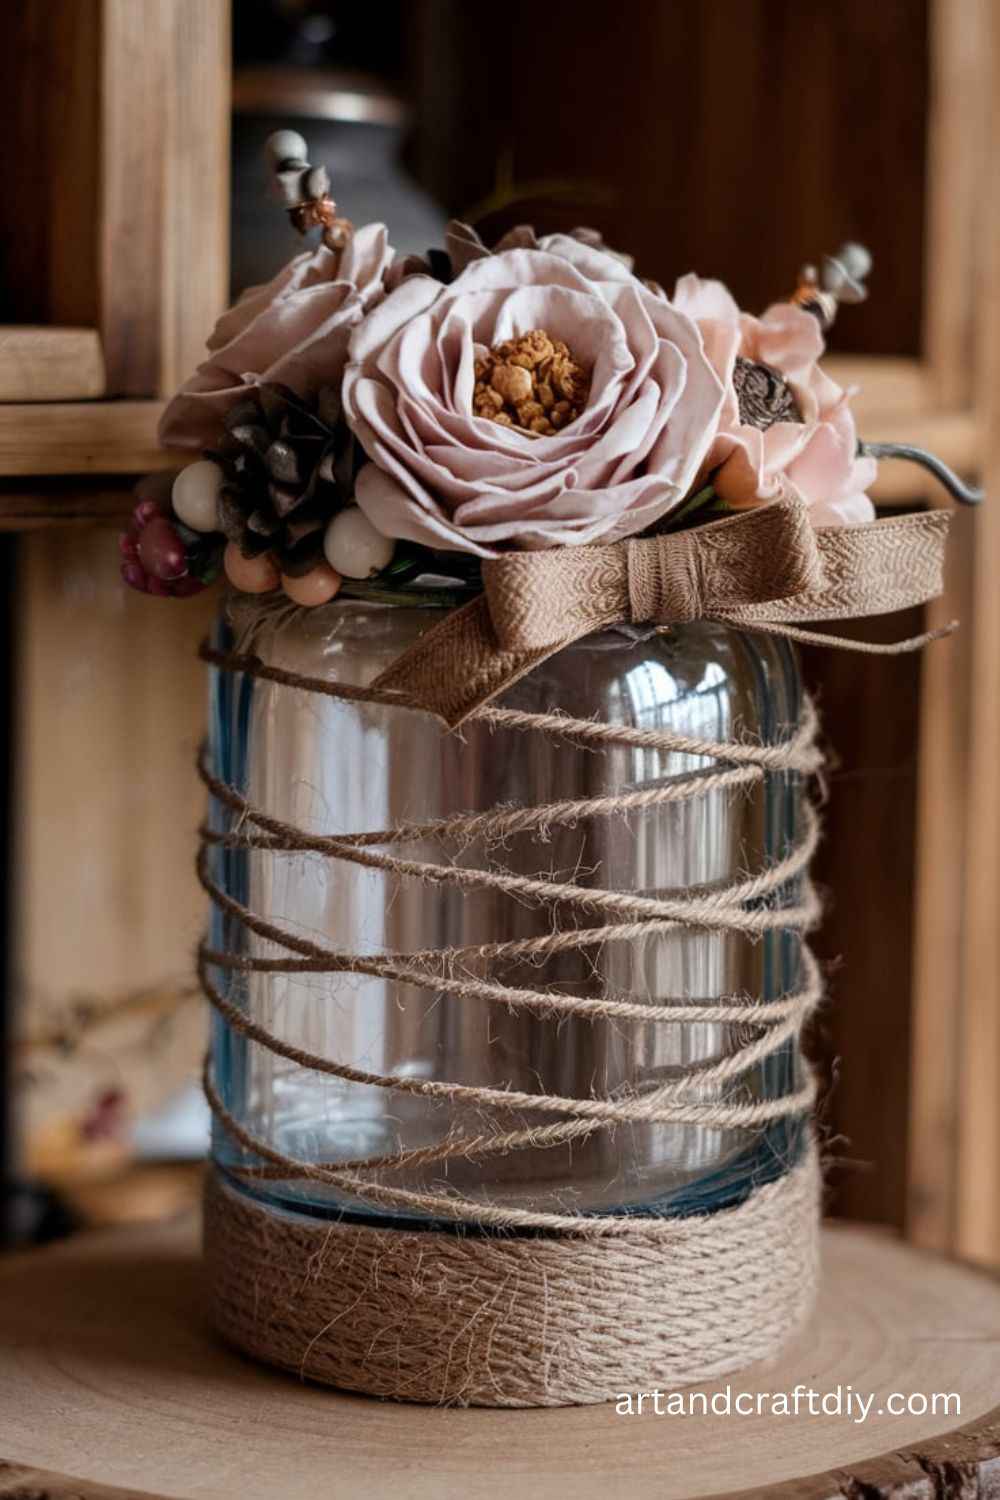
I can’t even tell you how many times I’ve walked past those plain Dollar Tree glass vases and thought, “You need some personality, my friend.” One day, I grabbed one, tossed some jute rope in my basket, and decided to play around. Honestly, this project is more about patience than skill. You just need a hot glue gun and steady hands. I usually start at the bottom, glue down the end of the rope, and wrap it tightly. It’s one of those oddly calming crafts—you know, like wrapping gifts but without the stress of tape sticking everywhere.
The fun part is watching it go from boring to rustic chic in just a few wraps. I’ve used mine to hold fresh flowers, but to be fair, they look just as good with fake blooms or even paintbrushes in my craft room. If you’re into farmhouse style, this little hack feels like a jackpot.
Picture Frame Lantern
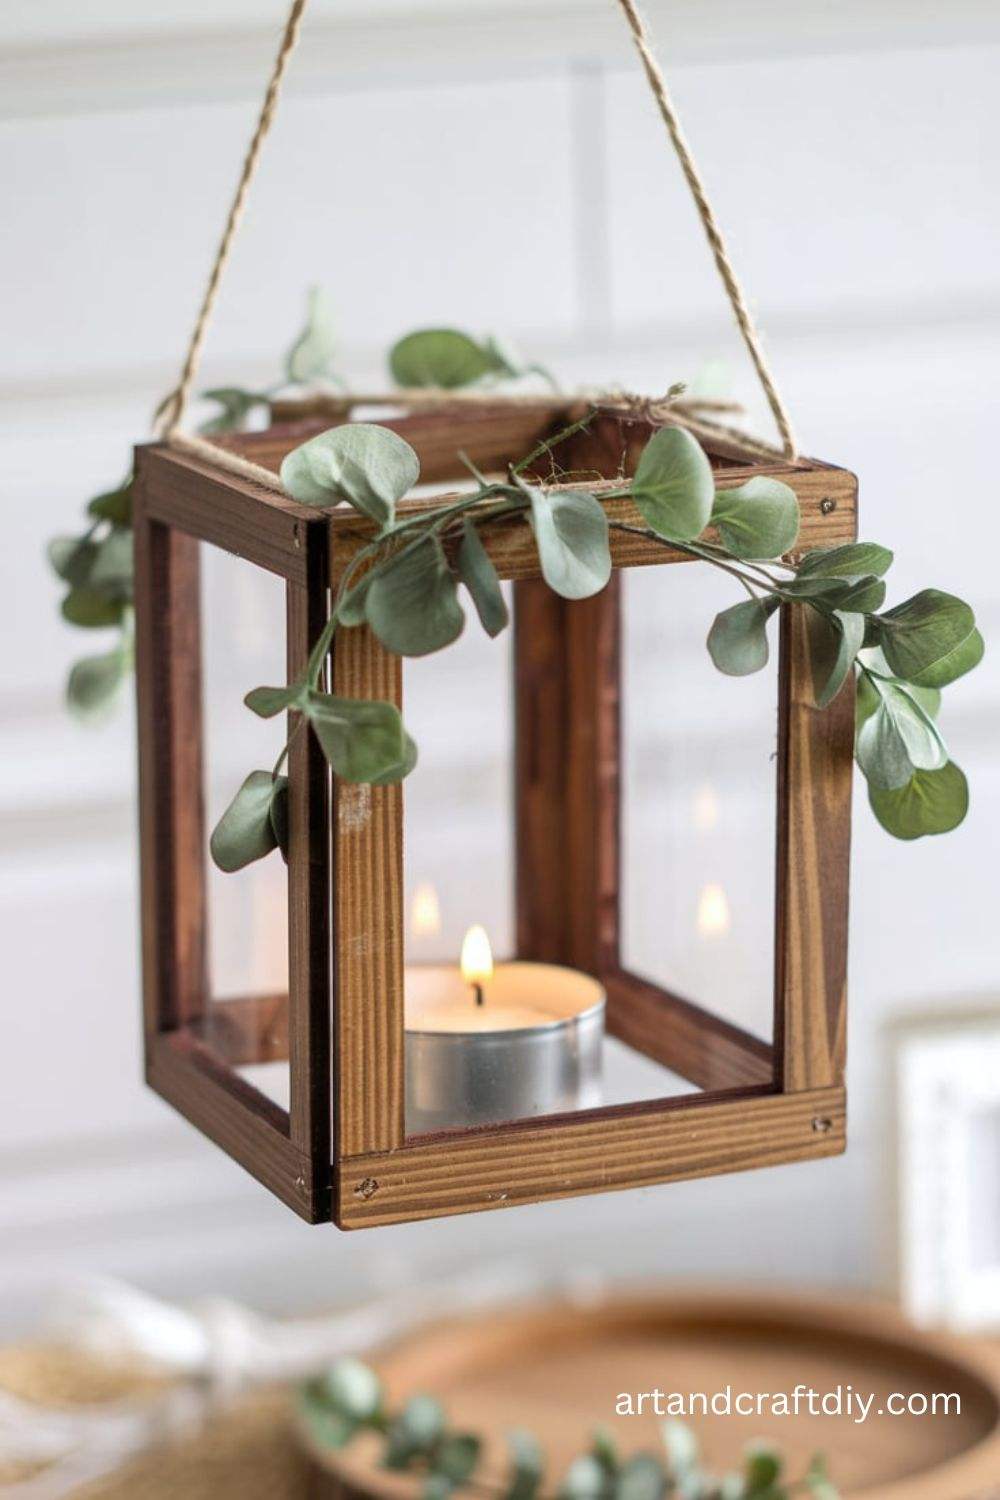
This one is so simple but has that “Wow, did you really make that?” effect. I remember the first time I saw someone turn cheap Dollar Tree picture frames into a lantern—I laughed, then I tried it, and now I’m obsessed. All you do is grab four frames, pop out the glass, and glue them together into a cube. I usually add a little base at the bottom and a handle on top if I’m feeling fancy. To me, it feels like a budget-friendly way to get those high-end lanterns you see in home stores for thirty bucks.
I’ve put LED candles inside mine (real candles are a no-go unless you want melted glue everywhere). The glow at night is so cozy, and I even used one as a centerpiece at a family dinner. Everyone thought I bought it. Honestly, nothing beats that moment when you can proudly say, “Nope, made it myself.”
Popsicle Stick Coaster Set
Okay, so this is one of those crafts that made me laugh at myself at first. Popsicle sticks? Really? But once I started, I got hooked. Dollar Tree sells packs of them, and with a little glue and paint, they actually turn into the cutest little coasters. I like to lay them out side by side, glue a few sticks across the back to hold them together, and then play around with stains or acrylic paint. I once made a colorful set for summer and a darker, rustic set for my coffee table.
What I love about this project is how customizable it is. If you’re a neat freak, you can sand them down perfectly. If you’re more like me and enjoy that handmade vibe, a few imperfections just make them charming. To be fair, they’re surprisingly durable too—I’ve spilled coffee on mine, wiped them off, and they still look great. It’s such a simple little win.
Decorative Mason Jar Organizer
Turn mason jars into chic organizers for your home or office.
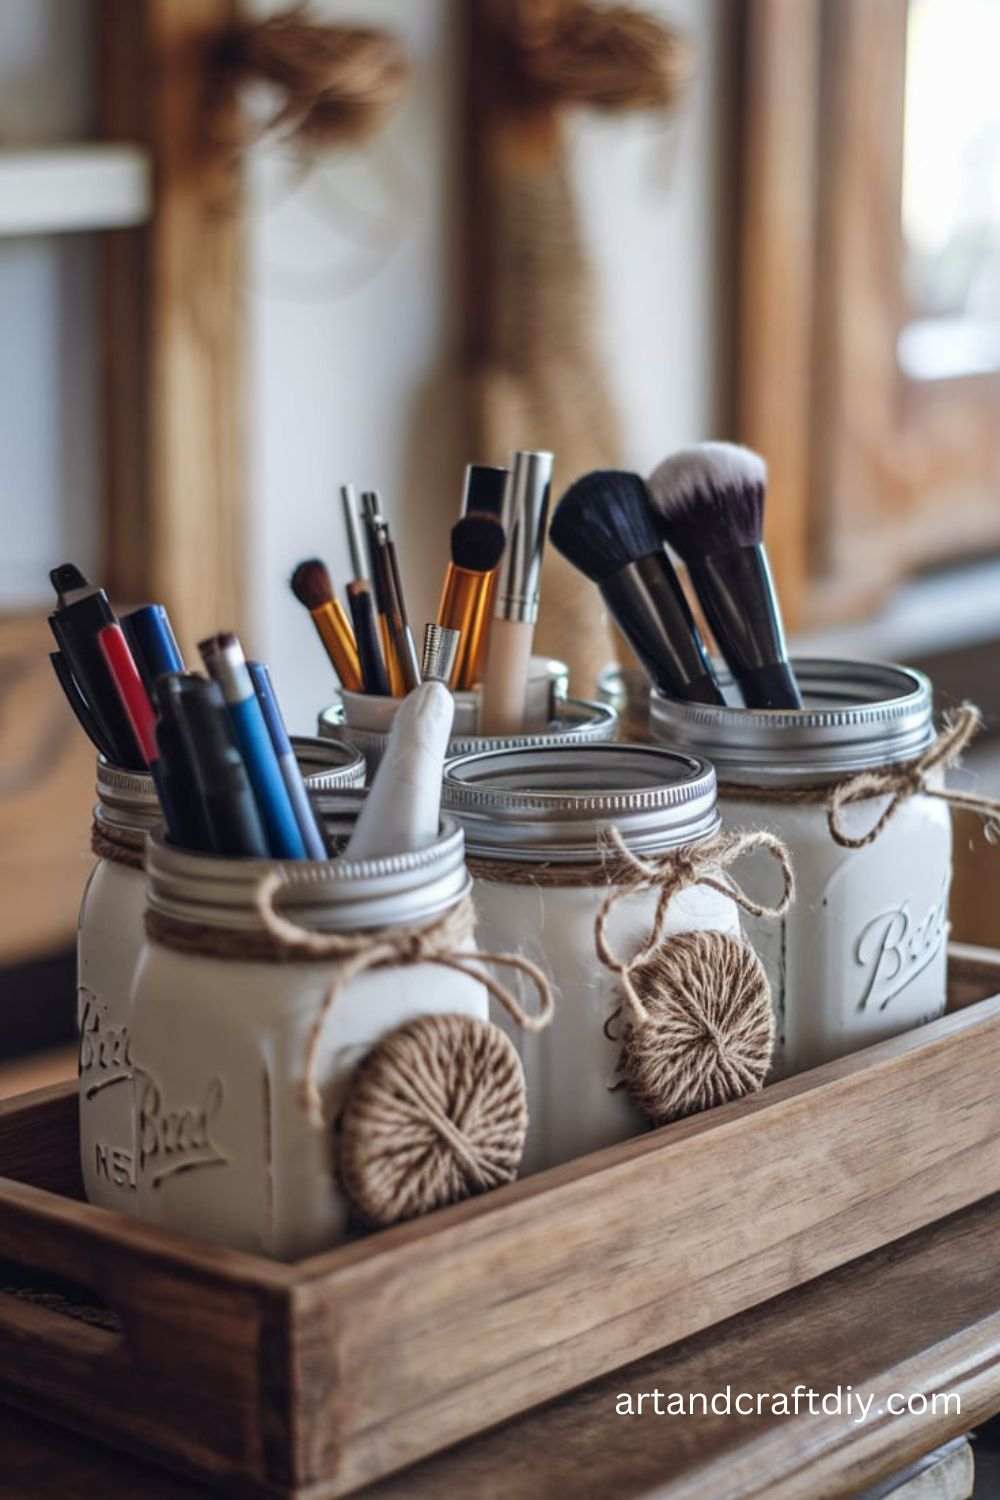
Materials Used:
- Mason jars
- Spray paint or acrylic paint
- Decorative ribbon or twine
- Hot glue gun
Steps:
- Clean and dry the mason jars.
- Paint the jars in your chosen color and let them dry.
- Wrap ribbon or twine around the neck of each jar and secure with hot glue.
- Arrange the jars in a group to store pens, brushes, or utensils.
Floral Hoop Wreath
Create a beautiful wreath using a simple embroidery hoop.
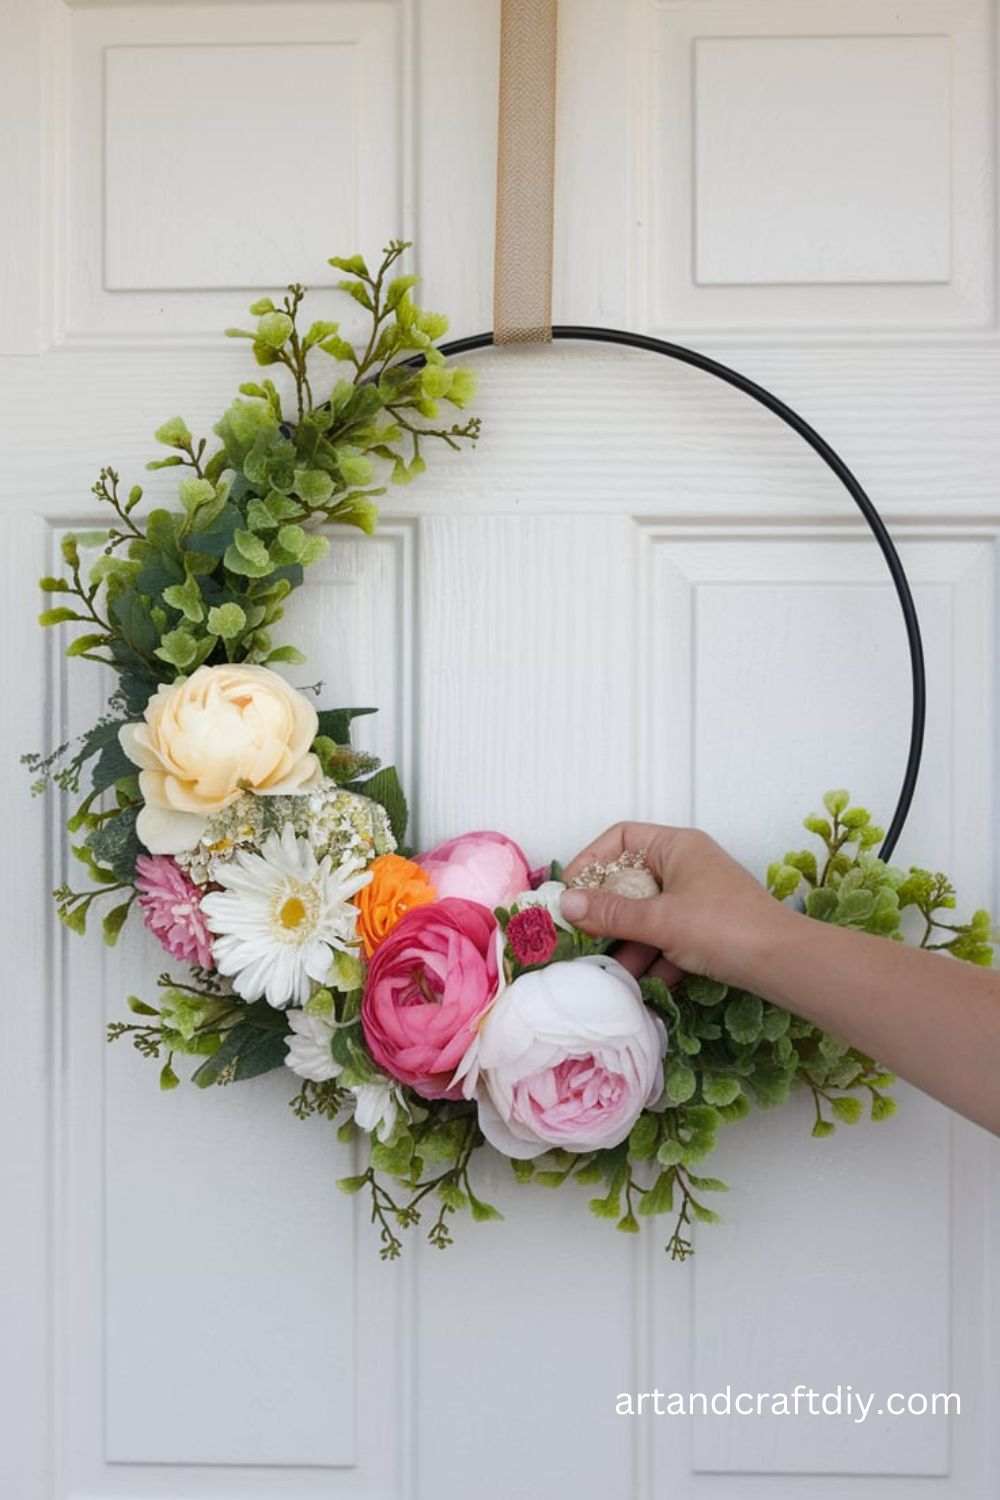
Materials Used:
- Embroidery hoop
- Faux flowers and greenery
- Hot glue gun
- Wire cutters
Steps:
- Attach greenery to one-half of the hoop using hot glue.
- Trim the stems of faux flowers and glue them onto the greenery.
- Leave part of the hoop exposed for a modern look.
- Add a ribbon loop at the top for hanging.
DIY Tiered Tray
Make an elegant tiered tray for displaying items.
Steps:
- Remove the backing and glass from all four picture frames.
- Spray paint the frames in your desired color, if preferred, and let them dry completely.
- Reinsert the glass into each frame and secure it in place.
- Use hot glue or E6000 to attach the sides of the frames together, forming a rectangular lantern.
- Place an LED candle inside for a cozy glow.
Rustic Farmhouse Coasters
Add a farmhouse touch to your table with custom coasters.
Materials Used:
- Cork sheets or cork coasters
- Jute twine
- Hot glue gun
- White paint and a stencil (optional)
Steps:
- Cut the cork sheets into coaster-sized squares or circles if not pre-made.
- Wrap jute twine around the edges, securing it with hot glue for a rustic border.
- Optionally, use a stencil and white paint to add patterns or farmhouse words like “Gather” or “Welcome.”
- Let the paint dry, and your coasters are ready to use.
Floral Wire Wreath
Craft a beautiful floral wreath for any season.
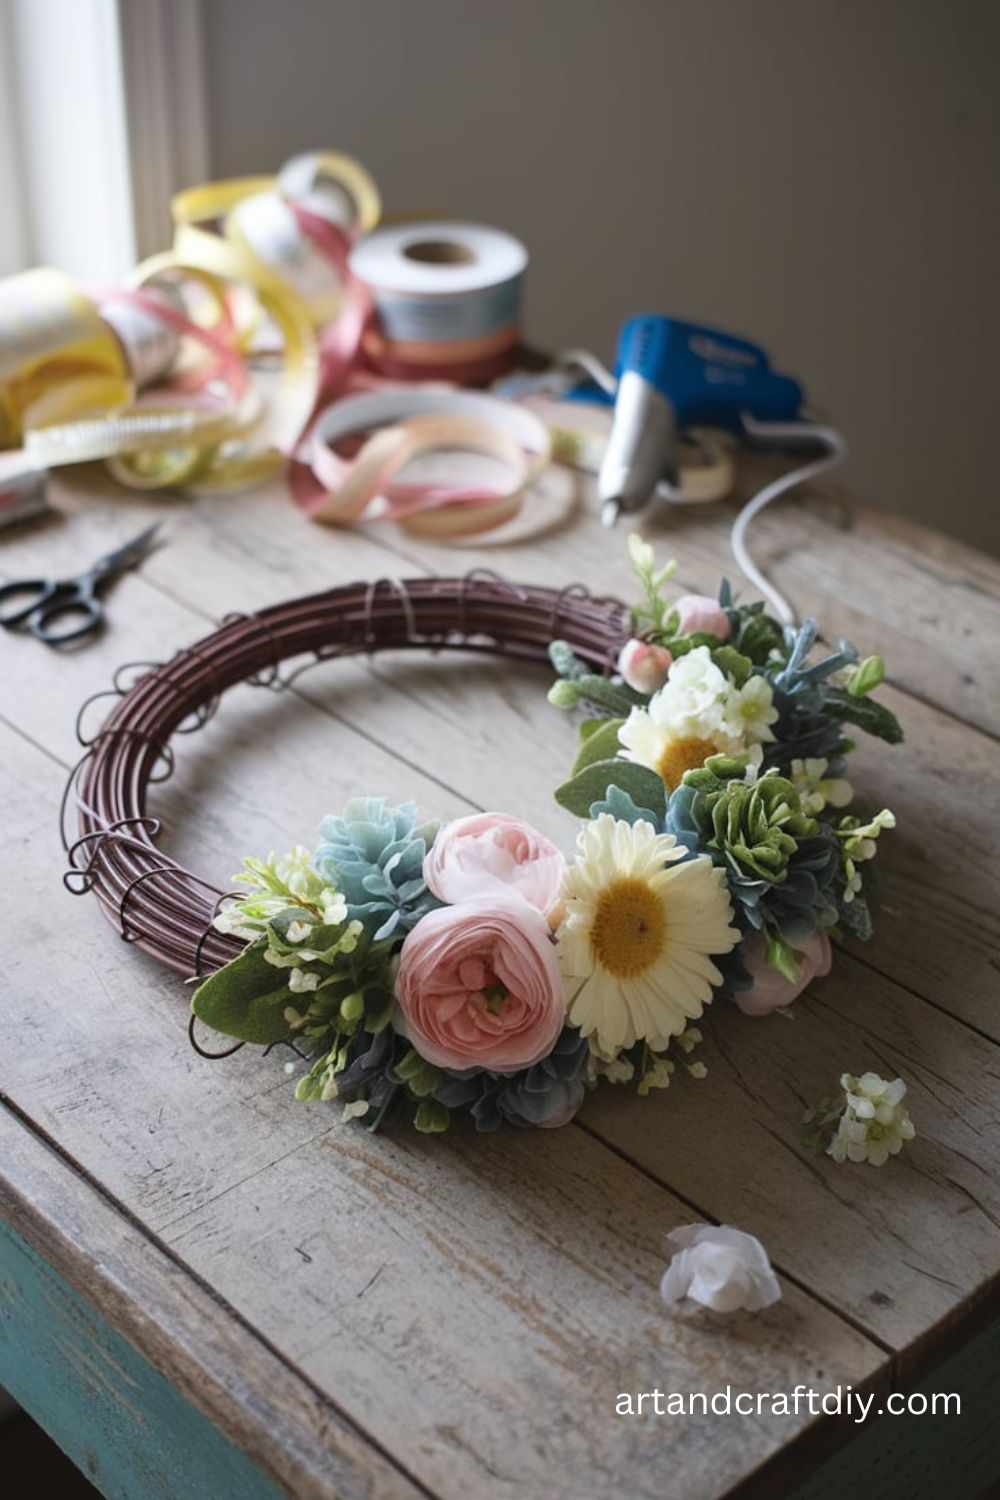
Materials Used:
- Wire wreath frame
- Faux flowers and greenery
- Floral wire
- Wire cutters
Steps:
- Separate the faux flowers and greenery from their stems using wire cutters.
- Arrange the greenery on the wreath frame, securing it with floral wire.
- Add faux flowers in clusters, wrapping the stems tightly to the frame with floral wire.
- Continue until the wreath is full and balanced in design.
- Hang it on your door or wall for instant charm.
Glittered Mason Jars
Turn ordinary mason jars into glittery décor pieces.
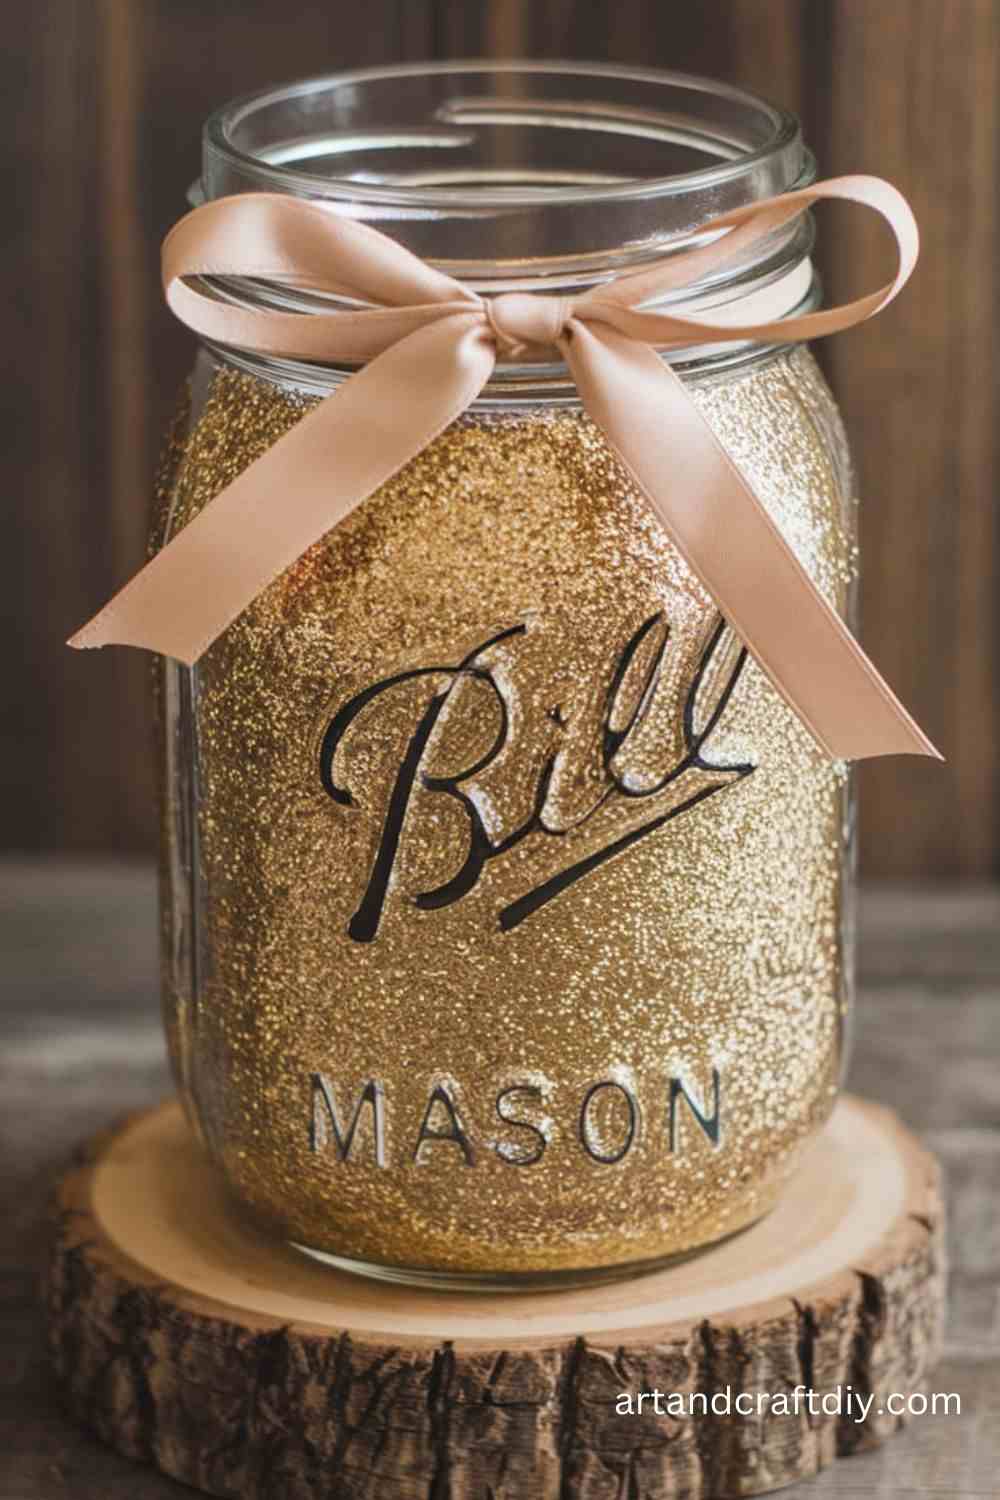
Materials Used:
- Mason jars
- Mod Podge
- Glitter (any color)
- Paintbrush
Steps:
- Clean and dry the mason jars thoroughly.
- Apply a layer of Mod Podge to the outside of the jar using a paintbrush.
- Sprinkle glitter generously over the glued surface, covering it completely.
- Let the jar dry, then apply a second coat of Mod Podge over the glitter to seal it in place.
- Use the jars as vases, candle holders, or storage.
Chalkboard Tray
Create a functional and decorative chalkboard tray.
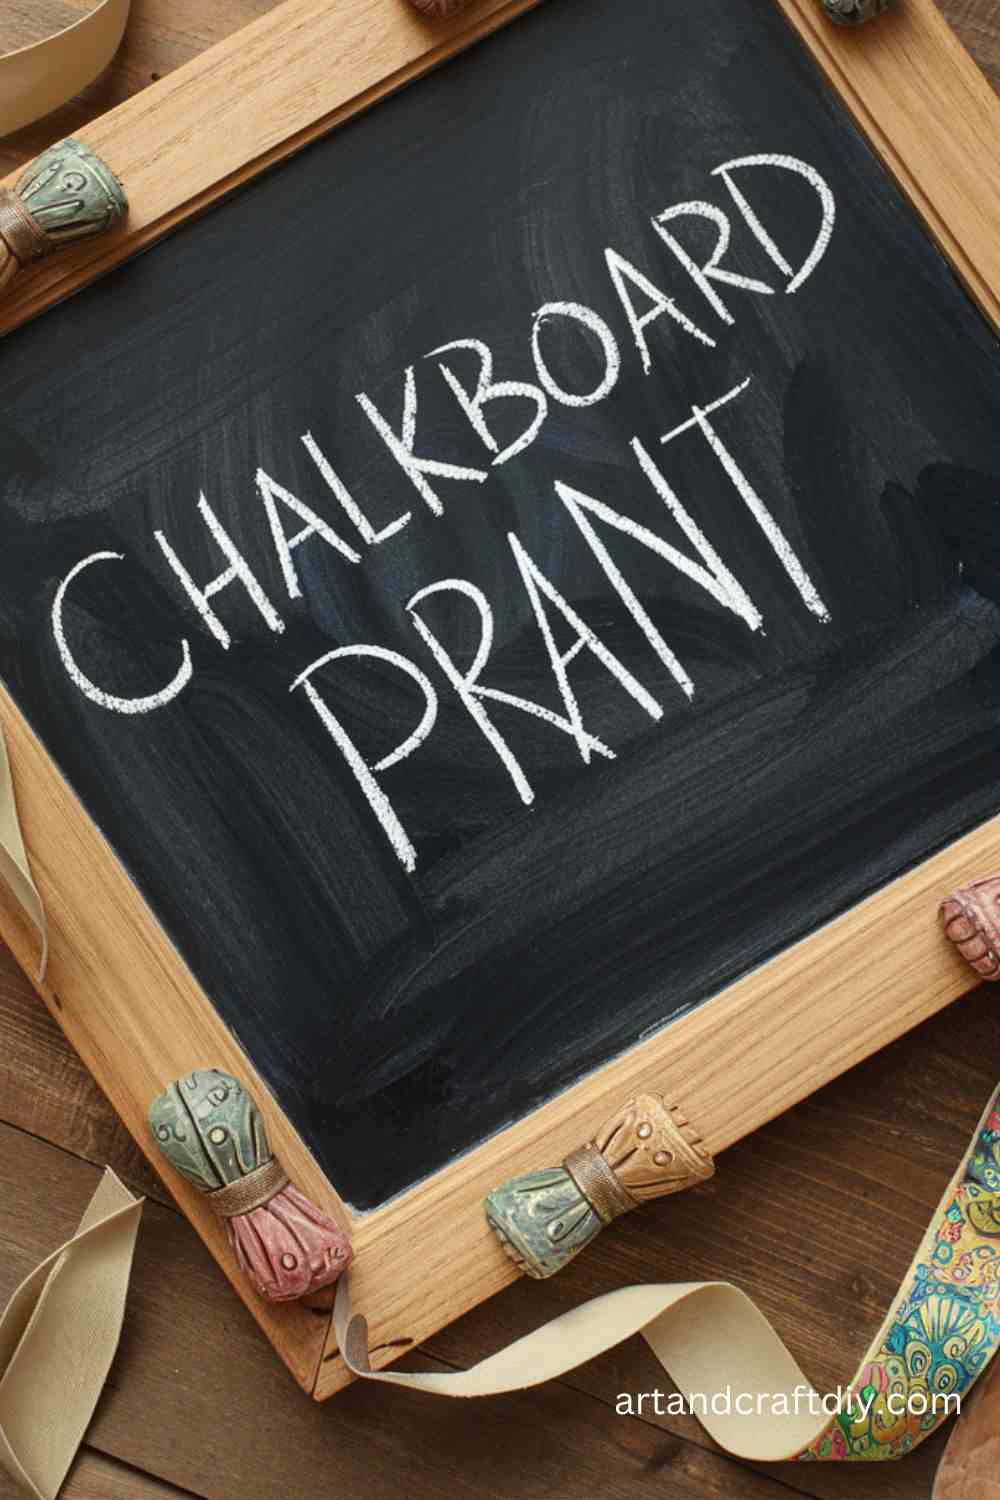
Materials Used:
- Metal tray from Dollar Tree
- Painter’s tape
- Paintbrush
- Chalk
Steps:
- Use painter’s tape to mask off the edges of the metal tray.
- Apply a coat of chalkboard paint to the flat surface of the tray.
- Allow the paint to dry completely before adding a second coat, if needed.
- Once dry, remove the painter’s tape.
- Write messages, labels, or doodles on the tray with chalk for a functional and stylish addition to your home.
DIY Jewelry Holder
Create a chic and functional jewelry holder using Dollar Tree supplies.
Materials Used:
- Picture frame
- Mesh or wire (for jewelry hanging)
- Hot glue gun
- Scissors
Steps:
- Remove the glass and backing from the picture frame.
- Cut a piece of mesh or wire to fit the frame and secure it with hot glue.
- Reinforce the edges of the mesh with extra glue to ensure it stays in place.
- Hang the frame on the wall, and use it to store earrings, necklaces, or bracelets.
Glittered Bow Wall Art
Craft a fun and festive bow wall art piece for your home or office.
Materials Used:
- Foam board
- Glitter
- Ribbon
- Hot glue gun
Steps:
- Cut a bow shape from foam board.
- Apply a layer of Mod Podge to the foam board bow and sprinkle glitter generously over it.
- Let the glitter dry, then attach a ribbon to the top of the bow for hanging.
- Hang the bow on your wall as a charming decorative piece.
DIY Mason Jar Soap Dispenser
Repurpose a mason jar into a stylish soap dispenser.
Materials Used:
- Mason jar
- Soap dispenser pump (Dollar Tree or other store)
- Hot glue gun
- Soap
Steps:
- Clean and dry the mason jar.
- Remove the pump mechanism from the soap dispenser.
- Using hot glue, attach the pump lid securely to the top of the mason jar.
- Fill the jar with liquid soap and screw the lid back on with the pump.
- Now you have a rustic and functional soap dispenser for your bathroom or kitchen.
Beaded Keychains
Craft colorful keychains that make great gifts or accessories.
Materials Used:
- Keychain rings
- Beads (variety of colors)
- Elastic cord
- Scissors
Steps:
- Cut a length of elastic cord that is long enough for your desired keychain length.
- String beads onto the cord in any pattern or color combination you like.
- Once you have the desired number of beads, tie a knot at the end of the cord to keep them in place.
- Attach the beaded strand to a keychain ring using a small knot.
- Trim any excess cord and enjoy your custom keychain.
Ribbon Wrapped Planters
Give your planters a pop of color with ribbons.
Materials Used:
- Plastic planters
- Decorative ribbon
- Hot glue gun
- Plants
Steps:
- Measure and cut ribbon to fit the height of the plastic planter.
- Apply a small amount of hot glue at the top of the planter and start wrapping the ribbon around it.
- Continue wrapping the ribbon, securing it with glue as you go.
- Once the planter is fully covered, let it dry and add your favorite plant.
- Display the decorated planter for a colorful touch in your home or garden.
Foam Pumpkins with Lace
Make elegant lace-covered foam pumpkins for a rustic yet chic fall décor.
Materials Used:
- Foam pumpkins
- Lace fabric
- Hot glue gun
- Scissors
Steps:
- Cut lace fabric into pieces that will wrap around the foam pumpkin.
- Apply a layer of hot glue to the surface of the pumpkin.
- Press the lace fabric onto the glued areas, smoothing it out.
- Let the glue dry, and trim any excess lace around the base.
- Display these elegant pumpkins as fall décor for your home.
Bead-Decorated Picture Frames
Transform a plain picture frame into a stylish beaded frame.
Materials Used:
- Plain picture frame
- Beads
- Hot glue gun
- Photo
Steps:
- Apply a thin line of hot glue around the edges of the picture frame.
- Start attaching the beads, pressing them into the glue and working your way around the frame.
- Let the glue dry and add a photo to the frame.
- You now have a beautiful, custom beaded picture frame.
Faux Marble Serving Tray
Create a faux marble serving tray using inexpensive supplies.
Materials Used:
- Wooden serving tray
- Contact paper (faux marble design)
- Scissors
- X-acto knife
Steps:
- Measure the dimensions of the tray and cut the faux marble contact paper to fit.
- Carefully peel off the backing and adhere the contact paper to the tray.
- Use the X-acto knife to trim off any excess paper around the edges.
- Now you have a sleek faux marble serving tray perfect for entertaining.
Yarn-Wrapped Letter Décor
Craft custom letters using yarn for a fun, personalized touch.
Materials Used:
- Foam letters
- Yarn
- Hot glue gun
- Scissors
Steps:
- Start by wrapping yarn tightly around the foam letters, securing the ends with hot glue.
- Continue wrapping until the letters are completely covered.
- Trim any excess yarn and hang or place the letters for a unique and colorful décor piece.
Pom-Pom Garland
Create a playful pom-pom garland to decorate any space.
Materials Used:
- Yarn in various colors
- Scissors
- Needle
- String
Steps:
- Make several pom-poms by wrapping yarn around your fingers and tying them in the center.
- Cut the loops on both sides to form pom-poms.
- Thread a needle with string and start stringing the pom-poms onto the thread.
- Continue until you have a garland of colorful pom-poms.
- Hang the garland in your room for a fun, festive look.
Wooden Spoon Planters
Repurpose wooden spoons into cute plant holders.
Materials Used:
- Wooden spoons
- Small pots
- Hot glue gun
- Paint (optional)
Steps:
- Paint the wooden spoons with your desired colors.
- Attach the spoons to the base of the small pots using hot glue.
- Let the glue dry completely before adding your favorite small plant to the pot.
- These mini spoon planters make a charming gift or addition to your décor.
Paper Mâché Bowls
Craft a decorative bowl out of paper mâché for storage or décor.
Materials Used:
- Balloon
- Newspaper strips
- Flour or craft glue
- Plastic wrap
- Paint (optional)
Steps:
- Inflate the balloon and cover it with plastic wrap.
- Dip newspaper strips into a flour-water mixture or craft glue and layer them over the balloon.
- Continue layering until the bowl is thick enough.
- Let the bowl dry for 24-48 hours, then pop the balloon and remove it.
- Paint the bowl as desired, and use it to store small items or as a decorative piece.
Tassel Wall Hanging
Create a trendy wall hanging with yarn tassels.
Materials Used:
- Yarn in various colors
- Wooden dowel or stick
- Scissors
- Hot glue gun
Steps:
- Cut multiple strands of yarn and tie them into tassels by looping the yarn and tying it in the middle.
- Attach the tassels to the wooden dowel using hot glue.
- Continue until the dowel is full of tassels.
- Hang the finished piece on your wall for a stylish, bohemian vibe.
Beaded Curtain Tiebacks
Add an elegant touch to your curtains with beaded tiebacks.
Materials Used:
- Curtain tiebacks
- Beads
- Ribbon
- Hot glue gun
Steps:
- Cut a length of ribbon and thread beads onto it.
- Secure the beads with hot glue as you go.
- Attach the ribbon to the curtain tieback.
- Use the beaded tiebacks to hold your curtains in place with a sophisticated flair.
Faux Leather Desk Organizer
Craft a chic faux leather desk organizer.
Materials Used:
- Faux leather sheets
- Hot glue gun
- Scissors
- Ruler
Steps:
- Cut the faux leather sheets into pieces to form sides of the organizer.
- Glue the edges together to form a box-like structure.
- Use the organizer for pens, paper, or office supplies on your desk.
DIY Woven Baskets
Create stylish woven baskets using twine.
Materials Used:
- Twine
- Hot glue gun
- Basket frame (optional)
Steps:
- Wrap the twine around the basket frame (or create your own shape with twine).
- Glue the twine in place as you weave it, layer by layer.
- Once the basket is complete, use it for storage or as a décor piece.
Tips for Crafting on a Budget
Crafting doesn’t have to be expensive. With a little creativity and careful planning, you can create beautiful DIY projects without breaking the bank. Here are some practical tips for crafting on a budget:
How to Plan Your Projects Before Shopping
- Set a Budget: Determine how much you’re willing to spend before you start shopping. This will keep you from over-purchasing materials and help you make more intentional choices.
- Make a List: Write down the supplies you’ll need for your project. This helps avoid impulse purchases and ensures you don’t forget any key materials.
- Research and Gather Ideas: Use Pinterest, Instagram, or YouTube to find inspiration and learn which supplies are essential for your project. This way, you’ll have a clearer idea of what you’re looking for.
- Prioritize Materials: Identify what items you absolutely need and focus on those first. Opt for low-cost alternatives for decorative elements if needed.
- Check Your Stash: Before heading to the store, see what supplies you already have at home. You might find that you can repurpose or use existing materials in your project.
Maximizing Dollar Tree Finds by Repurposing
Dollar Tree is a goldmine for budget-friendly crafting supplies. Here are a few ideas for making the most of what you find:
- Repurpose Frames: Dollar Tree often has inexpensive photo frames that can be turned into wall art, mirrors, or even functional decor like a chalkboard.
- Glass Jars and Containers: These can be turned into vases, candle holders, or even storage solutions. Paint or decorate them to suit your style.
- Ribbon and Crafting Materials: While it may be inexpensive, Dollar Tree ribbon can be used for wreaths, gift wrap, or accent pieces for other crafts.
- Wooden Items: Small wood pieces from Dollar Tree can be transformed into custom coasters, signs, or shelves with just a little sanding, paint, or decoration.
- Floral Picks: Dollar Tree flowers can be repurposed for bouquets, wreaths, or garlands. Mix and match different colors for a fresh look.
FAQ
What are DIY Dollar Tree Crafts ?
DIY Dollar Tree crafts are creative projects made using materials primarily purchased from Dollar Tree stores. DIY Dollar Tree Crafts can range from home decor to personalized gifts, with most items being budget-friendly.
How do I find the best materials at Dollar Tree for crafts?
Look for versatile items like frames, glass jars, picture frames, floral arrangements, ribbons, and paints. Seasonal items and DIY sections are often stocked with great materials for crafting.
Are Dollar Tree supplies good quality for crafting?
Yes, many Dollar Tree items are of great quality for basic crafts, though it’s important to check the condition of the materials, as they can vary. For projects that need durability, you might want to reinforce or modify some materials.
What types of crafts can I make with Dollar Tree supplies?
You can create a wide range of crafts such as:
- Home decor (wall art, wreaths, decorative trays)
- Seasonal decorations (Christmas ornaments, Halloween decor)
- Personalized gifts (mugs, photo frames, custom cards)
- Storage solutions (baskets, bins)
- Party supplies (centerpieces, table settings)
Can Dollar Tree supplies be used for kids’ crafts?
Absolutely! Dollar Tree carries a variety of crafting items like stickers, construction paper, markers, and foam sheets that are perfect for kids’ crafts. Be sure to supervise younger children with small pieces or sharp tools.

Hi, I’m Victoria, an art and craft teacher at Newark City Schools, where I have the joy of working with middle school students to help them explore their creativity and develop their artistic talents. I believe that art is a powerful way for students to express themselves, and I strive to make every lesson a fun, engaging, and inspiring experience.
I created this website to share the art and craft projects, techniques, and resources that I use in my classroom, hoping to inspire both educators and young artists alike. Whether you’re a teacher looking for new ideas or a student eager to try something new, I’m excited to provide creative tools and projects that anyone can enjoy.
When I’m not in the classroom, I love experimenting with different art forms and learning new crafting techniques. My goal is to help others discover the joy of making things with their hands, and I hope my website serves as a space for everyone to explore their creative potential.