
STEM (Science, Technology, Engineering, and Mathematics) is a multidisciplinary approach that emphasizes the integration of these fields to encourage practical learning and innovative thinking. When combined with crafts, STEM concepts come to life in a hands-on way, offering children an exciting opportunity to explore complex ideas through creative projects. Engaging kids in STEM crafts not only fosters their curiosity but also plays a crucial role in developing problem-solving skills, creativity, and critical thinking. Through these interactive activities, children can experiment, make mistakes, and learn through doing, which builds confidence and nurtures a deeper understanding of how the world works.
STEM crafts are particularly effective in making abstract concepts more accessible and engaging for kids. By incorporating materials like paper, clay, cardboard, or even recycled items, children can physically manipulate objects to visualize and comprehend scientific principles, technological innovations, engineering challenges, and mathematical puzzles. For example, building a bridge from straws or creating a simple circuit with playdough introduces fundamental engineering and electrical concepts in a fun, approachable way. These hands-on experiences allow children to witness real-world applications of STEM fields, fostering a deeper connection to what they are learning.
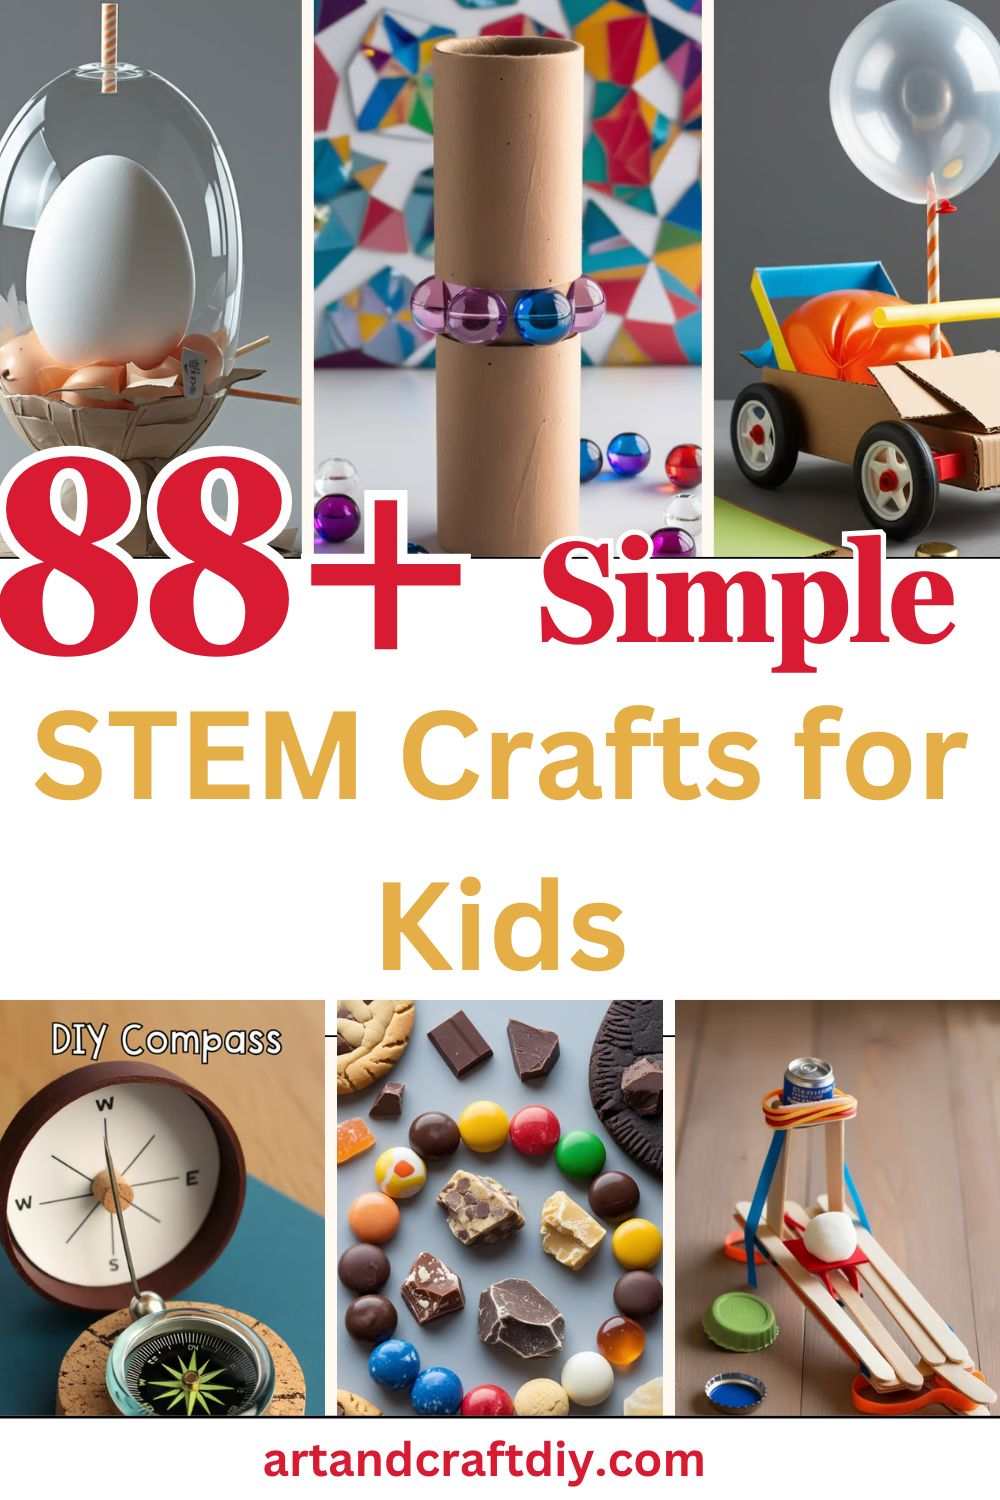
STEM Crafts for Kids
STEM Crafts for Kids are fun, hands-on activities that combine science, technology, engineering, and math with creativity. STEM Crafts for Kids help children develop problem-solving skills, critical thinking, and a love for learning through interactive experiments and DIY projects. From building simple machines to creating chemical reactions, STEM crafts make education exciting and engaging for young minds!
Balloon-Powered Car
Teach kids about physics and motion with a DIY balloon-powered car.
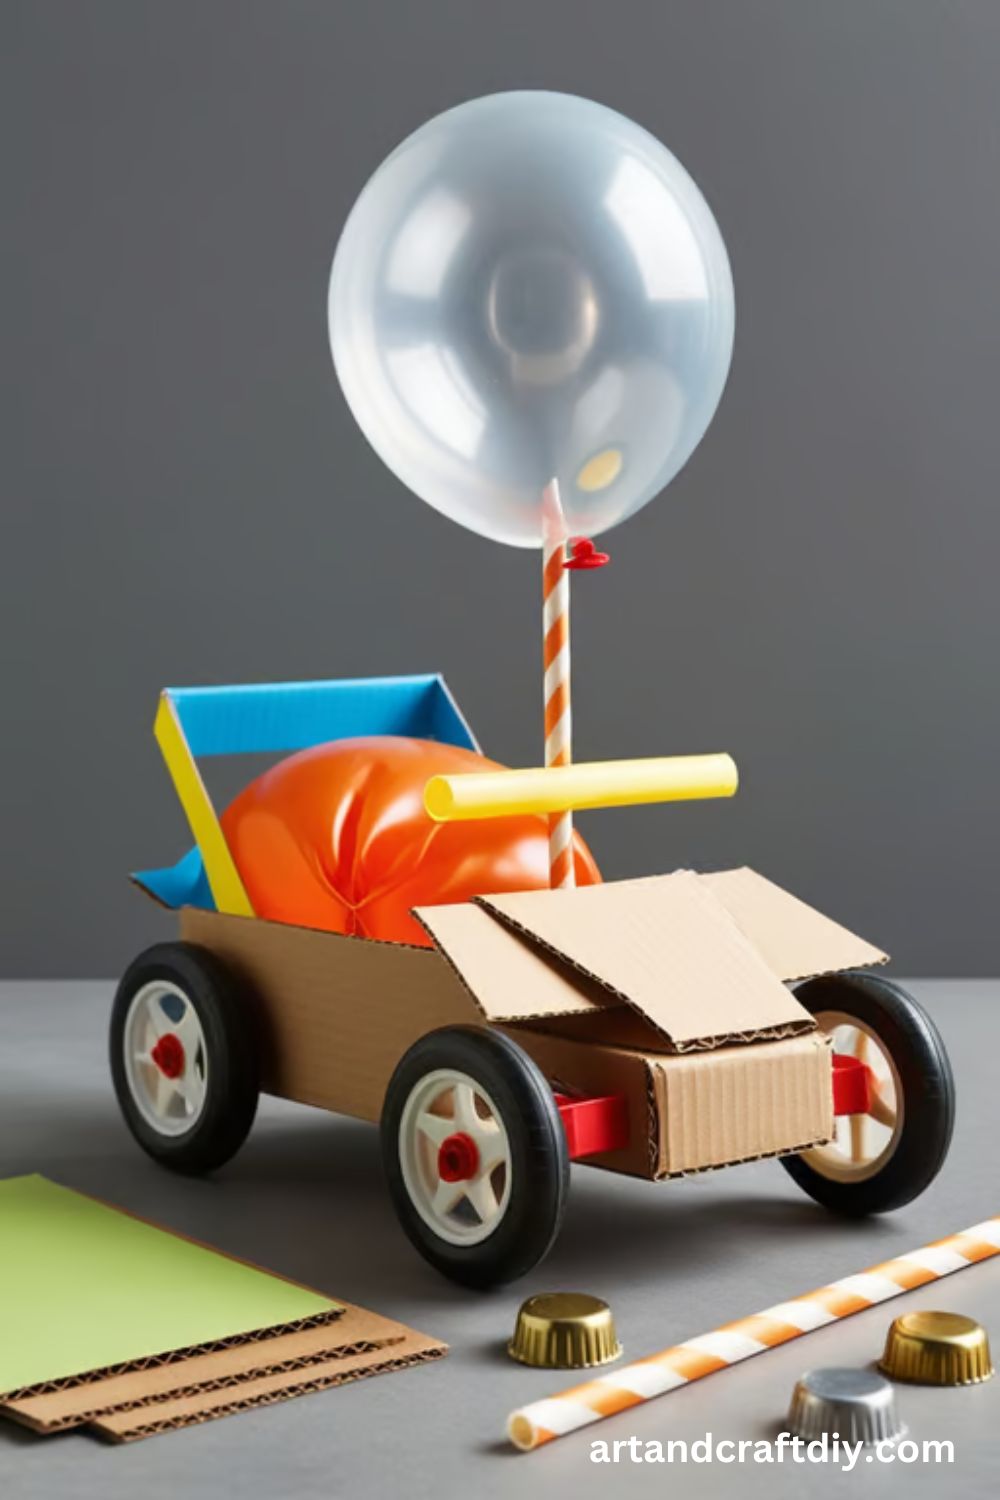
Materials: Plastic bottle, bottle caps, straws, skewers, balloon, tape, scissors
Steps:
- Cut a plastic bottle in half to create the car body.
- Attach two straws underneath as axles and slide skewers through them.
- Attach bottle caps to the skewers as wheels using glue or push them in snugly.
- Tape a balloon to the end of another straw and insert the other end into a hole in the car.
- Blow up the balloon, place the car on the floor, and release to see it move!
Lava Lamp
Demonstrate density and chemical reactions with a homemade lava lamp.
Materials: Clear bottle, vegetable oil, water, food coloring, Alka-Seltzer tablets
Steps:
- Fill a clear bottle three-quarters full with vegetable oil.
- Pour water into the bottle until almost full, leaving some space at the top.
- Add a few drops of food coloring and let it settle.
- Drop in half an Alka-Seltzer tablet and watch the bubbles rise like a lava lamp!
Static Electricity Butterfly
Explore the power of static electricity with a floating butterfly.
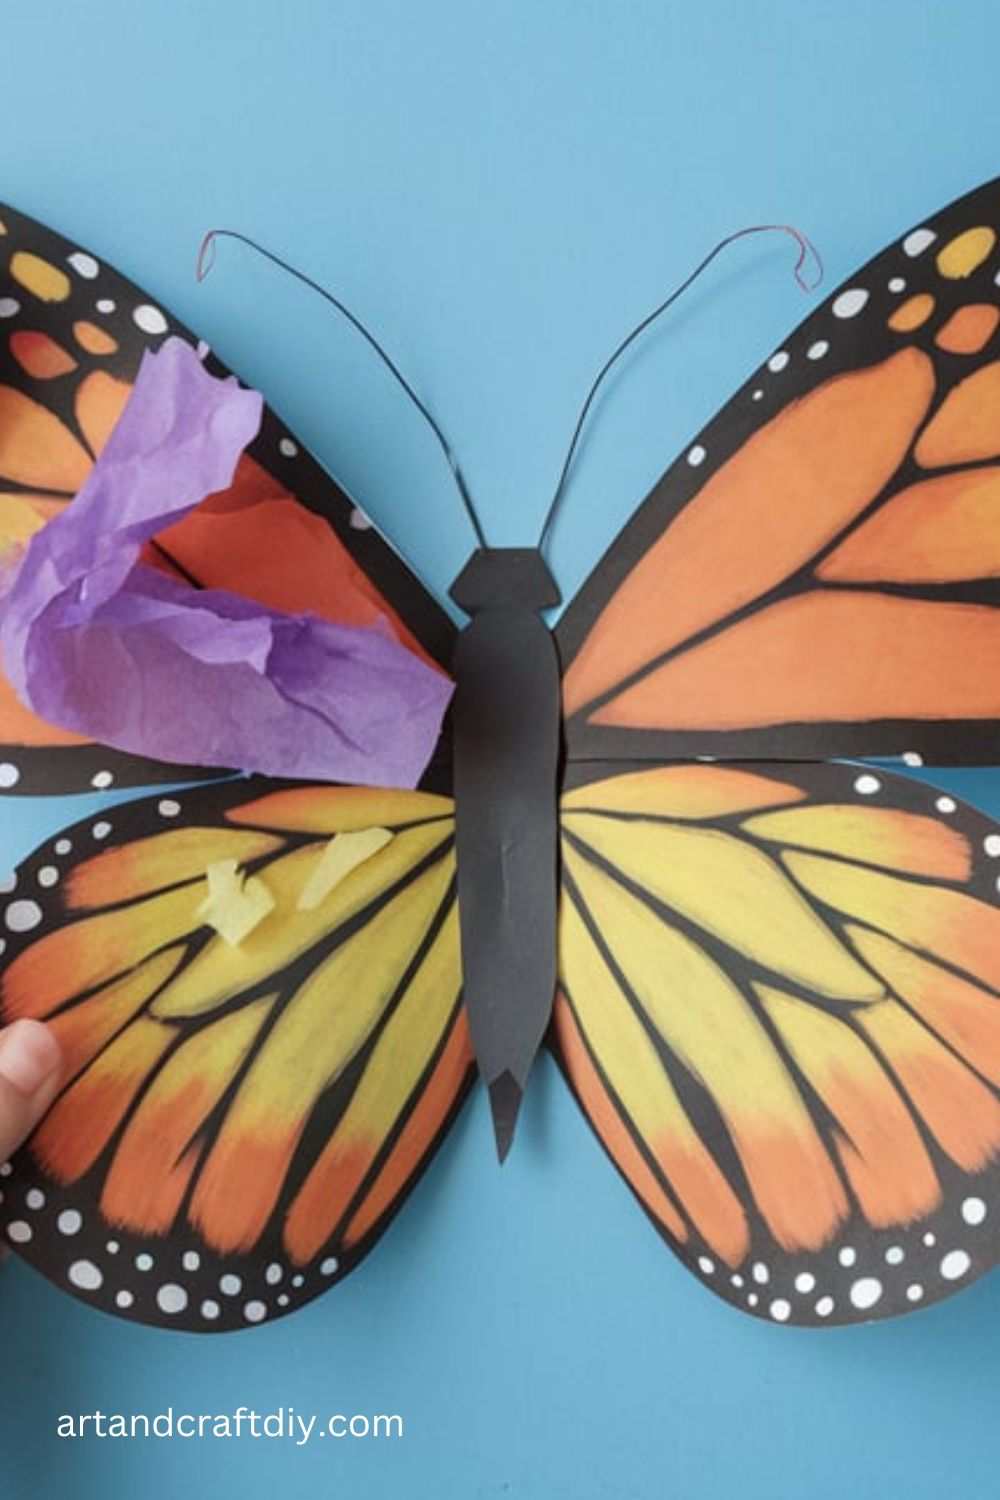
Materials: Tissue paper, construction paper, balloon, glue, scissors
Steps:
- Cut a butterfly shape from tissue paper and a slightly larger one from construction paper.
- Glue the tissue paper butterfly onto the construction paper, but leave the wings free.
- Inflate a balloon and rub it on your hair or a wool sweater to create static.
- Hold the balloon near the butterfly’s wings and watch them lift and move!
DIY Compass
Teach kids about magnetism and navigation by making a simple compass.
Materials: Small magnet, sewing needle, bowl of water, cork or foam, paperclip
Steps:
- Rub a magnet along a sewing needle in one direction about 20 times to magnetize it.
- Stick the needle through a small piece of cork or foam.
- Float the cork in a bowl of water and watch the needle align with north and south!
Rainbow Walking Water
Show kids capillary action by making colors move between cups.
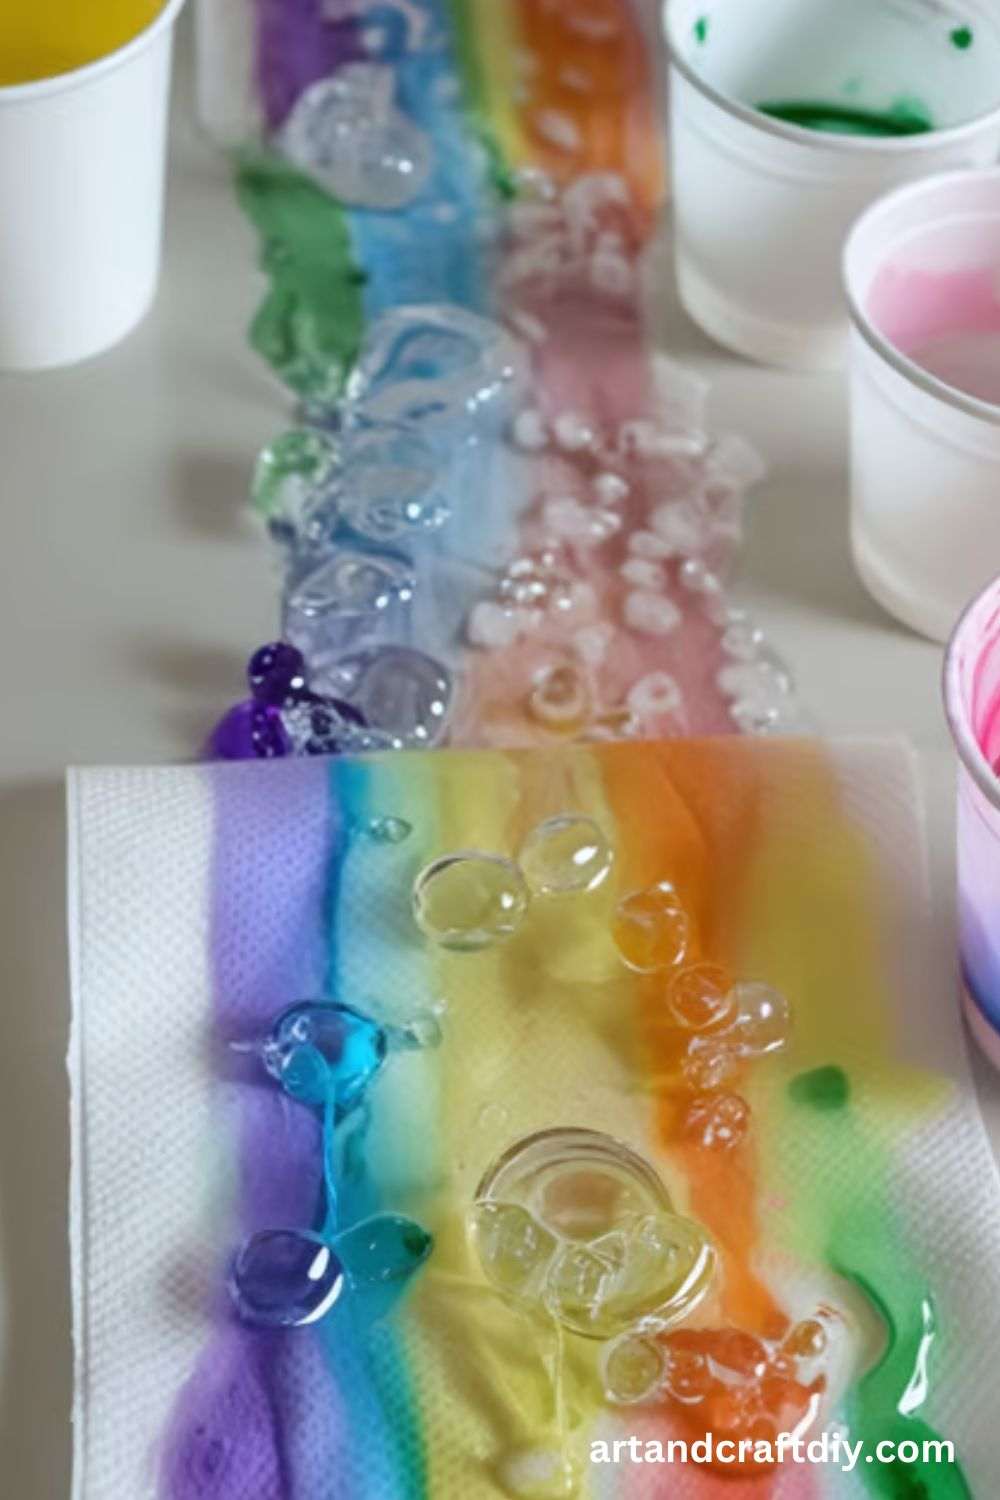
Materials: 6 clear cups, water, food coloring (red, yellow, blue), paper towels
Steps:
- Arrange six cups in a row and fill the 1st, 3rd, and 5th with water.
- Add red food coloring to the 1st, yellow to the 3rd, and blue to the 5th cup.
- Fold paper towels into strips and place one end in each cup to connect them.
- Watch as water “walks” into the empty cups and mixes to form new colors!
Catapult Challenge
Learn about tension and force by making a popsicle stick catapult.
Materials: Popsicle sticks, rubber bands, plastic spoon, pom-poms
Steps:
- Stack 6 popsicle sticks and secure both ends with rubber bands.
- Stack 2 sticks and slide them perpendicularly between the first stack.
- Secure everything with a rubber band and attach a plastic spoon on top.
- Press down the spoon, release, and watch your pom-poms launch!
DIY Sundial
Introduce kids to telling time using the sun’s position.
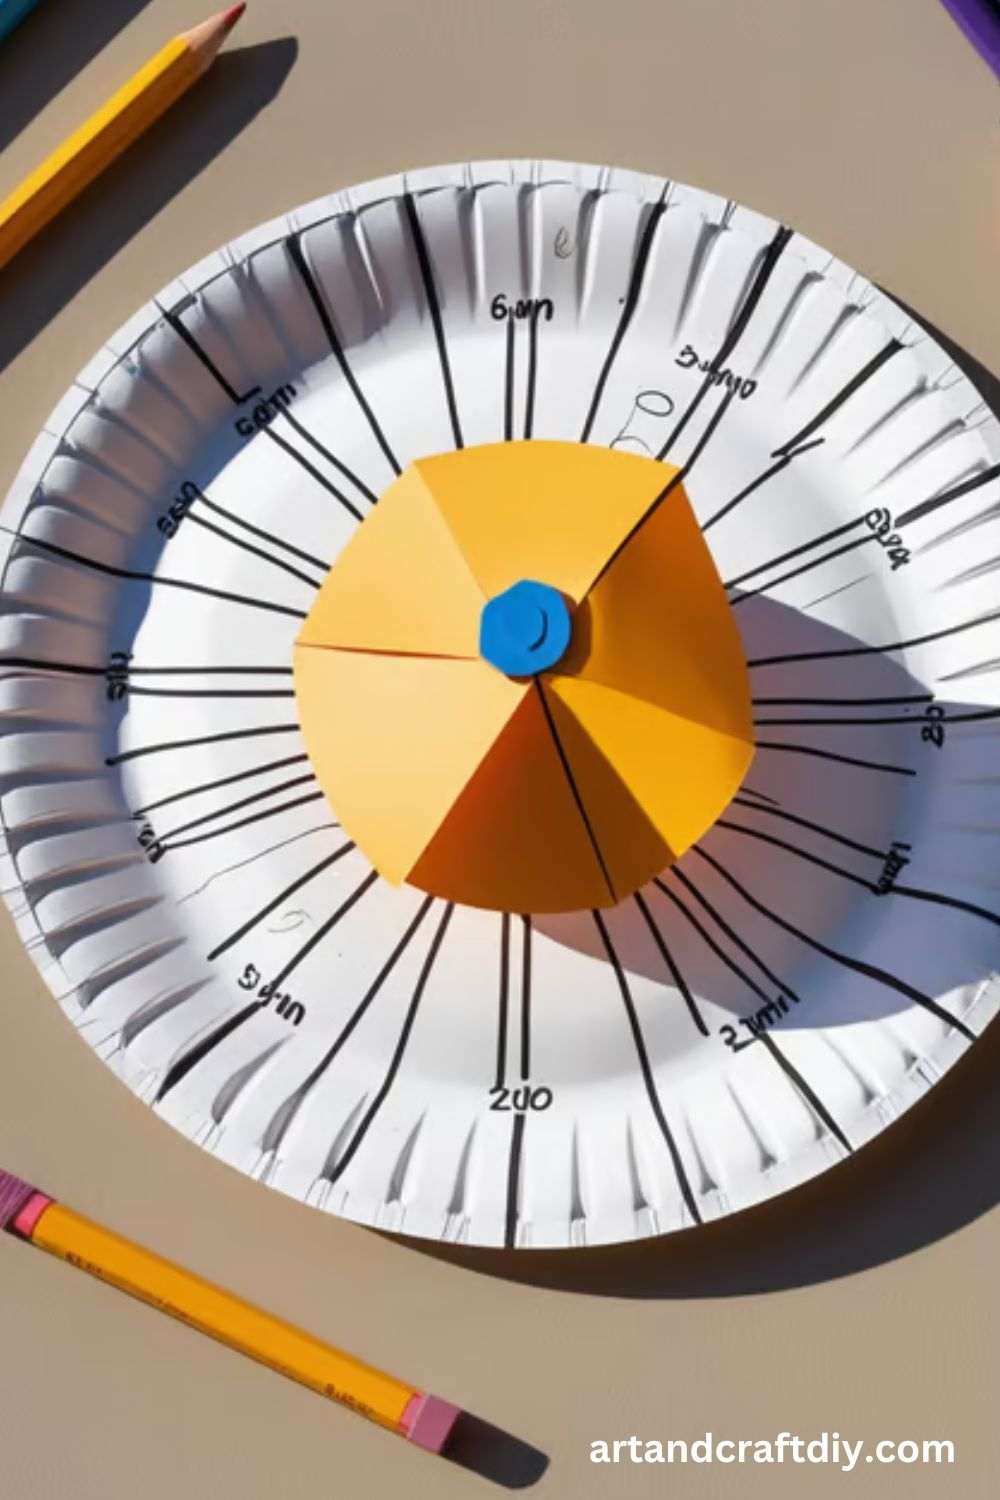
Materials: Paper plate, straw, marker, clock
Steps:
- Poke a hole in the center of a paper plate and insert a straw upright.
- Place the sundial outside in a sunny spot at noon and mark the shadow’s position.
- Every hour, mark where the shadow falls. By the end of the day, you’ll have a homemade sundial!
Edible Rock Cycle
Explore geology by making edible rocks with chocolate.

Materials: White, milk, and dark chocolate, wax paper, microwave-safe bowls
Steps:
- Melt small pieces of chocolate together to represent sedimentary rock.
- Press melted chocolate layers together to show metamorphic rock.
- Melt all the chocolate completely and let it harden again to form igneous rock!
DIY Kaleidoscope
Discover light reflection and symmetry with a homemade kaleidoscope.

Materials: Paper towel roll, reflective paper, beads, clear plastic sheet, tape
Steps:
- Cut three strips of reflective paper and tape them into a triangle shape.
- Insert the triangle into a paper towel roll.
- Cover one end with a clear plastic sheet and add small beads inside.
- Look through the tube and turn it to see beautiful patterns!
Egg Drop Challenge
Teach engineering and physics with a fun egg drop experiment.
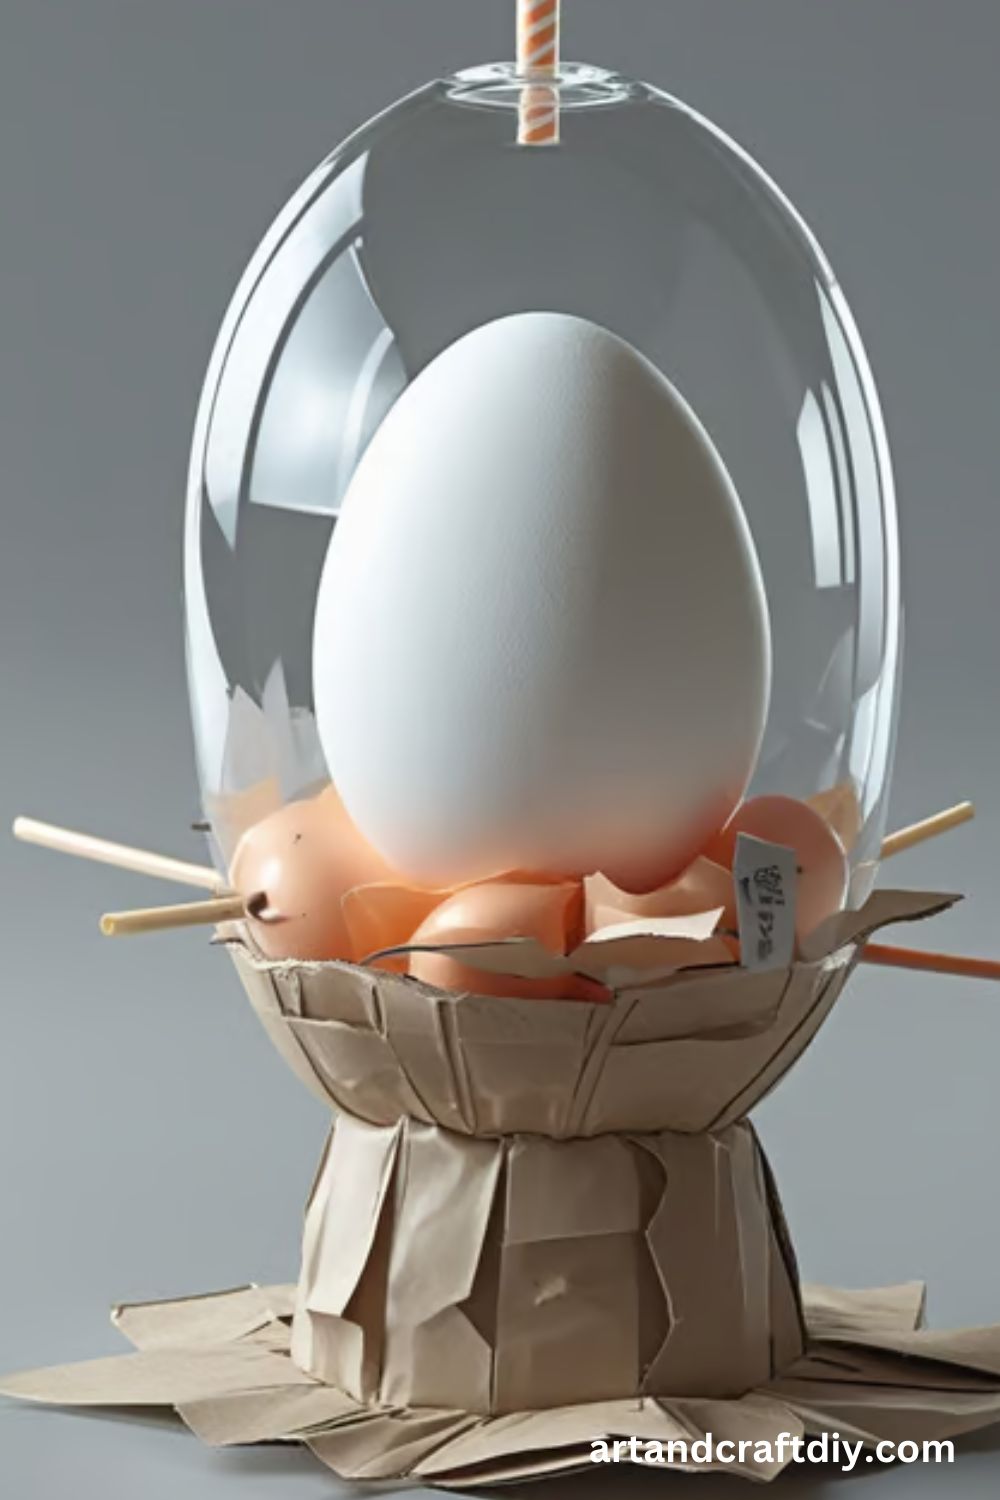
Materials: Raw egg, cotton balls, straws, tape, small box
Steps:
- Design a protective container for an egg using soft materials.
- Secure the egg inside with cotton balls and straws.
- Drop the egg from a height and check if it survives the fall!
Magic Milk Experiment
Explore chemical reactions and surface tension with milk and soap.
Materials: Whole milk, dish soap, food coloring, cotton swab
Steps:
- Pour milk onto a plate and add drops of food coloring.
- Dip a cotton swab into dish soap and touch the milk’s surface.
- Watch the colors swirl as the soap breaks surface tension!
DIY Parachute
Learn about air resistance with a simple parachute craft.
Materials: Plastic bag, string, tape, small toy
Steps:
- Cut a square from a plastic bag and attach four strings to its corners.
- Tie the strings to a small toy.
- Drop it from a height and watch the parachute slow the fall!
Water Bottle Rocket
Demonstrate Newton’s Third Law with a water-powered rocket.
Materials: Empty plastic bottle, cork, vinegar, baking soda, paper towel, tape
Steps:
- Fill the bottle one-third with vinegar.
- Wrap baking soda in a paper towel and quickly drop it in.
- Seal with a cork and place the bottle upside down.
- Step back and watch the rocket launch!
Paper Circuit Cards
Introduce kids to basic electronics by making light-up paper circuits.
Materials: Cardstock, copper tape, LED light, coin battery, tape
Steps:
- Draw a simple circuit on cardstock using copper tape.
- Place an LED at the end of the circuit with its legs touching the tape.
- Attach a coin battery where the circuit completes, ensuring the positive and negative sides match.
- Press the battery to light up the LED!
Salt Crystals Experiment
Teach kids about evaporation and crystallization with this fun experiment.
Materials: Salt, warm water, jar, string, pencil
Steps:
- Dissolve salt in warm water until it stops dissolving.
- Pour the solution into a jar and hang a string inside, tied to a pencil resting on the jar’s rim.
- Let it sit for a few days and watch crystals form on the string!
DIY Stethoscope
Learn about sound waves and the human body with a homemade stethoscope.
Materials: Paper towel roll, balloon, rubber band, plastic tubing
Steps:
- Cut the top off a balloon and stretch it over one end of a paper towel roll.
- Secure it with a rubber band.
- Attach plastic tubing to the other end of the roll and listen to heartbeats!
Tornado in a Bottle
Explore vortex motion with this easy water experiment.
Materials: Two plastic bottles, water, duct tape, glitter (optional)
Steps:
- Fill one plastic bottle two-thirds with water and add glitter if desired.
- Tape another bottle upside down to it, securing their mouths together.
- Flip the bottles and swirl them in a circular motion to create a mini tornado!
Lemon Battery
Teach kids about electricity by making a battery from lemons.
Materials: Lemon, copper coin, zinc nail, wires, LED light
Steps:
- Insert a copper coin and a zinc nail into a lemon.
- Connect wires from the metal pieces to an LED light.
- The lemon’s acid will generate a small electric current to power the light!
Baking Soda Volcano
A classic experiment demonstrating chemical reactions.
Materials: Baking soda, vinegar, dish soap, food coloring, small bottle
Steps:
- Place a small bottle on a tray and add baking soda inside.
- Mix vinegar with dish soap and food coloring in a separate cup.
- Pour the mixture into the bottle and watch the foamy “lava” erupt!
Oobleck (Non-Newtonian Fluid)
Make a substance that acts like both a liquid and a solid.
Materials: Cornstarch, water, food coloring
Steps:
- Mix 2 parts cornstarch with 1 part water in a bowl.
- Add food coloring if desired.
- Play with the mixture—it hardens when squeezed and turns liquid when released!
Straw Roller Coaster
Introduce engineering by building a marble roller coaster.
Materials: Straws, tape, cardboard, marble
Steps:
- Tape straws onto a cardboard base, creating ramps and loops.
- Test the track by rolling a marble down.
- Adjust angles and inclines to make the marble move smoothly!
Soap-Powered Boat
Demonstrate surface tension by making a soap-powered boat.
Materials: Small cardboard or foam, dish soap, toothpick
Steps:
- Cut a small boat shape from cardboard or foam.
- Cut a small notch at the back.
- Dip a toothpick in dish soap and touch the notch—watch the boat move forward!
Magnetic Slime
Make slime that reacts to magnets!
Materials: Liquid starch, white glue, iron filings, magnet
Steps:
- Mix glue and liquid starch to create slime.
- Add iron filings and knead well.
- Use a strong magnet to make the slime move!
Cloud in a Jar
Teach kids about condensation and weather with this experiment.
Materials: Jar, hot water, ice, hairspray
Steps:
- Pour hot water into a jar.
- Spray hairspray inside quickly.
- Place ice on the jar’s lid and watch as a cloud forms inside!
Water Clock
Make a simple time-measuring device using dripping water.
Materials: Two plastic cups, pin, stopwatch
Steps:
- Poke a small hole in the bottom of one cup.
- Fill it with water and place it over an empty cup.
- Start a stopwatch and measure how long it takes for the water to drain completely.
Solar Oven
Use sunlight to cook food with a homemade solar oven.
Materials: Pizza box, aluminum foil, plastic wrap, black paper
Steps:
- Cut a flap in the pizza box’s lid and cover the inside with aluminum foil.
- Line the bottom of the box with black paper.
- Stretch plastic wrap over the opening.
- Place food inside and leave in the sun to heat up!
DIY Barometer
Measure air pressure with a simple barometer.
Materials: Glass jar, balloon, rubber band, straw, index card
Steps:
- Cut a balloon and stretch it over the jar’s opening, securing it with a rubber band.
- Tape a straw to the balloon’s surface.
- Place an index card behind it and mark changes as the straw moves with pressure changes!
Coding with LEGO Bricks
Introduce kids to binary code using LEGO bricks.
Materials: LEGO bricks, binary alphabet chart
Steps:
- Assign a color to represent “1” and another for “0.”
- Use binary coding to spell out words with bricks.
- Decode messages using the binary chart!
Mini Water Cycle
Show how water moves through evaporation, condensation, and precipitation.
Materials: Ziplock bag, marker, water, blue food coloring, tape
Steps:
- Draw the sun, clouds, and water on a Ziplock bag.
- Fill it with a small amount of blue-colored water.
- Tape it to a sunny window and watch condensation form inside!
DIY Periscope
Learn about reflection by making a periscope.
Materials: Cardboard tube, two small mirrors, tape, scissors
Steps:
- Cut holes at opposite ends of a cardboard tube.
- Attach mirrors at 45-degree angles inside the tube.
- Look through one end and see what’s reflected on the other!
Crafting Safety Tips for Kids
Crafting is a fun and creative activity, but safety should always come first, especially when kids are involved. Here are some essential safety tips to ensure a secure crafting experience:
Safety Tips:
- Use Child-Safe Tools: Always provide kids with safety scissors that have rounded tips to prevent accidental cuts.
- Supervise Crafting Activities: Keep an eye on children when using hot glue guns, craft knives, or any sharp objects to avoid injuries.
- Handle Small Parts with Care: Be cautious with beads, buttons, and other tiny materials, especially for young children, to prevent choking hazards.
- Be Cautious with Adhesives and Paints: Ensure kids use non-toxic glue, paints, and markers to avoid harmful chemical exposure.
- Battery Safety: If a project involves batteries or electronic components, make sure kids do not attempt to insert, remove, or handle them unsupervised.
Tips for Maximizing Learning and Fun
Learning doesn’t have to be boring—when approached the right way, it can be an exciting adventure! Whether at home or in the classroom, incorporating creativity, curiosity, and real-world connections makes learning more engaging and enjoyable. Here are some tips to maximize both learning and fun:
1. Keep Projects Open-Ended
- Instead of rigid instructions, allow for flexibility and creativity.
- Encourage kids to explore different solutions and unique ideas.
- Let them take ownership of their projects to boost confidence and problem-solving skills.
2. Ask Thought-Provoking Questions
- Spark curiosity with open-ended questions like, “What do you think will happen if…?” or “How would you solve this problem?”
- Encourage critical thinking by discussing different possibilities and outcomes.
- Let kids explain their thought process, helping them develop reasoning skills.
3. Integrate STEM Concepts into Daily Life
- Show how science, technology, engineering, and math (STEM) exist all around us.
- Observe patterns in nature, discuss how machines work, or experiment with simple physics at home.
- Use everyday tasks, like cooking or building with blocks, to introduce STEM ideas in a fun, hands-on way.
FAQ
What are STEM crafts for kids?
STEM crafts are fun, hands-on activities that combine Science, Technology, Engineering, and Math (STEM) with creativity. These crafts help kids learn concepts through interactive projects, such as building simple machines, making slime, or designing paper circuits.
What age group is best for STEM crafts?
STEM crafts can be adapted for kids of all ages! Simple activities like color-mixing experiments work well for preschoolers, while older kids might enjoy robotics, coding crafts, or physics-based projects.
What are some easy STEM crafts for beginners?
Here are a few easy STEM craft ideas:
- Balloon Rocket (explores physics & motion)
- Homemade Lava Lamp (teaches density & chemical reactions)
- Salt Crystal Art (introduces crystallization)
- Popsicle Stick Catapult (shows engineering principles)
What materials do I need for STEM Crafts for Kids?
Most STEM crafts use household or easy-to-find materials, such as:
- Paper, cardboard, and glue
- Baking soda & vinegar (for chemical reactions)
- Straws, rubber bands, and balloons
- LED lights & batteries (for circuits)

Hi, I’m Victoria, an art and craft teacher at Newark City Schools, where I have the joy of working with middle school students to help them explore their creativity and develop their artistic talents. I believe that art is a powerful way for students to express themselves, and I strive to make every lesson a fun, engaging, and inspiring experience.
I created this website to share the art and craft projects, techniques, and resources that I use in my classroom, hoping to inspire both educators and young artists alike. Whether you’re a teacher looking for new ideas or a student eager to try something new, I’m excited to provide creative tools and projects that anyone can enjoy.
When I’m not in the classroom, I love experimenting with different art forms and learning new crafting techniques. My goal is to help others discover the joy of making things with their hands, and I hope my website serves as a space for everyone to explore their creative potential.