
Oh man, I still remember last Easter—I tried making these cute little bunny decorations with my niece, thinking it’d be super easy. Spoiler alert: glue got everywhere, glitter was in places I didn’t even know existed, and somehow one of the eggs ended up looking more like a potato than a pastel masterpiece. But you know what? We laughed so much, and by the end, our DIY Easter crafts actually looked… well, charmingly messy, let’s say. If you’re anything like me, sometimes the thought of making your own decorations can feel totally overwhelming.
“Where do I even start?” you might be thinking. Don’t worry—I’ve got you. In this little guide, I’m going to share some fun, simple DIY Easter crafts that won’t stress you out, are super budget-friendly, and actually look cute. Whether it’s kids’ crafts, home décor, or last-minute ideas, I promise you’ll walk away inspired (and maybe a little sparkly).
DIY Easter Crafts
DIY Easter crafts are a fun and creative way to celebrate the holiday while adding a personal touch to your decorations and activities.

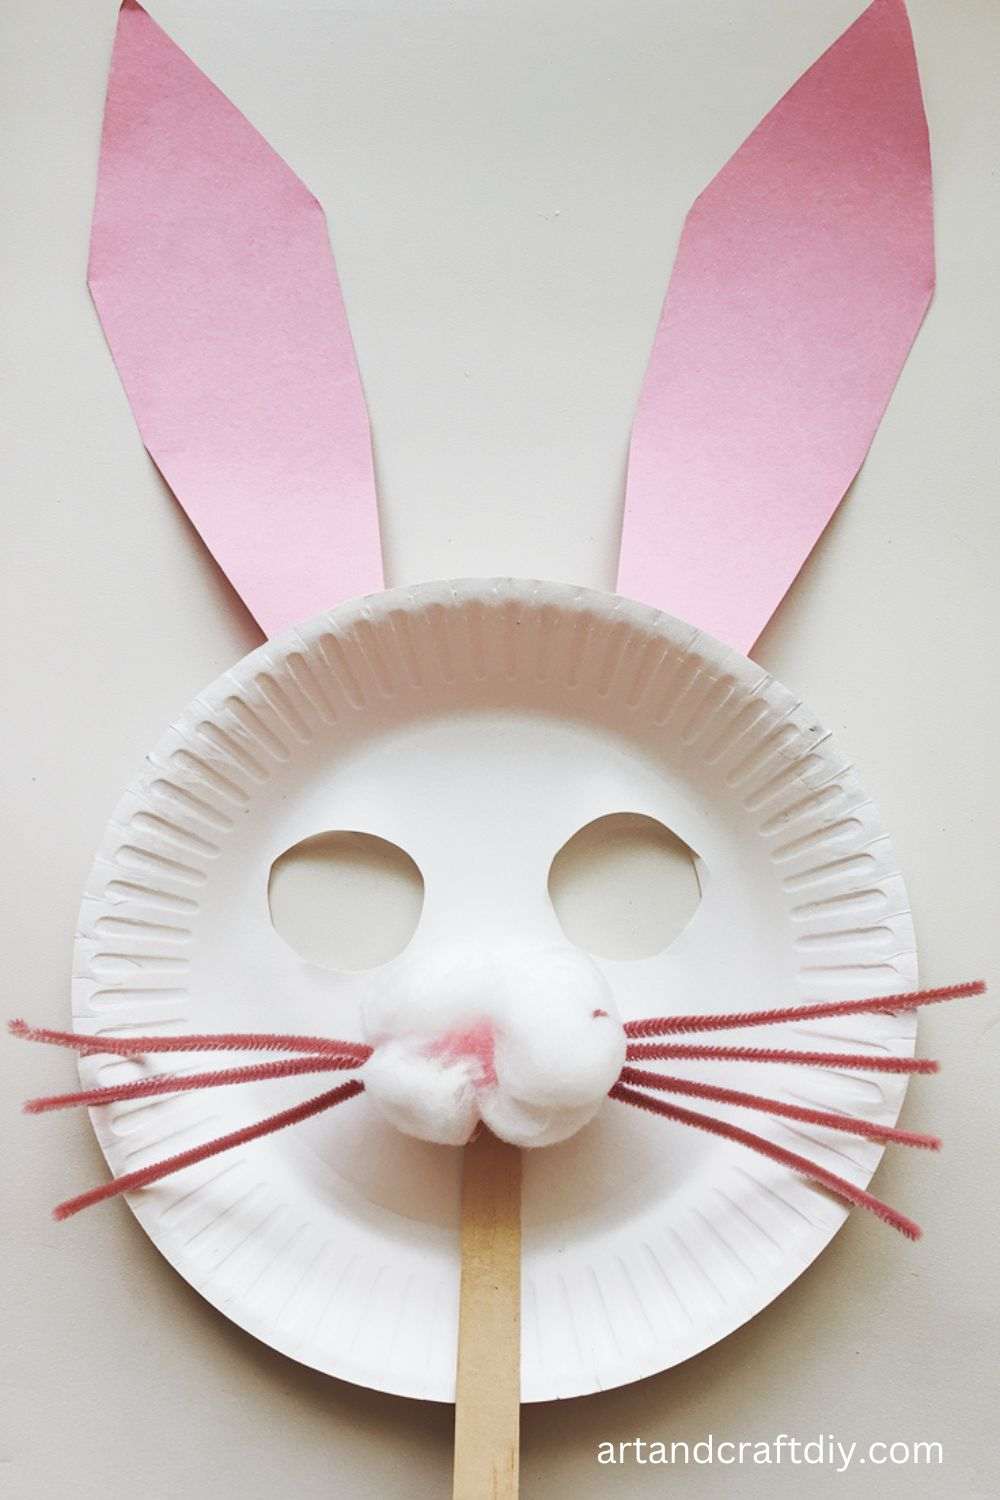
Easter Bunny Paper Plate Mask
Explore more: DIY Nightmare Before Christmas Themed Halloween Paper Craft
Honestly, I think Easter Bunny masks are one of the cutest little crafts you can do, especially if you’ve got kids running around eager to get messy. I usually grab a simple paper plate and some pink construction paper, glue, and pipe cleaners, and suddenly it’s like a mini costume party at my kitchen table. To be fair, my first try was a bit wonky—ears were lopsided and the bunny looked more like a confused raccoon—but that’s part of the fun. I’ve found that letting the kids color their own whiskers with markers adds a personal touch.
Cutting out the ears is the trickiest part if you’re a bit clumsy like me, so I usually pre-cut them and let the kids glue them on. Elastic string makes it wearable, and honestly, seeing their little faces pop out of these masks is priceless. In my opinion, these masks also double as hilarious photo props for Easter pics.
Pom-Pom Easter Chicks
<
p data-start=”936″ data-end=”1430″>I’ve always loved making pom-pom chicks because they’re fluffy, tiny, and just pure joy to squish while crafting. I start with yellow yarn, wrap it around my fingers way too many times, and then tie it tight. Honestly, at first, mine looked more like fuzzy lemons than chicks, but trimming them properly changes everything. Adding little googly eyes and an orange felt beak really brings them to life. To be fair, I never thought I’d enjoy making something so fiddly, but it’s oddly relaxing.
One funny thing is that my cat always tries to steal the pom-poms mid-way, so you may want to craft somewhere safe from pets. I usually make a dozen at a time and place them in tiny egg cups, and it instantly makes my table feel festive. In my opinion, these are perfect for Easter decorations or as little gifts for neighbors or friends, and they’re honestly just adorable no matter how messy they turn out.
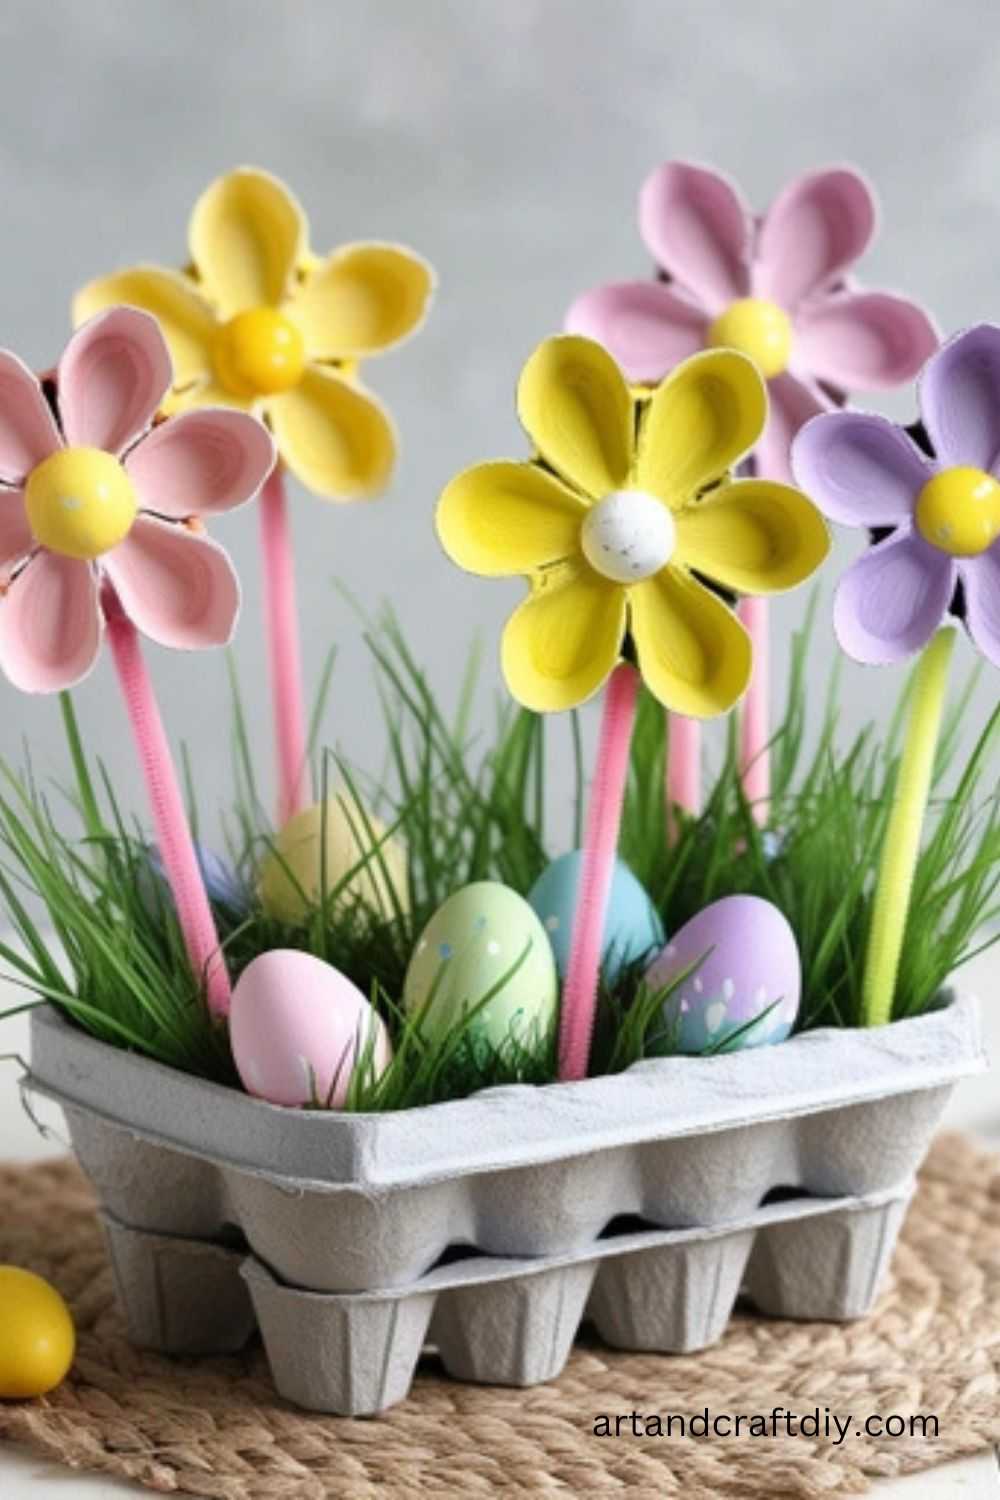
Egg Carton Flowers
Explore more: DIY Wooden Cross Designs For Crafts
Egg cartons have honestly become my secret weapon for crafts—they’re sturdy, eco-friendly, and surprisingly cute when turned into flowers. I cut each cup into a flower shape, paint them in pastel shades, and then poke a little hole for a pipe cleaner stem. My first attempt was kind of sad because the flowers flopped over, but a few layers of paint and a bit of careful gluing solved it. I’ve found that mixing colors makes them pop way more than sticking to a single shade.
Sometimes I like to add glitter or tiny beads in the middle—it feels a little extra, but in my opinion, that’s what makes them fun. Arranging them in a mason jar or even gluing them onto a cardboard wreath turns them into instant décor. Honestly, seeing these recycled pieces become something cheerful for Easter gives me a weird sense of pride, and I always end up making more than I thought I would.
Handprint Easter Cards
Personalize Easter greetings with handprint designs.
Materials Used:
- Colored cardstock
- Paint
- Paintbrush
- Marker
- Glue
- Optional: Glitter
Steps:
- Fold the cardstock into a card shape.
- Apply paint to your child’s hand and press it onto the front of the card.
- Let the paint dry, and then add bunny ears, whiskers, or chick details with a marker.
- Add glitter or other decorations as desired.
- Write a sweet Easter message inside.
Bunny Jar Lanterns
Add charm to your Easter décor with glowing bunny jars.
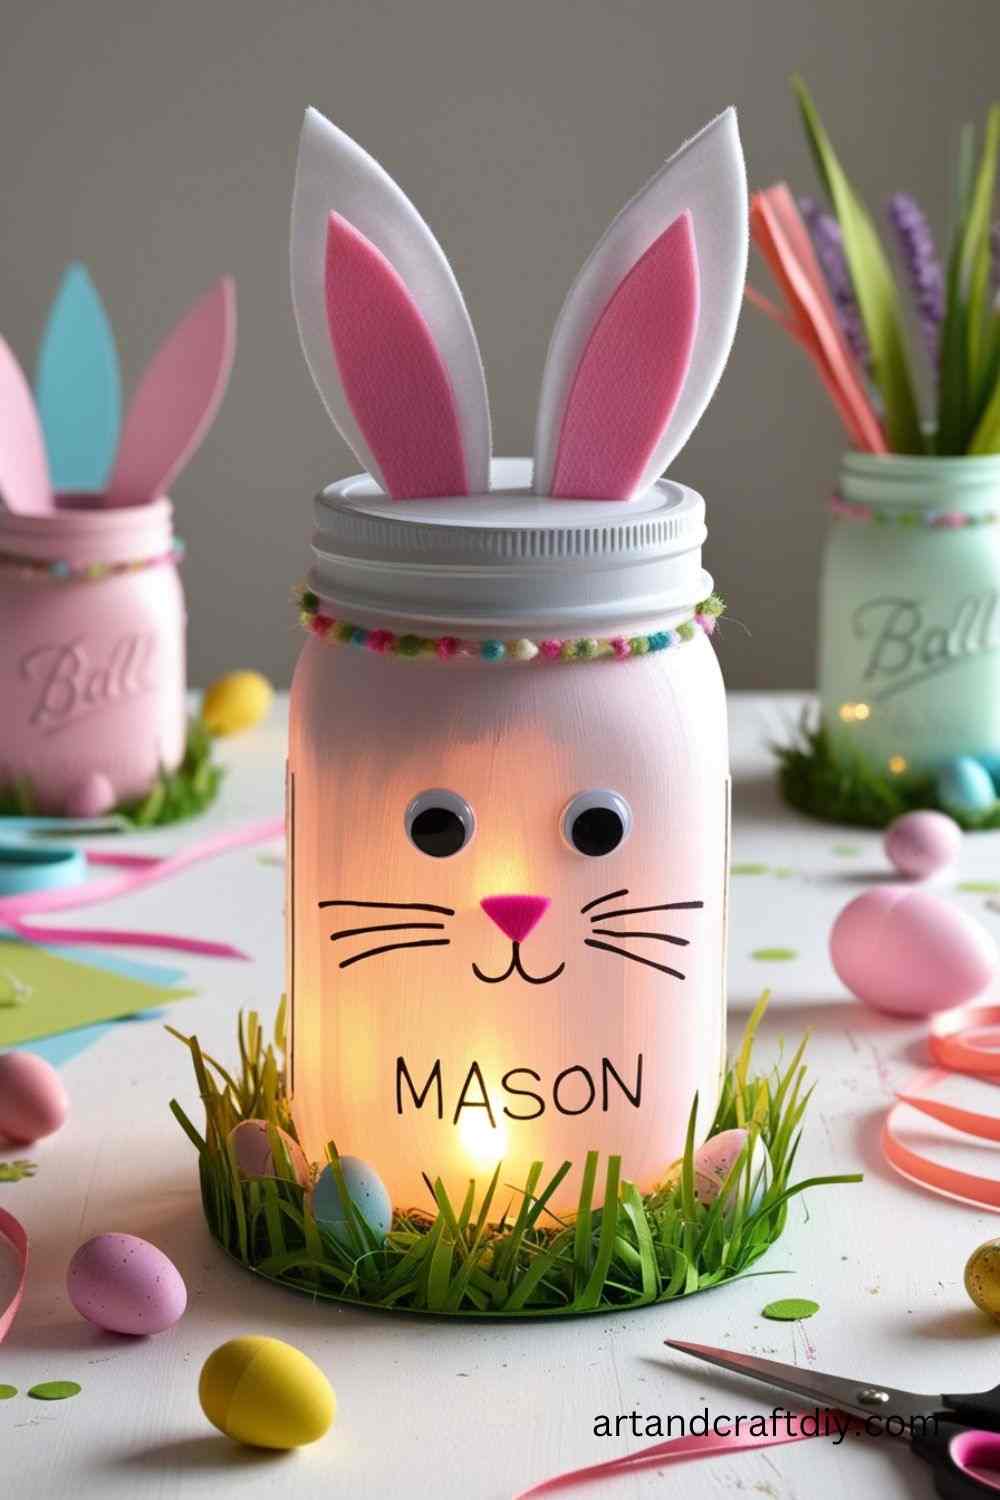
Materials Used:
- Mason jars
- White acrylic paint
- Pink paint
- Battery-operated tea lights
- Black marker
- Ribbon
- Paintbrushes
Steps:
- Paint the entire mason jar white and let it dry.
- Add bunny ears, nose, and cheeks using pink paint.
- Use a black marker to draw eyes and a mouth.
- Tie a ribbon around the neck of the jar.
- Place a tea light inside the jar to light up your design.
Carrot Utensil Holders
Craft festive holders to set the perfect Easter table.
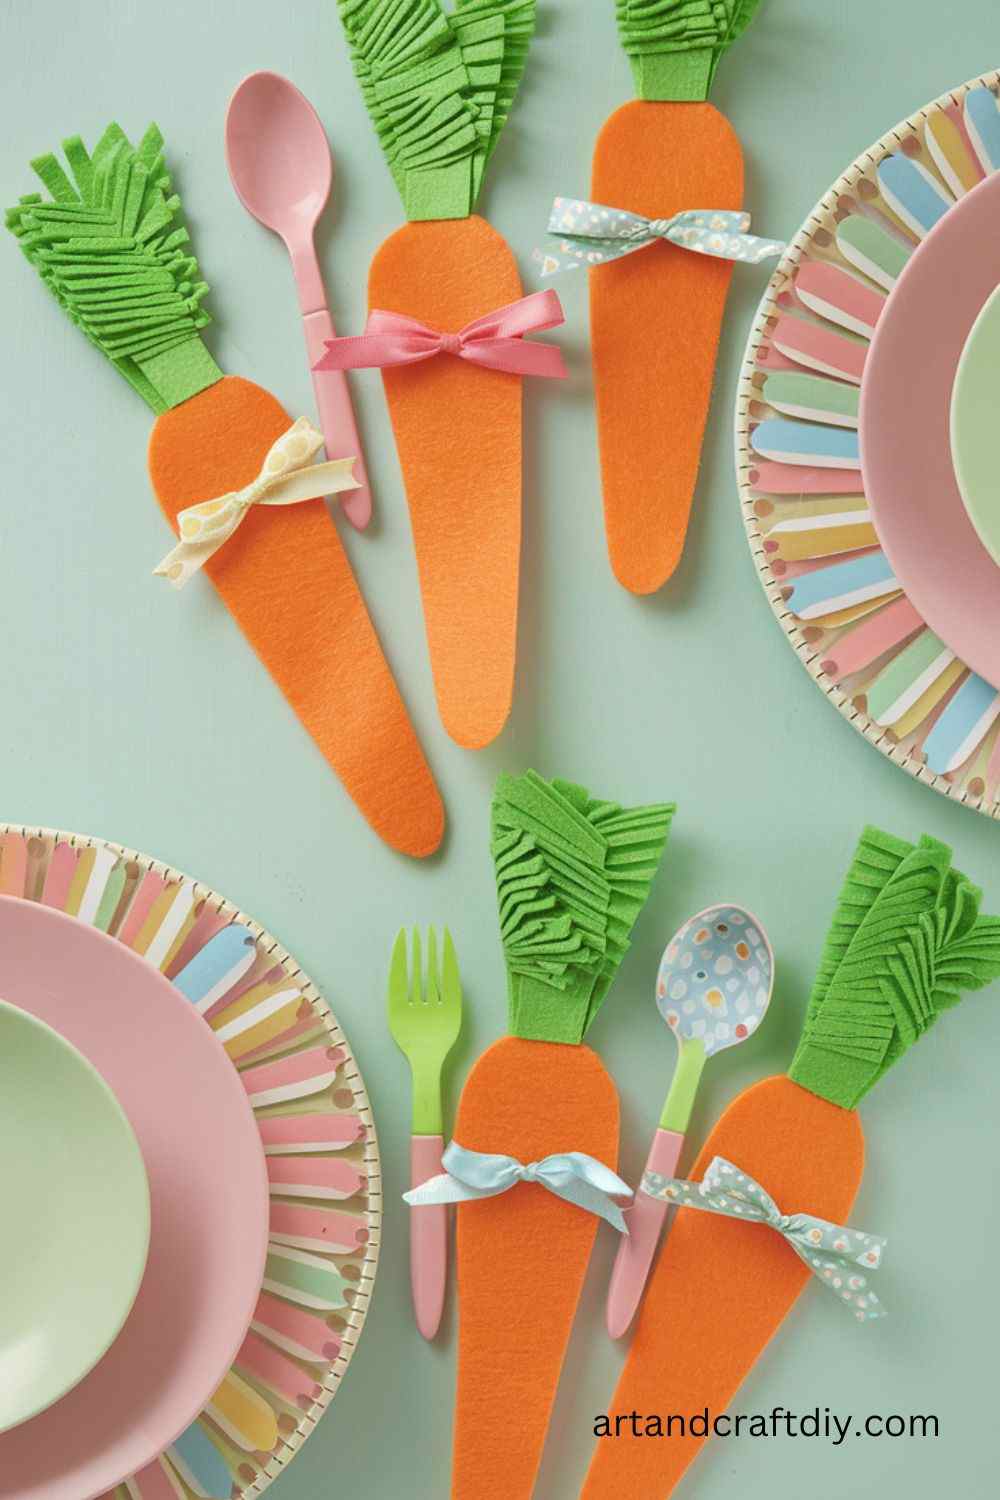
Materials Used:
- Orange felt
- Green felt
- Scissors
- Hot glue
- Utensils
Steps:
- Cut a triangle from the orange felt for the carrot body.
- Roll the triangle into a cone shape and secure with hot glue.
- Cut green felt into strips to create carrot tops.
- Glue the green strips to the inside of the cone’s top edge.
- Insert utensils into the holder for a charming table setting.
Tissue Paper Easter Eggs
Design colorful eggs using tissue paper and glue.
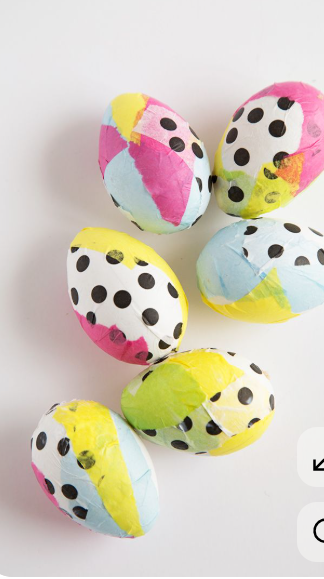
Materials Used:
- Plastic eggs or paper mache eggs
- Tissue paper (various colors)
- Mod Podge or glue
- Paintbrush
Steps:
- Cut tissue paper into small squares or shapes.
- Apply a layer of Mod Podge to the egg surface.
- Stick the tissue paper pieces onto the glue.
- Seal the design with another layer of Mod Podge and let it dry.
- Display your vibrant creations in an Easter basket.
Bunny Ear Napkin Rings
Give your Easter table a playful touch with bunny ear napkin rings.
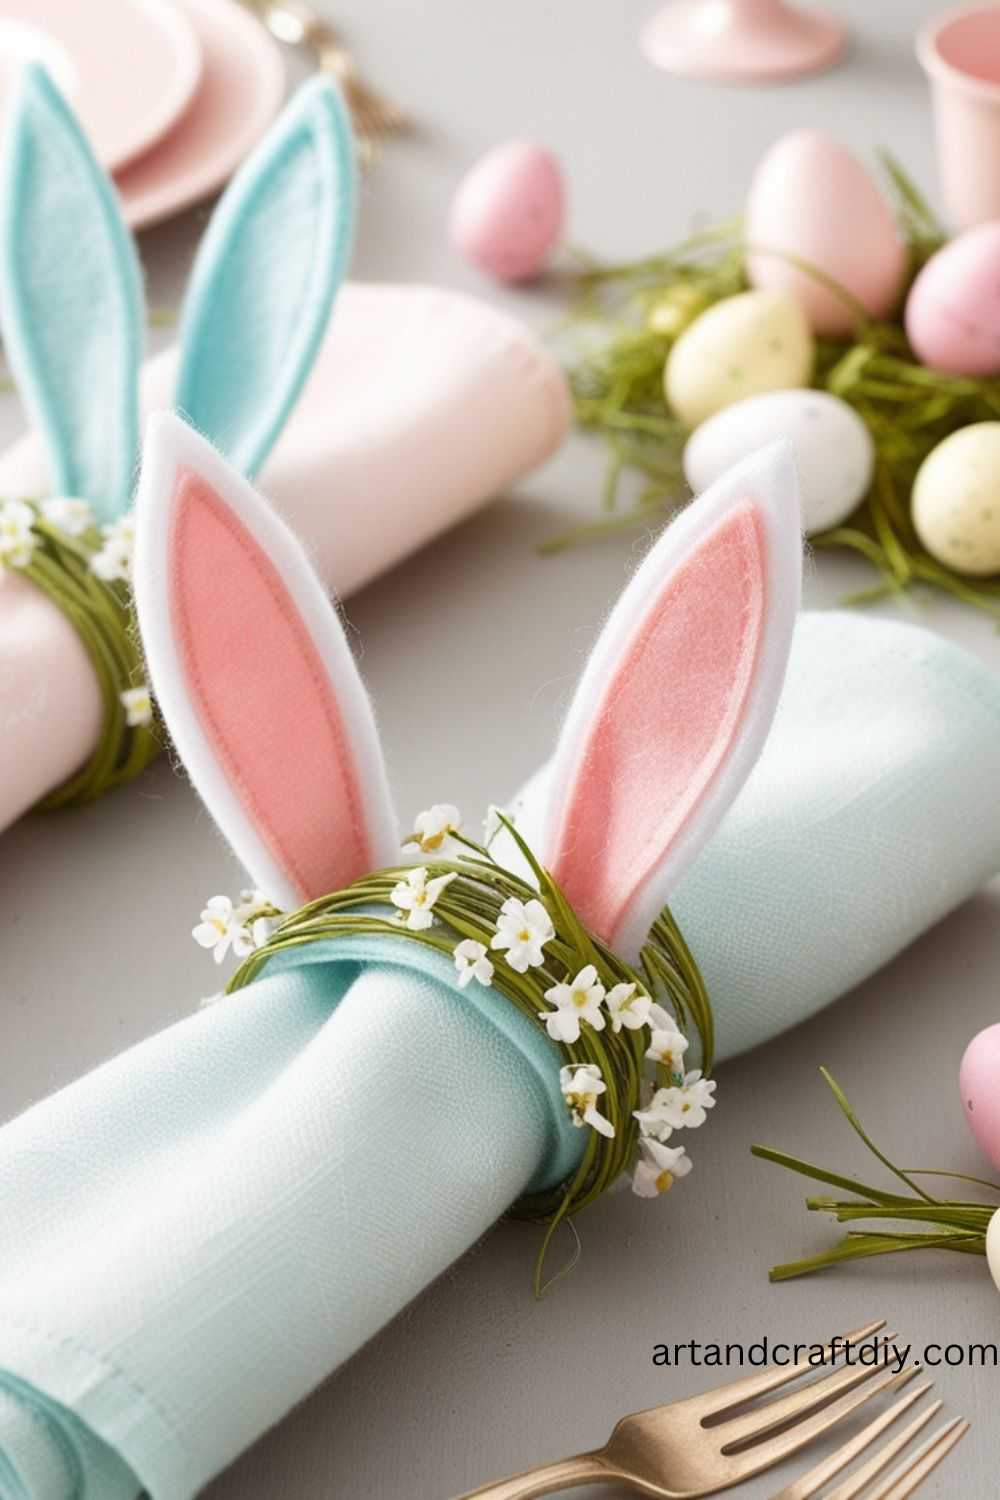
Materials Used:
- Brown kraft paper
- Scissors
- Pencil
- Ribbon or twine
Steps:
- Draw a bunny ear template on kraft paper and cut it out.
- Roll the kraft paper into a tube and secure the ends with glue.
- Tie a ribbon or twine around the paper tube.
- Slip a folded napkin through the ring for a festive table accent.
Peeps Garland
Turn marshmallow Peeps into a fun Easter garland.
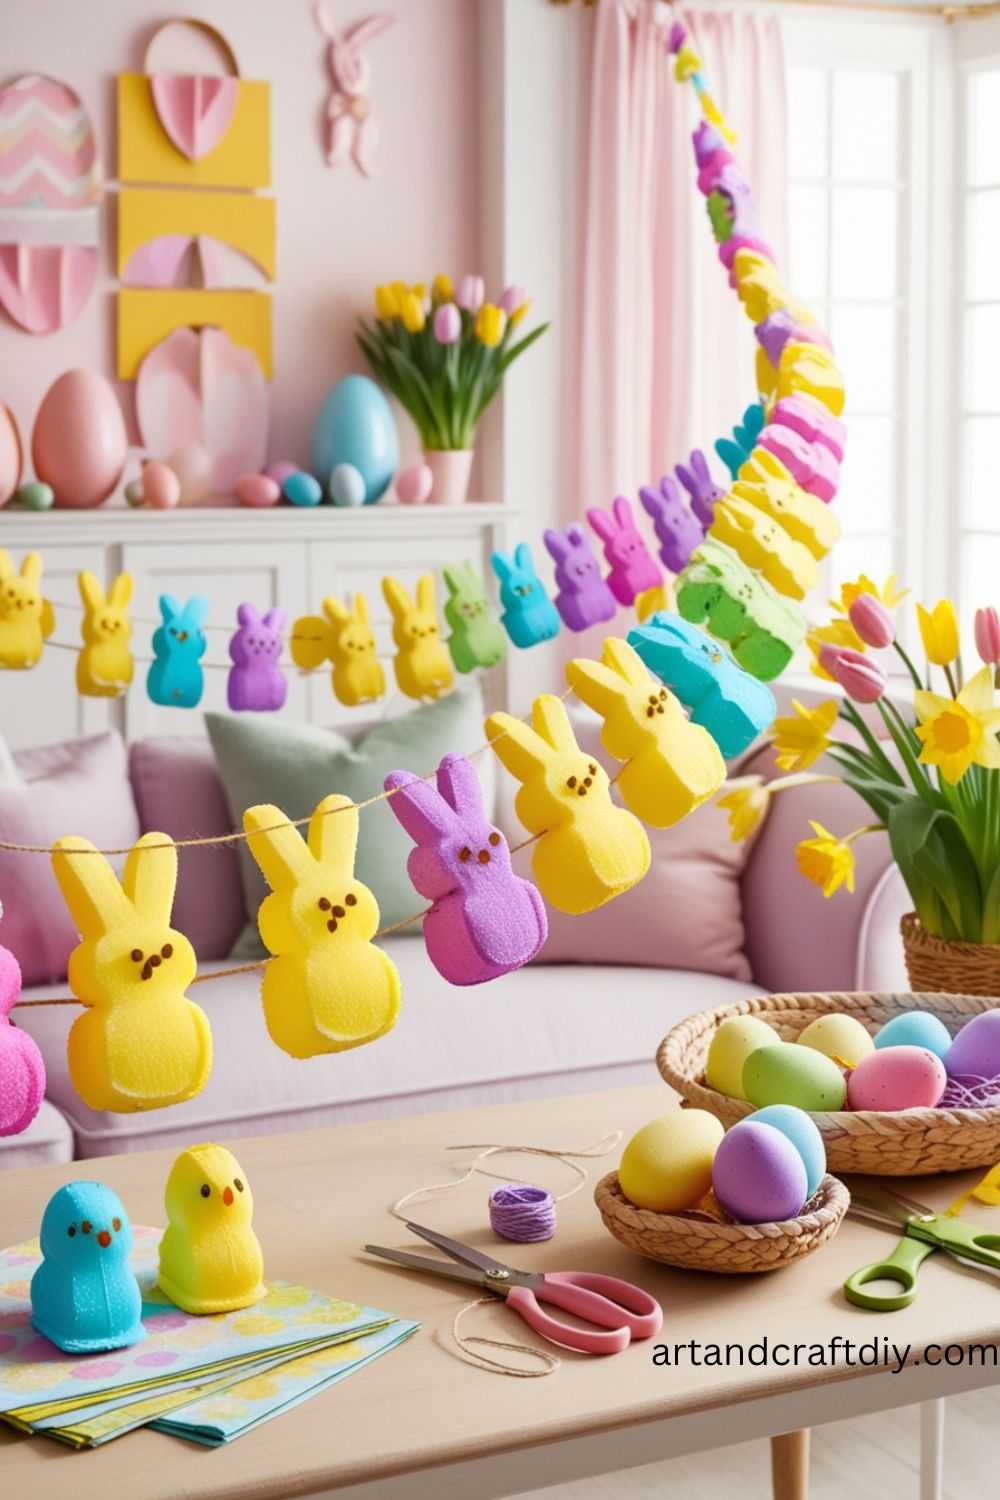
Materials Used:
- Marshmallow Peeps
- String
- Needle
- Plastic wrap
Steps:
- Wrap each Peep in plastic wrap to preserve it.
- Thread a needle with string and gently poke it through the wrapped Peeps.
- Space them evenly along the string and knot at both ends.
- Hang the garland across a wall, mantle, or doorway.
Bunny Cupcakes
Decorate Easter desserts with bunny faces.
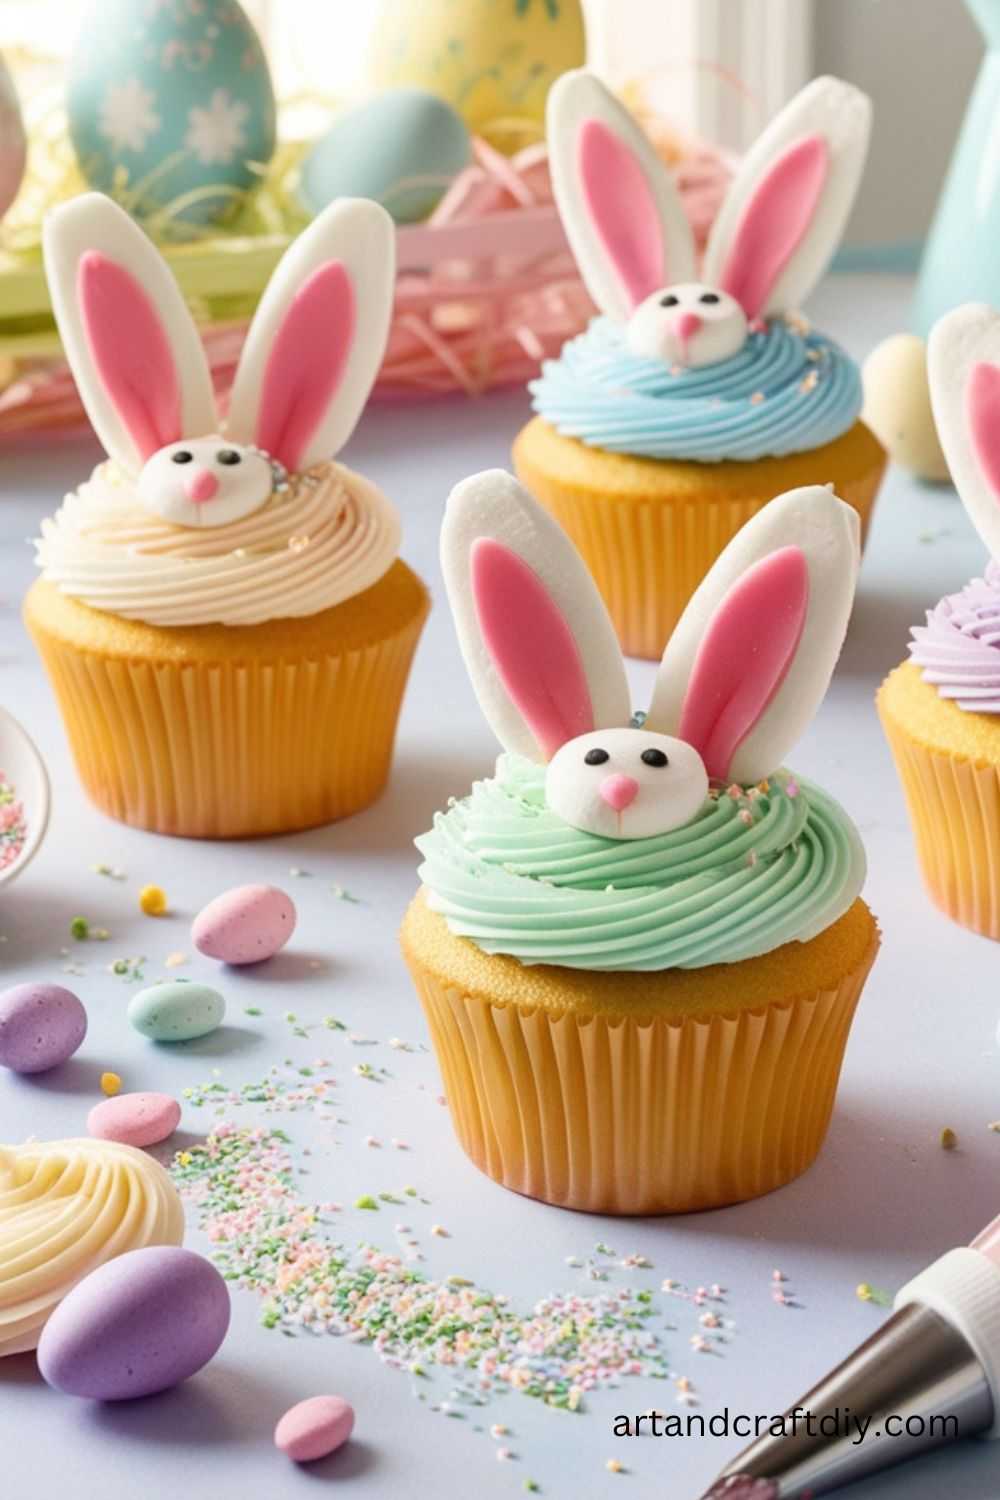
Materials Used:
- Cupcakes
- White frosting
- Pink frosting
- Marshmallows
- Chocolate chips
Steps:
- Frost the cupcakes with white frosting.
- Slice marshmallows diagonally to make bunny ears.
- Coat the sticky side of the marshmallows in pink frosting and place on top of the cupcakes.
- Add chocolate chips for eyes and a small dollop of pink frosting for the nose.
- Serve your adorable bunny-themed treats
Sock Bunnies
Turn old socks into adorable bunny decorations for Easter.
Materials Used:
- Clean socks (preferably pastel-colored)
- Rice or cotton stuffing
- Ribbon
- Rubber bands
- Scissors
- Googly eyes
- Black and pink markers or fabric paint
Steps:
- Fill the sock with rice or stuffing to about ¾ full. Tie a rubber band at the top to seal.
- Shape the top portion into a smaller ball (the head) and secure it with another rubber band.
- Cut the excess sock above the top rubber band into two ear shapes.
- Use markers or fabric paint to add facial features, or glue on googly eyes.
- Tie a ribbon around the neck for a cute touch.
- Display these soft and cuddly bunnies around your home.
Bunny Butt Flower Pots
Create a fun and whimsical centerpiece featuring bunny butts!
Materials Used:
- Small terra cotta pots
- White pom-poms
- Pink pom-poms
- White felt
- Hot glue gun
- Acrylic paint (optional)
- Artificial flowers or plants
Steps:
- Paint the terra cotta pots in pastel colors if desired and let them dry.
- Glue a large white pom-pom inside the pot opening to resemble the bunny’s body.
- Attach a smaller pink pom-pom on the white one for the bunny tail.
- Cut paw shapes from the white felt and glue them below the pom-pom.
- Fill the pot with artificial flowers or plants for a complete look.
Easter Egg Bath Bombs
Combine creativity with relaxation by making bath bombs shaped like Easter eggs.
Materials Used:
- Baking soda
- Citric acid
- Cornstarch
- Epsom salts
- Essential oils
- Food coloring
- Plastic Easter egg molds
- Mixing bowls
- Water spray bottle
Steps:
- Mix equal parts baking soda and citric acid in a bowl.
- Add half the amount of cornstarch and Epsom salts to the mixture.
- Slowly mix in a few drops of essential oil and food coloring.
- Spritz the mixture with water until it clumps when squeezed.
- Press the mixture firmly into the egg molds and let them dry overnight.
- Carefully remove the hardened bath bombs and package them in Easter baskets.
Paper Roll Bunnies
Upcycle empty toilet paper rolls into delightful bunny crafts.
Materials Used:
- Empty toilet paper rolls
- Acrylic paint
- Paintbrushes
- White and pink construction paper
- Googly eyes
- Glue
- Scissors
- Black marker
Steps:
- Paint the paper rolls in pastel colors and let them dry.
- Cut bunny ears from white construction paper and smaller inner ear shapes from pink paper.
- Glue the ears to the top of the roll.
- Attach googly eyes and draw a nose, mouth, and whiskers with a black marker.
- Display these cute bunnies on shelves or tables.
Rainbow Easter Egg Wreath
Welcome spring with a vibrant Easter egg wreath for your front door.
Materials Used:
- Foam wreath base
- Plastic eggs in various colors
- Hot glue gun
- Ribbon
- Artificial flowers (optional)
Steps:
- Wrap the foam base with ribbon, securing the ends with glue.
- Arrange the plastic eggs around the wreath, alternating colors.
- Hot glue the eggs to the foam base, layering as needed.
- Add artificial flowers or greenery for extra flair.
- Attach a loop of ribbon to hang the wreath on your door.
Mini Egg Topiaries
Create elegant decorations using mini Easter eggs.
Materials Used:
- Small foam cones
- Mini plastic or chocolate eggs
- Hot glue gun
- Moss (optional)
Steps:
- Starting at the bottom, glue mini eggs around the foam cone in rows.
- Continue gluing eggs upward until the cone is covered.
- Add moss between gaps for a natural look if desired.
- Display the topiaries as table centerpieces or mantel decorations.
Bunny Footprint Path
Add whimsy to your Easter morning with a trail of bunny footprints.
Materials Used:
- White paper
- Scissors
- Tape or adhesive
Steps:
- Draw or print bunny paw shapes onto white paper and cut them out.
- Use tape to secure the paw prints to the floor, creating a trail from the front door to an Easter basket or egg hunt area.
- Enhance the effect with small tufts of cotton “bunny fur” along the path.
Jelly Bean Trees
Decorate your home with colorful jelly bean trees.
Materials Used:
- Foam cone
- Jelly beans
- Hot glue gun
- Small flowerpot (optional)
Steps:
- Glue jelly beans around the foam cone, covering it completely.
- Place the cone into a small flowerpot for stability if desired.
- Add a ribbon or small bow at the top for decoration.
- Display as a centerpiece or festive accent.
Felt Bunny Garland
Create a charming garland using felt bunny shapes.
Materials Used:
- Felt in pastel colors
- Scissors
- Ribbon or string
- Glue or a sewing kit
Steps:
- Cut out bunny shapes from the felt using a stencil or freehand.
- Attach the bunnies to a length of ribbon or string with glue or by sewing.
- Add bows, pom-pom tails, or other embellishments to each bunny.
- Hang the garland along a wall, mantle, or window.
Easter Egg Candles
Craft glowing candles shaped like Easter eggs.
Materials Used:
- Real eggshells
- Candle wax
- Wicks
- Crayons for coloring
- Double boiler
Steps:
- Carefully crack the top of an eggshell and empty the contents.
- Clean and dry the eggshells.
- Melt candle wax and a crayon for color in a double boiler.
- Place a wick inside each eggshell and pour in the melted wax.
- Let the wax cool and trim the wick before lighting.
Painted Rock Easter Eggs
Transform ordinary rocks into vibrant Easter egg decorations.
Materials Used:
- Smooth, flat rocks
- Acrylic paints
- Paintbrushes
- Clear sealant spray
Steps:
- Wash and dry the rocks to remove any dirt or debris.
- Paint the rocks in solid pastel colors as the base and let them dry.
- Use small brushes to add patterns like stripes, dots, and zigzags.
- Once the paint is dry, spray a clear sealant to protect your designs.
- Arrange the painted rocks in baskets or scatter them in the garden.
Easter Bunny Clay Magnets
Craft playful bunny magnets with air-dry clay.
Materials Used:
- Air-dry clay
- Acrylic paints
- Paintbrushes
- Small magnets
- Hot glue
- Sculpting tools (optional)
Steps:
- Shape the air-dry clay into bunny faces or full bunny figures.
- Let the clay dry completely according to the package instructions.
- Paint the bunnies with pastel colors, adding details like eyes and whiskers.
- Glue small magnets to the back of each figure.
- Display the magnets on your fridge or gift them to friends.
Bunny Tail Cupcake Toppers
Make your cupcakes festive with bunny tail toppers.
Materials Used:
- White mini marshmallows
- Shredded coconut
- Toothpicks
- Frosted cupcakes
Steps:
- Dip mini marshmallows in frosting and then roll them in shredded coconut to create bunny tails.
- Insert a toothpick into each tail and secure it in the center of a frosted cupcake.
- Add two small frosting dollops to resemble bunny feet, if desired.
Ribbon Easter Egg Ornaments
Craft elegant hanging eggs with ribbons.
Materials Used:
- Plastic eggs
- Ribbon in various colors
- Glue gun
- Scissors
- Thread or string
Steps:
- Cut ribbons into strips and glue them around the plastic eggs in overlapping layers.
- Create a loop with string or ribbon at the top of each egg for hanging.
- Add small bows or embellishments as finishing touches.
- Hang the ornaments on branches, windows, or an Easter tree.
Easter Bunny Paper Fans
Turn paper fans into bunny-themed decorations.
Materials Used:
- White paper fans (store-bought or DIY)
- Pink and white construction paper
- Glue
- Scissors
- Black marker
Steps:
- Open the paper fan and glue pink construction paper ears to the top.
- Cut out and attach a pink nose and white whiskers.
- Use a black marker to draw eyes and a mouth.
- Hang the fans from the ceiling for a fun, festive display.
Carrot Gift Bags
Create carrot-shaped treat bags for Easter goodies.
Materials Used:
- Orange cellophane bags
- Green ribbon
- Candy or small toys
Steps:
- Fill orange cellophane bags with candy or toys.
- Twist the top of the bag and tie it with green ribbon to resemble a carrot stem.
- Arrange the carrot bags in a basket for a festive Easter gift.
Bunny Pom-Pom Garland
Make a soft and fluffy garland with bunny-shaped pom-poms.
Materials Used:
- Yarn (white or pastel)
- Pom-pom maker or fork
- Scissors
- Ribbon or string
- Felt for ears
Steps:
- Use a pom-pom maker or a fork to create large and small pom-poms.
- Attach a small pom-pom (head) to a larger one (body) with yarn.
- Cut felt ears and glue them to the top of each bunny.
- String the bunnies along a ribbon or string to create a garland.
- Hang the garland as a cheerful Easter decoration.
Bunny Basket Covers
Dress up plain baskets with bunny-themed covers.
Materials Used:
- Fabric (felt or cotton)
- Scissors
- Sewing kit or glue gun
- Pom-poms
Steps:
- Cut the fabric to fit the size of your basket, leaving extra for ears.
- Sew or glue the fabric to cover the basket.
- Attach fabric ears and a pom-pom tail to complete the look.
- Use the basket for collecting eggs or displaying Easter treats.
Chocolate Spoon Gifts
Make edible chocolate spoons as Easter party favors.
Materials Used:
- Plastic or wooden spoons
- Melted chocolate
- Sprinkles
- Wax paper
Steps:
- Dip the spoon heads into melted chocolate, covering them generously.
- Sprinkle with colorful decorations while the chocolate is wet.
- Place the spoons on wax paper to cool and harden.
- Wrap each spoon in plastic and tie it with a ribbon for gifting.
Easter Bunny Door Hanger
Create a welcoming bunny door decoration.
Materials Used:
- Foam board or cardboard
- Paint
- Scissors
- Ribbon
- Pom-pom
Steps:
- Draw and cut out a large bunny shape from foam board or cardboard.
- Paint the bunny white and add facial details.
- Glue a pom-pom to the back for a tail.
- Attach a ribbon loop at the top for hanging.
DIY Egg Shell Planters
Use egg shells as mini planters for herbs or small flowers.
Materials Used:
- Eggshell halves
- Potting soil
- Small seeds or seedlings
- Egg carton
Steps:
- Clean and dry the eggshell halves.
- Fill each shell with potting soil.
- Plant seeds or place small seedlings in the soil.
- Place the egg planters in an egg carton for stability.
- Water lightly and watch your plants grow.
Easter Bunny Headbands
Make fun headbands for kids and adults.
Materials Used:
- Plastic or metal headbands
- White and pink felt
- Scissors
- Hot glue
Steps:
- Cut bunny ears from white felt and smaller inner ear shapes from pink felt.
- Glue the pink shapes onto the white ones.
- Attach the ears to the headband with hot glue.
- Let the glue dry and wear your bunny headband with pride.
Why Choose Craft Kits and Templates?
- Simplicity: Pre-packaged kits and templates make it easy for beginners to dive right into crafting without needing to worry about gathering materials or following complex instructions.
- Time-saving: With everything prepared for you, you can focus on the creative process and enjoy the experience.
- Fun for All Ages: Whether you’re working with young children or crafting solo, these kits and templates offer something for everyone, making Easter crafts accessible to all skill levels.
- Customizable: Templates and kits allow for personalization, so you can add your own touches and create truly unique items to celebrate the holiday.
With these ready-to-use Easter craft kits and downloadable templates, you can embrace the spirit of the season and create memorable decorations, cards, and gifts without the stress. Let your creativity shine and have fun!
FAQ
What materials do I need for Easter egg decorating?
To decorate Easter eggs, you’ll need hard-boiled eggs, food coloring or dye, paint, brushes, stickers, markers, and glitter. You can also use natural dyes made from vegetables like onions and beets for a more eco-friendly option.
Can I make my own Easter baskets?
Yes! You can create your own Easter baskets using materials like wicker, fabric, or even paper. Decorate the basket with ribbons, flowers, or paint to give it a personal touch. You can also use baskets from previous years and update them with new colors or embellishments.
How do I make Easter bunny ears for a costume or decoration?
To make Easter bunny ears, you’ll need some cardstock or felt, glue, scissors, and a headband. Cut out large bunny ear shapes, and decorate them with pink inner ears using construction paper or felt. Glue them to a headband and add any extra embellishments like flowers or pom-poms.
Are there any eco-friendly DIY Easter crafts I can try?
Yes, you can use materials like recycled paper, fabric scraps, and natural dyes for eco-friendly Easter crafts. Consider creating decorations from repurposed materials, such as cardboard for egg shapes or fabric scraps for bunny plushies, to keep your crafts sustainable.

Hi, I’m Victoria, an art and craft teacher at Newark City Schools, where I have the joy of working with middle school students to help them explore their creativity and develop their artistic talents. I believe that art is a powerful way for students to express themselves, and I strive to make every lesson a fun, engaging, and inspiring experience.
I created this website to share the art and craft projects, techniques, and resources that I use in my classroom, hoping to inspire both educators and young artists alike. Whether you’re a teacher looking for new ideas or a student eager to try something new, I’m excited to provide creative tools and projects that anyone can enjoy.
When I’m not in the classroom, I love experimenting with different art forms and learning new crafting techniques. My goal is to help others discover the joy of making things with their hands, and I hope my website serves as a space for everyone to explore their creative potential.