Last week, I was sipping on a pumpkin spice latte (yes, I fully embrace the cliché) when I realized my living room felt… kinda blah. You know that moment when the air turns crisp, the leaves start crunching under your feet, and suddenly you need your home to feel just as cozy as the season outside? That was me. I thought, “Okay, Victoria, time to bring in some cozy & fun fall craft ideas for adults before you lose this autumn magic.” Because let’s be honest—crafting isn’t just about hot glue and glitter anymore. It’s about slowing down, creating something with your own hands, and making your space feel warm and inviting. And if you’ve ever sat there wondering what to do on a chilly Sunday afternoon, I promise, these ideas will not only keep your hands busy but also your heart happy. Ready? Let’s dive in.
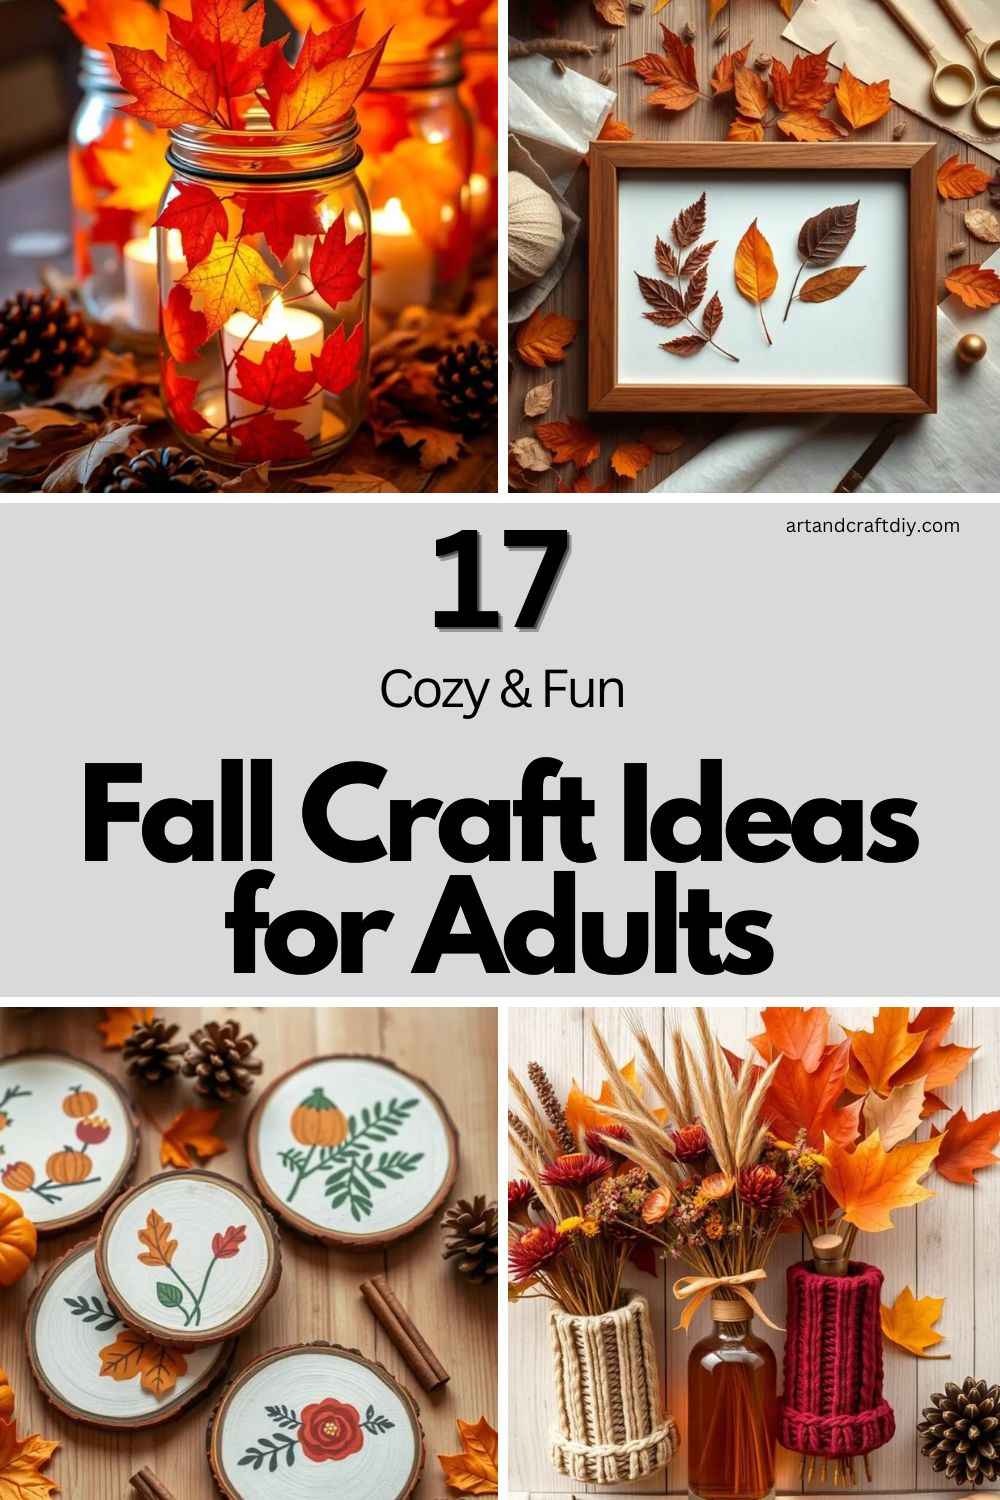
Fall Craft Ideas for Adults
Fall Craft Ideas for Adults are a fun and relaxing way to celebrate the cozy season with creativity. From home décor to handmade gifts, these crafts bring warmth and charm to autumn days.
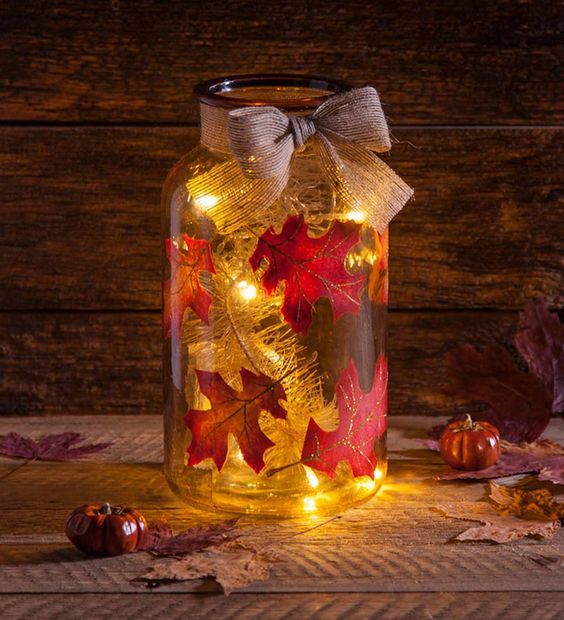
Autumn Leaf Mason Jars
There’s something magical about autumn leaves, right? I can’t walk past a pile of them without stopping to pick up at least one (my neighbors must think I’m nuts). Last year, I started pressing them in books and, one day, decided to stick a few onto mason jars with Mod Podge. Honestly, it turned out better than I expected—the light flickers through the leaves and makes the whole room glow like a mini campfire. It’s ridiculously cozy.
The best part? You don’t need much. Just grab a couple of old jars, real or faux leaves, and some glue. I like to pop in tea lights, but fairy lights work too if you want that twinkly vibe. To be fair, mine looked a little messy the first time, but I’ve learned not to stress—it’s handmade charm, not perfection, that makes it feel so warm.
Use real or artificial fall leaves for different textures.
Apply Mod Podge to glue the leaves onto the jar.
Use LED tea lights for safety and reusability.
Add twine or raffia around the top for a rustic finish.
Choose tinted jars or use glass paint for extra flair.
Pumpkin Yarn Garlands
Pumpkins are everywhere in fall, but carving them? Messy. Yarn pumpkins, though? Way less slimy and they last the whole season. I made a garland out of them one rainy afternoon, and now it’s one of my favorite things to hang on the mantel. Plus, wrapping yarn is oddly relaxing—it’s like a craft and stress therapy session rolled into one.
All you need is some yarn (orange is classic, but I’ve played around with cream and mustard too), balloons or little molds, and a bit of glue. You wrap, let it dry, then pop the balloon and—boom—you’ve got tiny pumpkins. Strung together, they look so cheerful. I’ve found guests always ask, “Where’d you get that?” and it feels good to say, “I made it!” Trust me, it’s one of those projects that makes you feel way craftier than you actually are.
Use orange and green yarn for classic fall colors.
Wrap yarn around your fingers to form pumpkin shapes.
Tie them in the center with green yarn to make stems.
String them together with twine or ribbon.
Mix in other shapes like leaves or acorns for variety.
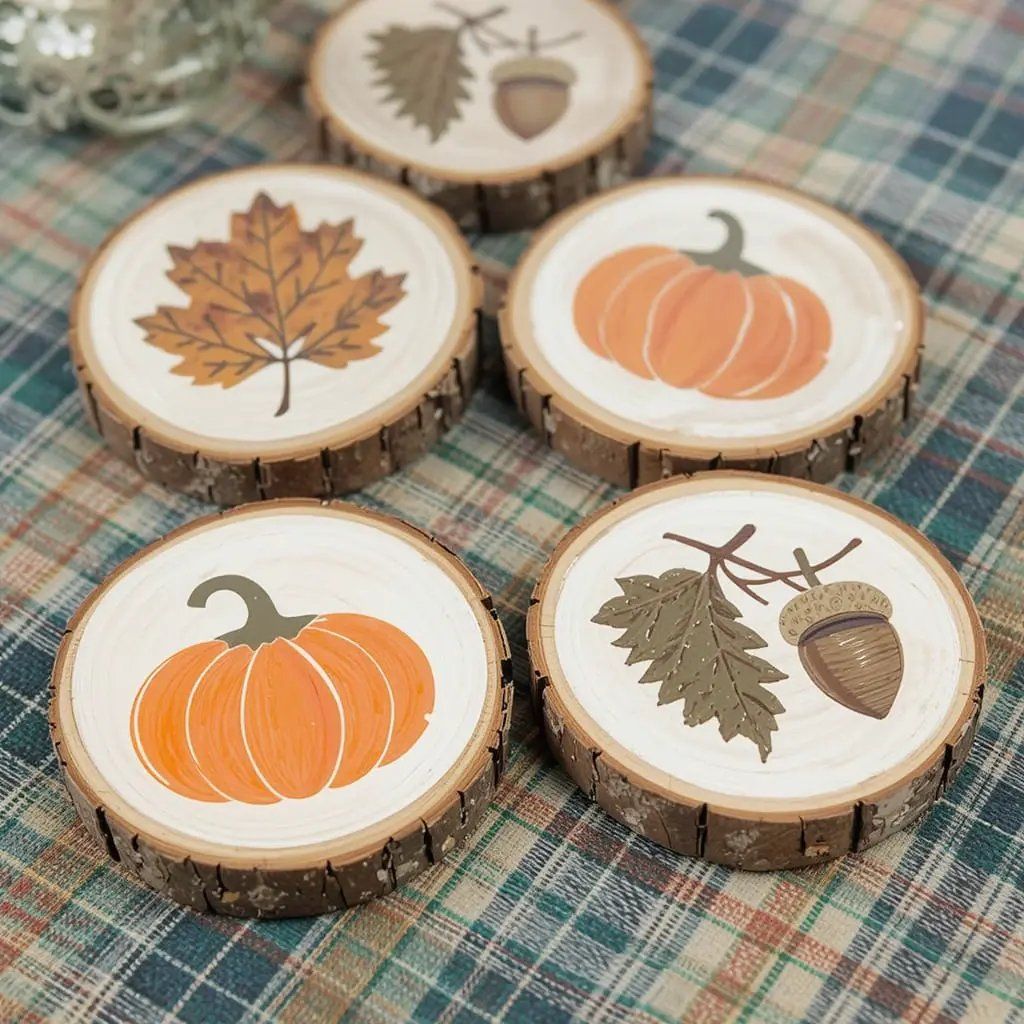
Rustic Wood Slice Coasters
Okay, so I don’t have a cabin in the woods, but these wood slice coasters make me feel like I do. My cousin brought me a bundle of little log slices last fall, and I thought, “Why not turn these into coasters?” A bit of sanding, sealing, and suddenly my living room looked like something out of a cozy lodge. And yes, they do hold up to hot cider mugs pretty well.
You can grab pre-cut slices at craft stores (because not all of us have chainsaws in the shed), then just seal them with Mod Podge or a clear varnish. If you’re extra artsy, you can even burn little designs into them—I tried doodling a leaf on one, and while it looked like a potato, it still made me smile. In my opinion, the imperfections just add to the rustic charm.
Use pre-cut wood slices or slice your own from tree branches.
Sand the surface before painting or decorating.
Use acrylic paint or wood-burning tools for designs.
Seal with a clear varnish to protect the surface.
Tie in sets with ribbon for a gift-ready finish.
Pressed Leaf Wall Art
Confession: I used to tape random leaves to my wall in college and call it “decor.” Not exactly Pinterest-worthy. But pressed leaf art? That’s the grown-up version, and it’s gorgeous. A few years back, I pressed some fiery red maple leaves, framed them with a plain black frame, and hung them in the hallway. Every fall, I pull them out again, and it feels like bringing a little piece of the season indoors.
The trick is patience—pressing leaves takes a couple of weeks in heavy books. Once they’re flat and dry, arrange them on white or kraft paper, then frame them. Honestly, it looks way fancier than it is. I’ve had friends ask where I bought mine, which makes me laugh. To be fair, it’s one of the simplest crafts, but the payoff is so high—it instantly warms up a space.
Collect freshly fallen leaves in various shapes and colors.
Press them in a heavy book for 7–10 days.
Arrange the leaves on neutral or textured backgrounds.
Use shadow boxes or glass frames for a polished look.
Add calligraphy or stencils for added detail.
Sweater Sleeve Vases
This one’s a little quirky, but hear me out. I had an old sweater I loved but couldn’t wear anymore (elbow holes, classic). Instead of tossing it, I snipped off the sleeves and slid them over glass vases. Voilà—instant cozy vibe. It’s like giving your vases a cute little sweater for the season. And yes, it looks as cozy as it sounds.
You just cut, slide, and tuck the edges so they don’t fray. Pop in some fall flowers—sunflowers, mums, even just branches—and suddenly you’ve got a centerpiece that feels super homey. In my opinion, it’s the easiest upcycle craft ever, and it beats spending money on seasonal decor that’ll just sit in a box half the year. Honestly, I love looking at mine every day because it feels like a little reminder that fall is meant to be soft, warm, and welcoming.
Cut sleeves from old or thrifted sweaters.
Slide over a glass jar or vase for a snug fit.
Use hot glue or rubber bands to secure the bottom.
Add lace, buttons, or twine for embellishment.
Pair with faux wheat, pampas grass, or fall foliage.
Cinnamon Stick Candles
There’s just something about cinnamon that screams fall to me. I remember the first time I wrapped cinnamon sticks around a plain white candle—I was half expecting it to fall apart, but honestly, it turned out way cuter than I thought. The whole kitchen smelled like I had been baking all day (even though I definitely hadn’t). The trick, in my opinion, is to use twine or rustic ribbon to tie them on. Hot glue is fine, but I always go for something that feels more natural.
I usually scatter a few of these candles on my dining table and coffee table, and to be fair, they make the whole place feel like a Pinterest board come to life. If you’re into cozy vibes without spending too much, this is it. Just grab cinnamon sticks from the grocery store, a couple of candles, and bam—you’ve got instant fall magic.
Use thick pillar candles in neutral tones.
Hot glue cinnamon sticks vertically around the candle.
Tie with ribbon, raffia, or burlap to secure.
Add a decorative charm or tag for extra style.
Display on a heat-safe dish with fall accents like mini pumpkins.
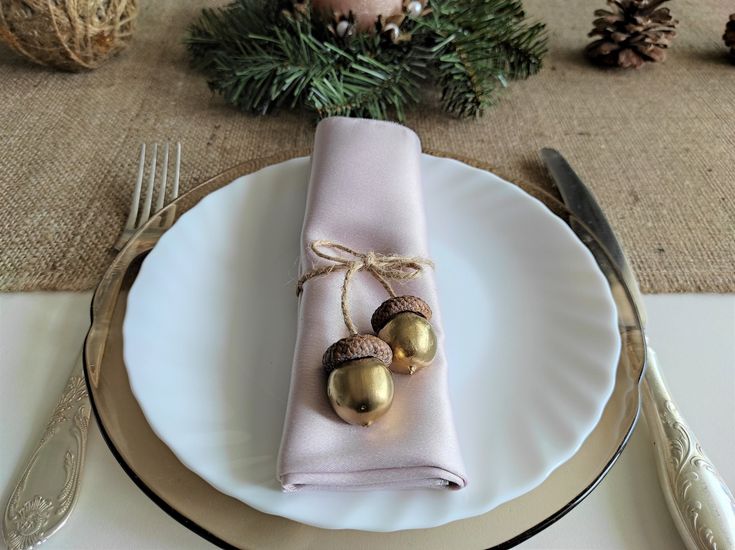
Acorn Napkin Rings
Okay, I’ll admit—I never thought I’d be the kind of person making napkin rings. But one Thanksgiving, I wanted something small but personal on the table, so I tried acorn napkin rings. And to be honest, they’re ridiculously simple but make your table look so pulled together. I usually hot glue a few acorns (sometimes I paint them gold if I’m feeling fancy) onto a strip of burlap or even wired twine, and it instantly looks like I tried way harder than I did.
What I’ve found is that these little details actually get people talking. Last fall, my sister wouldn’t stop fiddling with hers and asking if I bought them somewhere. Nope. Just me, a glue gun, and some acorns I picked up on a walk. If you’re looking for a small craft that gives you a big payoff, this is definitely one to try.
Gather or buy small acorns and clean them thoroughly.
Use hot glue to attach acorns to a strip of burlap or leather.
Wrap around rolled napkins and secure with velcro or glue.
Add faux leaves or small pinecones for extra detail.
Spray paint the acorns gold or copper for a chic touch.
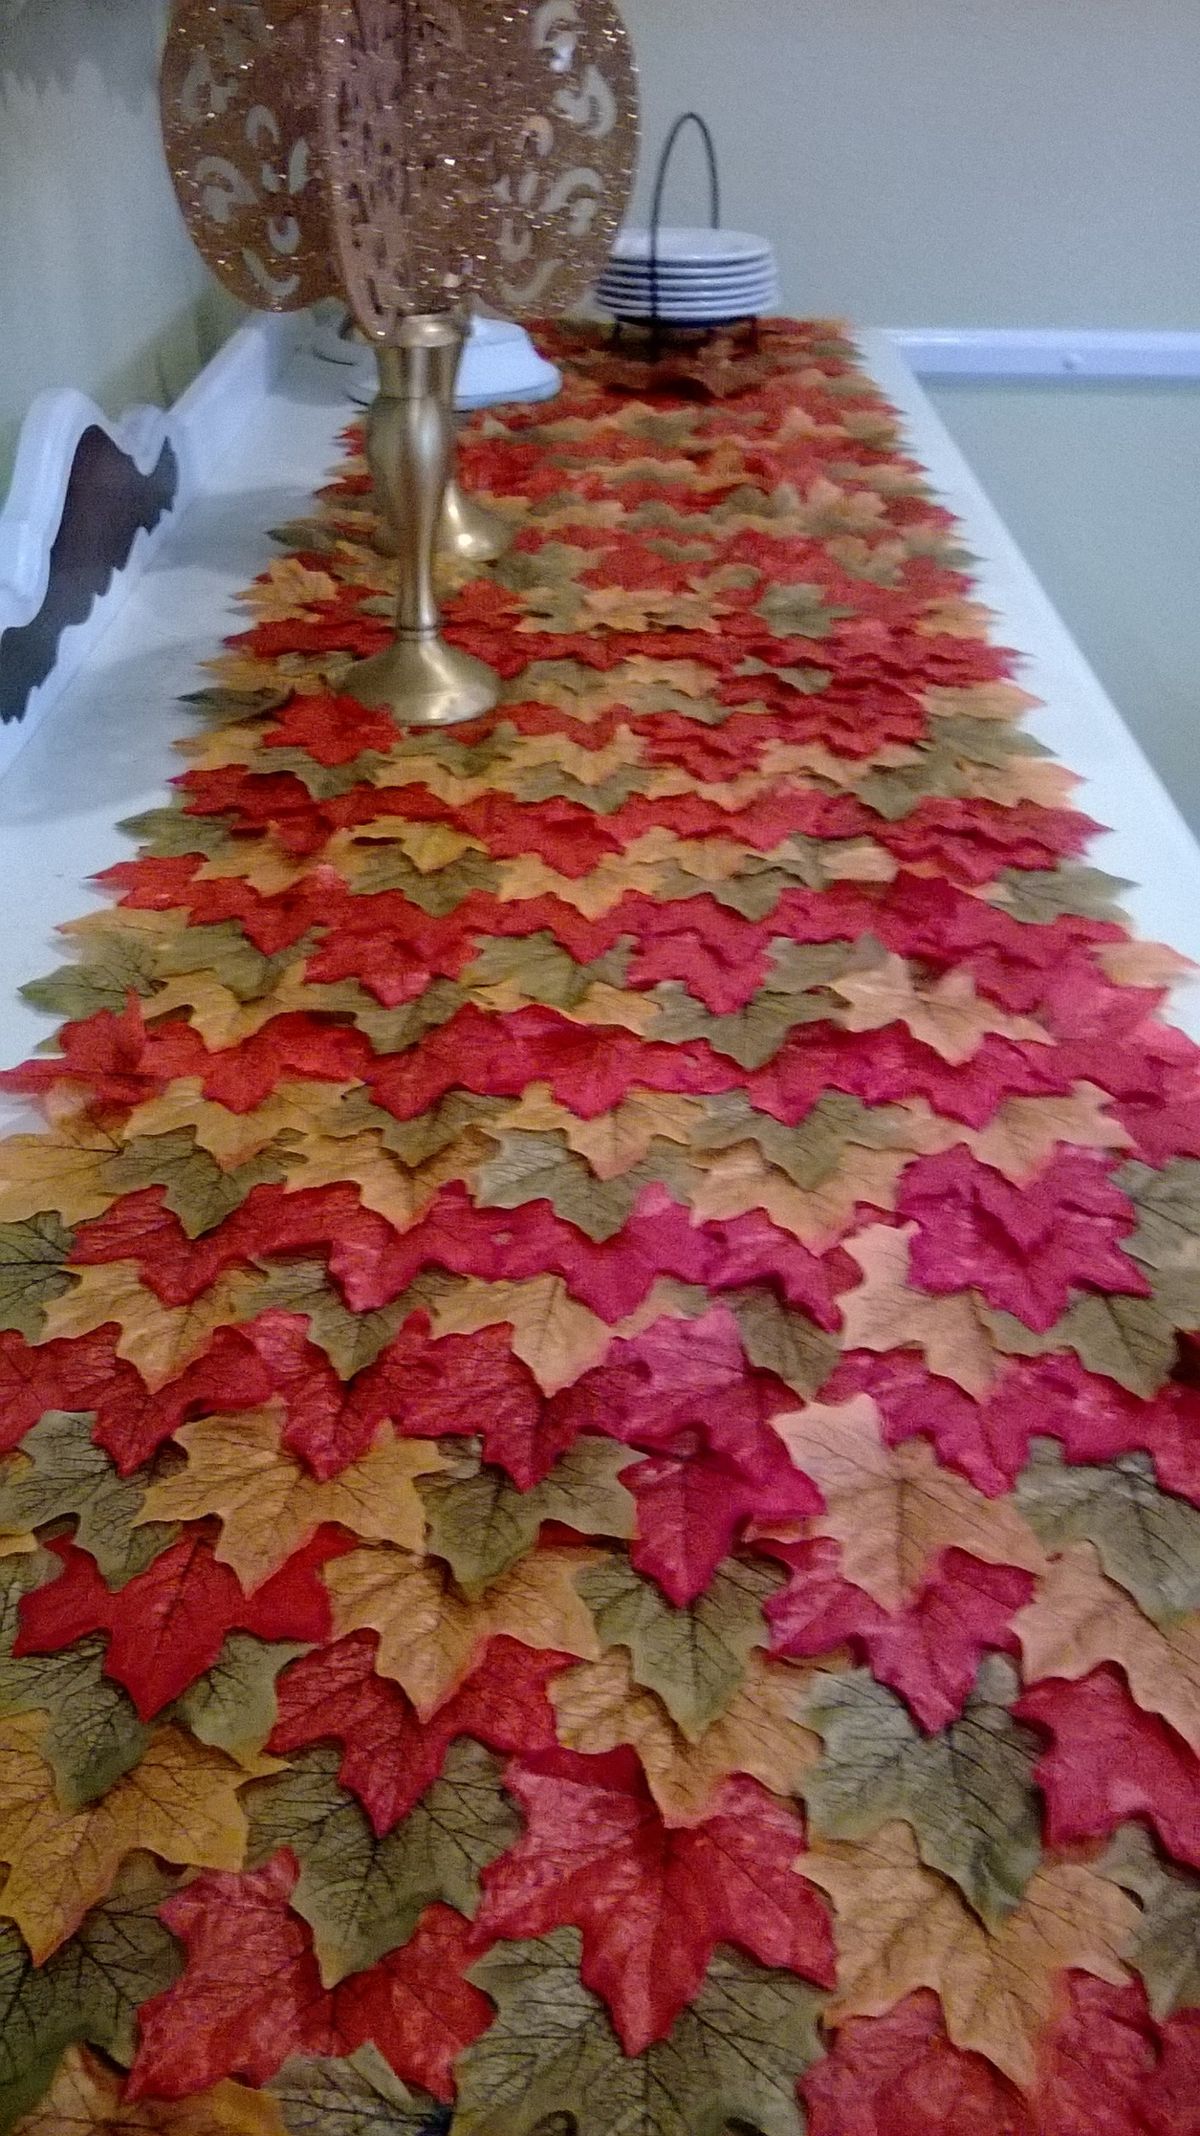
Felt Leaf Table Runner
This one might sound intimidating, but hear me out—it’s way easier than it looks. I once bought a stack of felt sheets in warm autumn colors (think mustard, burnt orange, deep red) and just started cutting leaf shapes while watching a movie. Honestly, it was kind of relaxing. The magic happens when you overlap them and stitch or glue them together into a long, wavy runner.
To be fair, mine wasn’t perfect—some leaves were crooked, and I may have glued my sleeve once—but that’s part of the charm. When I finally laid it across my table, it looked like this cascade of fall leaves had just drifted down. Guests noticed right away. In my opinion, this is one of those crafts where the imperfections actually make it better, because nature isn’t perfectly symmetrical either.
Cut leaf shapes from various fall-colored felt sheets.
Stitch or glue them slightly overlapping in rows.
Use a base runner or felt backing for support.
Add decorative stitching with embroidery floss.
Roll up for easy storage and reuse every year.
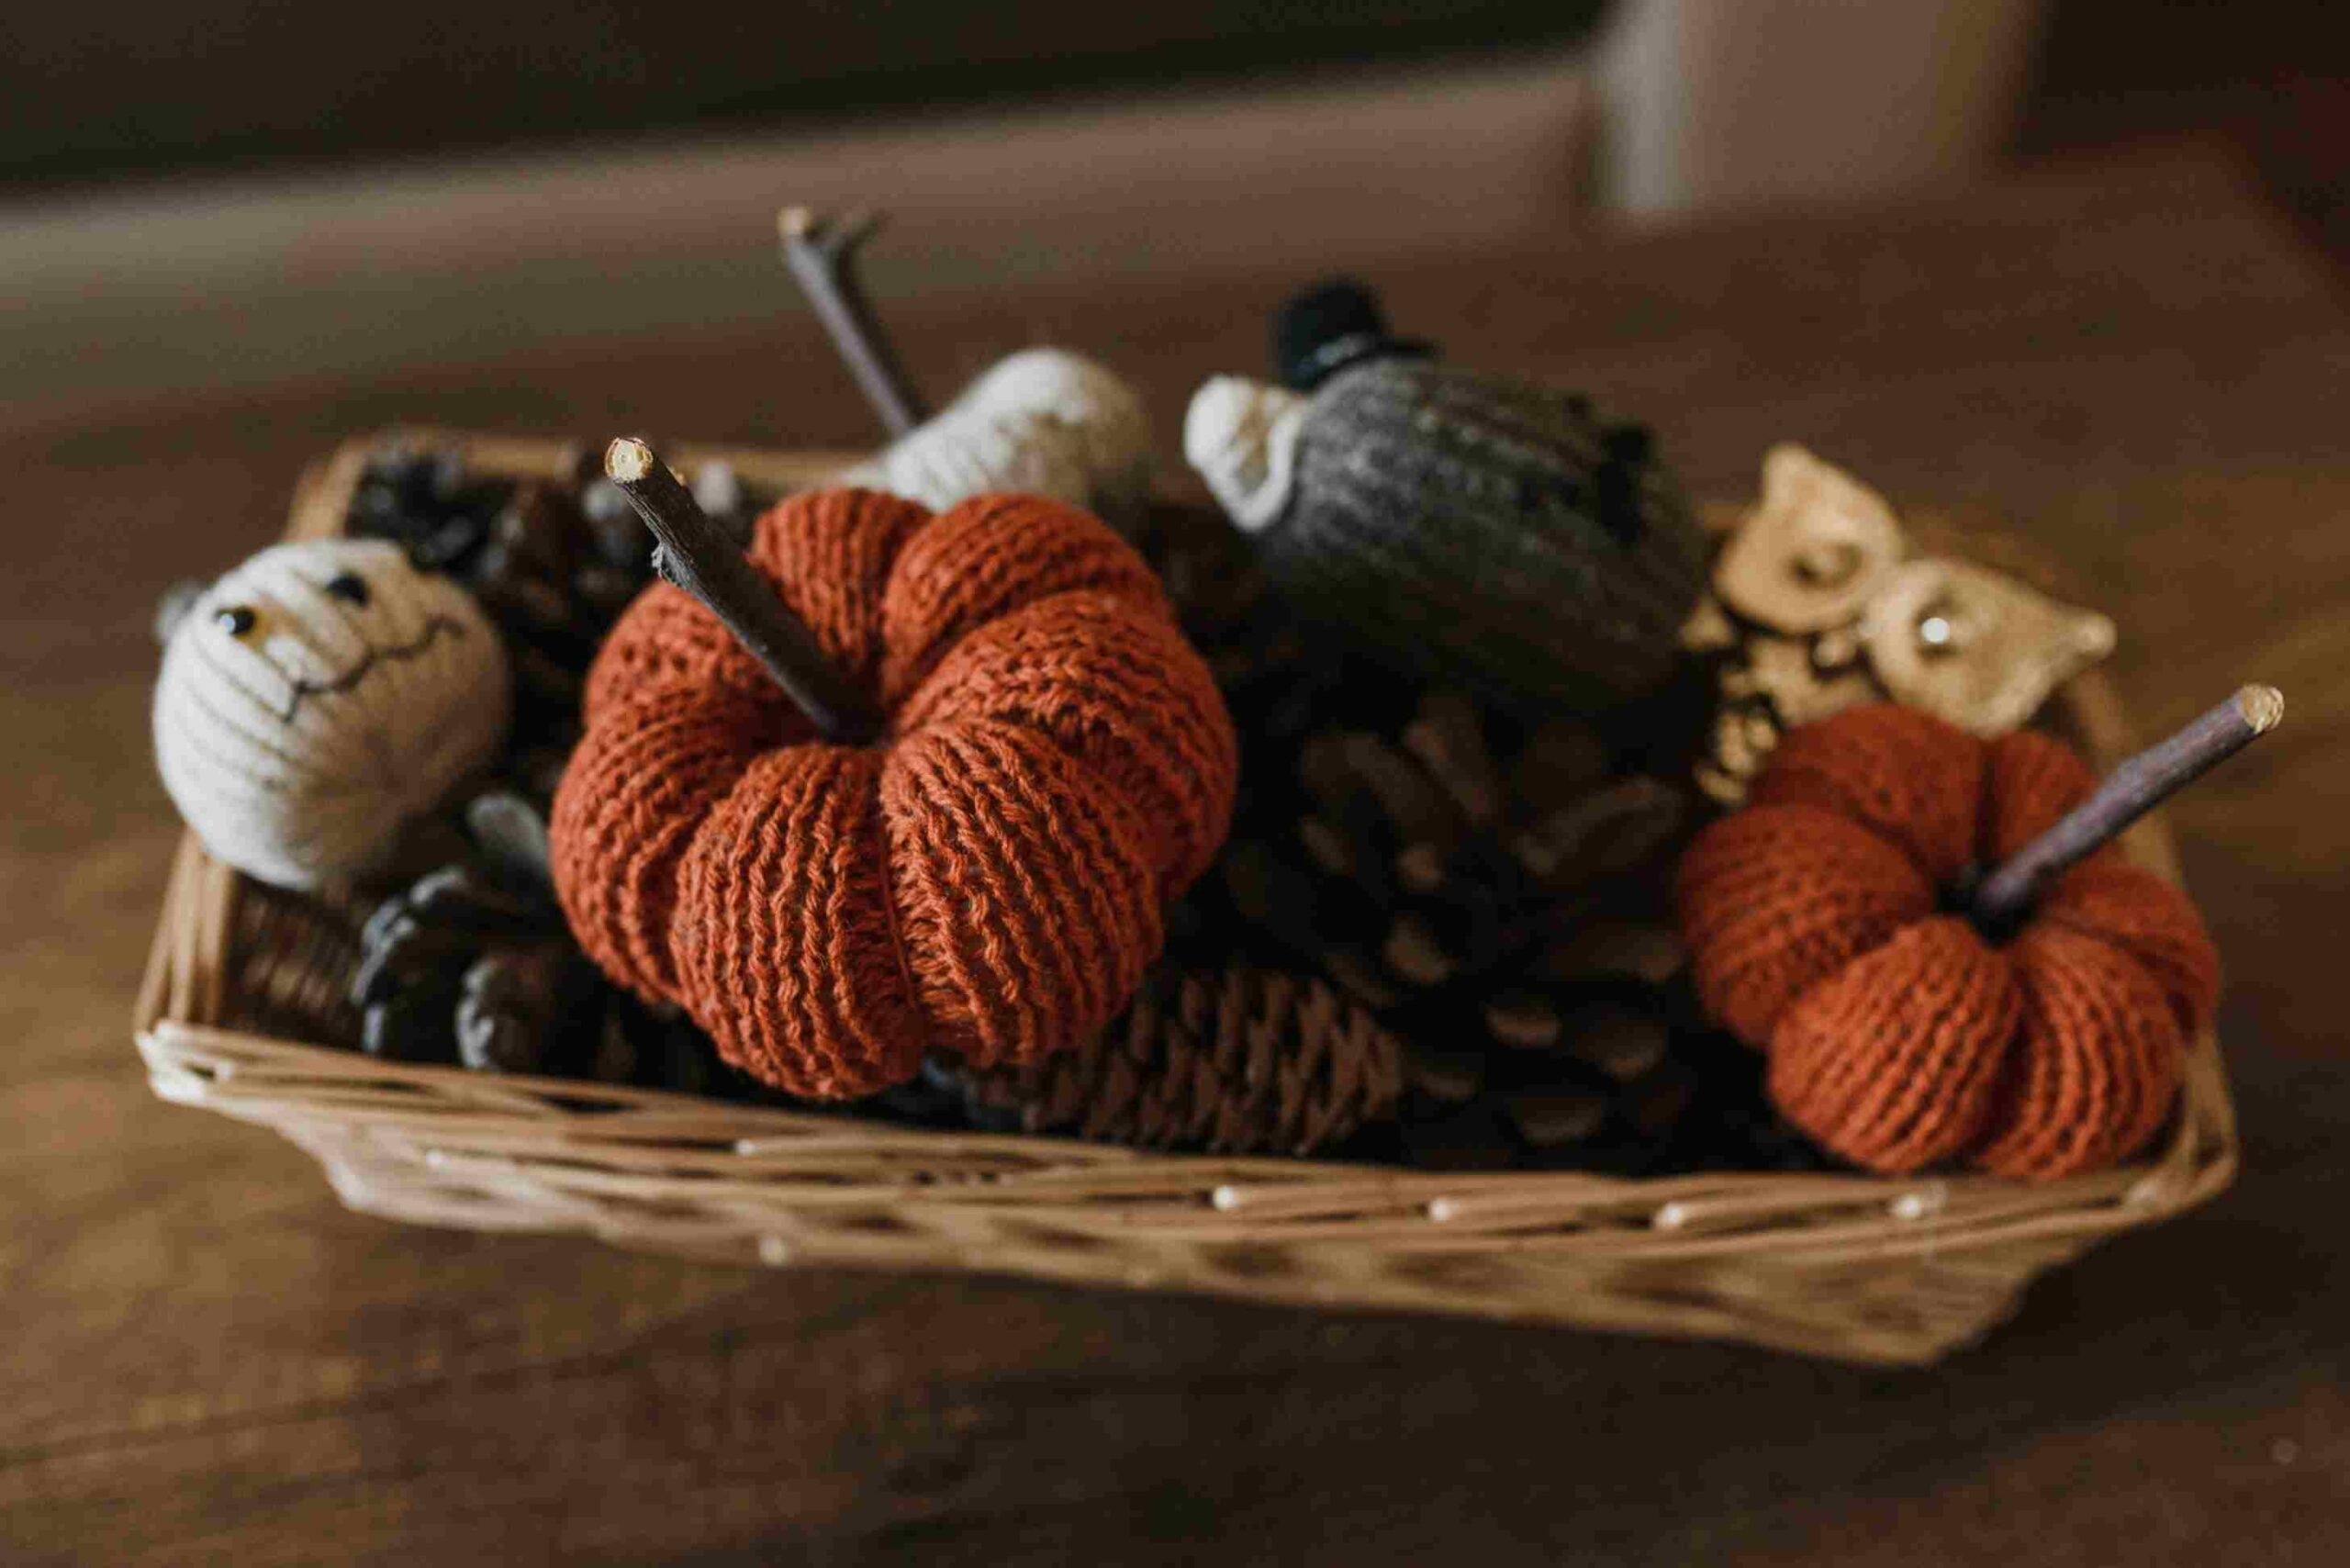
Burlap Pumpkins
If you’re tired of the same old plastic pumpkins, burlap pumpkins are such a fun swap. The first time I tried them, I didn’t even follow a tutorial—I just wrapped some burlap around a ball of stuffing, tied it up, and stuck a stick in the middle for a stem. And honestly? It worked. The rough, rustic look of the burlap makes them look cozy without trying too hard.
Now I keep a little group of them by my fireplace, mixed with a few real mini pumpkins. What I’ve learned is that you don’t have to be too neat with these. A bit of frayed edge here and there just adds to the charm. Plus, they last forever—unlike the real pumpkins that (let’s be honest) always start to smell before Thanksgiving even hits.
Cut circles of burlap fabric and fill with fiberfill or rice.
Gather and tie the top with twine to form a pumpkin shape.
Insert a cinnamon stick or twig as the stem.
Tie a fabric leaf or ribbon around the stem.
Spray lightly with starch to hold shape.
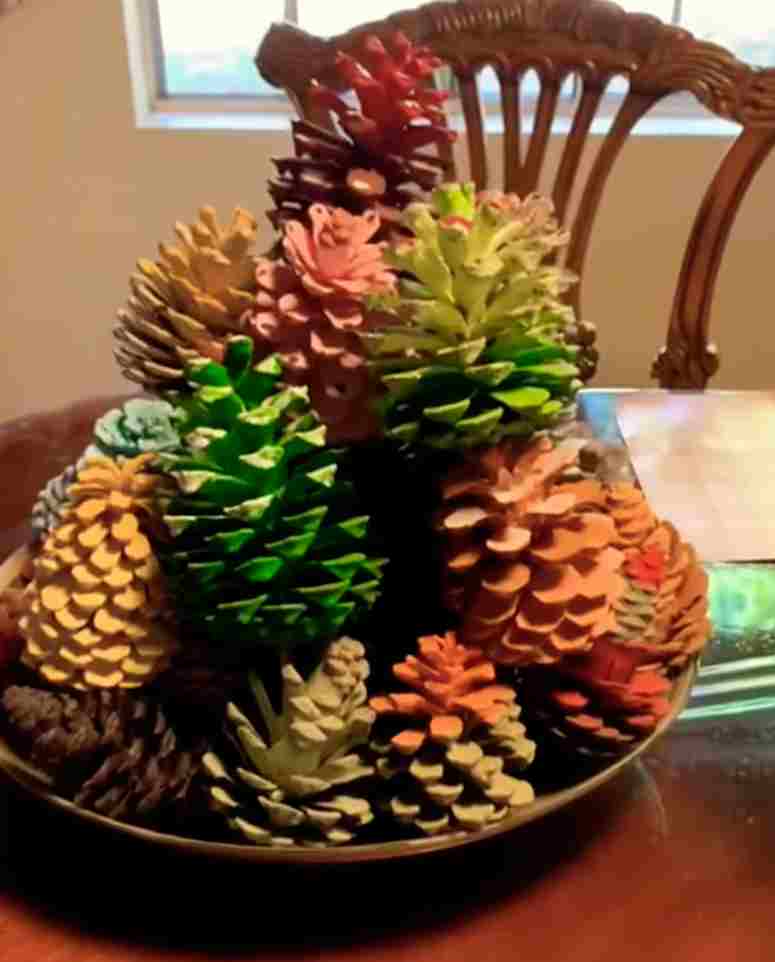
Painted Pinecones
Pinecones are basically nature’s free craft supply. I grew up collecting them on chilly walks, and I still do, but now I actually put them to use. Last fall, I brushed just the tips with white paint, and they looked like they were kissed with frost—so simple, but honestly gorgeous. Sometimes I go bold with metallics too; gold pinecones mixed in with candles look insanely chic for how little effort it takes.
One year I even let my nieces help, and let me tell you—there was more paint on their hands than the pinecones, but the end result still looked festive. What I’ve found is that pinecones are forgiving. Even if you glob the paint on, they still look good once they’re dry. Toss them in a bowl or scatter them along your table runner, and suddenly you’ve got instant fall décor.
Collect pinecones and bake them to kill any bugs.
Paint the tips with gold, white, or autumn colors.
Use glitter or metallic spray for extra shimmer.
Arrange in bowls with mini pumpkins or leaves.
Attach twine to make ornaments or garlands.
Mod Podge Pumpkins
I’ll be honest—I used to think Mod Podge was just for kids’ crafts. Then I tried it on pumpkins, and now I’m hooked. Basically, you grab some fabric scraps, tissue paper, or even pretty napkins, brush on the Mod Podge, and smooth it over a pumpkin. It dries clear, so all you see is this gorgeous patterned pumpkin that looks way more expensive than it is.
I once covered a set in floral paper, and they ended up being my favorite fall decorations. To be fair, it can get a little messy (my kitchen counter was sticky for days), but the end result is worth it. The best part? You can reuse them every year. In my opinion, this is the perfect project if you want something crafty that feels a little artsy but doesn’t require a ton of skill.
Use foam or plastic pumpkins for ease.
Tear paper into small pieces for better adhesion.
Apply Mod Podge under and over the paper.
Smooth bubbles with a soft brush or fingers.
Finish with a clear sealant and a ribbon bow.
Fall Quote Canvas Art
Celebrate the season with canvas art featuring your favorite fall quotes. This easy project brings inspiration and style into your home or office. Choose warm tones and meaningful messages to make it your own.
Use stencils or hand-lettering for the quote.
Choose canvas sizes based on your space.
Blend fall colors in the background with acrylic paint.
Add leaf prints or pumpkin designs around the text.
Seal with clear spray for protection.
Pumpkin Spice Bath Bombs
Mix up a batch of pumpkin spice bath bombs for relaxing autumn evenings or thoughtful gifts. They’re fun to make and smell like fall in a tub. This craft is perfect for self-care lovers.
Use baking soda, citric acid, Epsom salt, and cornstarch.
Add pumpkin spice fragrance or essential oils.
Use orange mica powder for color.
Press into silicone molds and let dry overnight.
Wrap in cellophane and tie with ribbon for gifting.
Corn Husk Wreath
Craft a beautiful and natural corn husk wreath to welcome guests this fall. It’s surprisingly simple to make and has an organic, farmhouse feel. Hang it on doors, above mantels, or on walls.
Soak husks in water to make them pliable.
Hot glue husks in layers onto a wreath base.
Alternate directions for a fuller look.
Add a burlap bow or wooden sign in the center.
Let dry thoroughly before hanging.
Apple Stamp Tea Towels
Add a handmade touch to your kitchen with apple-stamped tea towels. This nostalgic craft turns apples into stamps for a fun, natural pattern. Great for fall-themed gifts or your own seasonal refresh.
Cut apples in half and blot dry.
Dip in fabric paint and stamp onto plain cotton towels.
Add leaves or words with paintbrushes or stencils.
Let dry and heat-set the paint if needed.
Wrap with a ribbon and tag for a sweet fall gift.
Fall Craft Party Ideas
Hosting a fall-themed craft party is a wonderful way to bring friends together while celebrating the cozy charm of the season. Whether you’re sipping cider, laughing over glue mishaps, or proudly showing off your creations, a craft night turns ordinary moments into memorable ones. It’s perfect for all ages and skill levels — just add autumn vibes, a touch of creativity, and good company!
How to Host a Fall-Themed Craft Night with Friends:
Choose a theme like “Pumpkin Projects,” “Leaf Art Night,” or “Rustic Fall Décor.”
Send out digital or handmade invites that match your craft theme.
Set up a cozy space with candles, fall music, and warm lighting.
Offer a mix of individual and group crafts to keep everyone engaged.
Provide an inspiration board or print-outs with ideas and steps.
Tips for Prepping Supplies, Snacks, and Setup:
Prepare kits with all craft materials ahead of time for easy distribution.
Cover tables with kraft paper or plastic cloths for easy cleanup.
Create a snack station with fall favorites: apple cider, pumpkin pie bites, caramel popcorn, or hot cocoa.
Set up a few “how-to” stations or demo tables for guidance.
Use mason jars, crates, or baskets to organize supplies attractively.
Project Suggestions Based on Skill Level and Time:
Beginner (15–30 min): Leaf garlands, painted pinecones, apple stamp cards.
Include at least one no-mess or low-mess option for those who prefer it.
Offer optional take-home kits for unfinished projects.
With the right mix of creativity, planning, and pumpkin-flavored snacks, your fall craft party is sure to be a hit!
FAQ
What are some easy Fall Craft Ideas for Adults can try?
Easy fall crafts include painted pinecones, leaf garlands, mason jar lanterns, and Mod Podge pumpkins. These require minimal supplies and are perfect for beginners.
Where can I find supplies for Fall Craft Ideas for Adults?
You can find craft supplies at local craft stores like Michaels or Hobby Lobby, dollar stores, or online marketplaces like Amazon. Nature also provides free materials like leaves, pinecones, and acorns.
Are fall crafts expensive to make?
Not at all! Many fall crafts are budget-friendly, especially when using items from nature or upcycled materials like old sweaters, mason jars, or scrap fabric.
Can I do these crafts with friends or at a party?
Absolutely! Fall crafts are great for hosting themed craft nights or parties. Choose a few simple projects, prepare kits in advance, and enjoy a creative evening with snacks and music.
Hi, I’m Victoria, an art and craft teacher at Newark City Schools, where I have the joy of working with middle school students to help them explore their creativity and develop their artistic talents. I believe that art is a powerful way for students to express themselves, and I strive to make every lesson a fun, engaging, and inspiring experience.
I created this website to share the art and craft projects, techniques, and resources that I use in my classroom, hoping to inspire both educators and young artists alike. Whether you’re a teacher looking for new ideas or a student eager to try something new, I’m excited to provide creative tools and projects that anyone can enjoy.
When I’m not in the classroom, I love experimenting with different art forms and learning new crafting techniques. My goal is to help others discover the joy of making things with their hands, and I hope my website serves as a space for everyone to explore their creative potential.