
You know, the other day I caught myself staring at this pile of old jars, cardboard boxes, and random bits of fabric I’d been meaning to toss out. Honestly, my first thought was, “Ugh, clutter again.” But then I remembered how much fun I had as a kid turning cereal boxes into dollhouses and soda bottles into bird feeders. Funny how we forget that feeling, right? The truth is, DIY crafts using recycled materials aren’t just about saving money or being eco-friendly (though that’s a pretty great bonus). They’re also about rediscovering a little creativity in the stuff we’d normally call trash. And if you’ve ever felt guilty about waste, or maybe just bored staring at a pile of “junk,” you’re definitely not alone. Stick around, because I’m going to share easy, fun, and surprisingly beautiful projects that’ll turn yesterday’s leftovers into something you’re actually proud to show off.
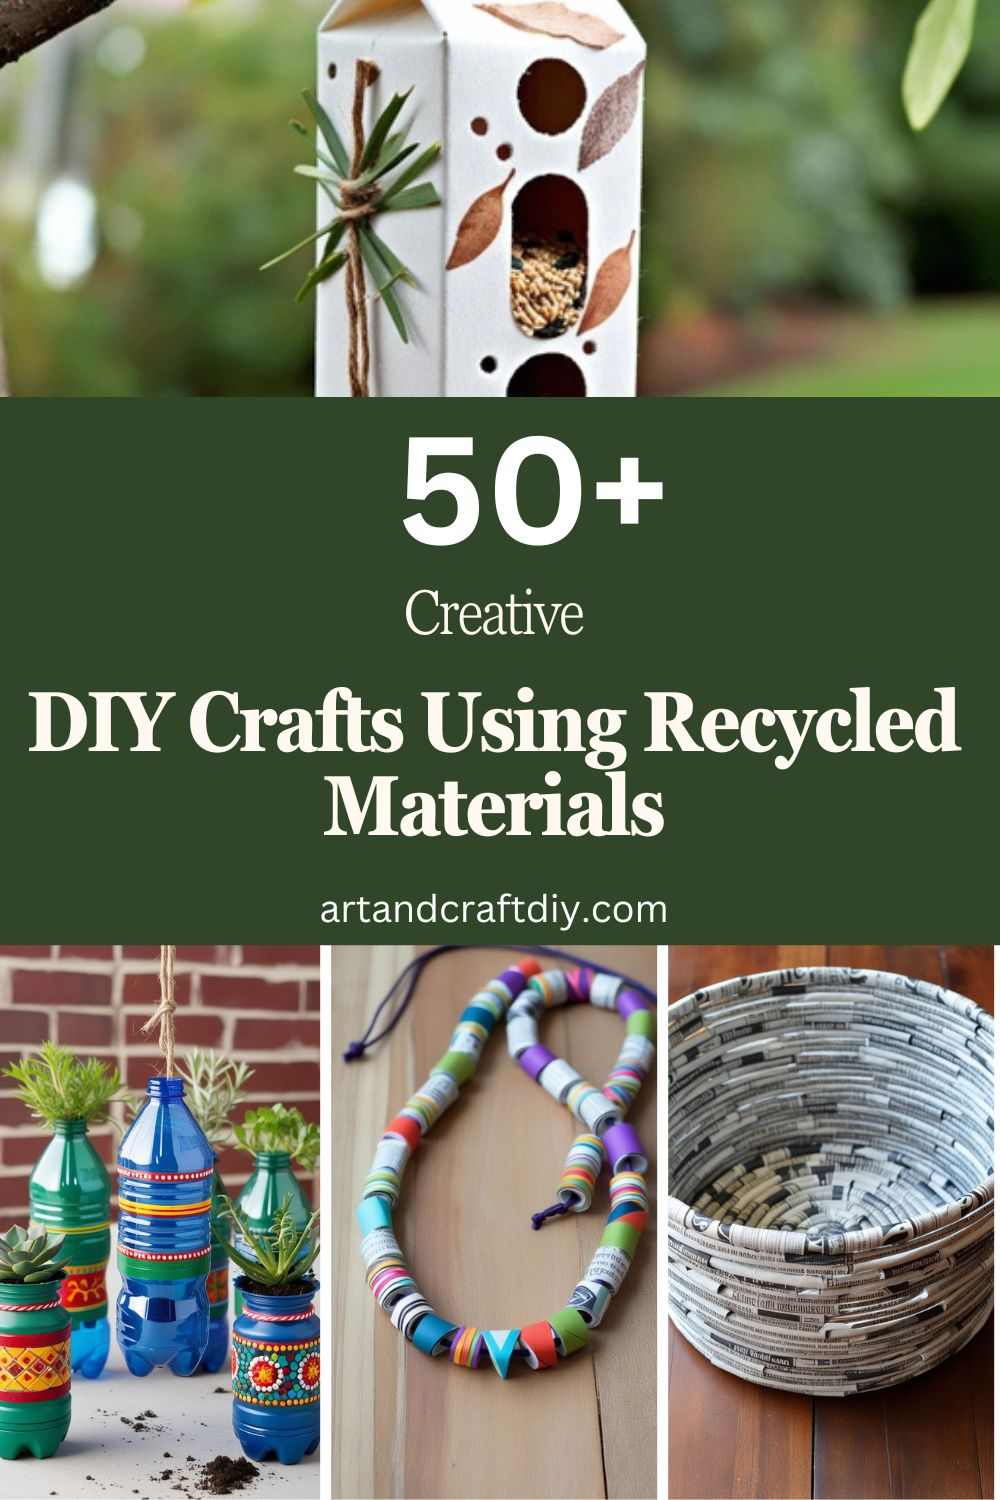
DIY Crafts Using Recycled Materials
DIY crafts using recycled materials are a creative and eco-friendly way to repurpose items that would otherwise end up in landfills.
Buttons Art

I’ve always had a little obsession with buttons. You know those random buttons that come with clothes, the ones we usually toss in a drawer and forget? Well, I started collecting them years ago, and one day I thought, “Why not turn this little pile of nothing into something cute?” That’s how my first button art came to life. To be fair, the first attempt was messy—glue everywhere, buttons sliding around—but once it dried, it looked surprisingly good.
What I’ve learned is you don’t need to be super precise. Honestly, that’s the fun part. I usually grab a piece of cardboard or canvas, sketch a simple heart or tree, and then just start filling it with buttons. Sometimes I paint the background first, sometimes I don’t bother. Both ways have charm. And if you’re doing this with kids, let them go wild—it’s their chaos that makes the piece look alive, in my opinion.
Old T-Shirt Tote Bags
Turning old t-shirts into tote bags has been one of my favorite upcycling projects ever. I mean, who doesn’t have a stack of worn-out tees they never wear but can’t throw away? I had one with a faded band logo that I just couldn’t part with. Instead of letting it sit uselessly, I grabbed some scissors, cut off the sleeves, and tied the bottom into knots. Boom—my first no-sew tote was born. It felt so satisfying to carry something functional that also held memories.
In my opinion, the best part is you don’t need sewing skills. If you do know how to sew, you can stitch the edges to make it sturdier, but even the knotted style holds up surprisingly well for groceries. To be fair, some of my early bags looked a little lopsided, but after a while, I stopped caring. They’re eco-friendly, personal, and honestly a conversation starter when someone asks, “Where did you get that bag?”
Egg Carton Flowers craft
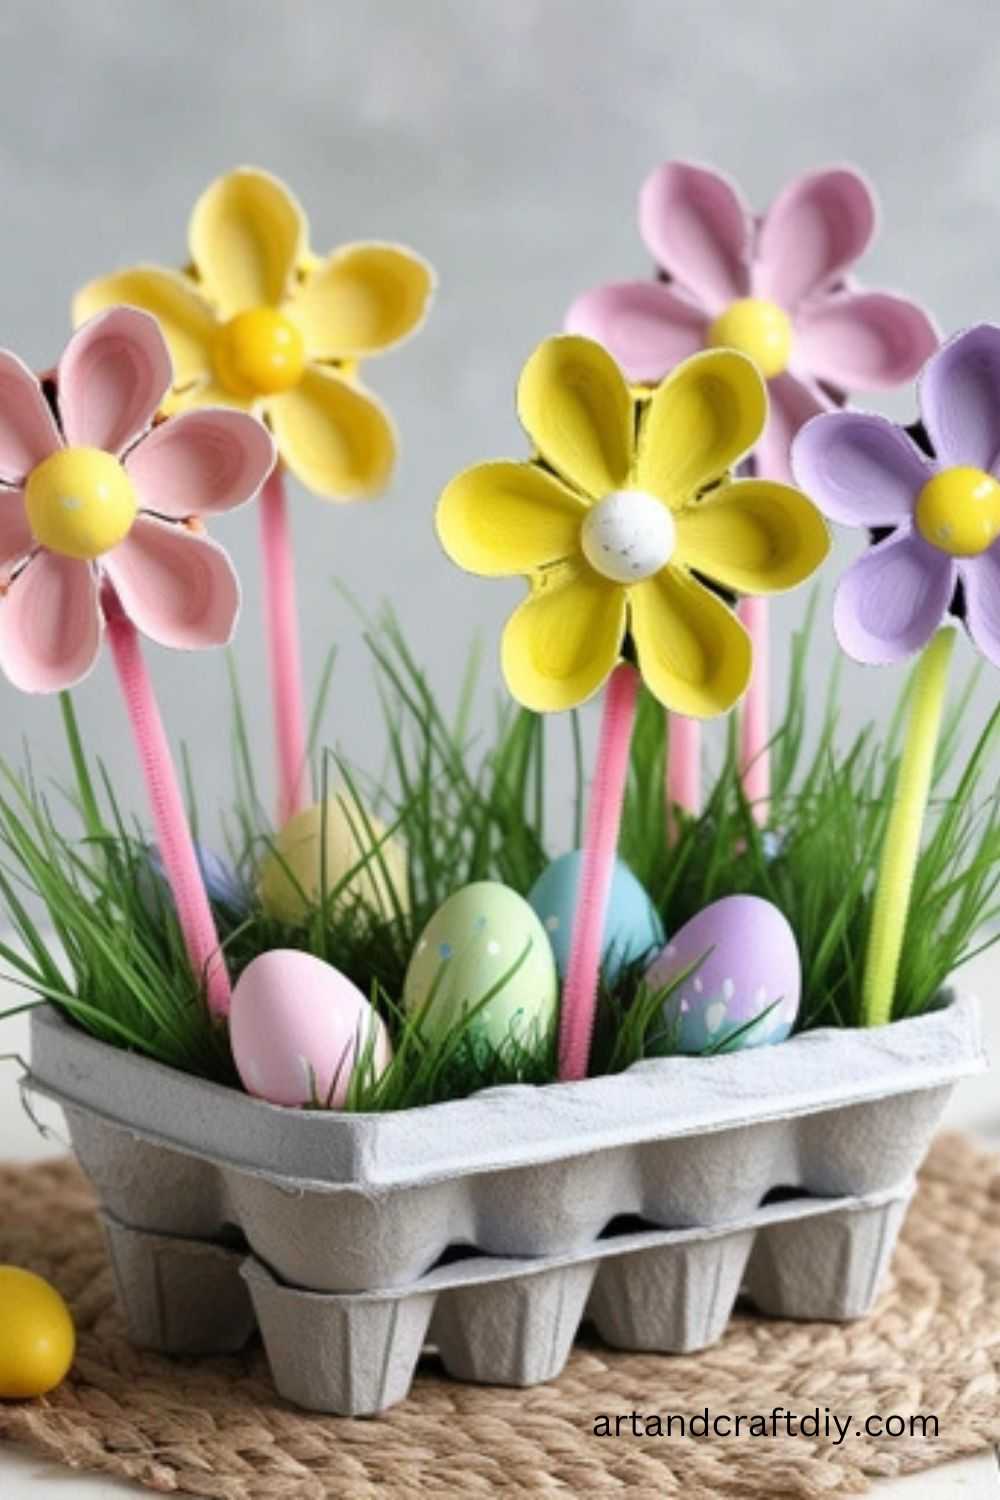
Now this one always makes me smile because it started as a rainy-day boredom buster. I had an empty egg carton sitting on the counter, and instead of tossing it, I cut out the little cups and thought, “Hmm, these actually look like flower petals.” A bit of paint later, and I had a whole bouquet sitting on my table. Honestly, I didn’t expect them to look so sweet, but once they dried, they had this quirky handmade charm that fresh flowers can’t give you.
What I love about this craft is how forgiving it is. The cuts don’t need to be perfect, and the paint can be as messy or as neat as you like. Sometimes I stick them on skewers to make stems, other times I just glue them onto cardboard to create floral wall art. Kids adore this one too because they get to splash paint everywhere. And, to be fair, adults do too—I know I do.
Tin Can Lanterns
Old tin cans can be transformed into lanterns that provide a rustic, warm glow. These lanterns are perfect for outdoor settings or as a centerpiece.
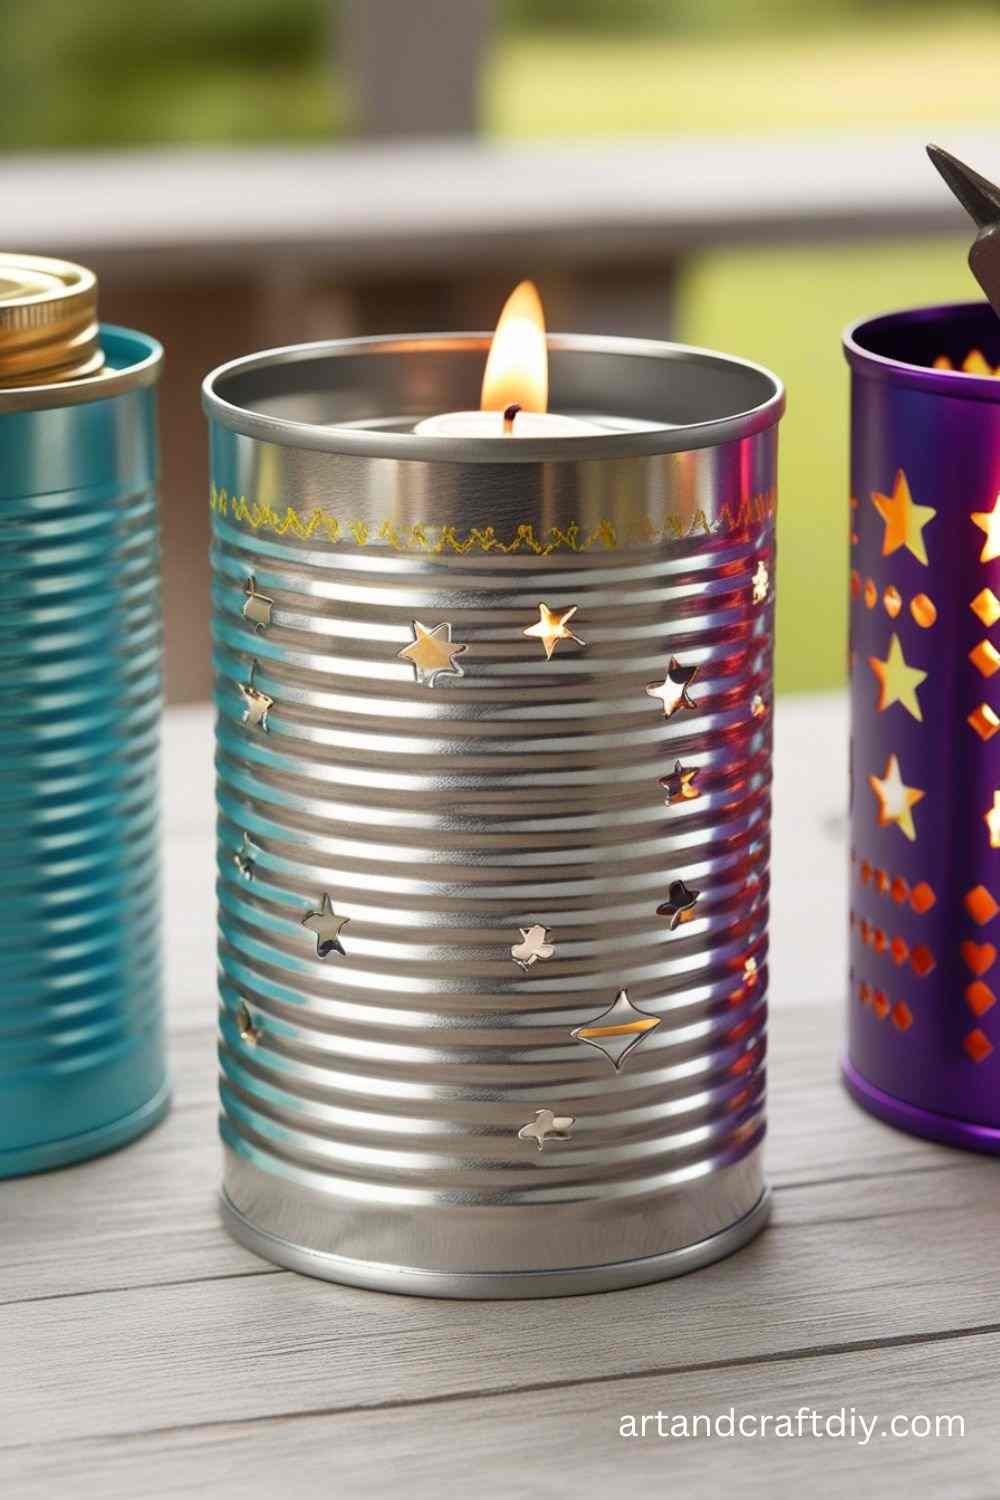
Materials Used:
- Empty tin cans
- Hammer and nail
- Tea light candles
- Paint (optional)
- Drill (optional)
Steps:
- Clean the tin cans and remove the labels.
- Use a hammer and nail to create patterns or holes on the surface of the tin can.
- If desired, paint the outside of the can for an added touch.
- Place a tea light candle inside the can.
- Light the candle and enjoy the soft glow of your recycled lanterns.
Tin Can Wind Chimes
Tin cans can be used to create wind chimes that produce a pleasant sound in the breeze. This is a great way to reuse cans and create beautiful outdoor decor.’
Materials Used:
- Tin cans
- String or wire
- Paint (optional)
- Beads or buttons
Steps:
- Clean and remove the labels from the tin cans.
- Paint the cans if desired.
- Drill a hole at the top of each can for hanging.
- Thread string or wire through the hole, tying knots at the top.
- Add beads or buttons for extra decoration and sound.
- Hang your wind chimes outside to enjoy the sounds.
Recycled Paper Beads Necklace
Creating a necklace from recycled paper is not only eco-friendly, but also a creative and fun way to repurpose old magazines or newspapers. This craft is simple yet stylish and can be made in various colors and patterns.
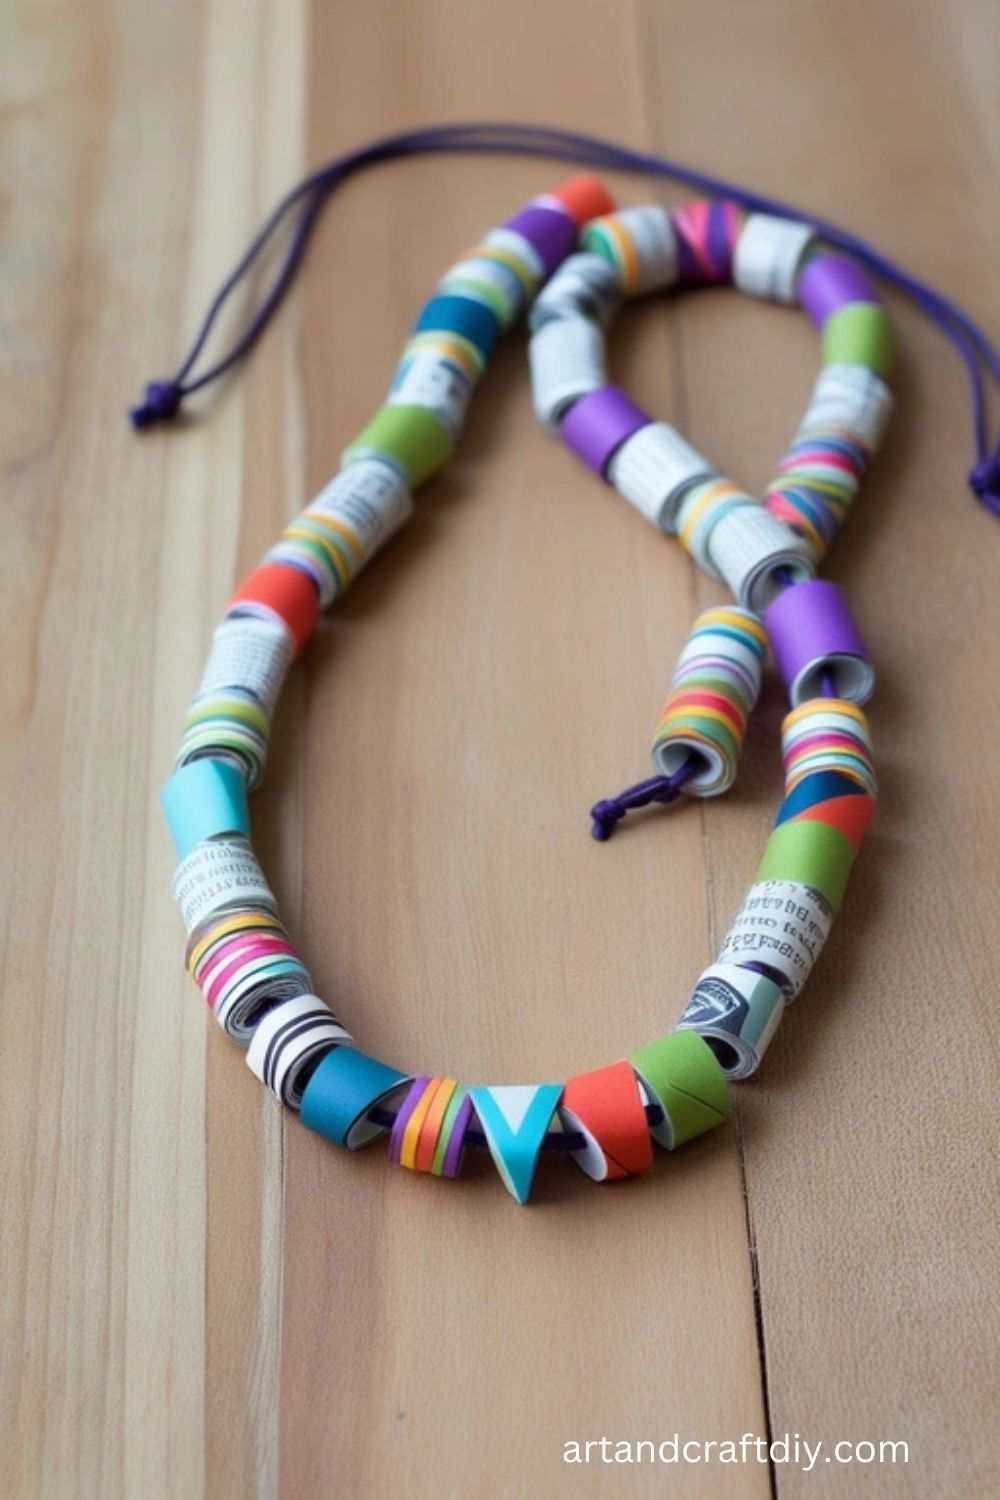
Materials Used:
- Old magazines or newspapers
- Scissors
- Glue
- Toothpick or pencil
- String or thread
- Ruler
Steps:
- Cut the paper into long, triangular strips. The wider the base, the larger the bead will be.
- Starting at the wide end of the strip, roll the paper tightly around a toothpick or pencil.
- Apply a small amount of glue as you roll to ensure the bead stays in place.
- Once rolled, seal the end with glue and carefully slide the bead off the toothpick.
- Let the beads dry completely.
- Once dry, string the beads together to form a necklace, tying the ends with a knot.
Plastic Bottle Planters
Turn empty plastic bottles into beautiful hanging planters for small plants. This eco-friendly project helps reduce waste while creating a functional piece of decor.
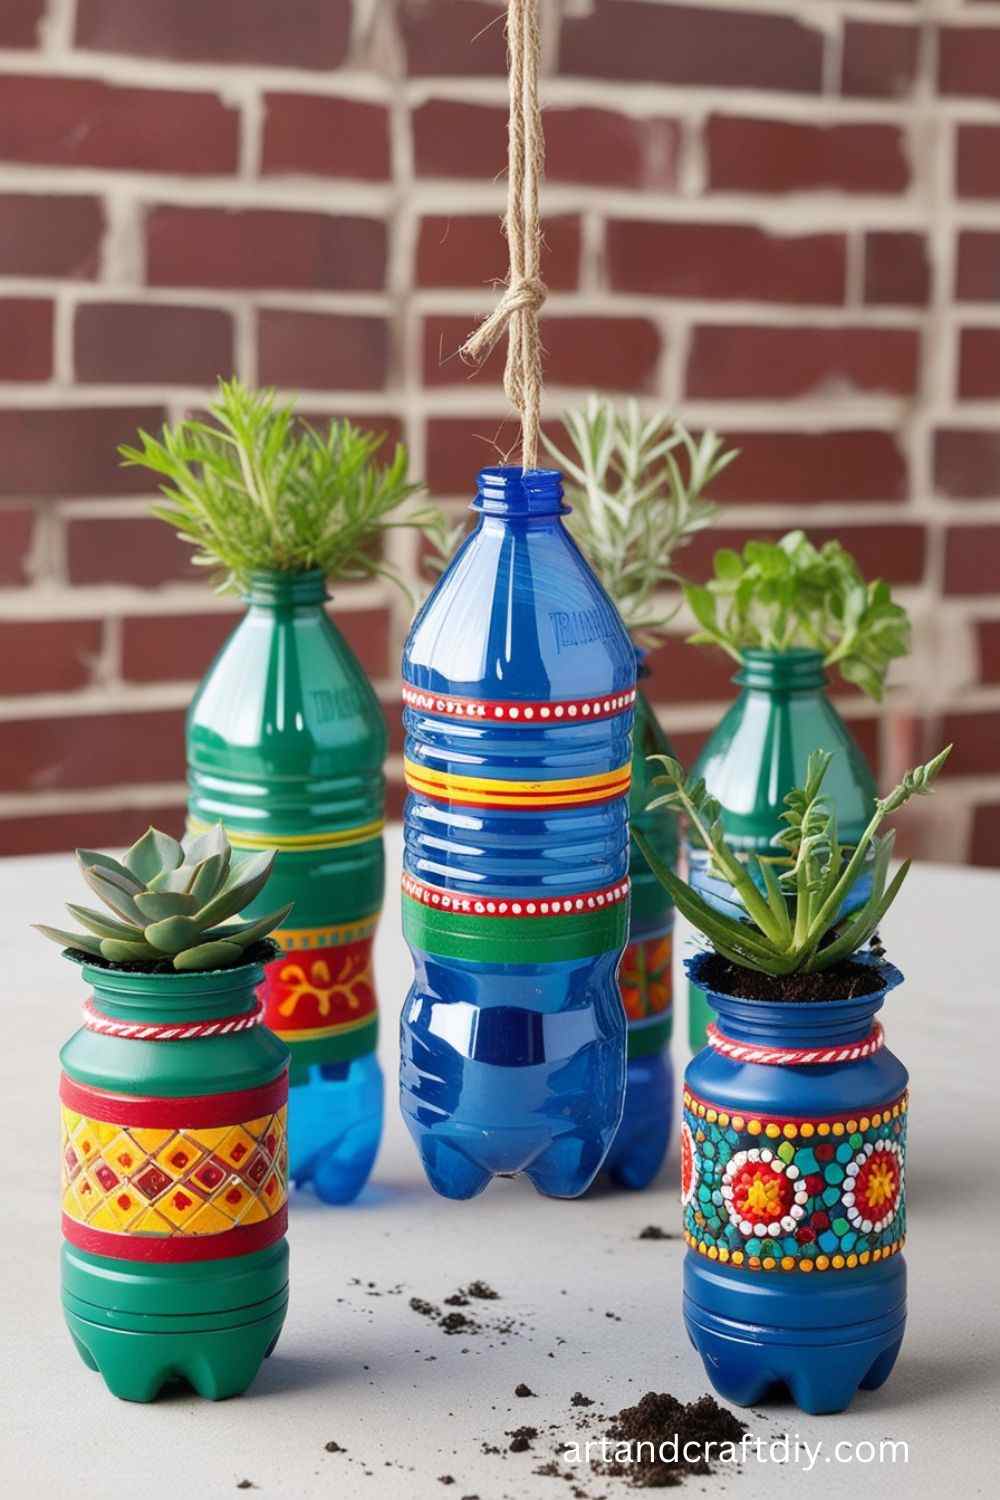
Materials Used:
- Plastic bottles (2-liter or smaller)
- Scissors
- Twine or string
- Paint (optional)
- Soil and plants
Steps:
- Cut the bottle in half, leaving the bottom part as the planter.
- If desired, paint the outside of the bottle for decoration.
- Poke small drainage holes in the bottom to allow water to escape.
- Fill the bottom part with soil.
- Plant your chosen plants inside the bottle.
- Tie twine around the top of the bottle and hang it from a tree, porch, or window.
Milk Carton Bird Feeder
A simple and effective way to help local wildlife is by making a bird feeder out of a milk carton. It’s easy to do and a great way to reuse milk cartons.
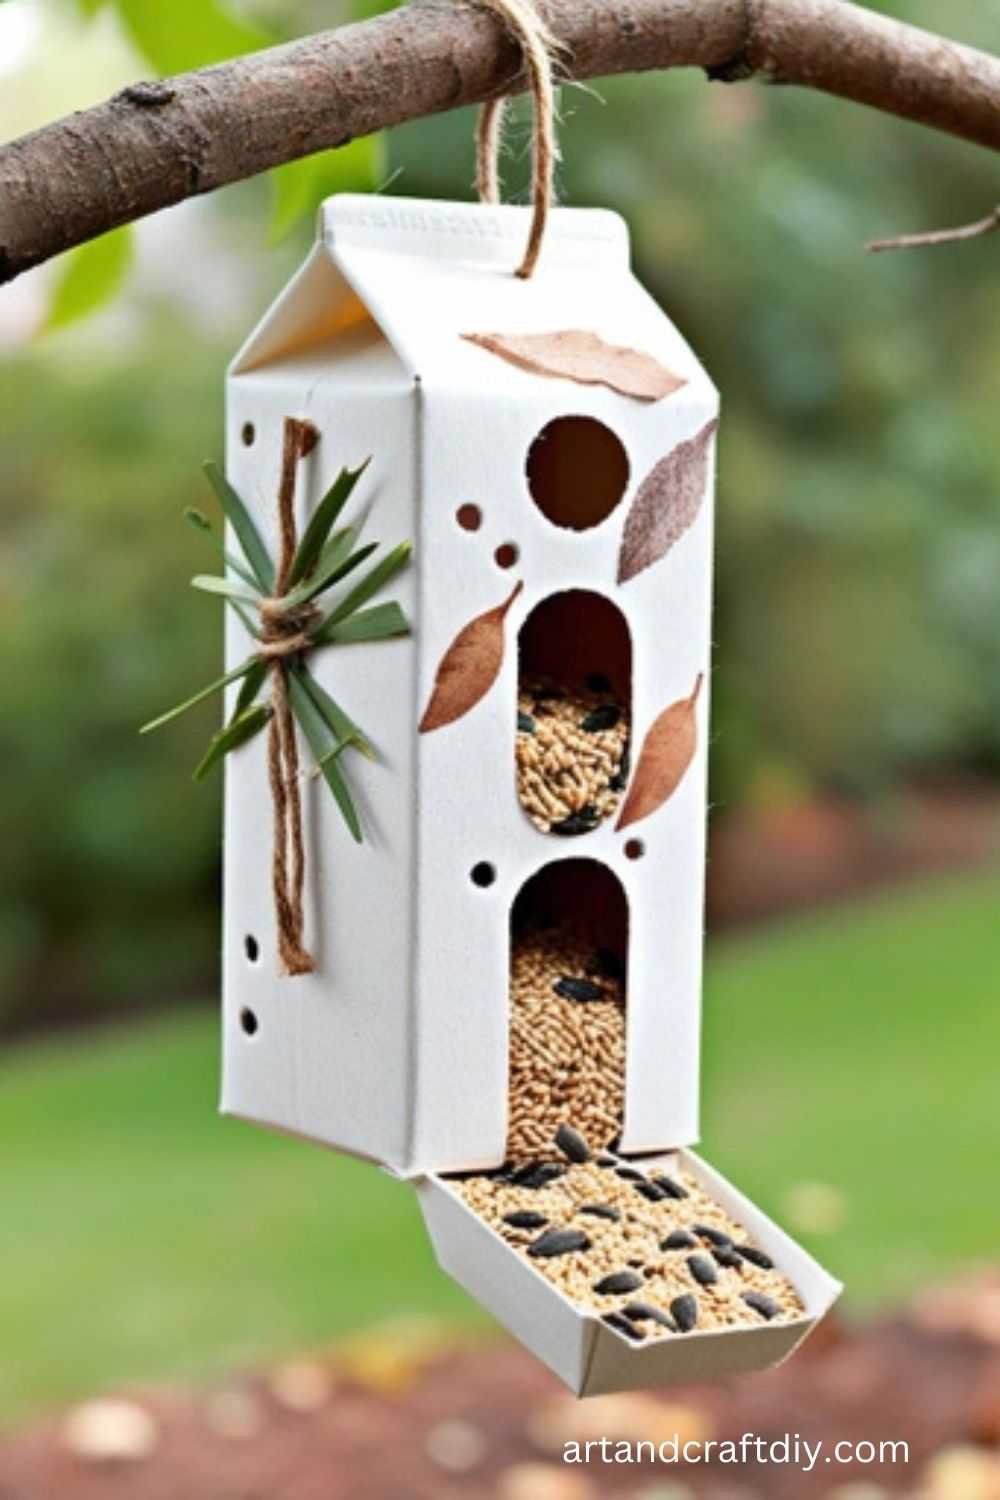
Materials Used:
- Empty milk carton
- Scissors
- Twine
- Peanut butter or lard
- Birdseed
Steps:
- Cut the top of the milk carton and make small holes on the sides for hanging.
- Spread peanut butter or lard inside the carton.
- Roll the carton in birdseed to coat the peanut butter.
- Thread twine through the holes and tie a knot for hanging.
- Hang the feeder outside for birds to enjoy.
Newspaper Woven Basket
Create a beautiful woven basket from old newspapers. This craft project is not only sustainable but also results in a useful item for storage or decor.

Materials Used:
- Old newspapers
- Scissors
- Glue
- A pencil or stick for rolling
Steps:
- Cut the newspaper into strips.
- Roll the strips tightly around a pencil or stick to create tubes.
- Form the base of the basket by weaving the tubes in a circular pattern.
- Continue weaving upwards to form the sides of the basket.
- Glue the ends of the tubes to secure them in place.
- Once dry, your newspaper basket is ready for use!
Cereal Box Notebooks
Turn old cereal boxes into unique, personalized notebooks. This craft is great for kids or anyone looking to reduce waste while making something functional.
Materials Used:
- Cereal box
- Scissors
- Paper (for pages)
- Hole punch
- Ribbon or twine
Steps:
- Cut the cereal box to the desired size for the cover of your notebook.
- Cut several sheets of paper to fit the cover.
- Punch holes along the side of the cover and pages.
- Thread ribbon or twine through the holes and tie it to bind the notebook together.
- Your eco-friendly notebook is ready to be used!
Bottle Cap Magnets
Old bottle caps can be turned into fun magnets for your fridge. This is a simple and creative way to reuse materials you might otherwise throw away.
Materials Used:
- Bottle caps
- Magnets
- Glue
- Paint or decorative paper
Steps:
- Clean and dry the bottle caps.
- Decorate the inside of the bottle caps with paint or cut-out decorative paper.
- Glue a small magnet to the back of each bottle cap.
- Let the glue dry completely before sticking them to your fridge.
CD Mosaic Coasters
Old CDs can be turned into colorful mosaic coasters. This simple craft adds an artistic touch to your coffee table and helps you reuse outdated media.
Materials Used:
- Old CDs
- Scissors
- Glue
- Cork backing (optional)
Steps:
- Cut the CDs into small pieces using scissors or a craft knife.
- Arrange the pieces on a flat surface to create a mosaic pattern.
- Glue the pieces down on a flat base like cork or cardboard.
- Let the glue dry completely before using the coasters.
Jigsaw Puzzle Piece Art
Turn old jigsaw puzzle pieces into a fun piece of wall art. This is a great way to repurpose incomplete puzzles and create something unique.
Materials Used:
- Old puzzle pieces
- Canvas or thick paper
- Paint
- Glue
Steps:
- Paint the puzzle pieces in bright colors or leave them as they are.
- Arrange the pieces on a canvas or thick paper to form a pattern or image.
- Glue the pieces down and let them dry completely.
- Frame the artwork or hang it as-is.
Milk Jug Snowman
An empty milk jug can be turned into a charming snowman for the winter holidays. This is a great seasonal craft to enjoy with kids.
Materials Used:
- Empty milk jug
- Paint (white, black, orange)
- Fabric or buttons
- Glue
- Ribbon
Steps:
- Clean and dry the milk jug.
- Paint the jug white to resemble snow.
- Use black paint for the eyes and buttons, and orange paint for the nose.
- Add a scarf or buttons for extra decoration.
- Display your snowman as a festive holiday decoration.
Toilet Paper Roll Rocket
Transform a toilet paper roll into a fun rocket ship! This craft is great for children to make and play with, sparking imagination.
Materials Used:
- Toilet paper roll
- Construction paper
- Scissors
- Glue
- Markers
Steps:
- Cover the toilet paper roll with construction paper, gluing it in place.
- Cut out a cone shape from paper to create the rocket’s nose and glue it to one end of the roll.
- Create flame shapes from red, orange, and yellow paper to attach to the bottom of the roll.
- Add additional decorative details with markers.
- Your rocket is ready to blast off!
Eggshell Planters
Repurpose eggshells into adorable little planters. This eco-friendly craft is perfect for growing tiny plants like herbs or succulents.
Materials Used:
- Eggshells
- Soil
- Small plant or seeds
- A spoon
Steps:
- Carefully crack the eggshells in half, being gentle not to break them completely.
- Clean out the inside of the eggshell and fill it with soil.
- Plant a small seed or tiny plant in each eggshell.
- Place the eggshells in a small carton or tray for support.
- Water the plants and watch them grow!
Newspaper Wall Art
Old newspapers can be used to create large, textured wall art that adds personality to any room. This craft project is ideal for creating unique and affordable decor.
Materials Used:
- Old newspapers
- Scissors
- Glue
- Large piece of cardboard or canvas
Steps:
- Tear the newspapers into strips or random shapes.
- Glue the pieces onto the cardboard or canvas, overlapping them for a textured effect.
- Continue layering the pieces until the entire surface is covered.
- Let the glue dry completely before displaying the artwork.
Jeans Pocket Organizer
Repurpose old jeans by turning the pockets into a hanging organizer. This craft helps you reduce waste while creating a useful storage solution.
Materials Used:
- Old jeans
- Scissors
- Needle and thread or fabric glue
- Ribbon or fabric strips
Steps:
- Cut the pockets off the jeans, making sure to leave a seam around the edges.
- Sew or glue the pockets onto a larger piece of fabric.
- Add a ribbon or fabric strips at the top to hang the organizer.
- Use the pockets to store small items like pens, keys, or makeup.
Fabric Scraps Quilt
Old fabric scraps can be stitched together to create a cozy quilt. This craft is a fantastic way to reuse fabric remnants while creating a functional item.
Materials Used:
- Fabric scraps
- Needle and thread or sewing machine
- Batting (optional)
Steps:
- Cut the fabric scraps into squares or rectangles.
- Sew the fabric pieces together in a pattern, such as a checkerboard or rows of different colors.
- Once the quilt top is complete, add batting (if desired) and stitch a backing fabric to complete the quilt.
- Bind the edges with fabric or trim to finish the quilt.
Wine Cork Bulletin Board
Repurpose wine corks into a charming bulletin board. This project is easy to make and can be customized to fit your space.
Materials Used:
- Wine corks
- Frame (wooden or plastic)
- Glue gun
- Scissors
Steps:
- Cut the corks in half lengthwise for a flat surface.
- Arrange the cork halves inside the frame, starting at the corners and working inward.
- Glue each cork piece in place, making sure they are securely attached.
- Let the glue dry and use the cork board for pinning notes or photos.
Denim Flower Brooch
Repurpose old denim jeans to create a stylish flower brooch. This craft allows you to turn worn-out jeans into a fashionable accessory.
Materials Used:
- Old denim
- Scissors
- Needle and thread
- Brooch pin
Steps:
- Cut the denim into petal shapes, making sure to have a variety of sizes.
- Layer the petals on top of each other, starting with the largest and working your way up to the smallest.
- Stitch the petals together at the center to form a flower shape.
- Attach the brooch pin to the back of the flower.
- Pin your new flower brooch to a jacket or bag.
Paper Plate Masks
Old paper plates can be used to make fun and creative masks for parties or Halloween costumes. This craft is great for kids and can be customized to suit any theme.
Materials Used:
- Paper plates
- Markers or paint
- Scissors
- String or elastic
Steps:
- Cut eye holes in the paper plate.
- Decorate the mask with markers, paint, or other craft supplies.
- Attach string or elastic to the sides of the plate so you can wear it as a mask.
- Let the mask dry before wearing it to your next event.
Old Sweater Mittens
Repurpose old sweaters into cozy mittens. This craft is perfect for cold weather and helps you recycle old knitwear.
Materials Used:
- Old sweater
- Scissors
- Needle and thread or sewing machine
- Pins
Steps:
- Cut the sleeves off the sweater.
- Turn the sleeves inside out and sew along the edge, leaving a hole for your thumb.
- Turn the mittens right side out and trim any excess fabric.
- Enjoy your new warm mittens!
Fabric Scrap Keychains
Use fabric scraps to create fun and colorful keychains. These keychains can be personalized and make great gifts.
Materials Used:
- Fabric scraps
- Scissors
- Keyring
- Glue or sewing supplies
Steps:
- Cut the fabric scraps into strips or small shapes.
- Attach the fabric to a keyring, either by gluing or sewing it on.
- Customize the keychain with additional fabric pieces, beads, or buttons.
- Add a clasp or loop for easy attachment to your keys or bag.
Cork Bulletin Board
Transform old wine corks into a stylish bulletin board. This is a fun way to repurpose corks while creating an organizational tool.
Materials Used:
- Wine corks
- Frame (wooden or plastic)
- Glue gun
Steps:
- Arrange the corks inside the frame.
- Glue the corks in place, making sure they fit snugly together.
- Let the glue dry, and then use your new cork bulletin board to display notes or photos.
Bottle Cap Picture Frame
Upcycle old bottle caps into a unique picture frame. This craft is a great way to add a creative touch to your photos.
Materials Used:
- Bottle caps
- Picture frame
- Glue
Steps:
- Collect enough bottle caps to cover the frame.
- Arrange the bottle caps around the edges of the frame.
- Glue the bottle caps securely to the frame.
- Once dry, insert a photo and enjoy your new frame.
Plastic Spoon Mirror Frame
Old plastic spoons can be transformed into a beautiful mirror frame. This upcycling project is perfect for adding a personal touch to your home decor.
Materials Used:
- Plastic spoons
- Mirror
- Hot glue gun
Steps:
- Cut the handles off the spoons.
- Attach the spoon heads around the edges of the mirror using a hot glue gun.
- Allow the glue to dry, and hang your new mirror in a prominent place.
Recycled Wood Pallet Shelf
Turn a wooden pallet into a rustic shelf for your home. This is a functional project that repurposes wood and adds style to your space.
Materials Used:
- Wooden pallet
- Sandpaper
- Paint (optional)
- Screws
Steps:
- Sand down the pallet to smooth out any rough edges.
- Paint or stain the pallet if desired.
- Attach brackets or screws to mount the pallet on the wall.
- Add shelves or hooks to the pallet for extra storage.
Recycled Paper Cards
Create beautiful greeting cards using recycled paper. This is a perfect craft for those who enjoy making personalized gifts or cards.
Materials Used:
- Old paper (scrap paper, magazines, etc.)
- Scissors
- Glue
- Markers or stamps
Steps:
- Cut the recycled paper into the desired card shape.
- Decorate the front of the card using stamps, markers, or collage techniques.
- Write a message inside and give it as a personal gift.
- The card can be used for birthdays, holidays, or any special occasion.
Tips for Successful Recycled Crafting
Recycled crafting is a fun, eco-friendly way to create unique DIY projects while reducing waste. By repurposing materials, you can transform old items into beautiful, functional, and creative pieces. Whether you’re a seasoned crafter or a beginner, there are several steps you can follow to make your recycled crafting experience enjoyable and successful.
1. How to Clean and Prepare Materials
- Sort Your Materials: Start by collecting and sorting the materials you want to recycle. Common items include glass jars, cardboard, fabric scraps, plastic containers, bottle caps, and old magazines.
- Clean Thoroughly: Before using any recycled materials, clean them thoroughly to remove dirt, grease, or food residue. Wash jars and bottles, wipe down cans, and dry fabrics or papers completely.
- Remove Labels and Adhesives: If you’re using containers with labels, carefully remove them. You can soak labels in warm soapy water or use a scraper to peel them off. Use adhesive removers for stubborn sticky spots.
2. Tools and Supplies to Keep on Hand for DIY Projects
- Scissors & Craft Knives: Have a sharp pair of scissors for cutting fabric, paper, and plastic, as well as a craft knife for more precise cuts on harder materials like cardboard and wood.
- Hot Glue Gun: This is essential for gluing a variety of materials together. Make sure to use glue sticks that are compatible with your glue gun.
- Paints & Brushes: Acrylic paints work well for most crafting materials. Stock up on basic colors, and consider specialty paints for glass, fabric, or metal surfaces.
- Ribbons, Twine, and Thread: These can be used for decoration or to assemble pieces together. Thread is great for sewing fabric, and twine adds a rustic touch.
- Stapler & Paper Clips: Useful for temporarily holding things together before finalizing with glue.
- Markers & Stamps: For adding designs, patterns, or personalized touches to your projects.
3. How to Incorporate Personal Style and Creativity
- Think Outside the Box: The beauty of recycled crafting is that there are no limits. Get creative by mixing different materials (e.g., combining fabric with plastic or paper with metal) to make something one-of-a-kind.
- Customize: Add your personal flair with color choices, textures, and embellishments. Personalize your creations with photos, quotes, or your favorite patterns to reflect your style.
- Experiment with Techniques: Don’t be afraid to try different crafting techniques like decoupage, embroidery, or painting. Layer materials or add multiple textures to enhance the final look.
- Upcycle Everyday Items: Think of items you use daily and find ways to repurpose them—like turning old jeans into a bag or wine corks into a wall organizer.
FAQ
How do I organize and store recycled materials for crafting?
Organize recycled materials in labeled containers or storage bins based on the type of material (e.g., paper, glass, plastic). Keep materials in a dry, cool place to avoid any mold or damage. Recycle the items you don’t need frequently to avoid clutter.
Can I sell DIY Crafts Using Recycled Materials?
Yes, many people sell crafts made from recycled materials, especially if they are unique and eco-friendly. You can sell your crafts at local craft fairs, online platforms like Etsy, or through social media. Make sure to promote the sustainability aspect of your products.
Is there a specific tool kit for crafting with recycled materials?
While there’s no specific tool kit for crafting with recycled materials, common tools include scissors, glue, tape, paint, markers, hot glue guns, and craft knives. Some projects may require additional tools like a drill, sewing kit, or hot embossing tool, depending on the complexity of the craft.
Can I involve children in recycled crafts?
Absolutely! Recycled crafts are a fun and educational way to engage children. Projects like making collages from old magazines, creating sculptures from cardboard, or designing homemade greeting cards can be done with kids of various ages. Just make sure to supervise them with tools like scissors or glue guns.

Hi, I’m Victoria, an art and craft teacher at Newark City Schools, where I have the joy of working with middle school students to help them explore their creativity and develop their artistic talents. I believe that art is a powerful way for students to express themselves, and I strive to make every lesson a fun, engaging, and inspiring experience.
I created this website to share the art and craft projects, techniques, and resources that I use in my classroom, hoping to inspire both educators and young artists alike. Whether you’re a teacher looking for new ideas or a student eager to try something new, I’m excited to provide creative tools and projects that anyone can enjoy.
When I’m not in the classroom, I love experimenting with different art forms and learning new crafting techniques. My goal is to help others discover the joy of making things with their hands, and I hope my website serves as a space for everyone to explore their creative potential.