
Last weekend, I sat at my kitchen table surrounded by orange paper scraps, glue sticks, and a very unimpressed cat. I was trying to make cute Halloween paper crafts—you know, bats, pumpkins, and those adorable ghost garlands you see all over Pinterest. Halfway through, my spider cutouts looked more like squished starfish, and I couldn’t stop laughing. But honestly? That’s the charm of DIY projects. They don’t have to be perfect to be fun. If you’ve ever wanted to bring a little spooky magic into your home without spending much, paper crafts are such a cozy and creative way to do it. Whether you’re decorating for a party or just keeping the kids busy on a rainy afternoon, I’ve got plenty of easy, budget-friendly ideas coming up. So grab some scissors and tape—let’s make this Halloween a little more handmade, shall we?
Halloween Paper Crafts
Halloween Paper Crafts are a fun and affordable way to create spooky decorations using just paper and a little imagination. Perfect for kids, adults, classrooms, or parties, these crafts add a personal touch to your Halloween celebrations.

Paper Ghosts

There’s just something delightfully spooky about little paper ghosts floating around the house. I started making them last year when I had a bunch of leftover white tissue paper from a gift bag. Instead of tossing it, I crumpled up some scrap paper into little balls, wrapped the tissue around them, and tied the neck with string. Boom—a ghost! You can draw little sad or silly faces on them with a black marker, which honestly gives each one a totally different personality.
I like to tape them to the ceiling or string them along some twine like a haunted garland. My niece helped me once and insisted they all have eyelashes. I didn’t argue—they looked adorable. These are great because they’re super cheap to make, don’t take a lot of time, and still add that Halloween charm. Plus, you don’t have to be crafty to pull them off.
Pumpkin Lanterns
I always associate Halloween with pumpkins, but carving real ones is messy and kind of a commitment. So, paper pumpkin lanterns became my go-to. I make mine out of orange construction paper, sometimes layering with yellow for a glowing effect. You just fold the paper in half, cut slits almost to the edge, roll it into a cylinder, and staple it—so simple.
I hang these in bunches on the porch or stick LED tealights inside if I want a cozy glow indoors. One year, I tried it with metallic paper, and the light shimmered so nicely! You can get creative with faces too. I’ve drawn goofy ones, spooky ones, and once even a mustache-pumpkin. In my opinion, these are a lifesaver for last-minute décor when you want to get festive without turning your kitchen into a pumpkin guts crime scene.
Bat Garlands

Bats are Halloween icons, and honestly, cutting them out of black paper is oddly satisfying. I remember the first time I made a bat garland—I messed up the wings so many times, but after a few tries, I got the hang of it. I usually fold the paper and cut them out symmetrically, kind of like making paper hearts back in school.
I string them across windows, mirrors, and even doorways. Once, I made a mistake and hung them all upside down, but you know what? It worked! Now I just pretend it was on purpose. If you want to be extra, you can add tiny googly eyes or glitter glue (which my younger cousin insists is a must). These garlands are great because they’re reusable and lightweight—I’ve had some for three years running!
Witch Hat Bookmarks
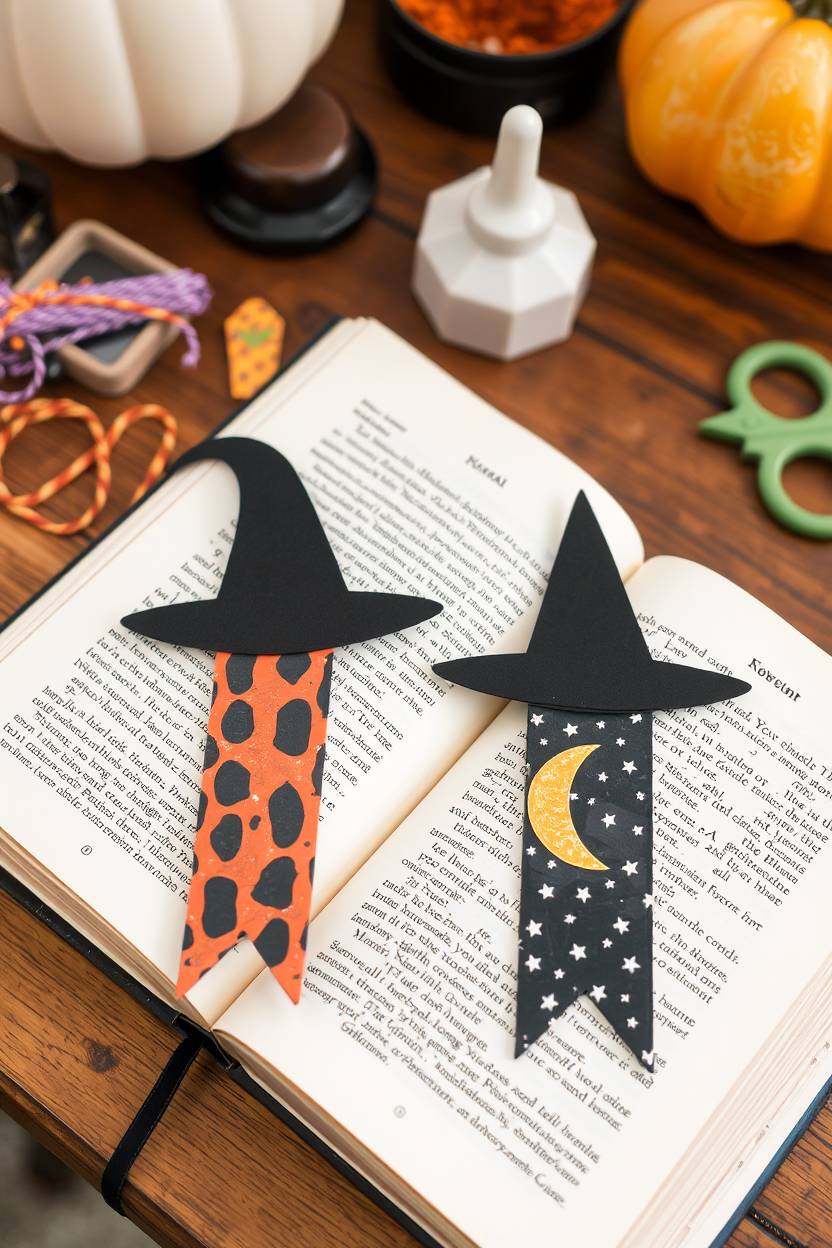
Okay, I admit it—I make these way more often than I need to. Witch hat bookmarks are just too cute not to. I stumbled onto the idea while folding origami one rainy afternoon and thought, what if I turn this into something spooky? You fold a triangle, cut out a little brim, and suddenly it’s a mini witch hat sitting on the edge of your book.
These make fun party favors too. I gave them out with candy at a Halloween book club meeting, and everyone lost their minds. You can use black cardstock or get fancy with patterned scrapbook paper. I once used glitter paper and, to be fair, regretted it a little—so much fallout. But honestly, these tiny hats are great little surprises to sneak into someone’s current read.
Spider Web Cutouts
These give me major nostalgia—they’re like the snowflakes we used to make in school but spookier. I use black or gray paper, fold it into a triangle, and start snipping little geometric shapes. When you unfold it—bam! A spider web! It takes a bit of practice to get the hang of spacing, but once you get it, it’s weirdly addictive.
Last Halloween, I stuck them on our windows with double-sided tape, and they looked so cool with the streetlight shining through. One tip: don’t try to be too perfect. Messy webs look more realistic anyway, in my opinion. Sometimes I add little paper spiders on top, which makes them extra creepy. If you’ve got kids around, this is a fun one to do together, just keep the scissors age-appropriate.
Skeleton Puppets

This one is always a hit, especially with kids who like to make things move. I print or draw skeleton parts on white cardstock, cut them out, and then attach them with little paper fasteners at the joints. Suddenly, you’ve got a dancing skeleton puppet you can pose however you like.
Once, I made a whole family of them and had a little puppet show for my nephew. He named one of them Mr. Jiggles, and it stuck. You can also color the bones with glow-in-the-dark paint, which is surprisingly effective under blacklight. These are perfect if you want something interactive instead of just decoration. Plus, I’ve found they make hilarious Halloween photo booth props.
Haunted House Silhouettes

Creating haunted house silhouettes has become a yearly tradition for me. I usually sketch out wonky roofs, crooked windows, and spooky chimneys on black paper and then cut them out to place on my windows. Add a bit of orange or yellow tissue paper behind them, and suddenly it looks like lights are glowing inside.
One time, I went way overboard and covered the whole front window with an elaborate haunted mansion scene. It took hours, but the compliments from neighbors made it totally worth it. The key is in the crooked details—nothing should be too straight or perfect. And honestly, cutting out tiny bats or ghosts to stick nearby just adds that extra creepy flair.
Monster Masks

Monster masks are where I get to go a little wild. I pull out all the colorful paper, yarn, foil, and anything else I can find in my craft bin. There’s no wrong way to make these—some of my favorites were completely weird with mismatched eyes and floppy tongues.
I like making them with elastic bands so people can actually wear them. Last year, I made a green one with eight eyes and gave it to my cousin, who wore it to the grocery store. People stared. It was glorious. These masks are awesome because they double as costume pieces and party entertainment. In my opinion, the sillier, the better.
Vampire Fangs Cards
This idea came from a joke card I made for a friend—I cut out paper fangs and stuck them inside a folded note that read “Bite me later.” It was a hit. Now, every Halloween, I make vampire fang cards with all sorts of messages.
You can make the fangs from white cardstock, add red paper drips, and glue them onto black folded cards. Sometimes I even tuck in a mini chocolate. I find these cards are great for classroom treats or spooky party invites. It’s just a fun twist on a greeting card that feels very Halloween-y without being over the top.
Black Cat Fans
These are surprisingly fun to make and even more fun to wave around dramatically. I start with a basic accordion-folded fan in black paper, then cut little triangle ears and green eyes to glue on the top. Add a tail on the back, and boom—you’ve got a black cat fan.
I used these once as party favors and someone said it reminded them of vintage Halloween décor. I hadn’t thought of that, but it fits! In my opinion, they look super cute stuck in flower vases or laid on a party table. And if you’re having a hot October (which we sometimes do here), they actually work as fans too.
Origami Bats
Origami bats are a bit trickier than the average fold, but once you get it right, they look so sleek. I watched a YouTube tutorial three times before I made one that didn’t look like a squashed frog, but now I can fold one in my sleep.
I use black origami paper, sometimes adding silver ink outlines to give them more dimension. These look great hanging from fishing line or glued to the wall in little flying groups. The best part is they’re flat, so they store super easily year to year. I’ve found these make great additions to cards and gift tags too—bonus Halloween flair with minimal effort.
Mummy Gift Bags
These are a hoot! I grab small brown or white paper bags, wrap them with strips of white crepe paper or gauze, and glue on a pair of googly eyes peeking through. They look like tiny wrapped mummies ready to hand out candy.
I once made these for a classroom party and the kids were obsessed. Some even named their bags. You can write little names or spooky sayings on the back too. In my opinion, they beat regular treat bags by a mile. Plus, they’re ridiculously easy to make last minute with stuff you probably already have.
Candy Corn Chains
These are bright, cheerful, and seriously underrated. I cut out tons of little candy corn shapes from yellow, orange, and white paper and glue them into a long garland. It’s kind of like a paper chain but cuter.
I hang mine across the fireplace or around door frames. One year, I even strung them across the car for a Halloween tailgate party. They held up surprisingly well! I think it’s the colors—they just scream Halloween without being scary. And if you’re not a fan of real candy corn (I get it, it’s a love-hate thing), this is a fun way to appreciate them from a safe distance.
Frankenstein Face Plates
Paper plates are the base for so many crafts, but Frankenstein plates are my favorite. I paint the plate green, glue on some paper bolts, add hair, and give him the goofiest face I can manage. I’ve even used yarn for hair or stuck on craft foam eyebrows.
These are awesome for decorating walls or sticking onto treat bags. My niece made one with one eye and a huge pink smile—not very spooky, but absolutely adorable. In my opinion, letting the kids go wild with the faces is half the fun. The wackier the better, I say.
Trick-or-Treat Signs
I love making my own signs for the door—”Trick-or-Treaters Welcome,” “Beware of the Witch,” or even silly ones like “Come Back With Candy.” I cut out large letters from paper, glue them to cardboard or foam core, and then go nuts decorating.
Sometimes I use glitter, sometimes googly eyes, sometimes just scribbly marker doodles. The best one I made was shaped like a tombstone with dripping letters. It stayed on our porch for weeks! Honestly, it’s a fun way to show off your personality and welcome trick-or-treaters in style. And making your own means it’s always unique.
Tips for Crafting with Kids
Crafting with kids during Halloween can be a fun, creative, and memorable experience. Halloween paper crafts are a great way to spark their imagination while spending quality time together. To keep things safe and enjoyable, here are some helpful tips:
-
Always supervise with scissors or sharp tools
Ensure an adult is present whenever children are using scissors, craft knives, or other sharp items to avoid accidents. -
Use templates to simplify tricky designs
Pre-made templates can make cutting and folding easier, especially for younger children or more detailed crafts. -
Set up a craft station with organized materials
Keep all supplies like paper, glue, markers, and decorations neatly arranged so kids can find what they need without making a mess. -
Make it a group activity or party craft session
Turn crafting into a social event by involving friends, siblings, or classmates—it makes the experience more fun and encourages teamwork.
FAQ
What age group are Halloween paper crafts suitable for?
Halloween paper crafts can be enjoyed by all age groups. Simple projects are perfect for young kids, while older children and adults can try more detailed designs.
What basic supplies do I need to start Halloween paper crafting?
You’ll need colored paper, scissors, glue or tape, markers, and optional items like googly eyes, glitter, or templates for added fun.
Can I use recycled paper for these crafts?
Yes! Using old newspapers, magazines, or cardboard is an eco-friendly way to create Halloween crafts and reduce waste.
Are there printable templates available for these crafts?
Yes, many websites offer free or paid printable templates for Halloween paper crafts, which can help make cutting and shaping easier.

Hi, I’m Victoria, an art and craft teacher at Newark City Schools, where I have the joy of working with middle school students to help them explore their creativity and develop their artistic talents. I believe that art is a powerful way for students to express themselves, and I strive to make every lesson a fun, engaging, and inspiring experience.
I created this website to share the art and craft projects, techniques, and resources that I use in my classroom, hoping to inspire both educators and young artists alike. Whether you’re a teacher looking for new ideas or a student eager to try something new, I’m excited to provide creative tools and projects that anyone can enjoy.
When I’m not in the classroom, I love experimenting with different art forms and learning new crafting techniques. My goal is to help others discover the joy of making things with their hands, and I hope my website serves as a space for everyone to explore their creative potential.