You know, the other day I was cleaning out a drawer and found this little bowl I made years ago from air dry clay. It was lopsided, the paint was chipped, and honestly—it looked kind of funny. But you know what? I couldn’t stop smiling, because it reminded me how much fun I had making it. That’s the magic of air dry clay crafts ideas—they don’t have to be perfect to be special.
If you’ve ever stared at a plain afternoon wondering what to do with your hands (or maybe even how to keep the kids entertained without screens), clay is such a lifesaver. No fancy kiln, no big mess, just a bit of imagination and some clay that dries on its own. In this post, I’ll share simple, fun, and creative ways you can turn that humble block of clay into little treasures that actually mean something.
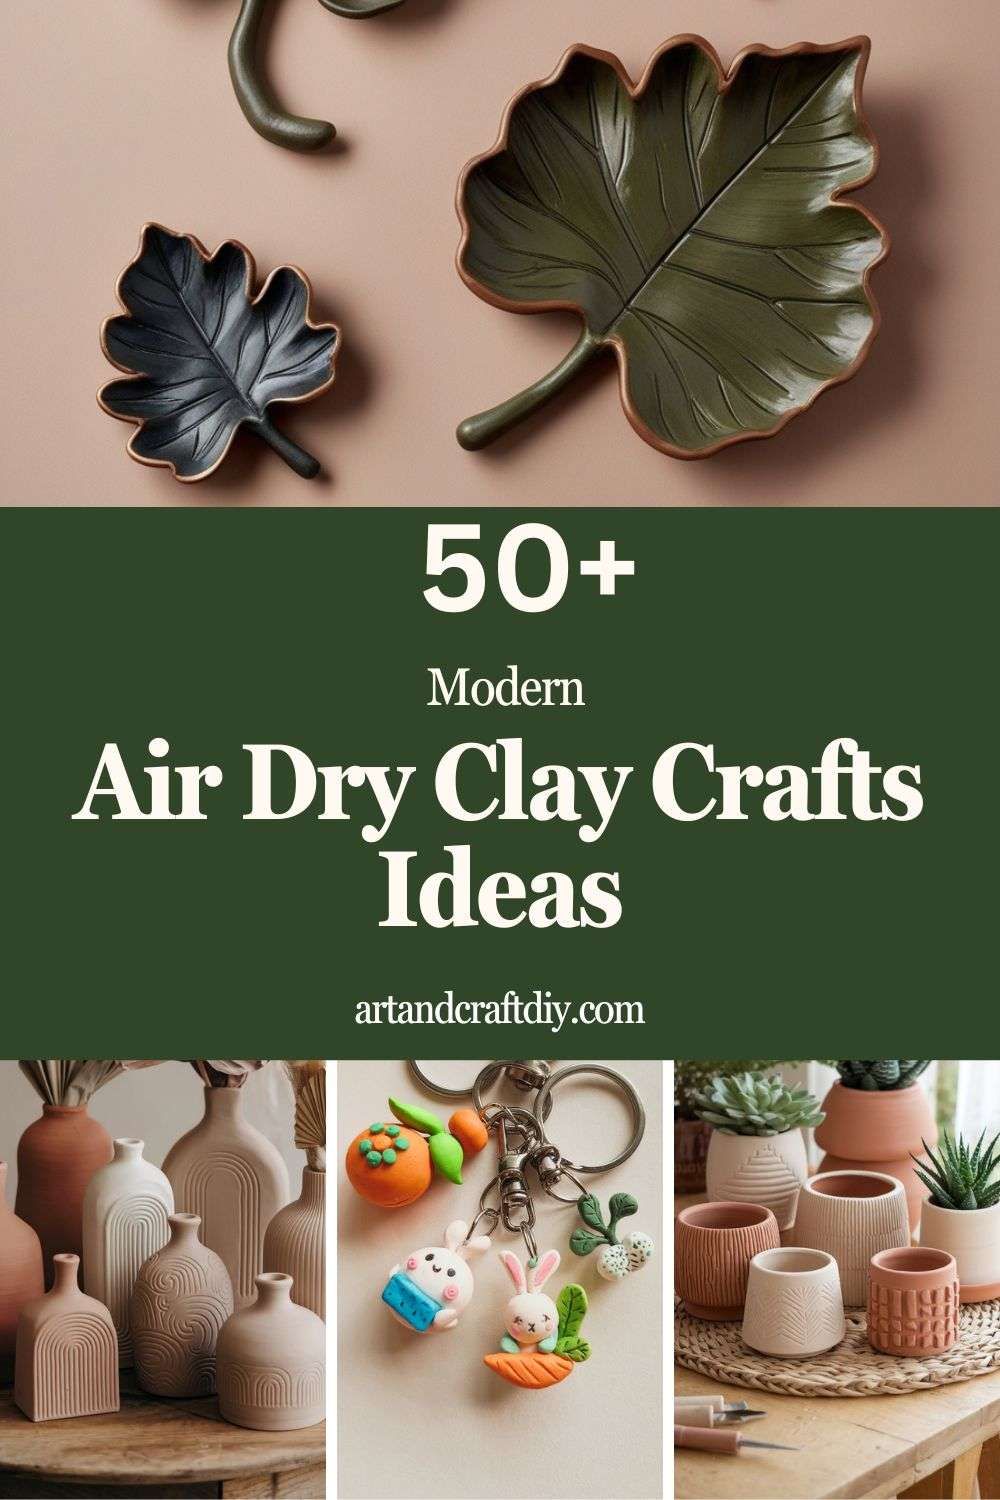
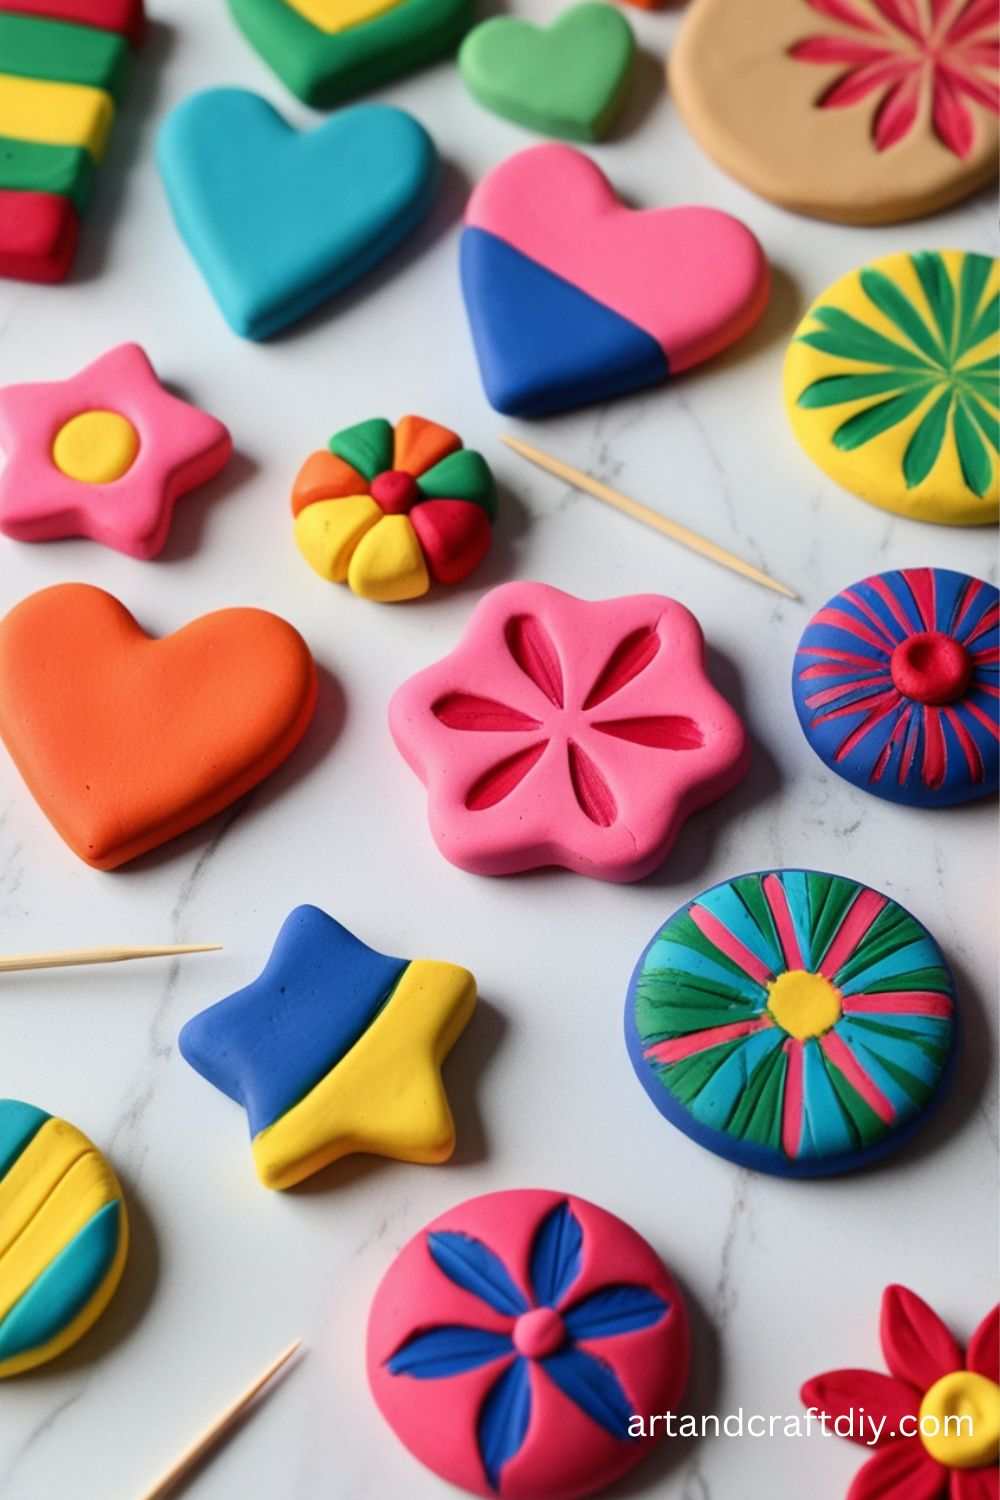
Air Dry Clay Crafts Ideas
Air dry clay is a versatile and easy-to-use material for crafting, offering endless possibilities for creative projects.
Air Dry Clay Coasters
I’ve always loved the idea of making my own coasters because, let’s be real, they’re one of those things you never buy intentionally, yet your table desperately needs them. The first time I made clay coasters, I remember sitting with a cup of tea nearby, rolling out the clay way too thick, and ending up with something that looked more like chunky tiles than coasters. But that’s the fun part—you experiment. I usually press a lace doily or even leaves onto the clay for texture. The imprint feels so unique, and you can even paint over it lightly to highlight the design.
Honestly, the best thing about clay coasters is how personal they can get. I once gifted a set to my friend, and I swear she thought I’d bought them from a boutique shop. A simple trick? Seal them properly with a clear varnish so they actually survive the coffee spills and water rings. Nothing feels better than sipping your chai and knowing the coaster under your cup was handmade by you.
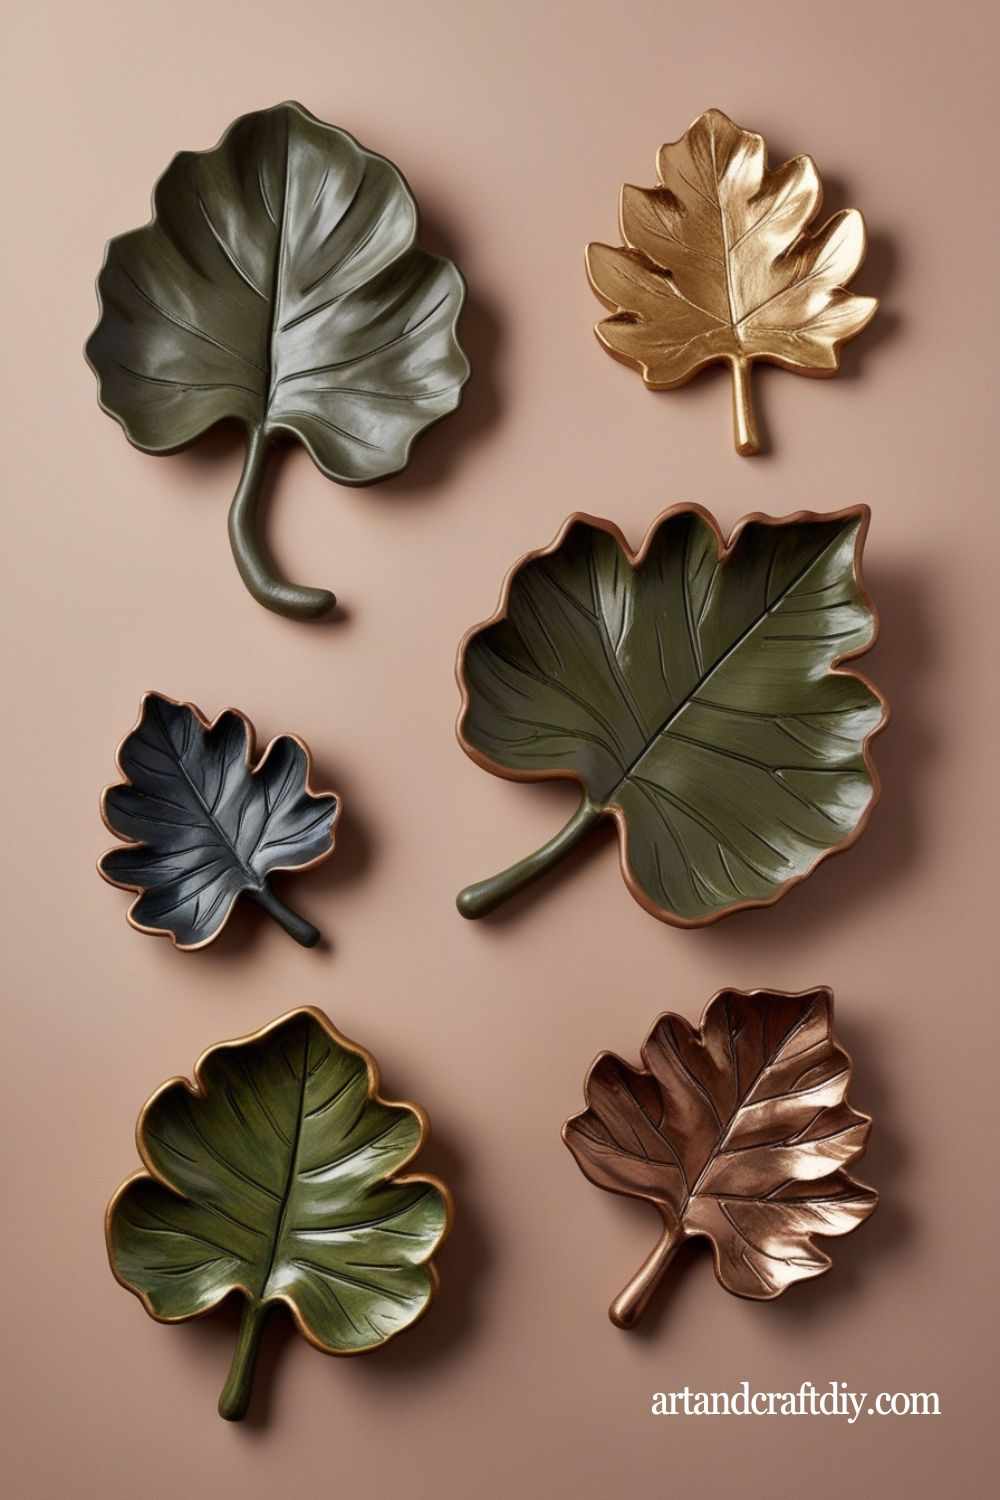
Clay Leaf Trays
Clay leaf trays are one of those projects that make you feel like nature is literally part of your décor. I remember once I went into my garden, picked a big mango leaf, pressed it into the clay, and when I peeled it off—oh boy—the veins looked magical. It’s like capturing a tiny fossil in your craft. These trays are perfect for keeping keys, jewelry, or even just as a little decorative piece by the window.
In my opinion, they work best when you don’t overthink them. Don’t stress if the edges aren’t smooth or if it looks a bit rustic. That’s the charm! I’ve made some as gifts, and every single time, people ask me where I bought them. And I love replying, “Actually, I made it.” If you want that natural, organic vibe in your home, clay leaf trays are such an easy win.
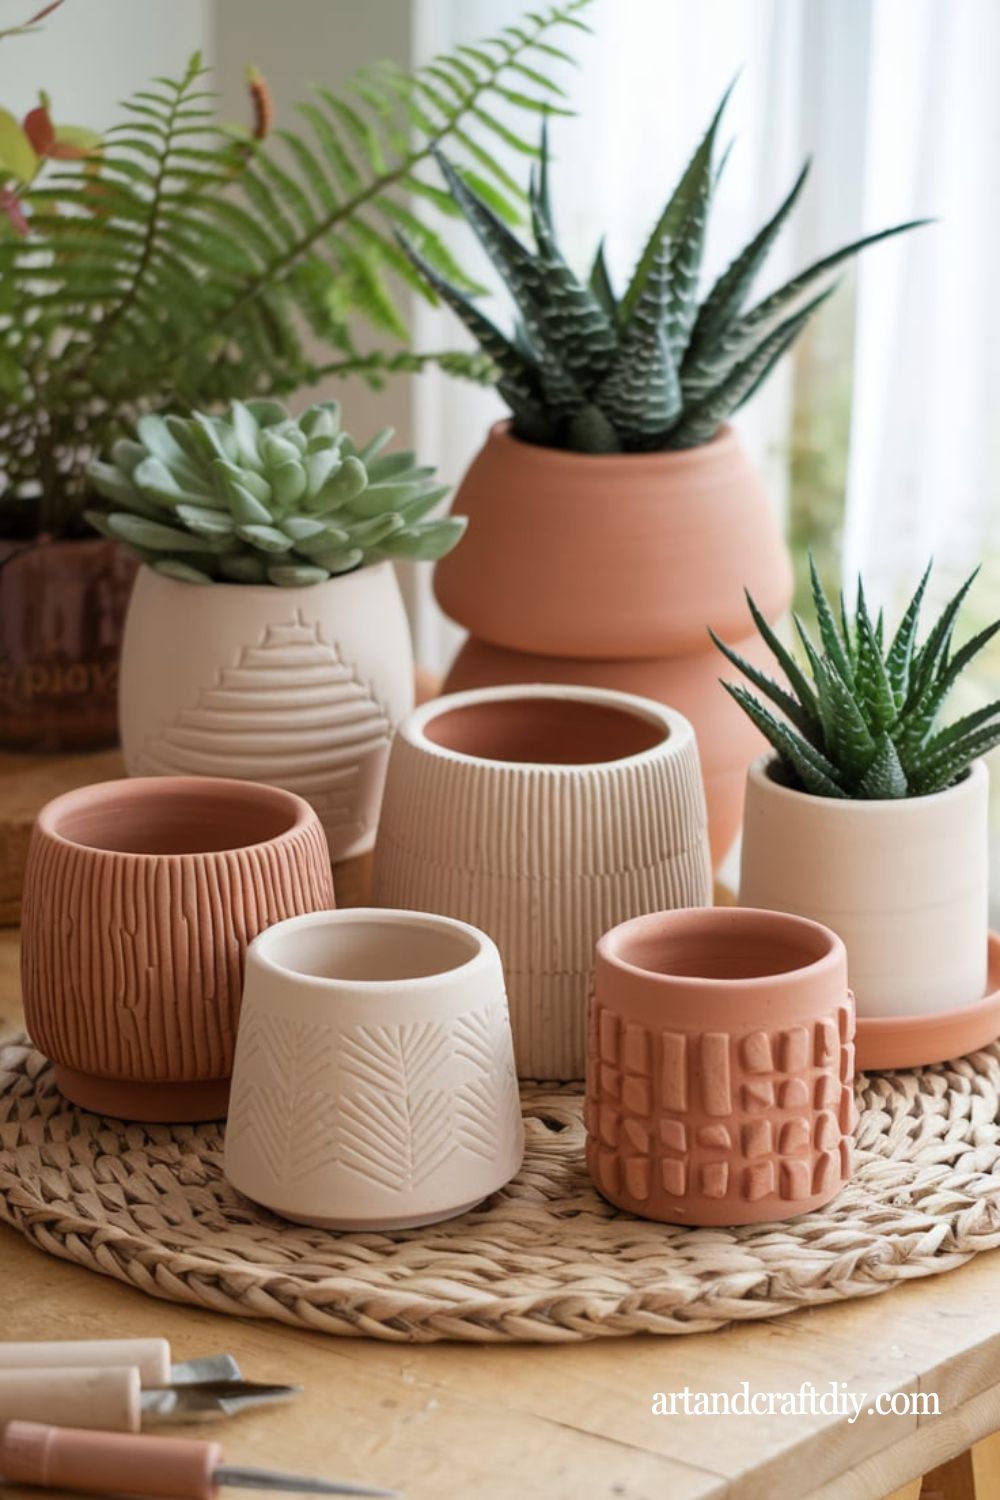
Clay Plant Pots
I’ve had a long love-hate relationship with clay plant pots. The first one I made cracked because I didn’t dry it evenly—rookie mistake. But when it works, it feels like magic. Shaping clay into a pot with your own hands, then watching a little succulent thrive in it—it’s like giving life twice. I like to roll out clay, cut a rectangle, and wrap it around a base. Simple but effective.
The real fun part is decorating. Sometimes I paint quirky faces on them, so it looks like the plant has hair growing out. Other times, I keep it minimal with just a matte white finish. To be fair, they’re not as durable as ceramic ones, but if you’re gentle, they last. Plus, nothing beats the pride of saying, “This pot? Yep, handmade.” Honestly, it just makes me water my plants more often.
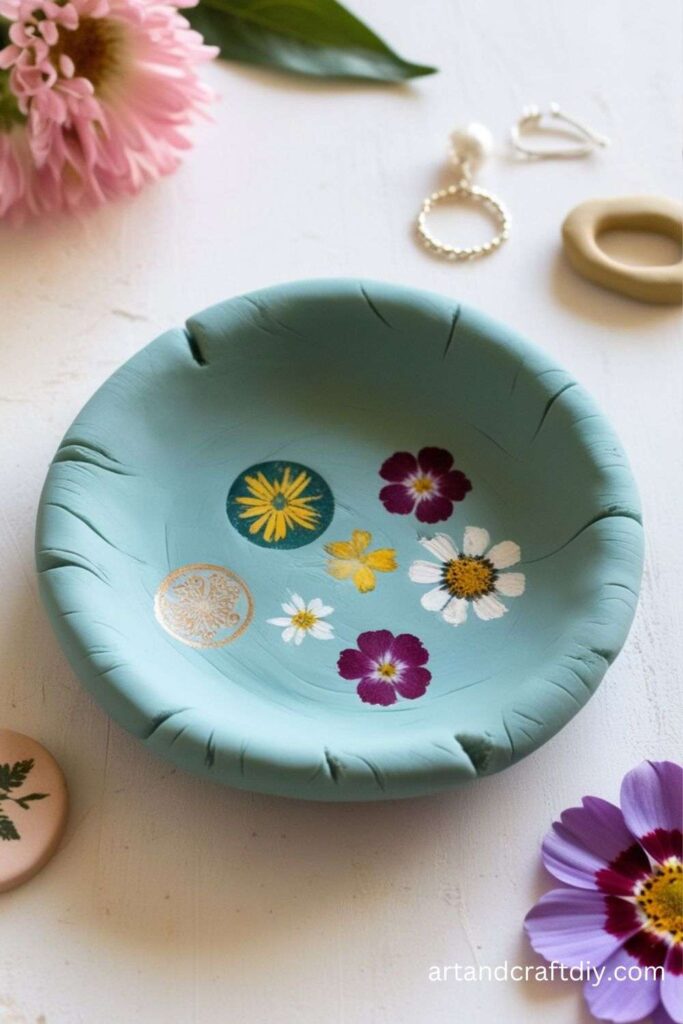
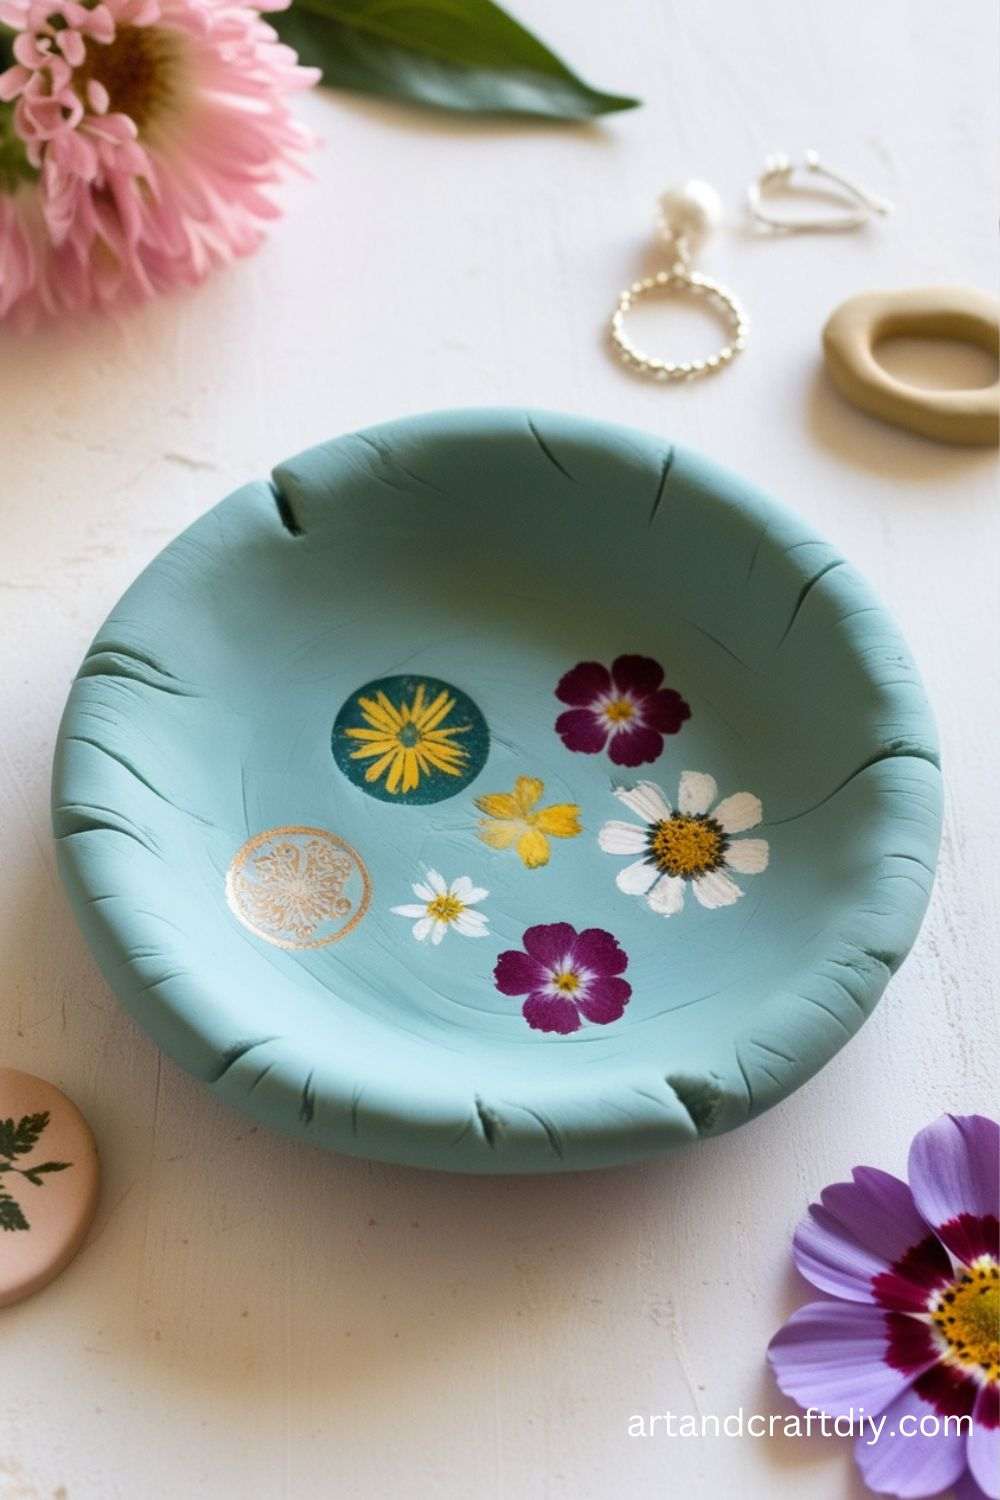
Clay Jewelry Dish
You know those little trinket dishes that keep your rings and earrings safe? Making them with clay feels so personal. I still remember the first jewelry dish I made—it was wobbly, uneven, and I absolutely loved it. There’s something charming about imperfections. I pressed tiny flowers into the clay before it dried, and when I painted over, the patterns looked so delicate.
Sometimes I go for a marbled look by mixing two clay colors together. It’s surprisingly easy and looks fancy without any effort. In my opinion, these make perfect handmade gifts—practical yet thoughtful. Every time I see mine on the dresser holding my rings, I feel a little proud. Honestly, why spend money on a store-bought dish when you can make one that tells your own story?
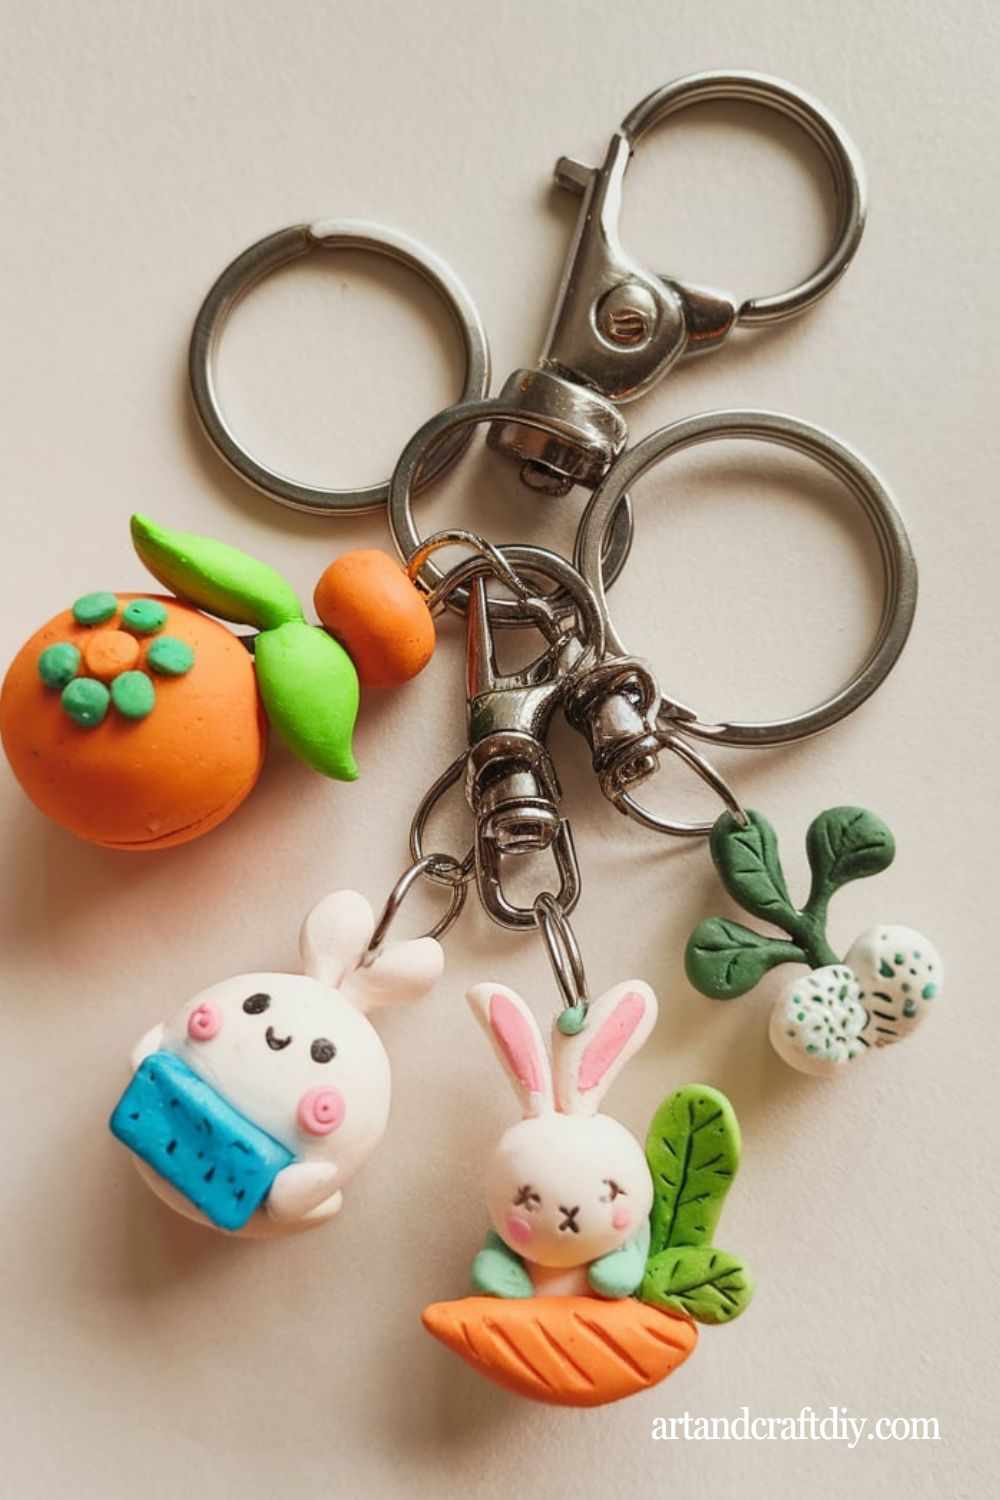
Clay Keychains
Clay keychains are probably the craft that made me realize how fun “small projects” can be. They don’t take much clay, but the impact? Huge. The first one I made was just a simple heart shape, painted red, and I used it for years until it wore out. It’s funny how a tiny piece of clay can travel everywhere with you, jingling along with your keys.
I love making alphabet keychains—initials of my friends’ names. They make great little surprise gifts. You can also play around with shapes: stars, animals, or even random blobs (I’ve done that too, and they looked cool). To be fair, the trickiest part is sealing the hole properly for the keyring, otherwise it can snap. But once you figure that out, you’ll find yourself making them in batches. Honestly, they’re addictive.
Clay Wall Art
Wall art with clay? Oh yes, it’s a game-changer. I once rolled out clay into thin sheets, cut out abstract shapes, painted them bold colors, and stuck them on a canvas. The 3D effect was incredible—it made my wall look like something out of an art gallery. And the best part? No two pieces ever look the same.
I’ve also tried making clay tiles with mandala patterns and hanging them in a set. They instantly warm up a boring wall. In my opinion, clay wall art is perfect for anyone who wants to add a personal stamp to their home without spending a fortune. It’s messy, sure, but isn’t that part of the fun? Honestly, every time I look at my handmade wall piece, I feel like I’ve sneaked a little bit of my personality onto the wall.
Clay Figurines
Figurines take patience, but oh, the satisfaction when you’re done! I once tried making a tiny clay cat because my niece loves cats. It was far from perfect—the ears were uneven, the tail wobbled—but she hugged it like it was treasure. That moment made me realize figurines don’t need to be perfect; they just need character.
If you’re like me and don’t have sculpting tools, don’t worry. Toothpicks, spoons, even your fingers do the trick. Honestly, I’ve made little gnomes, animals, even a funny snowman once. To be fair, it takes some trial and error, but each piece carries a bit of your personality. Whenever I look at the figurines I’ve made, they remind me of the mood I was in while creating them. That’s what makes them special.
Clay Magnets
Clay magnets are ridiculously fun. I first made them as a last-minute craft before a party, and people went nuts over them. I cut out small shapes—flowers, stars, even little fruit slices—painted them in bright colors, glued magnets on the back, and boom! My fridge went from boring to cheerful in one afternoon.
The best part? They’re so customizable. I once made a set shaped like coffee mugs because, well, I’m a coffee addict. Every time I open the fridge, they make me smile. Honestly, it’s the easiest project if you’re looking for quick wins. Plus, they make great little gifts. In my opinion, everyone secretly loves a fun fridge magnet—it’s like a tiny piece of joy that greets you every day.
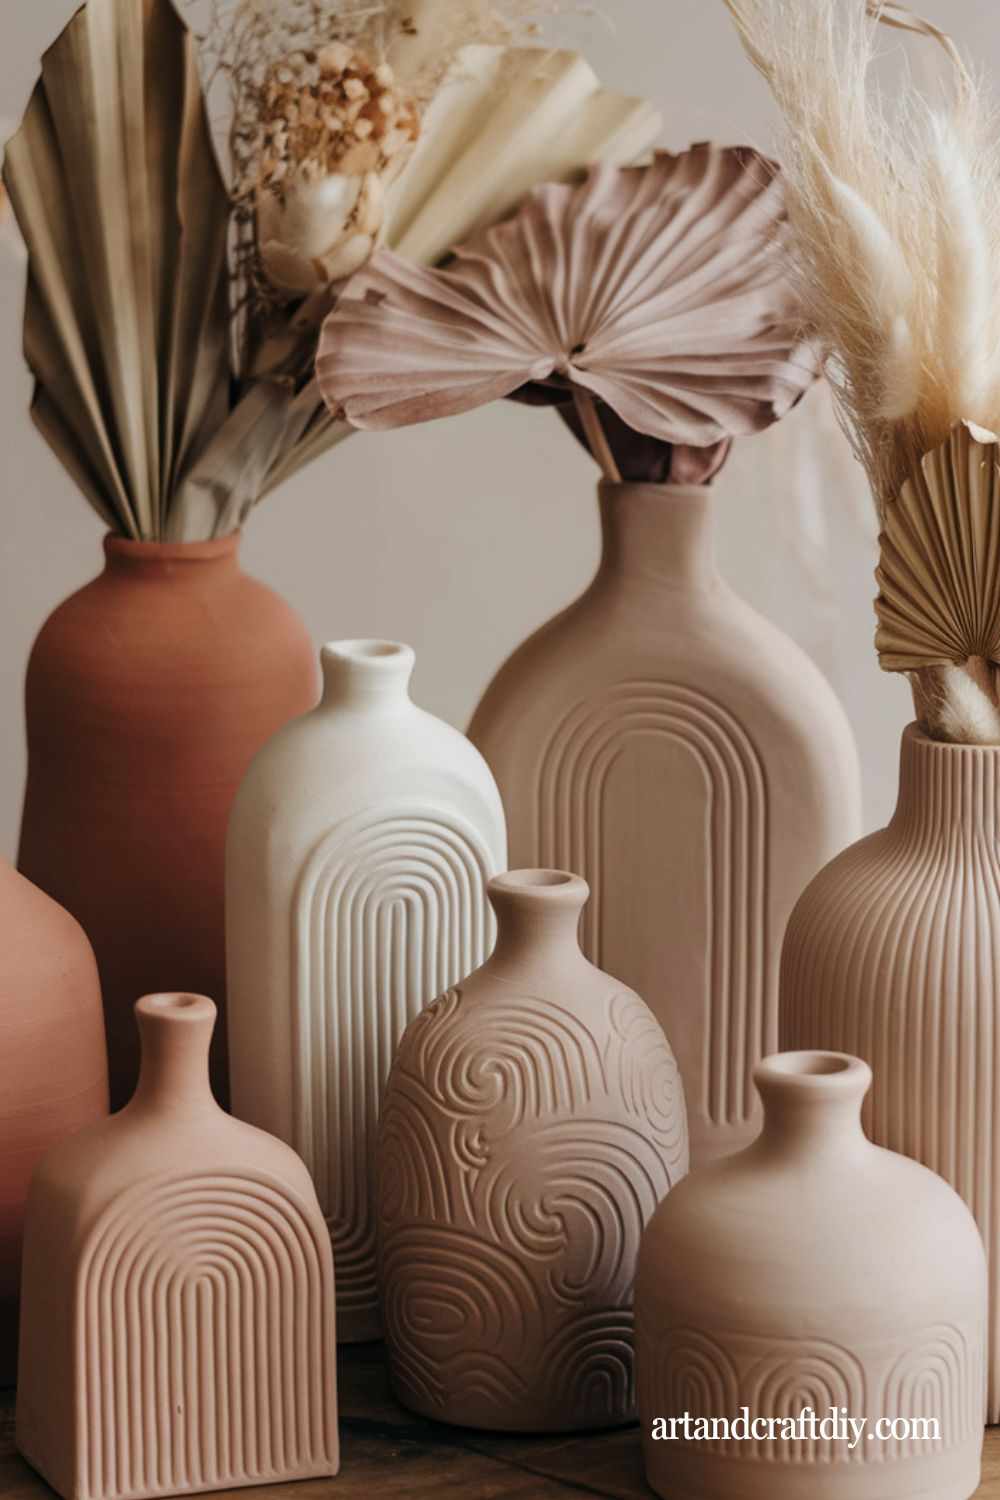
Clay Vases
Now, vases are a bit of a challenge, but they’re worth every bit of effort. I remember the first vase I made collapsed halfway through drying because I didn’t support it well. Lesson learned! But once I got it right, it became the centerpiece of my dining table. There’s something magical about putting fresh flowers into a vase you actually made with your own hands.
I usually go for small, bud-sized vases because they’re easier and honestly less risky. Painting them is the fun part—you can go sleek and minimal or bold and artsy. To be fair, they’re more for decorative use than holding gallons of water, but hey, they look stunning. Whenever guests come over, that’s one of the first things they notice. And I always grin and say, “Yep, made it myself.”
Clay Candle Holders
Candle holders out of clay are pure coziness. I once made a set of tealight holders shaped like stars for Diwali, and when the candles lit up inside, the glow was unreal. The clay gives such a warm, earthy vibe—it instantly makes the space feel more inviting.
I’ve played around with different shapes—circles, hearts, even abstract blobs. Honestly, the imperfect ones look the best once the candles are lit. I’d say just make sure the base is flat enough so it doesn’t tip over. To be fair, I’ve made so many over the years that I now use them year-round. They make even a dull evening feel special. And the best part? People always assume they’re store-bought. Nope—handmade, thank you very much.
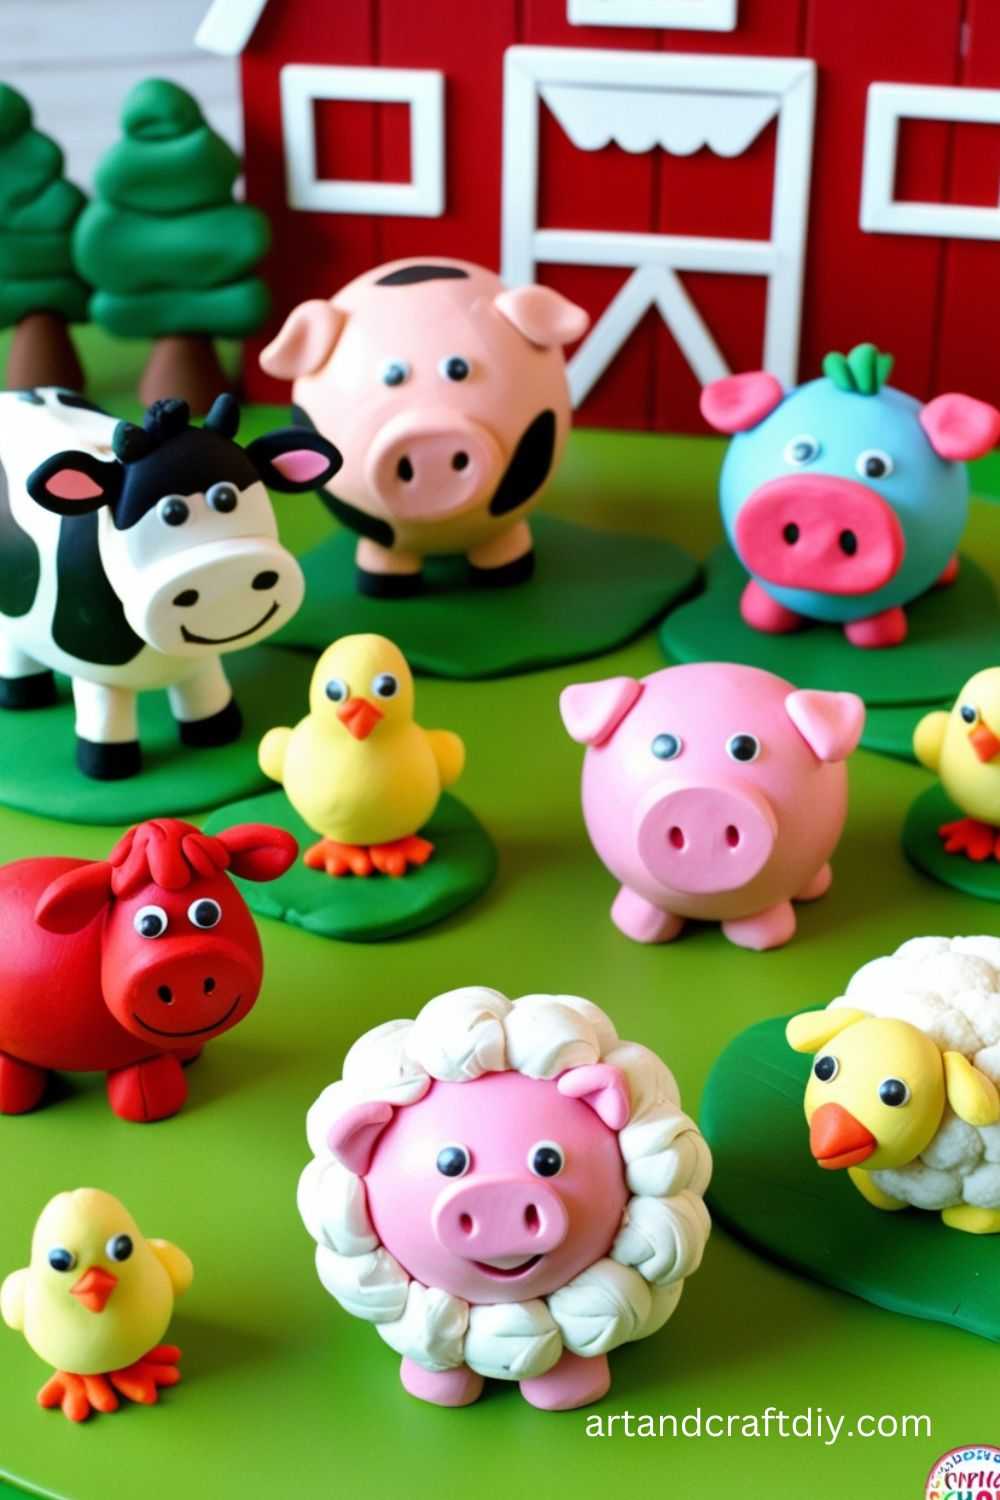
Clay Animal Sculptures
Create miniature animals out of clay for a fun art project.
Materials Used:
Air dry clay
Sculpting tools
Acrylic paint
Steps:
Shape clay into the basic form of an animal.
Use sculpting tools to add details such as eyes, ears, and limbs.
Let the sculpture dry thoroughly.
Once dry, paint and decorate the animal as desired.
Clay Decorative Bowls
Create small bowls that can be used for candies, jewelry, or as decorative items.
Materials Used:
Air dry clay
Rolling pin
Bowl for shaping
Acrylic paints
Steps:
Roll out the clay to an even thickness.
Use a small bowl as a mold, pressing the clay into the shape of the bowl.
Smooth the edges and let it dry.
Once dry, paint the bowl with any design you like.
Use your new bowl for storing small items or as decoration.
Clay Fridge Decor
Small clay pieces to decorate your fridge or magnetic surfaces.
Materials Used:
Air dry clay
Rolling pin
Cookie cutters or molds
Craft knife
Magnets
Paint (optional)
Steps:
Roll out the clay and cut into fun shapes like fruits, flowers, or animals.
Attach a magnet to the back of each shape.
Allow the clay to dry.
Paint and decorate the pieces if desired.
Stick them on your fridge to add a personal touch.
Clay Miniature Food
Make tiny clay food items, like cakes, cupcakes, or fruits, for miniature scenes or as keychains.
Materials Used:
Air dry clay
Sculpting tools
Acrylic paint
Steps:
Roll small balls of clay and shape them into miniature food items, such as cookies or fruits.
Add small details with sculpting tools, like texture or small decorations.
Let the items dry completely.
Once dry, paint with acrylic paints for a realistic look.
Clay Button Bracelets
Create stylish bracelets with personalized buttons made from air dry clay.
Materials Used:
Air dry clay
Craft knife
Toothpick
String or elastic thread
Acrylic paint (optional)
Steps:
Roll out the clay and cut small button shapes with a craft knife.
Use a toothpick to create holes in the center of the buttons.
Let the buttons dry completely.
Paint the buttons if desired.
Thread the buttons onto string or elastic to make a bracelet.
Clay Bangle Cuffs
Design stylish bangles or cuffs with air dry clay.
Materials Used:
Air dry clay
Rolling pin
Craft knife
Acrylic paint
Steps:
Roll out the clay into a flat sheet.
Cut the sheet into a strip that fits around your wrist.
Shape the strip into a bangle or cuff shape.
Let the bangle dry completely.
Paint and decorate the cuff as desired.
Clay Pinch Pots
Create small pinch pots for holding jewelry, keys, or small trinkets.
Materials Used:
Air dry clay
Craft knife
Water
Steps:
Take a small ball of clay and pinch it between your fingers to form a bowl shape.
Smooth out the inside and outside of the pot.
Let it dry completely.
Once dry, you can decorate it with paint or glaze.
Clay Jewelry Sets
Make matching earrings, necklaces, and rings from air dry clay.
Materials Used:
Air dry clay
Rolling pin
Craft knife
Earring hooks or necklace chains
Acrylic paint
Steps:
Roll out the clay and cut it into shapes for earrings, necklaces, and rings.
Use small tools to add details and holes for hooks or chains.
Let the pieces dry completely.
Once dry, paint and assemble your jewelry.
Clay Garden Markers
Create decorative garden markers for your plants.
Materials Used:
Air dry clay
Craft knife
Acrylic paints
Steps:
Roll out the clay and cut into shapes like rectangles or leaves.
Use a craft knife to carve the plant names onto the markers.
Let the markers dry completely.
Once dry, paint them for extra decoration.
Clay Pendants
Make personalized pendants for necklaces or keychains.
Materials Used:
Air dry clay
Rolling pin
Craft knife
Paint or markers
Steps:
Roll the clay into a flat shape and cut out your pendant design.
Use a craft knife to carve details and make a hole for the chain.
Let it dry completely.
Once dry, paint or decorate the pendant as desired.
Clay Wall Hooks
Design functional and decorative wall hooks using air dry clay.
Materials Used:
Air dry clay
Rolling pin
Hooks
Acrylic paint
Steps:
Roll out the clay and cut it into your desired shape for the hook base.
Attach a metal hook to the base while the clay is still soft.
Let the clay dry completely.
Once dry, paint the wall hook to match your décor.
Clay Picture Frames
Create custom picture frames using air dry clay.
Materials Used:
Air dry clay
Picture frame template
Craft knife
Acrylic paints
Steps:
Roll the clay and shape it into a frame to fit your picture.
Cut and shape the clay to create a textured look or smooth edges.
Allow the frame to dry completely.
Once dry, paint or decorate the frame as desired.
Clay Candle Toppers
Create decorative clay toppers for candles.
Materials Used:
Air dry clay
Rolling pin
Craft knife
Acrylic paints
Steps:
Roll out the clay and shape it into the design you want for the candle topper.
Let it dry completely.
Once dry, paint it for decoration.
Place the topper on top of a candle for a unique touch.
Clay Trivets
Make clay trivets to protect your table from hot pots and pans.
Materials Used:
Air dry clay
Rolling pin
Craft knife
Acrylic paint (optional)
Steps:
Roll the clay into a flat slab.
Cut the shape of the trivet, making sure it’s large enough for hot items.
Smooth the edges and surface.
Let it dry completely.
Once dry, paint it with a design if desired.
Clay Cupcake Toppers
Make cute toppers for cupcakes or cakes for birthdays and parties.
Materials Used:
Air dry clay
Rolling pin
Cookie cutters
Sculpting tools
Acrylic paint
Steps:
Roll out the clay and use cookie cutters to cut out small shapes for the toppers.
Add details with sculpting tools to make fun designs like flowers or animals.
Let the toppers dry completely.
Paint them for extra decoration and stick them onto cupcakes.
Clay Handprints
Make a lasting memory with a clay handprint.
Materials Used:
Air dry clay
Rolling pin
Craft knife
Paint (optional)
Steps:
Roll out a slab of clay.
Press your hand firmly into the clay to create a handprint.
Smooth the edges and let it dry.
Once dry, paint it as desired and display it as a keepsake.
Clay Picture Holders
Create picture holders using air dry clay.
Materials Used:
Air dry clay
Craft wire
Acrylic paint
Steps:
Roll out clay into a base shape for the picture holder.
Use wire to create a stand for the photo.
Let the clay dry completely.
Paint the holder and wire as desired.
Clay Animal Ornaments
Create small animal ornaments for your Christmas tree or as gifts.
Materials Used:
Air dry clay
Sculpting tools
Paints
Steps:
Shape the clay into small animal forms using sculpting tools.
Let them dry completely.
Paint the animals and add string to hang them as ornaments.
Clay Miniature Pots for Dolls
Make miniature flower pots for dollhouses or as decorative pieces.
Materials Used:
Air dry clay
Craft knife
Paints
Steps:
Roll out small pieces of clay and shape them into miniature pots.
Smooth the edges and let them dry.
Once dry, paint and decorate as desired.
Clay Wind Chimes
Craft a beautiful set of wind chimes using air dry clay.
Materials Used:
Air dry clay
Craft wire
Beads
Paint
Steps:
Roll out the clay and cut it into small shapes for the chimes.
Attach beads and use wire to string the pieces together.
Let everything dry completely.
Paint the chimes as desired and hang them outside to enjoy the breeze
Clay Storage Solutions
Clay storage solutions offer a beautiful and functional way to organize your space while adding a touch of artistry. Whether you’re storing small trinkets, jewelry, or simply looking for a unique decorative item, clay boxes and containers provide endless opportunities for customization. Here’s a guide on how to create small decorative boxes or jars using clay, and tips for making them even more special.
Clay Boxes and Containers
Creating clay boxes and containers is a fun and rewarding craft project. These pieces can be both practical and decorative, serving as storage solutions for small items, while elevating your home decor. Here’s how you can create your own:
Basic Materials Needed:
Air-dry or oven-bake clay
Rolling pin
Clay tools (such as a cutter, blade, and texture tools)
Paint or glaze for finishing
Creating the Base:
Roll out your clay to the desired thickness.
Cut out the shapes for the sides, bottom, and lid of the container.
Score and slip the edges before joining to ensure they stick together properly.
Shaping the Container:
Mold the clay into the desired box or jar shape.
Ensure the edges are smooth and that the lid fits snugly, leaving some room for easy removal.
Drying and Baking:
Allow the container to dry completely if using air-dry clay, or bake it if using oven-bake clay, following the manufacturer’s instructions.
How to Create Small Decorative Boxes or Jars
If you want your clay storage to have a bit of flair, here are some tips for creating small decorative boxes or jars:
Choose Your Design:
Decide on the theme or style you want for your container—rustic, minimalist, boho, or even elegant.
Consider the purpose of the container—whether it’s for jewelry, trinkets, or simply a decorative piece.
Shape and Texture:
You can create different textures on the surface of the clay using tools like stamps, lace, or natural objects (e.g., leaves, flowers).
Adding texture can give the piece a handmade and organic feel.
Decorative Lids, Handles, and Embellishments:
Lids: For lids, think of creating unique shapes, like a flower, geometric design, or a simple flat lid with an added knob.
Handles: Use small coils of clay to create handles or knobs, which can be attached with scoring and slipping.
Embellishments: Add decorative elements like gold leaf, beads, or buttons to enhance the design.
Trinket Boxes: Personalized Storage for Jewelry or Keepsakes
Trinket boxes are a great way to store small, precious items while showcasing your personal style. Here’s how you can create your own personalized trinket boxes for jewelry, keepsakes, or other small treasures:
Personalization:
Make the box unique by choosing a design that reflects the personality of the person receiving it or your personal style. Consider adding initials or custom patterns to the surface.
Use of Color:
Choose colors that complement the space or the individual’s taste. You can use paint, markers, or glazes to color your box.
Decoration Tips:
Painting: Use acrylic paints to add vibrant designs, patterns, or personalized touches to the surface of the box.
Gold Leaf: Apply gold leaf for an elegant and luxurious finish. This works especially well on the edges or the lid.
Adding Texture: Use different tools to create a variety of textures, such as a distressed or rough texture, which can add visual interest to the design.
Creating a Secure and Stylish Lid:
A snug lid is important for a trinket box, so make sure your lid fits well. You can make it decorative by adding raised patterns or embellishments like a small clay flower or gemstone.
Tips & Techniques for Air Dry Clay Crafting
Air Dry Clay Crafts Ideas are versatile medium that’s perfect for crafting everything from simple decorations to intricate sculptures. Whether you’re a beginner or experienced crafter, understanding the best techniques can significantly improve the outcome of your projects. Below are some essential tips to help you work with air dry clay efficiently and troubleshoot common issues.
Sculpting Tips
Prepare Your Workspace: Always work on a clean, flat surface. Lay down parchment paper or a silicone mat to prevent the clay from sticking.
Use Proper Tools: While hands are great for shaping, tools like clay knives, rolling pins, and texture stamps can help you achieve fine details and smooth surfaces.
Moisture Control: Keep the clay damp, but not wet, when working with it. If it starts to dry out too quickly, lightly mist it with water to maintain flexibility. Use a damp cloth to cover unused clay to prevent it from drying out prematurely.
Break Projects into Phases: For larger or more complex projects, work in stages. Allow certain parts of your creation to dry slightly before adding more clay to prevent sagging or collapse.
Best Practices for Shaping and Molding the Clay
Start with Basic Forms: When sculpting, begin with simple shapes (balls, ovals, cylinders) and build from there. This approach ensures structural integrity and saves time.
Use the Pinch and Coil Method: For detailed sculptures or models, use the pinch technique (pinching small pieces of clay) and the coil method (rolling out clay into thin ropes) to build up texture and volume.
Press and Join Parts Carefully: To join pieces of clay, score both surfaces (make small scratches) and use water or slip (a mixture of clay and water) to bind them. Smooth out seams for a professional finish.
Layering: If you’re creating thick pieces, work in layers to avoid cracking. Allow each layer to dry slightly before adding the next to ensure even drying.
Techniques for Smoothing Out Cracks and Imperfections
Wet Your Fingers: If cracks start to form during sculpting, use a small amount of water on your fingers to smooth out the clay. Gentle pressure will help eliminate small imperfections.
Use a Clay Tool: Tools like a rubber sculpting tool or plastic knife can help smooth over cracks and join seams without disturbing the overall shape.
Fixing Dried Cracks: If cracks appear after the clay starts to dry, you can rehydrate the clay with a little water and gently press the area to re-mold. For deeper cracks, you might need to add extra clay and re-smooth the surface.
Drying and Finishing
Drying Speed: To speed up drying, place your project in a warm, dry area with good airflow. Avoid direct sunlight or intense heat, as it can cause the clay to dry too quickly and crack.
Proper Storage: When not in use, store air dry clay in an airtight container or a sealed plastic bag to prevent it from drying out. If the clay becomes too dry or hard, you can rehydrate it by adding a few drops of water and kneading it until it becomes pliable again.
Drying Time: Depending on the size and thickness of your project, drying can take anywhere from 24 to 72 hours. Larger pieces may require a longer drying period, and thinner pieces will dry faster.
Sealing and Painting Air Dry Clay Crafts Ideas
Sealing: Once your project is dry, it’s essential to seal it with a clear acrylic sealer or varnish. This protects the surface and enhances durability, especially for pieces that will be handled frequently.
Painting: You can paint air dry clay with acrylic paints. For the best results, apply a coat of primer to help the paint adhere. Use light layers to avoid disturbing the surface texture.
Sanding: If your surface has rough patches after drying, lightly sand it with fine-grit sandpaper to smooth it before painting or sealing.
Troubleshooting Common Issues with Air Dry Clay Crafts Ideas
Cracking: Cracking can occur if the clay dries too quickly or if the piece is too thick. To prevent this, work in layers and ensure proper drying times. If cracks do form, they can usually be repaired with a damp sponge or rehydrated clay.
Warping: Warping happens when thicker parts of a project dry more slowly than thinner parts. To prevent this, make sure your project is evenly thick and dry in stages. You can also prop up sections as they dry to prevent bending.
Uneven Texture: Uneven texture can arise from too much moisture or improper smoothing techniques. Use tools and your fingers to gently smooth out rough areas and ensure a uniform texture. If the clay is too wet, give it time to firm up before shaping it.
By applying these tips and techniques, you can create stunning air dry clay crafts that are smooth, professional, and durable. Whether you’re creating functional items or artistic sculptures, mastering these practices will make your clay crafting experience more enjoyable and rewarding.
FAQ
What is air dry clay and how is it different from other types of clay?
Air dry clay is a type of modeling clay that does not require baking or firing in a kiln to harden. It air-dries over time, making it easy to use for various Air Dry Clay Crafts Ideas at home. Unlike polymer clay, which requires baking in an oven, air dry clay can be left to dry naturally, making it more accessible and convenient for beginners and casual crafters.
What types of crafts can I make with air dry clay?
Air Dry Clay Crafts Ideas are versatile and can be used to make a wide variety of crafts, including jewelry, home decor, figurines, ornaments, vases, and even functional items like bowls or planters. You can also create miniature models, sculptures, and custom home accessories. Its ability to be molded easily allows for endless creative possibilities.
Do I need special tools to work with air dry clay?
While you don’t need many specialized tools, having a few basic items can enhance your crafting experience. Essential tools include sculpting tools (such as knives, needles, and shaping tools), rolling pins for flattening the clay, and texture stamps or molds for added detail. You may also need sandpaper to smooth the surface after the clay dries.
How long does air dry clay take to dry?
Drying time for air dry clay can vary depending on the size and thickness of your project, but typically it takes between 24 to 72 hours to dry completely. Thicker pieces may take longer, so it’s important to ensure the clay is completely dry before handling or painting
Hi, I’m Victoria, an art and craft teacher at Newark City Schools, where I have the joy of working with middle school students to help them explore their creativity and develop their artistic talents. I believe that art is a powerful way for students to express themselves, and I strive to make every lesson a fun, engaging, and inspiring experience.
I created this website to share the art and craft projects, techniques, and resources that I use in my classroom, hoping to inspire both educators and young artists alike. Whether you’re a teacher looking for new ideas or a student eager to try something new, I’m excited to provide creative tools and projects that anyone can enjoy.
When I’m not in the classroom, I love experimenting with different art forms and learning new crafting techniques. My goal is to help others discover the joy of making things with their hands, and I hope my website serves as a space for everyone to explore their creative potential.