
You know those days when you’re trying to think of something fun and different to do with your boyfriend, but every idea feels like the “same old, same old”? Yeah, I’ve been there too. Dinner and a movie is nice, but sometimes you just want something that feels more personal, more you two. That’s actually how I stumbled into the idea of a “Clay Date.” Sounds cute already, right? Clay crafts for boyfriend time isn’t just about making a mess with your hands (though, let’s be honest, that part’s hilarious). It’s about sitting side by side, laughing over lopsided mugs or silly little figurines, and realizing it doesn’t have to be perfect to be special. If you’ve ever wanted a date that feels creative, a little romantic, and something you’ll actually remember the next day—this is it. Stick around, I’ll share some super doable ideas you’ll love.
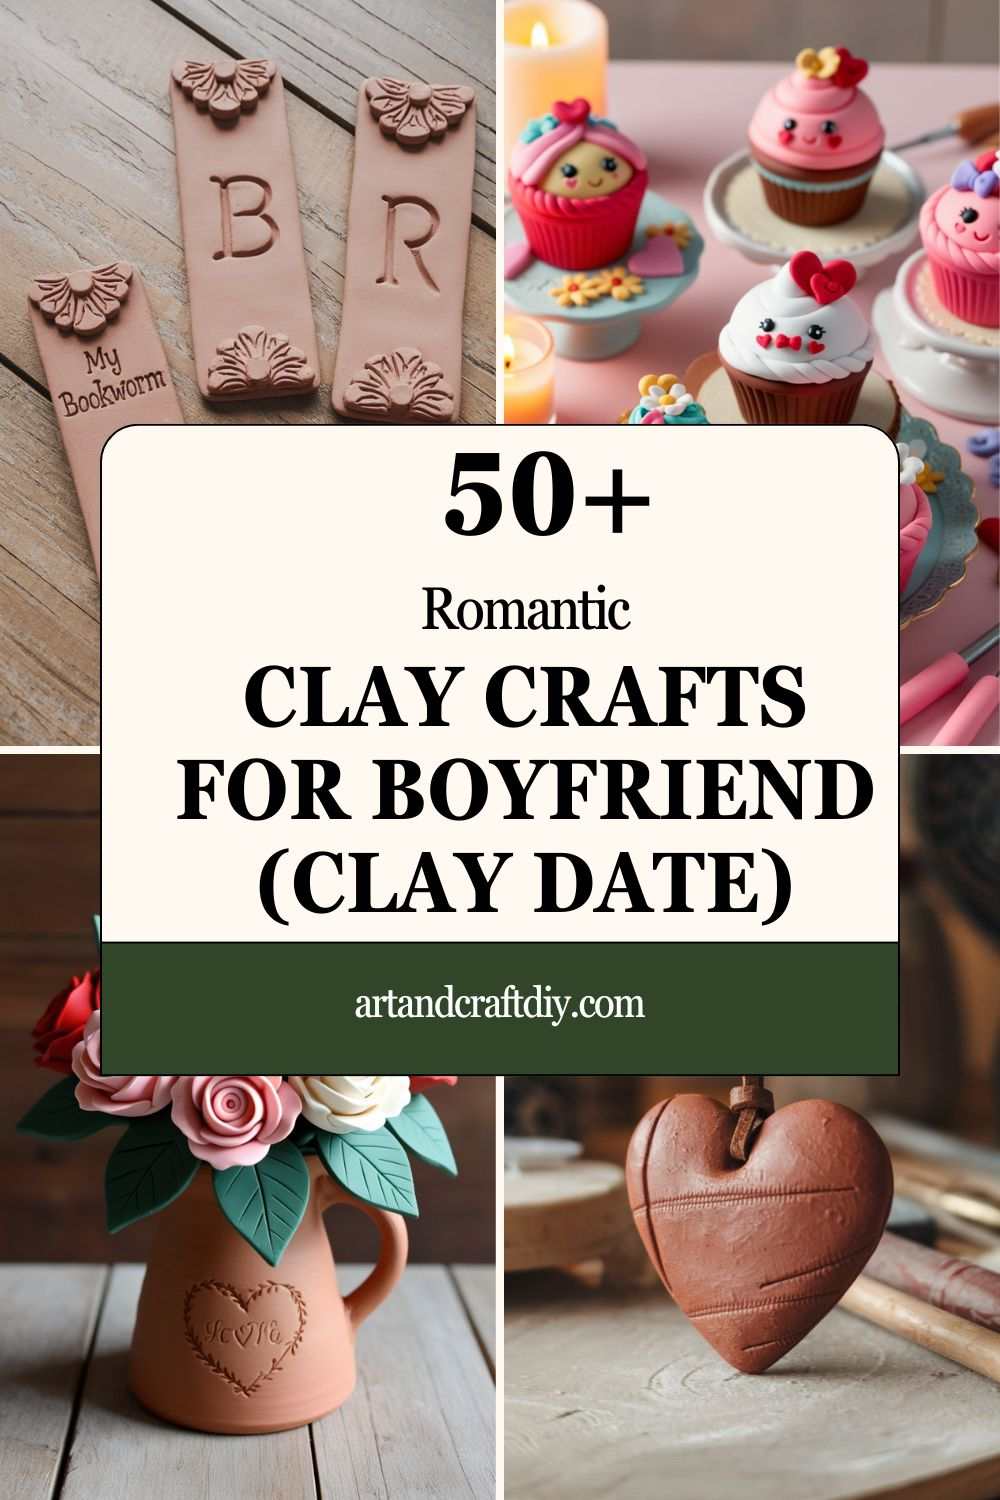
Clay Crafts For Boyfriend (Clay Date)
Clay Crafts for Boyfriend offers a wonderful opportunity to express your feelings in a creative and meaningful way.
Heart-Shaped Clay Pendant
The first time I made a heart-shaped clay pendant, I wasn’t even planning to gift it—I was just messing around with some leftover clay. But when I looked at it, I thought, “Wow, this would actually make the cutest little token for my boyfriend.” The beauty of it is you don’t need crazy skills. Just roll the clay flat, cut out a heart shape, poke a hole for a chain or cord, and you’re already halfway there. I usually paint mine red or gold, but honestly, even leaving it plain with a natural clay finish feels super romantic.
What makes this pendant special is how personal it feels. Whenever I see him wearing it, it’s like a small secret reminder between us. And to be fair, I think he enjoys knowing it’s handmade. It’s not about perfection; it’s about that sweet little effort you put in. Plus, every tiny fingerprint or smudge just makes it feel more authentic.
Custom Clay Keychain
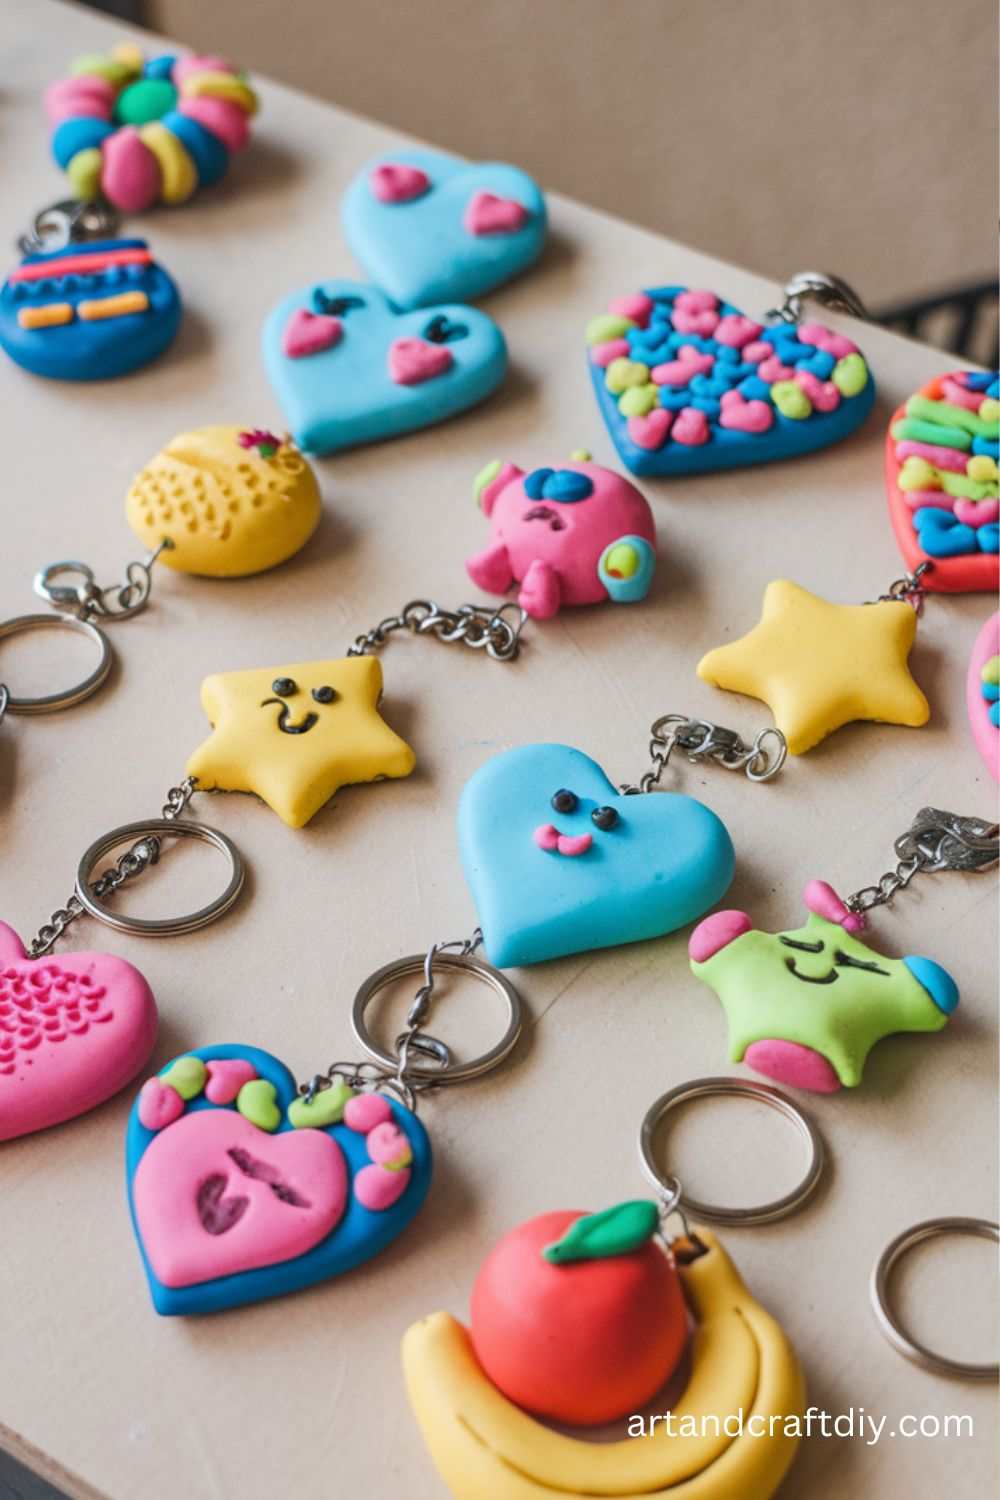
Keychains are underrated gifts, in my opinion. I once made a clay keychain shaped like his initials, and he still uses it daily. The best part is that it’s practical—something he actually needs—but it also has that sweet handmade charm. You can make it as simple as rolling clay into a rectangle and stamping his initials, or go all out with shapes he loves, like his favorite game logo or even a tiny pizza slice. I personally love glazing them because it gives a shiny, professional vibe.
The funny thing is, the first time I made one, it broke because I hadn’t baked it long enough. Lesson learned! Now, I always double-check the baking time. I’d say go for sturdy shapes rather than delicate ones. Whenever I hand him a new clay keychain, he laughs and says, “Another one for the collection?” But secretly, I think he’s proud to carry them around.
Clay Animal Figurines
One of the most fun crafts I’ve done is making little clay animal figurines. My boyfriend has this goofy love for pandas, so I decided to sculpt a tiny panda for him. It wasn’t perfect—the eyes were a little lopsided, and the ears were different sizes—but he loved it anyway. I think that’s the charm of handmade stuff. You can make any animal he adores, from dogs to dragons, and it always feels thoughtful.
The trick, I’ve found, is starting with simple shapes—little balls and cylinders—and building them up. Don’t stress about making it “art gallery” quality; just aim for something that makes him smile. I once made a clay cat for myself, and he instantly asked for his own version. That’s when I realized these figurines aren’t just decorations—they become little symbols of your inside jokes or shared favorites.
Clay Rose Bouquet
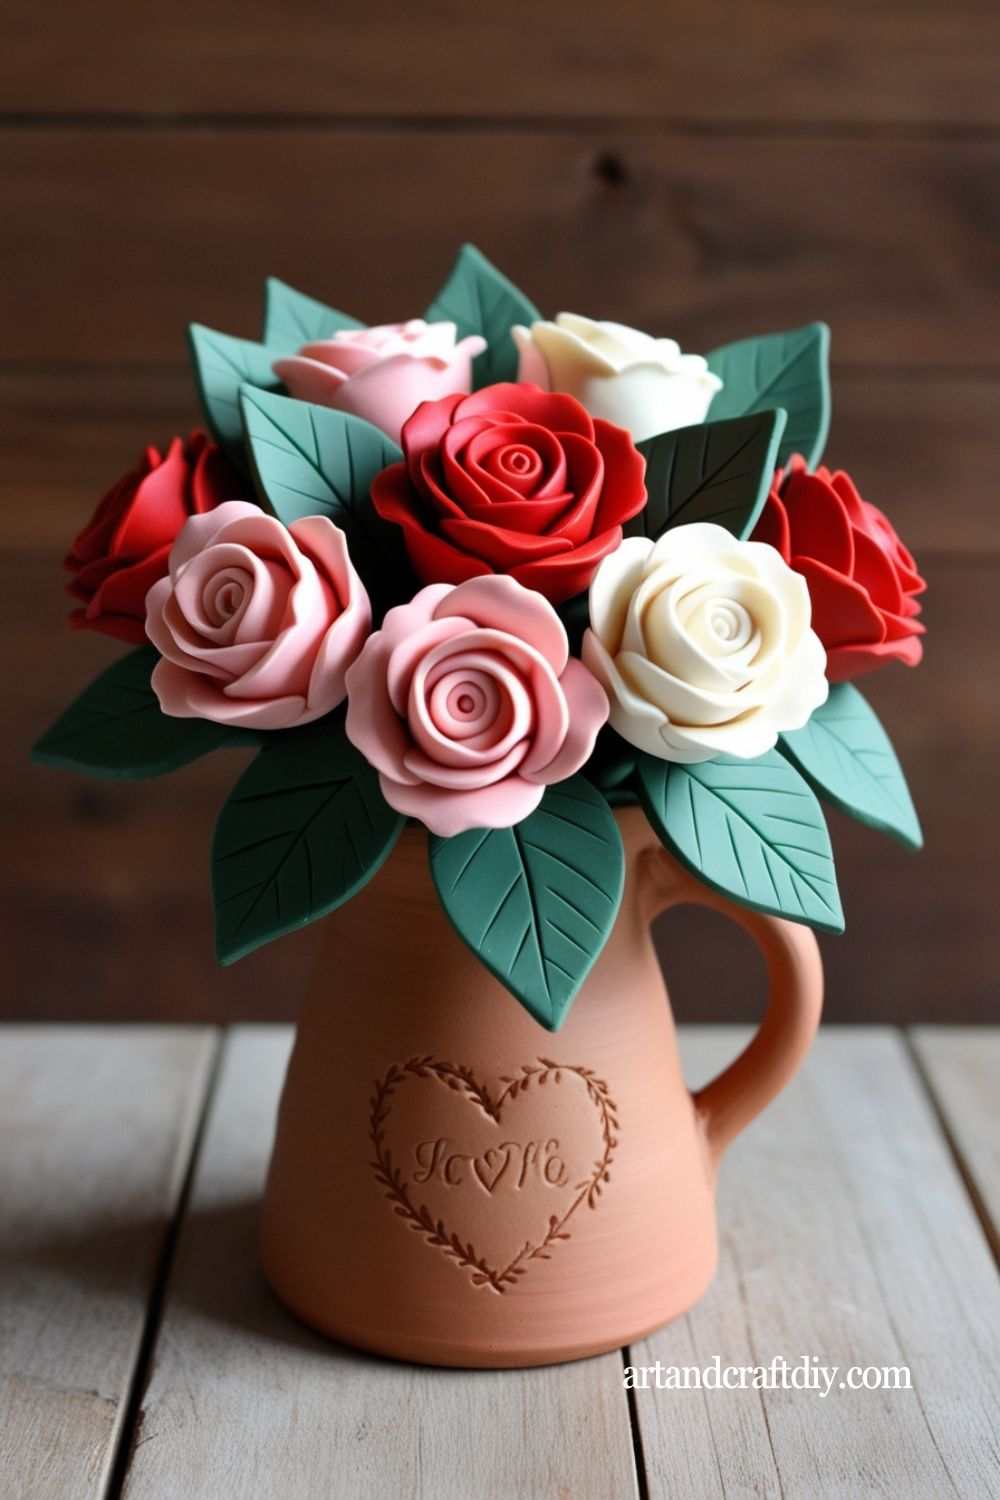
Instead of giving real roses that eventually dry up, I once surprised him with a bouquet of clay roses. Honestly, it was one of my favorite projects. Rolling tiny strips of clay into spirals to mimic petals is so satisfying. You can paint them red, pink, or even fun colors like blue. I made mine in shades of red and black to give it a unique, slightly edgy vibe because he’s not into overly “cutesy” things.
When I handed it over, he actually said, “These will last longer than I do,” which cracked us both up. To be fair, it does take a bit of time to make a whole bouquet, but even just one clay rose looks stunning in a little jar. The fact that he still has them on his desk makes me think this was one of the best clay gifts I’ve ever made.
Clay Love Letter Box
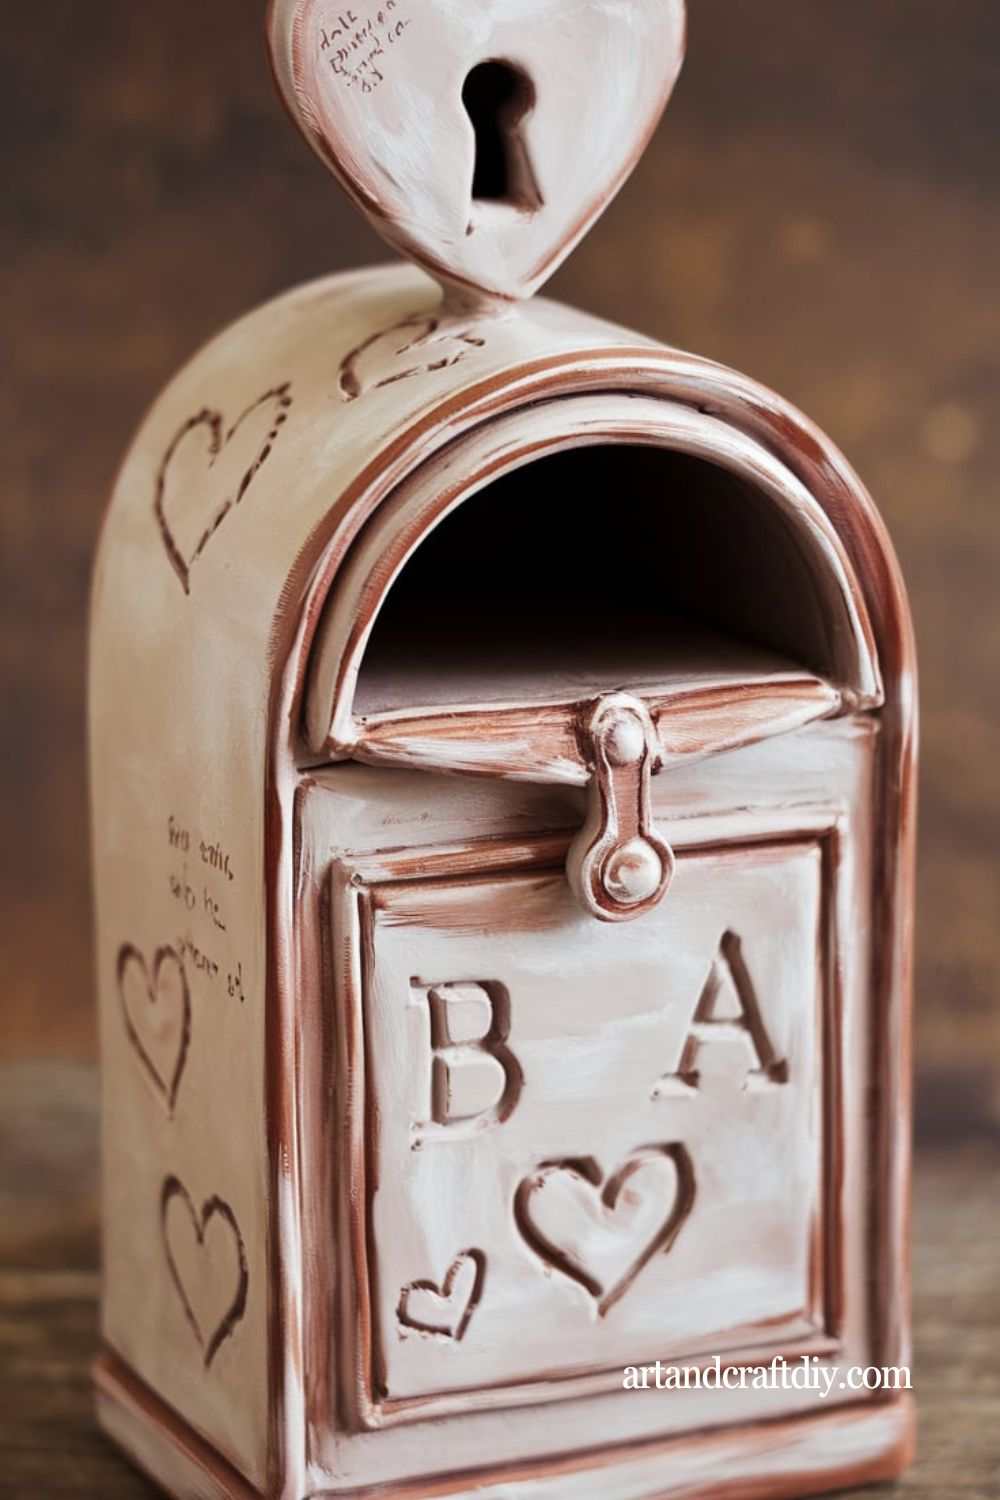
There’s something so nostalgic about love letters, and I wanted to make a keepsake box where he could store them. Using clay, I shaped a small box with a lid, not too big, but enough to hold folded notes and little mementos. At first, I thought it would be too fragile, but with proper baking, it turned out surprisingly sturdy. Painting it with his favorite colors gave it a personal touch.
I remember the first time I gave it to him, I slipped a handwritten note inside. He opened it, grinned, and said, “Guess I’ll need to start writing back.” It’s become our little tradition—we exchange notes and store them in that box. If you’re like me and love mixing old-school romance with crafting, a clay love letter box is such a meaningful gift.
Clay Cupcake Figurines

My boyfriend has a sweet tooth, but instead of giving him actual cupcakes (which disappear way too fast), I made clay cupcake figurines. They look ridiculously adorable, especially with “frosting” made from clay swirls and little sprinkle details. I even painted one to look like his favorite chocolate cupcake with a cherry on top.
The best part? He keeps them lined up on his shelf like collectibles. Once, he jokingly pretended to eat one, and I almost screamed because I thought he’d break it. Making them is honestly just fun—you get to play around with colors and designs without worrying about calories. If your boyfriend loves desserts, these are quirky little reminders of his sweet side.
Personalized Clay Mug
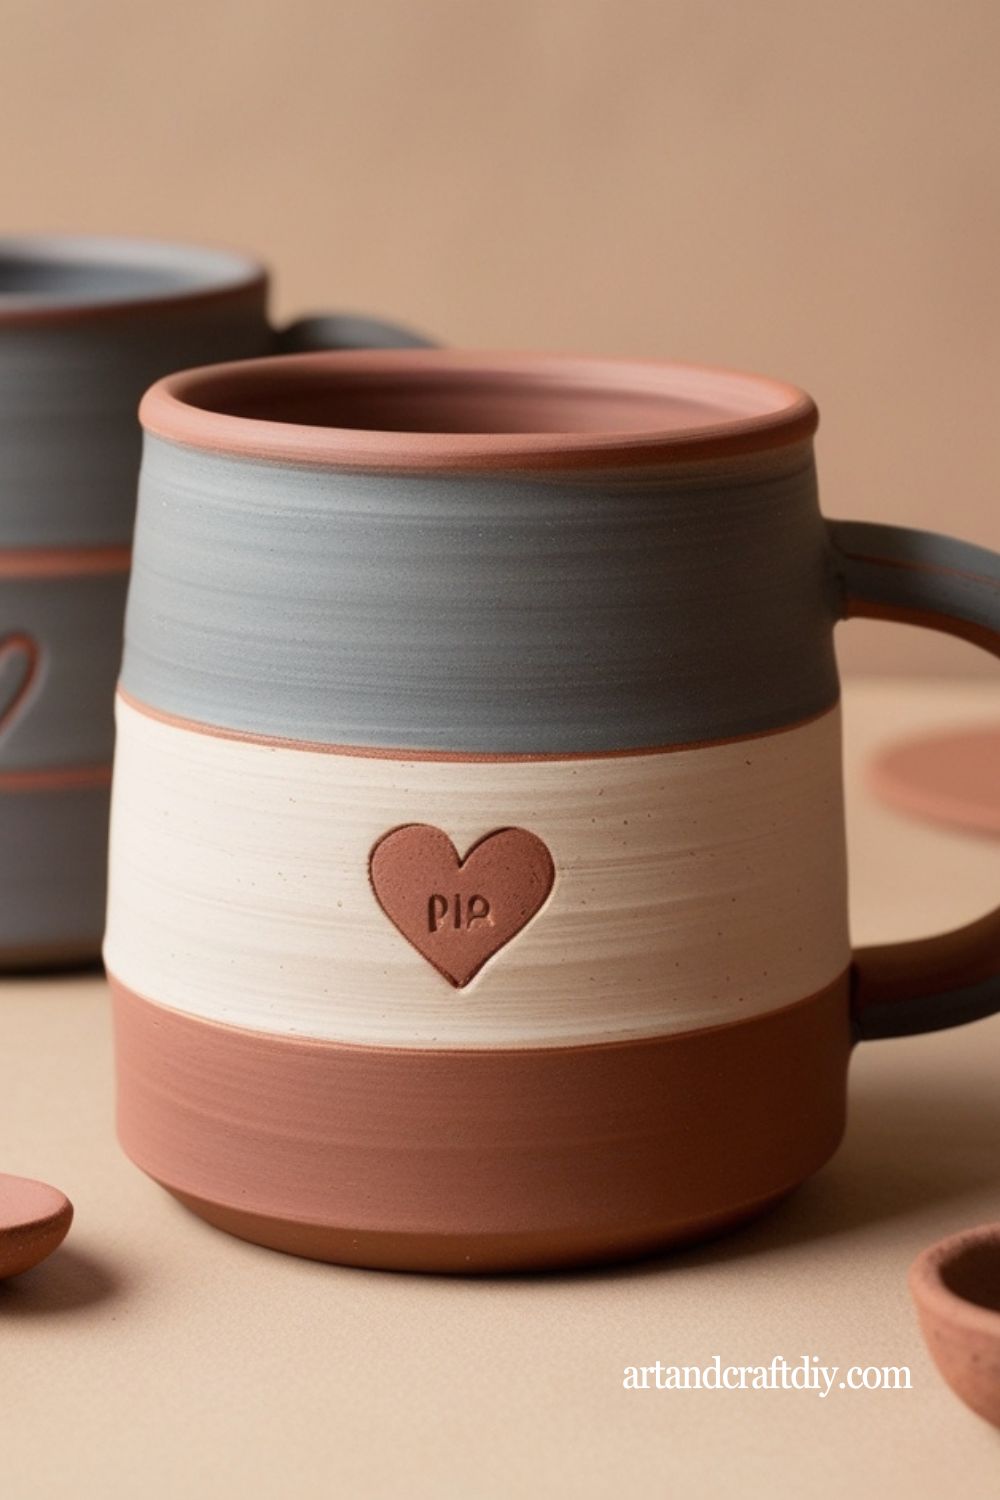
One of my proudest clay projects was making a mug. Okay, I’ll admit—it wasn’t perfect, and the handle was slightly crooked, but it had his name carved into it, and he loved it. I used air-dry clay for mine, which meant it wasn’t really for drinking hot coffee, but more like a pen holder. Still, it looked like a real mug and carried that homemade vibe.
If you’re good at sculpting, you can make it functional by using oven-bake clay and sealing it with food-safe glaze. But even as a decorative piece, it’s such a thoughtful gift. He laughed when he first saw it, saying, “This looks like something out of a rustic café.” Now it’s his desk mug, filled with pens, and every time I see it, I feel a little proud of my wobbly creation.
Clay Phone Stand
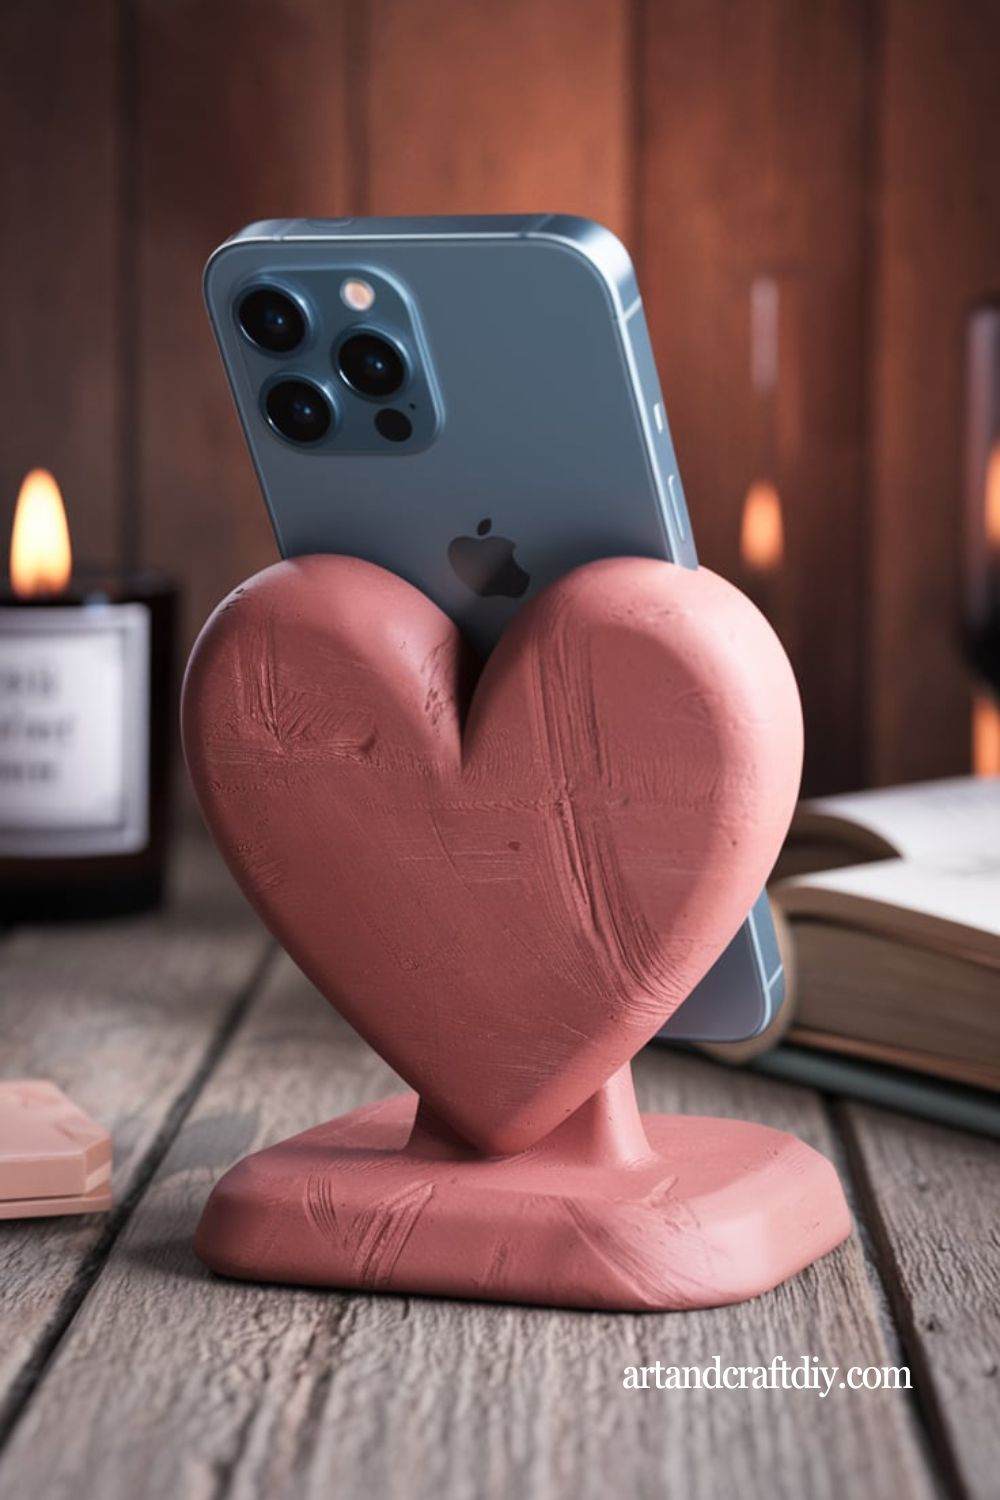
This one’s practical and honestly kind of genius. I made a little clay phone stand shaped like a couch so his phone could “sit” on it. It turned out both funny and useful. Sculpting a basic stand isn’t hard—just create a sturdy base with a slight angle where the phone can lean. You can even personalize it with initials, patterns, or his favorite colors.
The first time he used it, he said, “You’ve basically upgraded my Netflix experience.” Now he actually uses it when he’s watching videos while eating. To be fair, I didn’t expect it to hold up as well as it does, but it’s solid. If your boyfriend’s always misplacing his phone or propping it up against random objects, a clay phone stand is a fun and thoughtful solution.
Clay Photo Frame
One of the sweetest things I ever made was a clay photo frame. I pressed little hearts and stars into the clay border before baking it, then painted them gold. Sliding in a picture of us made it feel extra special. You don’t have to overcomplicate it—a simple square or rectangle works fine, and the decorations are what really make it unique.
When I gave it to him, he immediately put it on his nightstand. Honestly, that meant more to me than anything. I love how clay allows you to create something so personal. You can even match it with his room’s aesthetic—neutral shades, bold colors, or just natural clay. A photo frame isn’t just décor; it’s a way of capturing a memory in something you built with your own hands.
Clay Bookmarks

If your boyfriend loves reading, clay bookmarks are such a cute idea. I made a couple shaped like arrows and one shaped like a tiny guitar since he’s into music. They’re flat enough to slide between pages, but still quirky and personal. The painting part is the most fun—you can match them to his favorite book covers or add inside-joke doodles.
He once told me that every time he opens his book and sees the clay bookmark, it feels like I’m there with him. To be fair, that melted my heart a little. They’re simple to make and don’t require much clay, but the thought behind them is priceless. Plus, they’re durable, so he can use them for years without them wearing out like paper bookmarks do.
Clay Necklace Holder
A cute and functional piece of decor, a clay necklace holder can keep his favorite chains organized.
Materials Used: Air-dry clay, sculpting tools, paint.
Steps:
- Roll out a large piece of clay and mold it into a rectangle or any shape you prefer for the base.
- Create small hooks or raised sections on top to hold necklaces.
- Let it dry completely before painting it with colors that match his style.
- Once dry, use it to organize necklaces, bracelets, or other small accessories.
Clay Letter Magnets
Personalize clay letter magnets that he can use on the fridge or a magnetic board.
Materials Used: Air-dry clay, letter stencils, magnet strips, paint.
Steps:
- Roll out small balls of clay and flatten them.
- Use letter stencils or hand-shape the clay into letters.
- Attach small magnet strips to the back of each letter.
- Paint the letters with fun colors or designs.
- Let the magnets dry and use them to spell out special messages.
Clay Key Holder
A functional yet creative clay key holder can be a great addition to his entryway.
Materials Used: Air-dry clay, hooks, paint.
Steps:
- Roll out clay into a long rectangular shape and form a base.
- Attach several hooks to the base for holding keys.
- Let the clay dry completely, then paint it with a color that matches his space.
- Install it on the wall as a functional and decorative piece.
Clay Pocket Heart
A small, heart-shaped clay pocket that can fit into his bag or pocket.
Materials Used: Air-dry clay, sculpting tools, paint.
Steps:
- Roll out a small piece of clay into a heart shape.
- Create a tiny indentation in the center where a small note can be placed.
- Let it dry, then paint it with personal colors or messages.
- This can be a cute surprise to find in his pocket or bag!
Clay Sloth Figurine
If he loves quirky animals, a cute clay sloth figurine will make him smile.
Materials Used: Air-dry clay, sculpting tools, paint.
Steps:
- Roll out small clay pieces to form the sloth’s body, arms, and legs.
- Attach the arms and legs to the body and smooth out the seams.
- Sculpt small eyes, nose, and details on the face.
- Let the figurine dry completely, then paint it with fun colors.
- Display it as a cute reminder of your love.
Clay Robot Figurine
Make a charming little robot that he can keep on his desk.
Materials Used: Air-dry clay, sculpting tools, paint.
Steps:
- Roll out balls of clay to form the robot’s head and body.
- Use small pieces for the arms, legs, and antennas.
- Attach all the parts and smooth them into place.
- Let the robot dry, then paint it with metallic or colorful shades.
- This quirky gift is perfect for a tech-loving boyfriend.
Clay Matchbox Holder
Create a cute matchbox holder that can store little notes or matches.
Materials Used: Air-dry clay, box or matchbox, paint.
Steps:
- Roll out clay to create a base that fits around a matchbox.
- Shape the clay around the matchbox and seal the sides.
- Let the clay dry completely.
- Once dry, paint it with his favorite colors or a romantic design.
- Use it to store little surprises like love notes or tiny gifts.
Clay Sushi Set
Make a fun and creative sushi set using clay for a unique gift.
Materials Used: Air-dry clay, sculpting tools, paint.
Steps:
- Roll out small pieces of clay to form the shapes of sushi rolls.
- Add details like rice, fish, and toppings.
- Let the sushi pieces dry completely.
- Once dry, paint the sushi with realistic colors.
- These can be kept as a fun figurine set or part of a creative date night idea.
Clay Coffee Cup Figurine
For a boyfriend who loves coffee, a small clay coffee cup figurine can be a cute, quirky gift.
Materials Used: Air-dry clay, sculpting tools, paint.
Steps:
- Roll out clay to form the shape of a coffee cup.
- Shape the handle and attach it to the side.
- Add small details like steam rising from the top.
- Let the cup dry, then paint it in earthy tones.
- This little figurine will be a reminder of his favorite morning ritual.
Clay Zodiac Sign
Create a clay figurine or plaque based on your boyfriend’s zodiac sign.
Materials Used: Air-dry clay, sculpting tools, paint.
Steps:
- Roll out a sheet of clay and shape it into a circle or square.
- Use sculpting tools to carve out the symbol or design for his zodiac sign.
- Let the clay dry completely.
- Paint the design with the colors that represent his sign, or use gold for a more elegant look.
Clay Donut Keychain
Make a fun, colorful donut keychain that represents his sweet tooth.
Materials Used: Air-dry clay, sculpting tools, keychain ring, paint.
Steps:
- Roll out clay and shape it into a donut shape.
- Add a small hole for the keychain ring.
- Let the donut dry, then paint it with colorful frosting and sprinkles.
- Attach it to the keychain ring.
Clay Pizza Slice
A quirky gift for food lovers, a clay pizza slice is a fun way to represent his favorite food.
Materials Used: Air-dry clay, sculpting tools, paint.
Steps:
- Shape the clay into a pizza slice by flattening it into a triangle.
- Use sculpting tools to add toppings like pepperoni, mushrooms, or olives.
- Let the pizza slice dry and paint it to make the toppings realistic.
- This can be a fun decorative piece for his room or desk.
Clay Glasses Holder
Make a practical and stylish glasses holder out of clay for his eyewear.
Materials Used: Air-dry clay, sculpting tools, paint.
Steps:
- Roll out clay to form the base and structure of the glasses holder.
- Shape a small head or abstract figure to hold the glasses.
- Let the holder dry completely and paint it with colors of your choice.
- Use it to keep his glasses organized in style.
Clay Guitar Figurine
For music lovers, a clay guitar figurine can be a great gift.
Materials Used: Air-dry clay, sculpting tools, paint.
Steps:
- Roll out the clay and shape it into the body and neck of the guitar.
- Add the strings, headstock, and other details.
- Let the guitar dry completely before painting it in your boyfriend’s favorite guitar style.
Clay Hot Air Balloon
A whimsical and romantic idea, a clay hot air balloon can represent your journey together.
Materials Used: Air-dry clay, sculpting tools, paint.
Steps:
- Shape a small balloon and basket from clay.
- Attach the two parts and smooth the edges.
- Let it dry, then paint it with fun colors and patterns.
- This figurine is a perfect symbol of adventure and love.
Clay Dinosaur Figurine
If he’s a fan of dinosaurs, creating a fun clay dinosaur figurine is a playful gift.
Materials Used: Air-dry clay, sculpting tools, paint.
Steps:
- Roll out small pieces of clay and shape them into a dinosaur body and limbs.
- Add small details like eyes, spikes, and tail.
- Let the dinosaur dry, then paint it with realistic or creative colors.
Clay Moon and Stars Figurine
A romantic moon and stars figurine can be a cute reminder of a starlit night together.
Materials Used: Air-dry clay, sculpting tools, paint.
Steps:
- Roll out clay to create a crescent moon and small stars.
- Attach the stars to the moon or arrange them in a design.
- Let it dry and paint it with silver, blue, or gold tones.
Clay Pencil Holder
A clay pencil holder adds a personal touch to his desk or workspace.
Materials Used: Air-dry clay, sculpting tools, paint.
Steps:
- Roll out the clay into a cylindrical shape for the holder.
- Add small details like designs or symbols to the surface.
- Let the holder dry, then paint it with colors that reflect his style.
Clay Origami Crane
An elegant symbol of peace and good luck, a clay origami crane is a thoughtful gift.
Materials Used: Air-dry clay, sculpting tools, paint.
Steps:
- Shape the clay into a flat piece and fold it into an origami crane.
- Smooth the edges and shape the wings and beak.
- Let it dry completely, then paint it with bright colors or metallics.
How to Plan a Clay Date: A Creative Way to Connect
Planning a Clay Crafts for Boyfriend (Clay Date) can be an enjoyable and memorable experience for couples, friends, or anyone looking for a unique activity. It’s a perfect way to bond while unleashing your creativity, all while making beautiful pieces of art together. Whether you’re seasoned crafters or beginners, this activity is sure to offer a fun and relaxed environment for everyone involved. Here are some tips to plan your clay date and make the most of it!
1. Setting the Mood: Tips for a Relaxed Atmosphere
Creating the right atmosphere is key to a successful clay date. Aim for a comfortable, cozy space where you can both feel at ease. Consider the following:
- Music: Set a soothing tone with your favorite playlist. Soft instrumental music or a mellow jazz playlist can keep the mood relaxed and focused.
- Snacks: Light, easy-to-eat snacks can keep the energy up without causing too much distraction. Think cheese and crackers, fruit platters, or chocolates.
- Wine or Drinks: A glass of wine or your favorite beverages can help you unwind and make the experience more enjoyable, but remember to drink in moderation.
- Lighting: Soft lighting can enhance the mood. Consider using candles or string lights for a warm, inviting ambiance.
2. Work at Your Own Pace: Clay Crafts Don’t Have to Be Rushed
One of the best parts of a clay date is that you can enjoy the process without feeling pressured. Clay crafts don’t have to be finished in a single session, and the beauty is in the journey.
- Relax and Enjoy: Take your time to mold and shape the clay at your own pace. There’s no need to rush—this is about having fun and connecting.
- Take Breaks: If you feel stuck or frustrated, take a short break, grab a snack, or just chat. It’s important to stay relaxed and comfortable.
- Embrace Imperfection: The best creations are often the ones that aren’t perfect. Allow room for happy accidents and enjoy the process of discovery.
3. Exploring New Techniques: Fun Challenges & Themes
Spice up the clay date by introducing some fun challenges or creative themes. This can give you a starting point and help push your creativity.
- Animal Shapes: Challenge each other to sculpt animals or creatures. It’s a fun way to see each other’s creative side while having a good laugh at your attempts.
- Symbols of Love: Create pieces that represent love and connection—whether it’s hearts, flowers, or intertwined hands.
- Abstract Designs: Try creating abstract shapes or even personal symbols that hold meaning for you both.
- Clay Mosaics: Work together on a large mosaic piece, where each person contributes a section, combining your individual designs into one larger artwork.
Final Thoughts
A Clay Crafts for Boyfriend (Clay Date) is all about relaxation, creativity, and connection. By setting the right mood, taking your time with the craft, and exploring fun techniques, you can create an unforgettable experience. Whether you make a beautiful sculpture or just enjoy the process, the memories you create together will last long after the clay is dry.
How to Present the Finished Craft: Creative Ways to Wrap or Display Clay Creations
Presenting a handmade clay craft is a wonderful way to show that you’ve put time, effort, and love into creating something unique. Whether it’s a sculpture, jewelry, pottery, or any other clay creation, how you wrap or display the piece can elevate the experience for the recipient. Here are a few creative ways to showcase your clay creations:
1. Natural Materials Wrapping
- Rustic Linen or Burlap: Wrap your clay item in soft, neutral-colored fabric like linen or burlap for a natural, earthy presentation. You can tie it with a twine or ribbon for a rustic look. This wrapping style complements the handmade feel of the clay and highlights the artisan quality.
- Leaf or Flower Embellishments: To add an extra touch of nature, adorn the fabric wrap with dried flowers, leaves, or a small sprig of greenery. This works especially well for earthy, nature-inspired clay pieces like planters or sculptures.
2. Decorative Gift Boxes
- Wooden or Cardboard Boxes: Place your clay creation in a carefully chosen wooden or vintage-style cardboard box. Line the inside with shredded paper or a soft cloth to ensure the piece is cushioned, and to add to the luxurious feel. Choose a box size that matches the scale of your creation for a snug fit.
- Clear Acrylic or Glass Display Boxes: For delicate or intricate clay creations, a clear acrylic or glass display box is a perfect way to both protect the piece and allow the recipient to admire it without unwrapping it. This type of display adds a level of sophistication and allows the piece to take center stage.
3. Customized Packaging
- Personalized Gift Bags or Tissue Paper: Create a custom look by using patterned tissue paper or gift bags that reflect the recipient’s personality or your artistic style. For example, you could choose paper with botanical prints, geometric patterns, or bold colors to add an extra flair.
- Handmade Tags: Make your own gift tags using leftover clay, wooden slices, or paper. You can personalize them with the recipient’s name or a special message. This makes the presentation feel even more heartfelt.
4. Themed Display Stands or Pedestals
- Mini Pedestals: If your clay creation is a small sculpture or decorative item, place it on a mini pedestal or stand. This gives the gift a “gallery-style” presentation, allowing it to be admired from all angles.
- Custom Stands for Functional Items: For functional clay pieces, such as mugs or plates, a small, simple wooden stand or display rack can highlight the piece. This makes it easy for the recipient to showcase it in their home or office.
Writing a Heartfelt Note or Card to Accompany the Gift
While the craft itself is a personal and meaningful gift, adding a handwritten note or card will deepen the emotional connection. Here are a few tips for writing a heartfelt note to accompany your clay creation:
1. Express Gratitude
- Start by expressing your appreciation for the recipient. Thank them for their friendship, support, or the role they play in your life. Acknowledge how much they mean to you, which will make the gift feel more personal.
- Example: “I am so grateful for your kindness and warmth. This little piece of art is just a small reflection of how much you mean to me.”
2. Share the Story Behind the Craft
- Talk about the inspiration behind the piece or the creative process. This adds a layer of thoughtfulness and helps the recipient connect with the piece on a deeper level. You might mention how long it took, the materials you used, or why you chose the design.
- Example: “I spent a lot of time shaping this piece, thinking of the memories we’ve shared. I hope it reminds you of the special moments we’ve had together.”
3. Personal Touch
- Incorporate something unique about the recipient, such as an inside joke, a shared memory, or a trait you admire about them. This will make the note feel even more special and tailored to them.
- Example: “I thought of you when I made this because of your love for the outdoors and nature. May this little creation bring a touch of the earth’s beauty into your life.”
4. Closing with Warmth
- End your note with a warm, heartfelt sentiment. Whether it’s a simple “With love,” “Best wishes,” or a more personal message, make sure it reflects your feelings.
- Example: “With all my love and appreciation, I hope this gift brings a smile to your face every time you see it.”
Together, the thoughtful presentation and heartfelt note will make your handmade clay creation not just a gift, but a meaningful experience that the recipient will cherish.
FAQ
What are Clay Crafts for Boyfriend (Clay Date) ?
Clay crafts for a boyfriend are handmade creations made from modeling clay, designed to show love, creativity, and appreciation. These can range from small figurines, keychains, or personalized sculptures, to more elaborate gifts like decorative items or customized clay jewelry.
How can I make a Clay Crafts for Boyfriend (Clay Date) ?
To make a clay craft for your boyfriend, start by gathering modeling clay, sculpting tools, and any accessories you might want to add. Consider what your boyfriend loves or an inside joke between you two for inspiration. Once you mold the clay, bake it (if necessary) and add finishing touches like paint, varnish, or small decorative elements.
What kind of clay is best for making Clay Crafts for Boyfriend (Clay Date) ?
Polymer clay is often the best choice for crafting personalized items because it hardens in a regular oven. Air-dry clay is another option if you don’t have access to an oven, though it may not be as durable. Choose a clay that suits the type of craft you’re making and your experience level.
Can I make a clay date activity with my boyfriend?
Yes, a clay date is a fun and intimate activity! You both can spend time together molding clay, creating something special, and sharing laughs. This hands-on activity is a great way to connect, express your creativity, and bond over making something meaningful.

Hi, I’m Victoria, an art and craft teacher at Newark City Schools, where I have the joy of working with middle school students to help them explore their creativity and develop their artistic talents. I believe that art is a powerful way for students to express themselves, and I strive to make every lesson a fun, engaging, and inspiring experience.
I created this website to share the art and craft projects, techniques, and resources that I use in my classroom, hoping to inspire both educators and young artists alike. Whether you’re a teacher looking for new ideas or a student eager to try something new, I’m excited to provide creative tools and projects that anyone can enjoy.
When I’m not in the classroom, I love experimenting with different art forms and learning new crafting techniques. My goal is to help others discover the joy of making things with their hands, and I hope my website serves as a space for everyone to explore their creative potential.