
You know, when I was a kid, I used to spend hours playing with clay — shaping tiny houses, pretending they were part of my own little village. It wasn’t perfect (most of my roofs were lopsided!), but that’s what made it special. There’s something really calming about molding clay with your hands, right? Whether you’re crafting with your kids or just need a quiet, creative escape, clay house craft ideas are such a fun way to express yourself. You don’t need fancy tools or expert skills — just a bit of imagination and a willingness to get your hands messy. In this post, I’ll share some super cute, easy ideas you can try at home — from mini clay cottages to fairy-style houses that’ll make your heart happy. So, grab that lump of clay, roll up your sleeves, and let’s make something truly magical together.
Clay House Craft Ideas
Clay House Craft Ideas are a fun and creative way to bring tiny homes to life using your imagination. Whether for décor, gifts, or school projects, these mini clay houses add charm and personality to any space.

Mini Fairy Clay House

Oh, this one will always have my heart! The Mini Fairy Clay House was actually the very first clay project I made when I started experimenting with air-dry clay. I remember sitting with my cup of tea, trying to mold those tiny windows and doors — honestly, it felt like I was creating a home for little fairies hiding in my backyard. If you’re new to clay crafts, this is such a fun way to start because it doesn’t have to be perfect. The charm lies in those little imperfections — a slightly crooked roof or uneven door just adds personality.
You can shape the walls with your fingers, then add tiny pebbles, leaves, or even glitter for that whimsical touch. I like to let mine dry overnight and then paint it in soft pastel shades. Trust me, once you see it sitting on your shelf or garden corner, you’ll want to make a whole fairy neighborhood.
Rustic Cottage Clay House
There’s something so cozy about a rustic clay cottage, don’t you think? I made mine after binge-watching a bunch of countryside vlogs — those stone walls and wooden doors just called to me. The trick is to mix texture into your clay. I sometimes roll a bit of sand or crushed dried herbs into the clay to give it that old, weathered look. It smells earthy and looks authentic!
I’ve found that using a toothpick to carve in the details — like brick lines or roof tiles — makes a huge difference. Once dry, I dab on muted tones like cream, brown, and moss green with a sponge. It looks aged in the best way. I keep mine by my indoor plants; it honestly makes the space feel like a little countryside escape right inside my home.
Christmas Snow Village House
Ah, the Christmas Snow Village House — this one is pure joy! Every year around December, I pull out my clay tools and make at least one new snowy little home to add to my collection. I love how magical they look with a dusting of white glitter for “snow.” I still remember my niece squealing when she saw the tiny candy cane door I added one year.
You can create a whole winter village by shaping a few small clay houses, painting them red, green, and gold, and then placing LED lights inside or behind them. It’s honestly such a cozy holiday tradition now. To be fair, it takes some patience — you have to let each layer of paint dry before adding snow details — but it’s so worth it. When the lights hit the glitter, it looks like a tiny Christmas dream come to life.
Mushroom Fantasy Clay House

If you’ve ever wanted to make something straight out of a fairytale, a Mushroom Fantasy Clay House is the one. I still laugh thinking about how my first one came out — the cap looked more like a wobbly pancake! But once I got the hang of shaping the top separately and attaching it later, it turned out adorable. I like using bright reds, oranges, and whites for a true fantasy feel.
In my opinion, adding little details like vines, doors hidden under leaves, and tiny clay mushrooms around the base really brings it to life. You can even hollow out the inside if you want to place a tea light under it — it glows beautifully. Whenever I show it to friends, they always say it looks like something from a children’s storybook. It’s whimsical, messy fun at its best.
Modern Tiny Clay Home
Now, this one’s for those who love a clean, minimalist vibe — the Modern Tiny Clay Home. I made this when I was tired of all the whimsical, fantasy-style houses and wanted something sleek and simple. Think straight lines, neutral tones, and geometric shapes. I used white clay and a flat-edged tool to make precise corners (which, to be honest, took a few tries).
What I love most is how polished it looks after sanding down the dried clay and adding a matte finish. I even made tiny windows from thin acrylic pieces — it looked like a mini architectural model! I’d suggest using soft greys and black accents for that urban-chic look. It’s funny — I never thought a clay house could look modern until I made this one, and now it’s one of my absolute favorites.
Beach Hut Clay House

This one reminds me of summer days and salty air. I started my Beach Hut Clay House after a seaside trip that left me missing the waves. I wanted to capture that feeling — the faded colors, the easy charm, and the relaxed vibe. So, I shaped the clay into a simple rectangular hut and added a slanted roof, then pressed in tiny shell fragments before it dried.
Painting it was my favorite part — pastel blues, sandy beige, and a pop of coral here and there. I even glued a mini surfboard (made from clay, of course!) beside the door. In my opinion, this craft is all about keeping it breezy and fun, not worrying about perfection. Every time I look at it on my windowsill, I swear I can almost hear the ocean.
Tree Trunk Fairy House
Oh, this one’s pure magic! I made my Tree Trunk Fairy House after seeing a massive old tree in my garden that looked like it could hide an entire fairy family. I shaped my clay around a small cylindrical mold, textured it with a toothbrush, and added twisty roots and tiny steps leading up to the door. Honestly, it felt like sculpting nature itself.
Once dry, I used shades of brown and green to paint it, blending colors with my fingers to get that mossy, aged look. To be fair, it’s a bit more time-consuming than other clay houses, but the final piece looks incredible — especially if you tuck a small LED candle inside. It’s one of those crafts that brings a little wonder into your everyday space.
Glow-in-the-Dark Clay Cottage

If you’ve never made a Glow-in-the-Dark Clay Cottage, you’re seriously missing out! I stumbled on this idea one night while experimenting with glow paint, and it turned out to be one of my most fun projects. I shaped a simple small house, let it dry, and then painted it with glow-in-the-dark acrylics — especially around the windows and door.
When the lights go out, it gives off this soft, dreamy glow that looks straight out of a fantasy movie. I’ve found that layering the paint makes it glow brighter and longer. Sometimes, I even mix in glow pigment powder directly into the clay. It’s so simple but incredibly cool. My friends always get amazed when they see it lighting up my shelf at night — it’s such a mood!
Birdhouse Clay Model
This one’s both cute and functional! I made a Birdhouse Clay Model for my balcony, and it’s been one of my most rewarding projects ever. I shaped the clay around a small round container as a base and left an opening for birds to peek through. I’ll admit, my first attempt was a bit lopsided — but honestly, that made it even more charming.
After drying, I painted it with waterproof outdoor paint in bright, cheerful colors. I even added a tiny perch using a wooden stick. In my opinion, it’s a wonderful way to combine creativity and care for nature. Watching little sparrows check it out was the sweetest thing. If you’ve got a garden or balcony, give this one a try — it’s magical seeing your craft become a tiny bird home.
Garden Gnome Clay House
Who doesn’t love a good gnome story? I made my Garden Gnome Clay House after finding an old ceramic gnome in my mom’s shed. I thought, “He deserves a proper home!” So, I built him one — rounded walls, a cone-shaped roof, and lots of quirky details. It’s honestly one of my most personality-filled creations.
I’ve found that painting it in earthy tones — deep reds, browns, and greens — makes it look perfectly cozy. Add little clay mushrooms or stepping stones to complete the look. I keep mine under my ferns, and every time I water the plants, I swear it looks like the gnome is waiting for tea time. It’s a heartwarming little project that never fails to make me smile.
Vintage Farmhouse Clay Home
If you’re into old-world charm, you’ll absolutely love making a Vintage Farmhouse Clay Home. I was inspired by an old countryside photo my grandmother showed me — cracked walls, weathered doors, and a warm, rustic feel. To recreate that, I shaped a simple rectangular house, pressed in texture with a crumpled foil sheet, and painted it with chalky whites and faded browns.
To be fair, it took a bit of layering to get that authentic “aged” look, but it was so satisfying. I also glued on tiny faux wood beams made from painted clay strips. It’s the kind of piece that feels nostalgic and homey — perfect for a farmhouse-themed shelf or windowsill display. Every time I look at it, I can almost smell baked bread and wood smoke.
Rainbow Roof Clay House
This one’s pure happiness in clay form! The Rainbow Roof Clay House started as a fun experiment when I had leftover paint colors. I shaped a small house and decided to go wild with the roof — painting each tile in a different bright color. Honestly, it looked chaotic at first, but once everything dried, it turned out vibrant and beautiful.
I think the key is to keep the rest of the house simple — maybe just a plain white or pastel base — so the rainbow roof stands out. I’ve made a few of these as gifts, and everyone loves how cheerful they look. It’s the kind of craft that instantly brightens your mood (and your shelf). Sometimes, messy experiments really do become the best ideas.
Desert Clay Hut
Inspired by desert architecture, this one has such a calm, grounded energy. I made my Desert Clay Hut after a trip to Rajasthan, where those sandy-colored homes looked like they were part of the earth itself. I used terracotta clay for that natural tone and kept the design simple — rounded corners, small windows, and minimal decoration.
Once it dried, I rubbed in a bit of cinnamon powder mixed with water to give it a sun-baked look — weird trick, but it works! In my opinion, it’s a great way to celebrate simplicity in craft. No flashy colors, just warm, earthy tones that remind you of quiet afternoons and golden light. It’s one of those pieces that feels peaceful every time I see it.
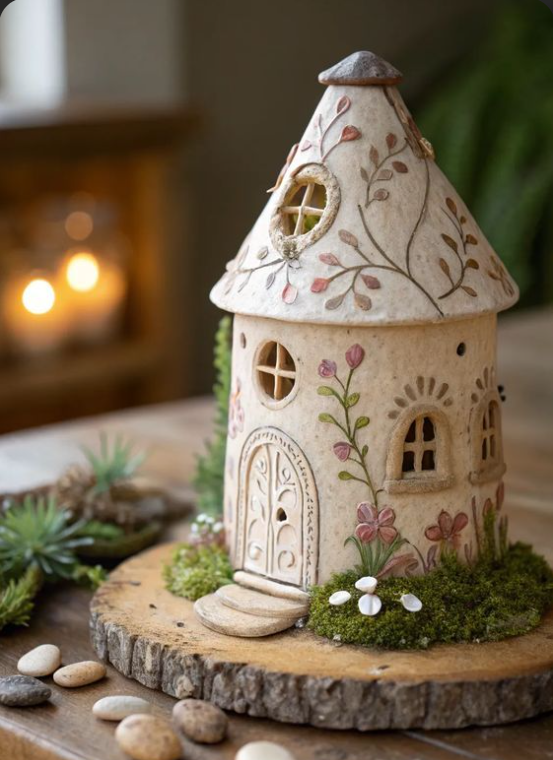
Lantern-Style Clay House
Now, this one is all about the glow. The Lantern-Style Clay House looks especially pretty when you carve windows and holes in the walls before the clay hardens. I like to keep the design minimal — just enough openings for light to shine through. Honestly, it feels magical when you drop a small candle or LED inside and watch the patterns dance on the walls.
You can shape it tall and narrow or short and round, depending on your mood. I’ve even tried making small star and heart-shaped cutouts — they look adorable in the dark. To be fair, it takes patience to get clean cuts, but it’s so worth it. Every time I light it up, my whole room feels cozier instantly.
Storybook Clay Village House
Ah, the grand finale — the Storybook Clay Village House! This one’s like bringing an illustrated tale to life. I started it as a single house but ended up making an entire “village” because I couldn’t stop. Think uneven roofs, bright colors, tiny paths connecting the houses — a whole little world made of clay.
In my opinion, this project captures everything I love about clay crafts: imagination, imperfection, and pure joy. You can mix different styles — a mushroom house here, a cottage there — and create your own fantasy scene. I sometimes sit and add details over days, like windows, fences, even little clay pets! Every time I look at my clay village, I feel like a kid again, lost in stories. It’s the perfect project to end (or start!) your clay crafting journey.
Eco-Friendly Clay Craft Tips
Creating clay houses can be both fun and environmentally friendly! By choosing sustainable materials and mindful crafting methods, you can make beautiful clay projects while helping the planet. Here are some easy eco-friendly tips to follow:
-
Use natural or homemade clay: Try making your own clay from flour, salt, and water, or buy clay made from natural materials instead of synthetic ones.
-
Reuse old clay pieces or molds: Don’t throw away leftover clay—reshape, recycle, or mix it into new projects to reduce waste.
-
Avoid plastic decorations — use organic materials: Replace plastic embellishments with natural items like dried leaves, small stones, twigs, or shells for a rustic and eco-friendly touch.
FAQ
What type of clay is best for making clay houses?
Air-dry clay and polymer clay are the most popular choices. Air-dry clay is great for beginners and doesn’t need baking, while polymer clay offers more durability and detail when baked.
How long does it take for a clay house to dry?
Drying time depends on the clay type and size of the house. Air-dry clay usually takes 24–48 hours to fully harden, while polymer clay requires baking for 15–30 minutes in the oven.
Can kids make clay house crafts?
Yes! Clay house crafts are perfect for kids with adult supervision. Using soft, non-toxic clay or playdough makes it safe and easy for them to create fun designs.
How can I make my clay house stronger?
Keep the walls and roof even in thickness, attach pieces firmly, and let the clay dry slowly. You can also seal the finished house with varnish or mod podge for extra strength.

Hi, I’m Victoria, an art and craft teacher at Newark City Schools, where I have the joy of working with middle school students to help them explore their creativity and develop their artistic talents. I believe that art is a powerful way for students to express themselves, and I strive to make every lesson a fun, engaging, and inspiring experience.
I created this website to share the art and craft projects, techniques, and resources that I use in my classroom, hoping to inspire both educators and young artists alike. Whether you’re a teacher looking for new ideas or a student eager to try something new, I’m excited to provide creative tools and projects that anyone can enjoy.
When I’m not in the classroom, I love experimenting with different art forms and learning new crafting techniques. My goal is to help others discover the joy of making things with their hands, and I hope my website serves as a space for everyone to explore their creative potential.
nice site
thank you