
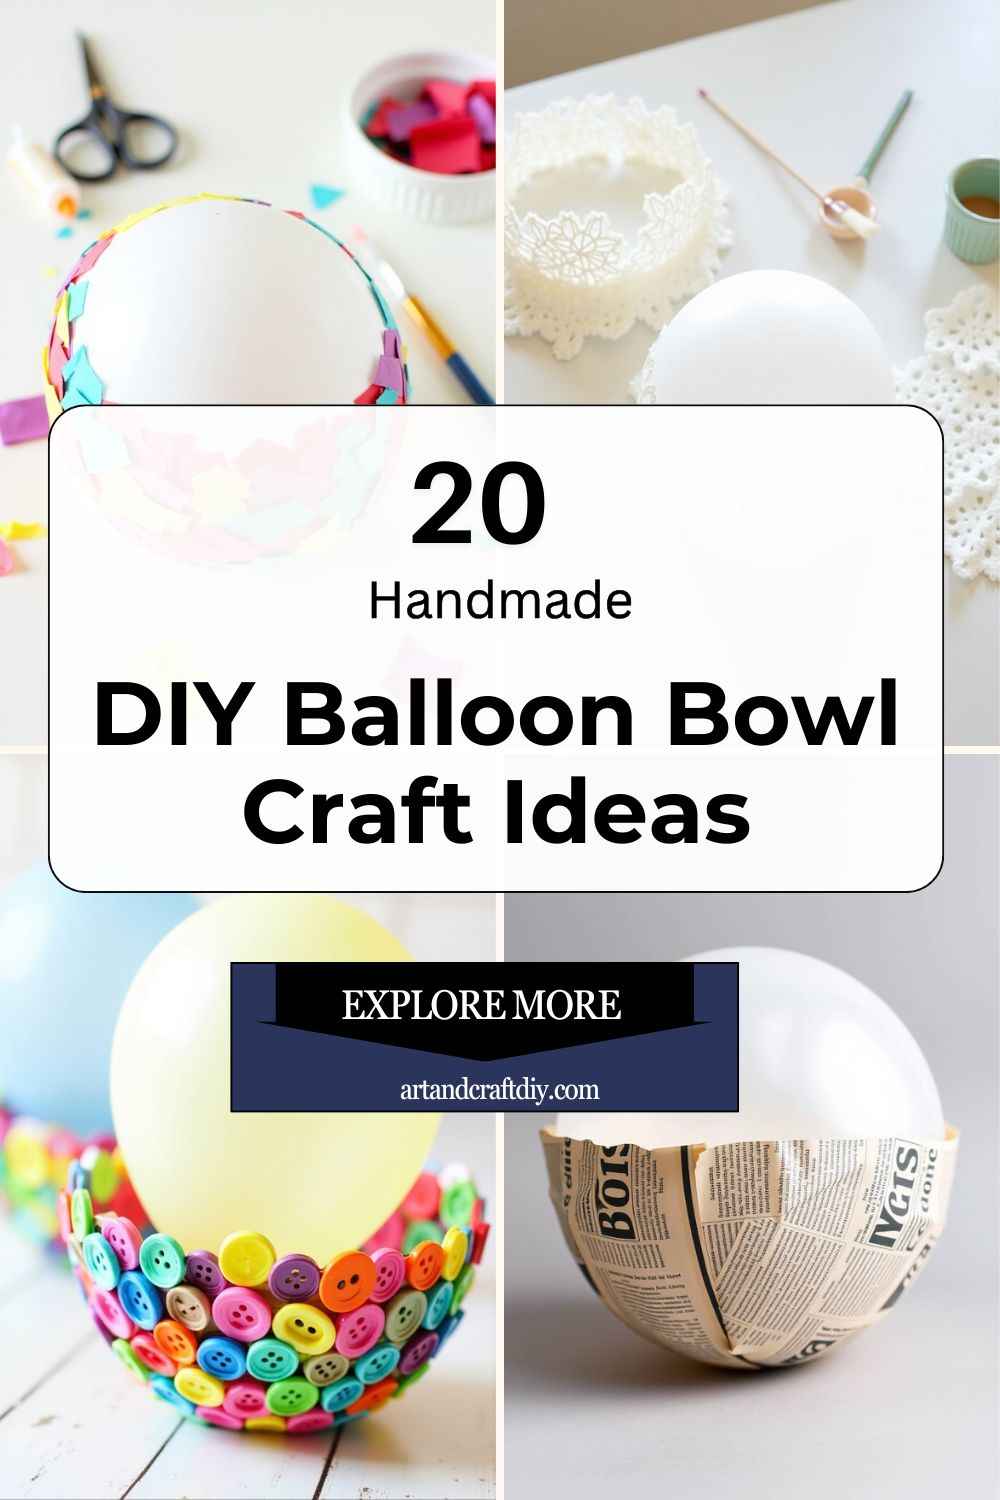
A DIY balloon bowl craft is a fun and creative project where you use a balloon as a mold to create a lightweight and decorative bowl using materials like yarn, tissue paper, or lace. The concept is simple: you layer glue-soaked decorative materials over the surface of an inflated balloon, allow it to dry and harden, then pop the balloon to reveal a unique handmade bowl. These bowls are not only beautiful but also easy to customize for any occasion or decor style.
DIY Balloon Bowl Craft
A DIY Balloon Bowl Craft is a fun and easy project where decorative materials are layered over a balloon to create a unique bowl. It’s perfect for creative home decor, party accents, or handmade gifts.
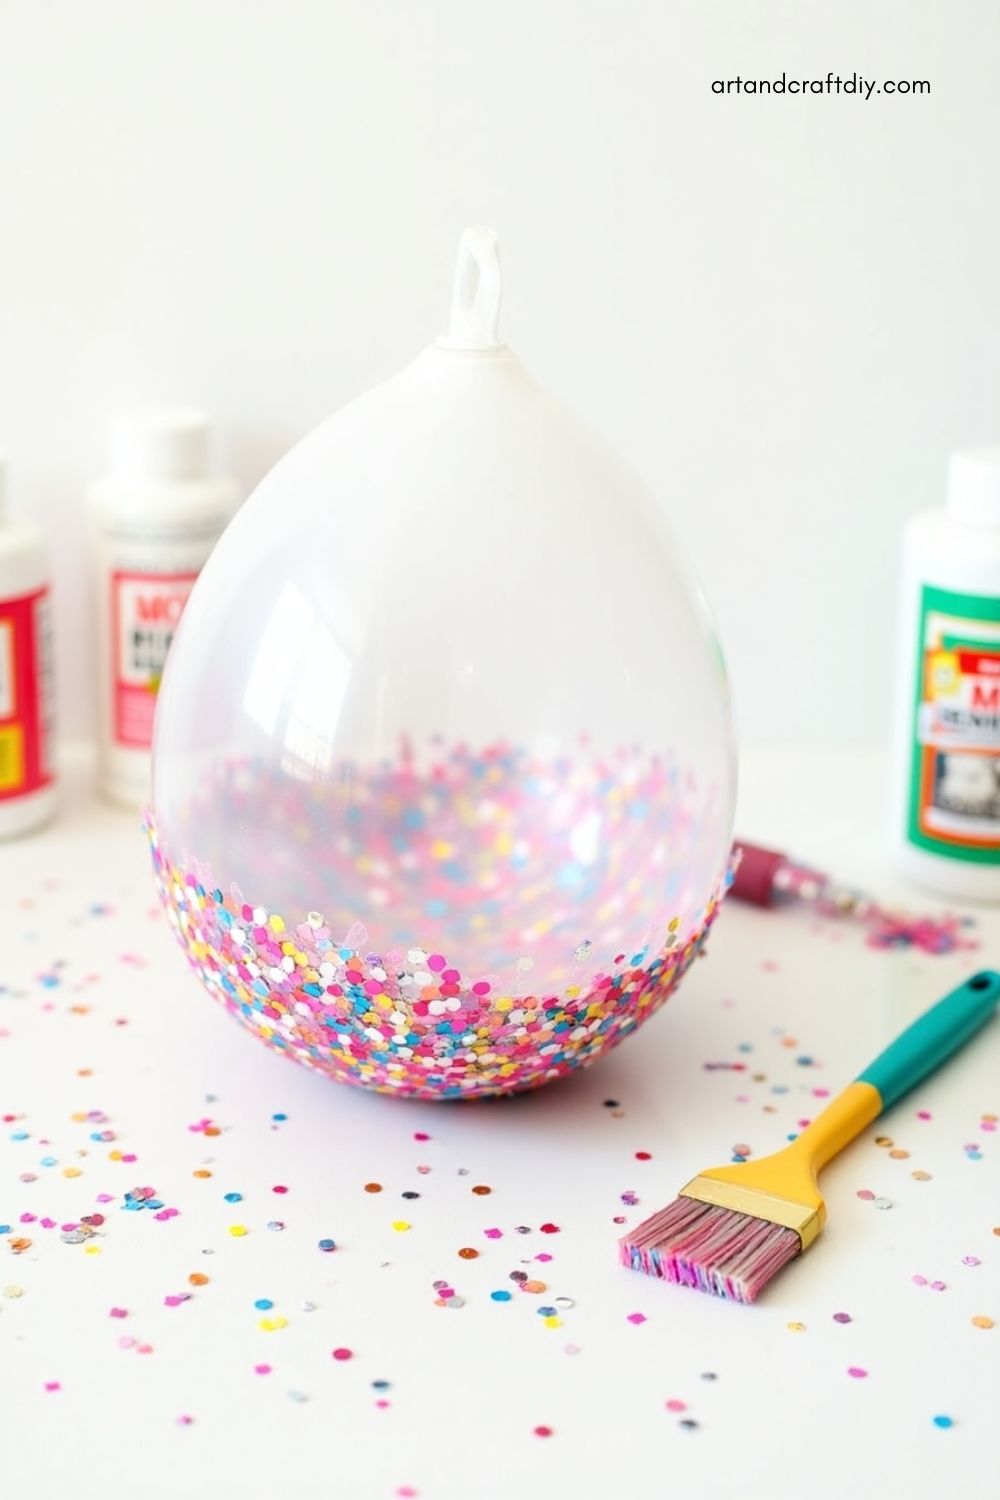
Glitter Confetti Balloon Bowl
This sparkly bowl is perfect for adding a touch of glam to your vanity or party table. Made with clear or tinted tissue paper and lots of glitter confetti, it reflects light beautifully and makes a great accent piece for special occasions.
-
Use Mod Podge mixed with fine glitter for a strong adhesive and sparkle combo.
-
Layer glitter confetti between tissue paper for extra shimmer.
-
Choose a clear balloon or light-colored base to enhance the glitter effect.
-
Let each layer dry partially before adding the next for a firmer bowl.
-
Seal with a final coat of glue for durability and shine.
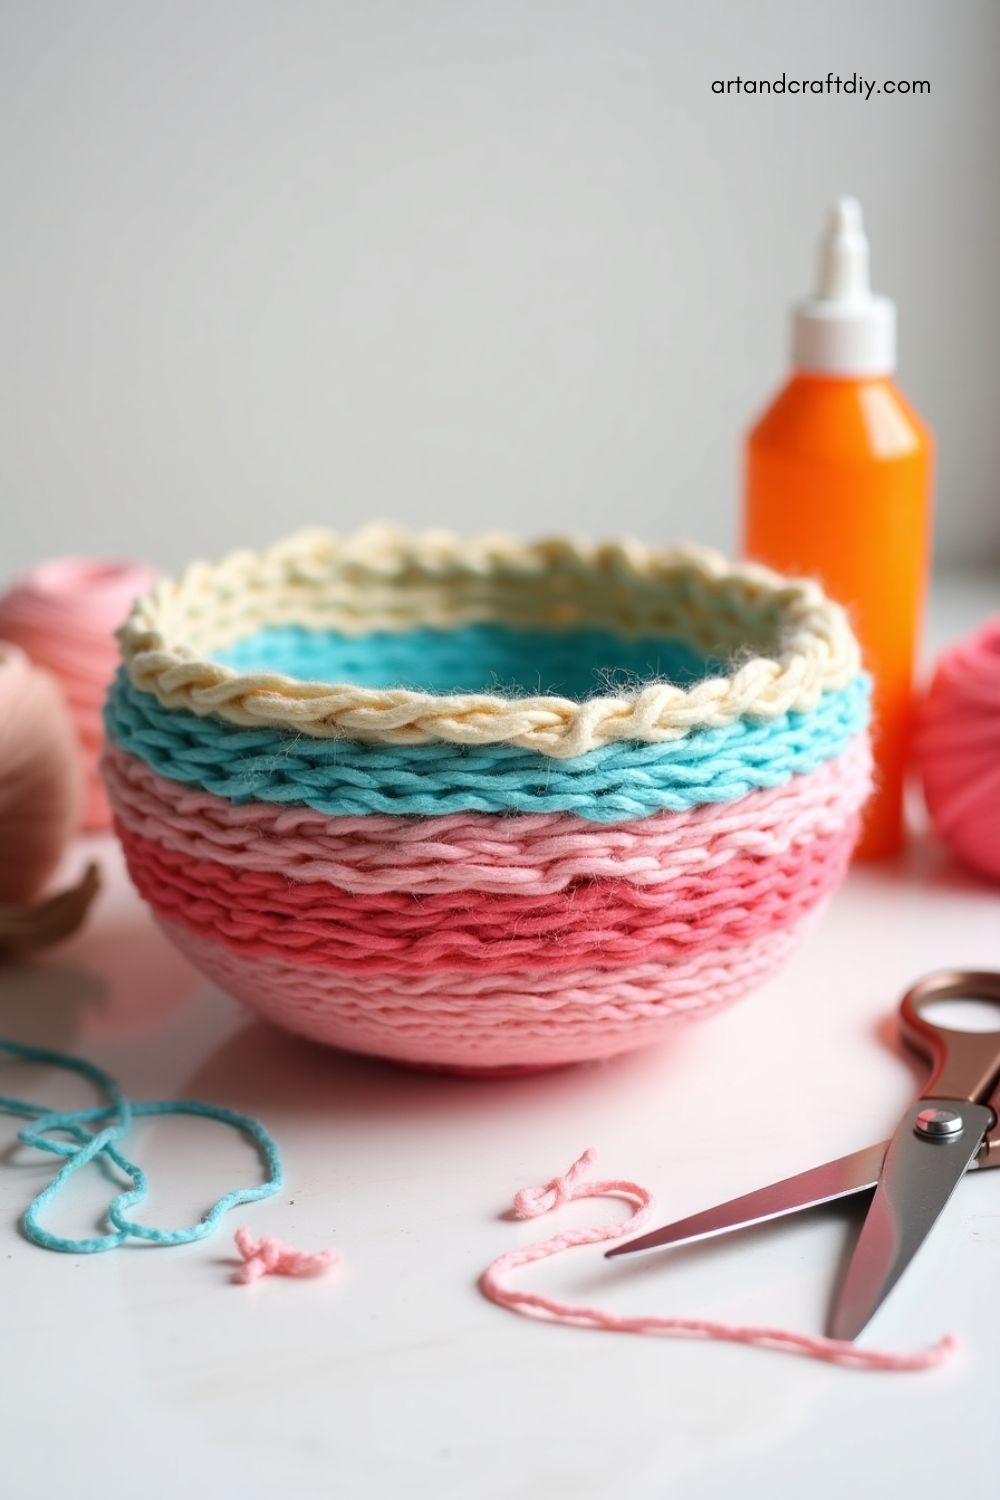
Yarn-Wrapped Balloon Bowl
Yarn bowls are textured, cozy, and charming. Using strands of yarn dipped in glue, you can wrap the balloon in a spiral or crisscross pattern to create a sturdy, see-through bowl that looks like modern string art.
-
Use cotton or acrylic yarn for best results—avoid slippery yarns.
-
Dip yarn completely in glue before wrapping.
-
Wrap in layers to build strength and design.
-
Use pins or clips to hold the ends in place while drying.
-
Add a pop of color by using different yarn shades in layers.
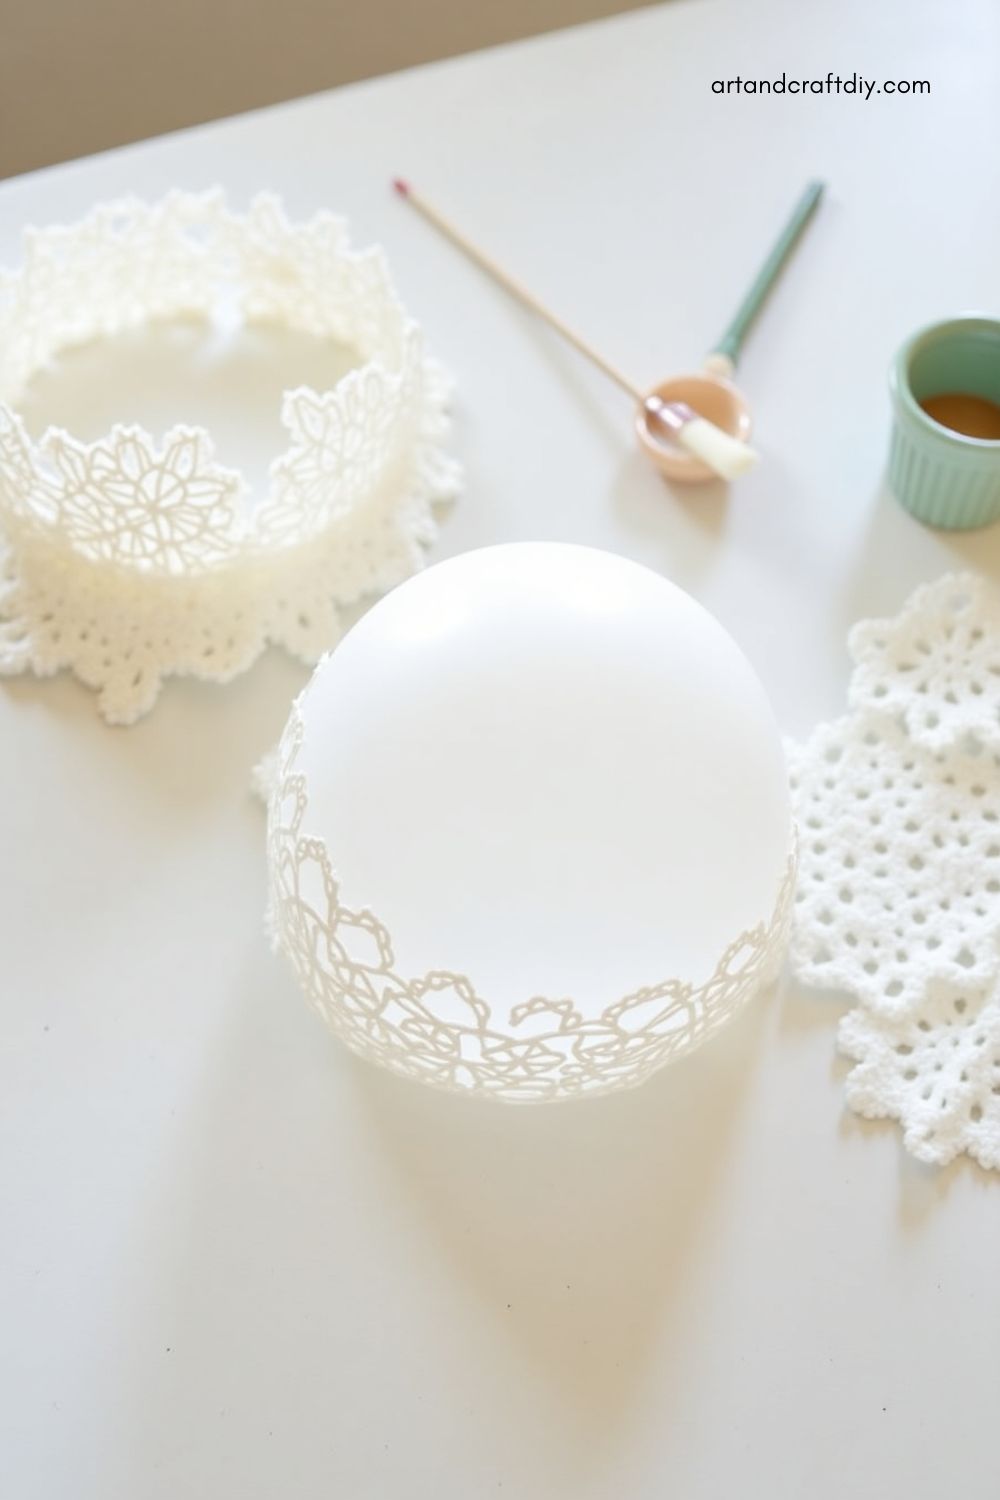
Lace Doily Balloon Bowl
A romantic and vintage-inspired craft, this balloon bowl uses old lace or crochet doilies to form a delicate, elegant container. It’s perfect for weddings, baby showers, or as a shabby chic room accessory.
-
Cut larger doilies into smaller pieces to fit the balloon shape.
-
Apply a generous layer of Mod Podge before and after laying the lace.
-
Use white or cream lace for a classic look, or dye it for a colorful twist.
-
Press out any air bubbles for a smooth surface.
-
Let dry for at least 24 hours to ensure stiffness.
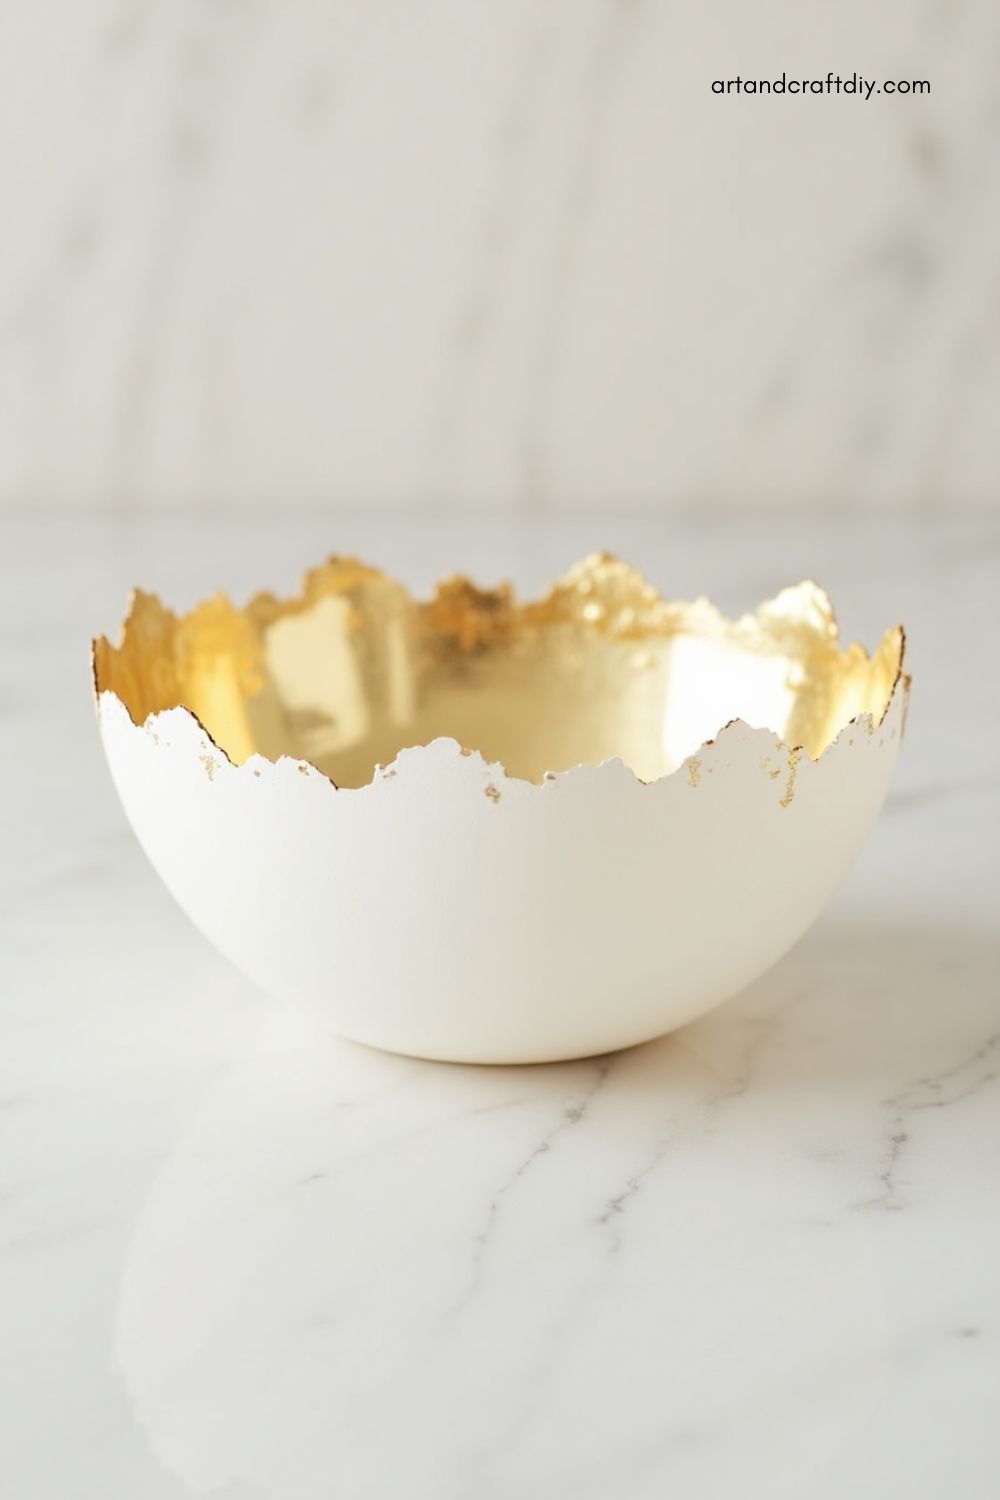
Gold Leaf Accent Balloon Bowl
This bowl combines minimal design with bold metallic flair using gold leaf sheets. It’s perfect for a glam living room display or as a holder for small trinkets and jewelry.
-
Use tissue paper or cardstock base before applying gold leaf.
-
Apply gold leaf adhesive (size) instead of regular glue.
-
Press gold leaf sheets gently over tacky surface.
-
Brush off excess leaf with a soft brush.
-
Seal with a top coat of clear gloss.
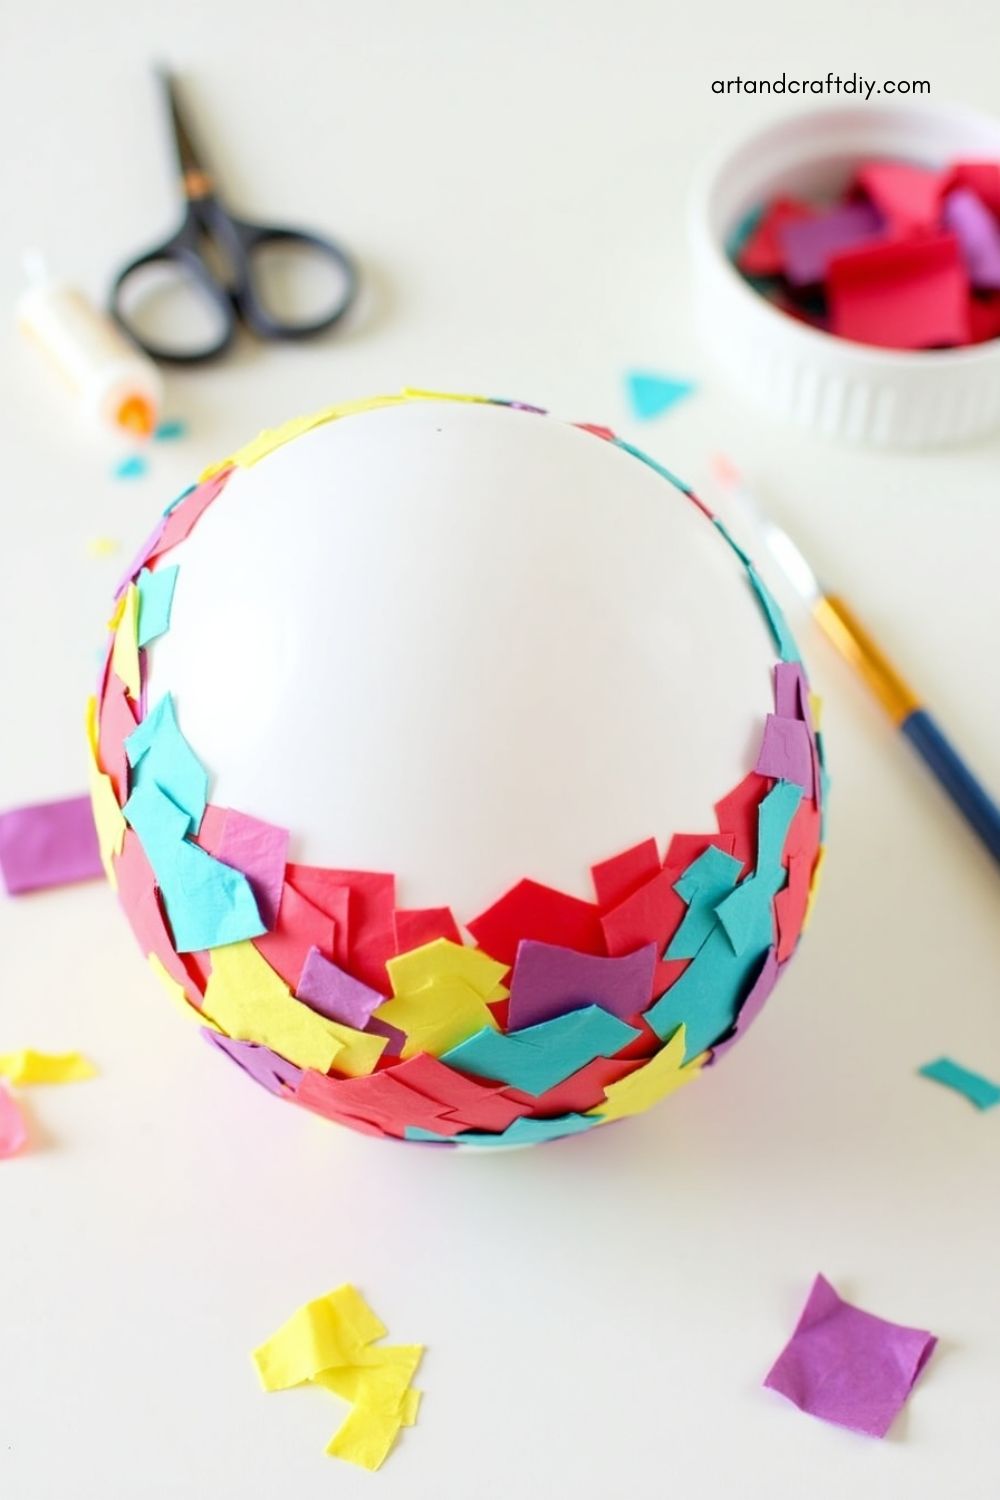
Tissue Paper Collage Balloon Bowl
Bright and colorful, this bowl uses torn pieces of tissue paper to create a fun mosaic or watercolor-like effect. Great for kids’ rooms or craft parties.
-
Use small torn pieces for easier layering and texture.
-
Overlap colors to create interesting blends and tones.
-
Use white glue diluted with a little water for smoother spreading.
-
Finish with a top coat to smooth and protect the surface.
-
Use themed colors for holidays or events.
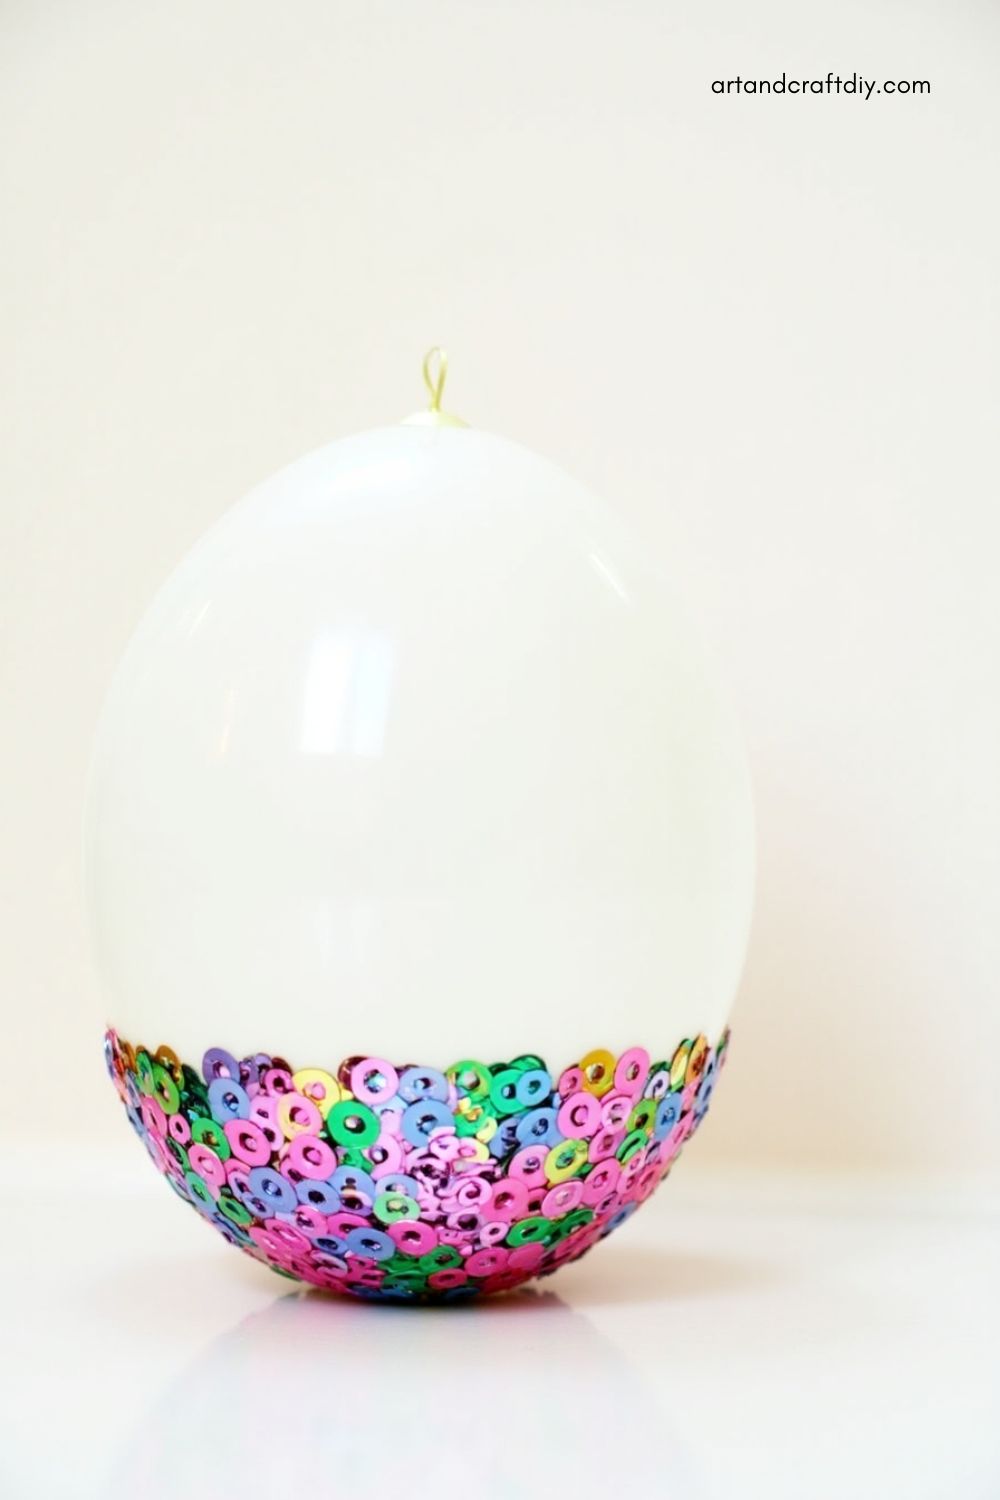
Sequin Balloon Bowl
Sparkle overload! A sequin balloon bowl is perfect for celebrations or as a glam makeup tray. It catches the light and makes a great conversation starter.
-
Choose flat sequins for easier layering.
-
Apply a thick layer of Mod Podge to hold sequins securely.
-
Use tweezers for detailed sequin placement.
-
Let dry in a dust-free space to preserve the sparkle.
-
Top with clear spray sealant to prevent flaking.
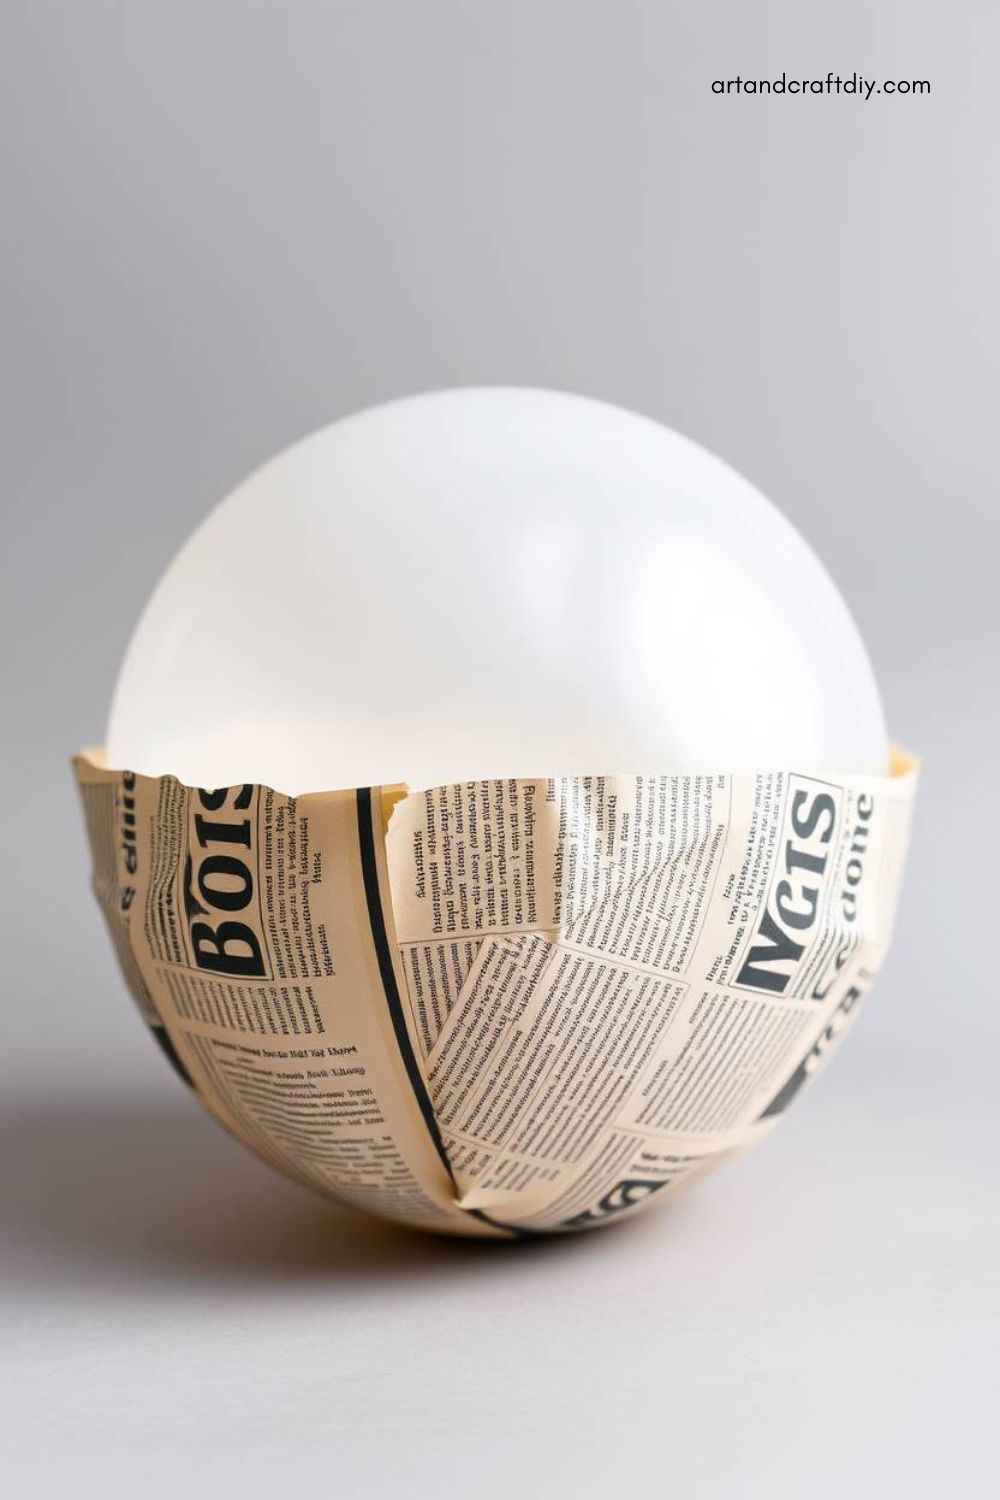
Newspaper or Book Page Bowl
Recycle and craft all at once! Use strips of newspaper or book pages to form a literary-themed bowl. It’s great for book lovers or rustic home decor.
-
Tear paper into thin strips for smooth application.
-
Arrange text outward for a readable finish.
-
Layer at least 3–4 times for strength.
-
Use matte Mod Podge for an aged, vintage look.
-
Optional: Stain with tea or coffee for antique color.
Colorful Button Bowl
A button-covered bowl is playful and bold, ideal for craft rooms or kids’ areas. It’s tactile and sturdy with lots of charm.
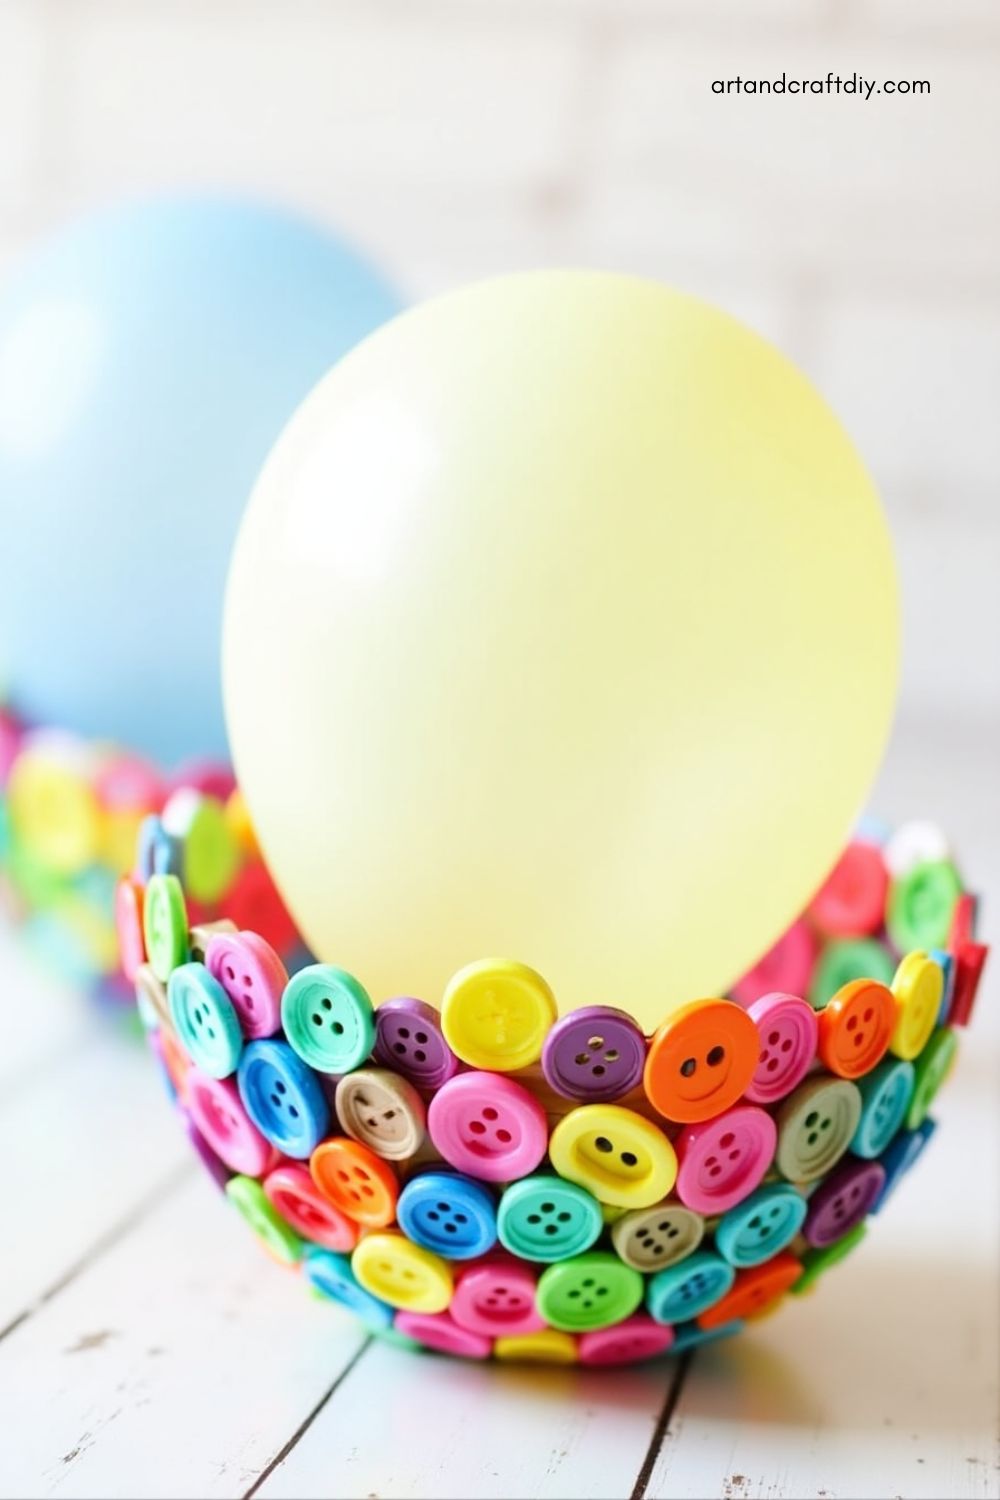
-
Use flat buttons in various sizes for best coverage.
-
Apply a base of fabric or mesh under buttons if needed.
-
Use hot glue or thick craft glue for stronger adhesion.
-
Arrange by color for a rainbow or ombré effect.
-
Seal with epoxy resin for a hard, glassy finish.
Feathered Balloon Bowl
Add a soft, whimsical flair with feathers! Perfect for boho decor or dreamy spaces, feather bowls are light and eye-catching.
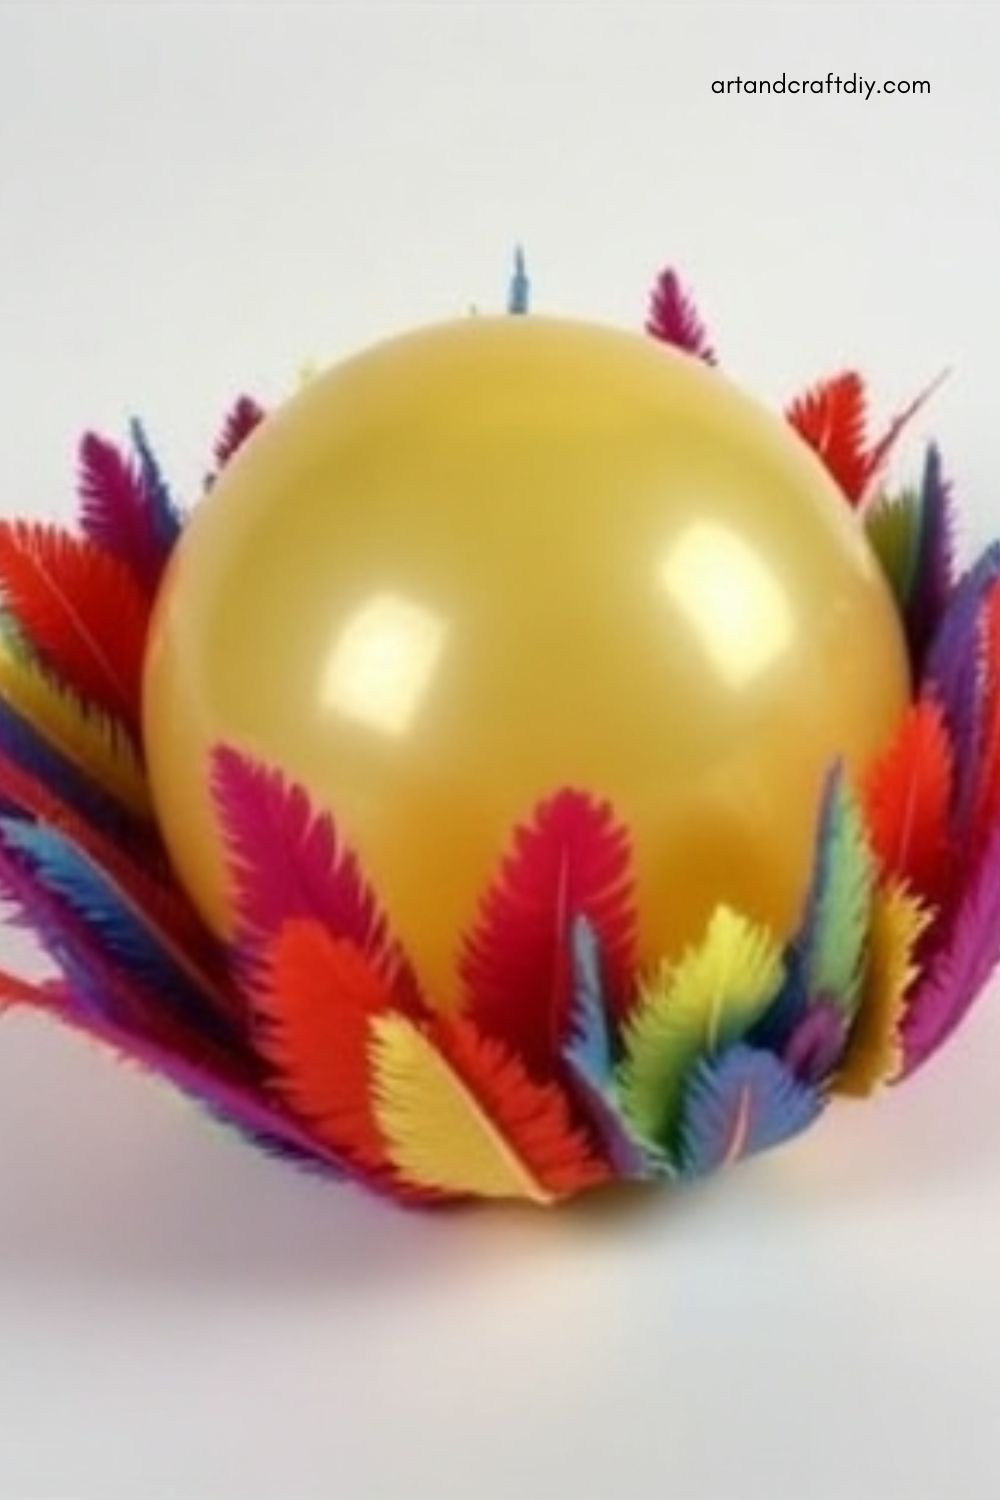
-
Use small craft feathers for better control.
-
Layer feathers in one direction for a sleek look.
-
Apply glue gently to avoid clumps.
-
Combine with lace or metallic accents for contrast.
-
Protect from moisture by sealing with spray varnish.
Metallic Painted Balloon Bowl
For a sleek, modern style, use metallic paint on your balloon bowl. Whether it’s gold, silver, or rose gold, this craft gives off upscale vibes with minimal effort.
-
Use a plain paper or yarn base for structure.
-
Spray paint or brush metallic acrylic paint for coverage.
-
Paint after the bowl is completely dry and balloon is removed.
-
Add painter’s tape for color block designs.
-
Finish with gloss spray to enhance the metallic shine.
Dried Flower Balloon Bowl
Incorporate dried petals and leaves for a nature-inspired, delicate look. Great for spring decor or eco-friendly gifting.
-
Press flowers before use to prevent curling.
-
Apply a base layer of white tissue paper for contrast.
-
Press petals carefully into glue without breaking them.
-
Arrange in patterns or scattered randomly.
-
Seal with a clear, non-yellowing finish.
Magazine Strip Bowl
A bold, recycled craft using glossy magazine strips. Each bowl is totally unique and vibrant with overlapping text and images.
-
Use colorful magazine pages for vibrant results.
-
Cut into strips or shapes for layering.
-
Stick pieces edge-to-edge or overlap slightly.
-
Use a gloss finish to bring out the colors.
-
Try thematic pages (fashion, food, travel) for a fun twist.
Cotton Ball Cloud Bowl
Soft and fluffy, this craft mimics the look of clouds using cotton balls. Great for nurseries or dreamy decor setups.
-
Stretch cotton balls slightly for smoother texture.
-
Use white glue with minimal water so they don’t collapse.
-
Add glitter for a magical touch.
-
Let dry completely before popping the balloon.
-
Keep away from moisture or heat sources.
Glow-in-the-Dark Bowl
A cool twist—make your bowl glow in the dark for nighttime fun! Ideal for sleepovers or Halloween.
-
Use glow-in-the-dark glue or paint over a yarn or tissue base.
-
Charge under bright light before use.
-
Layer thin coats for stronger glow.
-
Combine with neon colors for daytime flair.
-
Add stars or moon shapes for a celestial theme.
Pom Pom Balloon Bowl
Fun, fuzzy, and colorful—this bowl uses mini pom poms for a playful design. It’s perfect for kids’ spaces or as a candy holder.
-
Use small pom poms for better shape adherence.
-
Stick with thick glue and press firmly.
-
Use color patterns for themes (rainbow, pastels, etc.).
-
Let dry in a stable cup so poms don’t shift.
-
Seal with clear glue to reinforce edges.
Safety Tips & Best Practices
DIY balloon bowl crafts are a fun and creative activity for all ages, but like any craft involving glue, scissors, and balloons, it’s important to keep safety in mind—especially when children are involved. Following a few simple guidelines can help ensure a safe and enjoyable crafting experience for everyone.
-
Supervise Young Kids When Using Glue and Scissors
Children should always be supervised when handling scissors or glue to prevent accidental cuts or spills. Use child-safe scissors and non-toxic glue for younger crafters, and demonstrate each step clearly before letting them begin. -
Use a Drop Cloth or Protective Surface
Craft glue and paint can easily drip or spill, so it’s wise to cover your workspace with a drop cloth, old newspaper, or a plastic table cover. This makes cleanup easier and protects furniture from damage. -
Ensure Ventilation If Using Strong Adhesives
If you’re using strong-smelling adhesives like Mod Podge or spray sealants, work in a well-ventilated area. Open windows, use fans, or move your craft station outdoors to avoid inhaling fumes—especially important for children or those with sensitivities.
Taking a few moments to prep your space and supervise participants will make the balloon bowl crafting process both safe and fun!
FAQ
How long does it take for the balloon bowl to dry completely?
It typically takes 12–24 hours to dry, depending on the thickness of the materials and the humidity in the room. For best results, let it dry overnight.
What kind of glue works best for balloon bowl crafts?
White school glue (PVA) or Mod Podge works well. You can dilute it slightly with water if needed for easier spreading.
Can I use any type of balloon?
Standard latex balloons (10–12 inches) work best. Avoid small water balloons or metallic-finished balloons, as they may not hold shape well or release cleanly.
Will the balloon pop too soon during the process?
If you handle it gently and avoid sharp objects, it should hold up. Make sure not to use hot glue directly on the balloon, as it may cause it to burst.

Hi, I’m Victoria, an art and craft teacher at Newark City Schools, where I have the joy of working with middle school students to help them explore their creativity and develop their artistic talents. I believe that art is a powerful way for students to express themselves, and I strive to make every lesson a fun, engaging, and inspiring experience.
I created this website to share the art and craft projects, techniques, and resources that I use in my classroom, hoping to inspire both educators and young artists alike. Whether you’re a teacher looking for new ideas or a student eager to try something new, I’m excited to provide creative tools and projects that anyone can enjoy.
When I’m not in the classroom, I love experimenting with different art forms and learning new crafting techniques. My goal is to help others discover the joy of making things with their hands, and I hope my website serves as a space for everyone to explore their creative potential.