
Last year, I sat on the living room floor surrounded by glitter, ribbon, and a pile of half-finished projects. I’d promised myself I wouldn’t overspend on store-bought decorations, but—let’s be honest—I also didn’t want my place looking like the Grinch had moved in. That’s when I stumbled into the world of DIY Christmas crafts, and oh my gosh… it changed everything. Not only did I save money, but I actually had fun (yes, real fun) making things with my own hands. And you know what? People noticed. Friends kept asking, “Where’d you buy that?” and I’d just smile.
I get it though—starting can feel overwhelming. What if it looks messy? What if you don’t have time? Trust me, I’ve been there. That’s exactly why I’m sharing simple, cozy, and budget-friendly ideas with you today. By the end, you’ll have decorations that feel personal and festive—without the stress.
DIY Christmas Crafts
DIY Christmas Crafts are creative, hands-on projects that bring a personal touch to holiday decorating and gifting.
Felt Christmas Ornaments
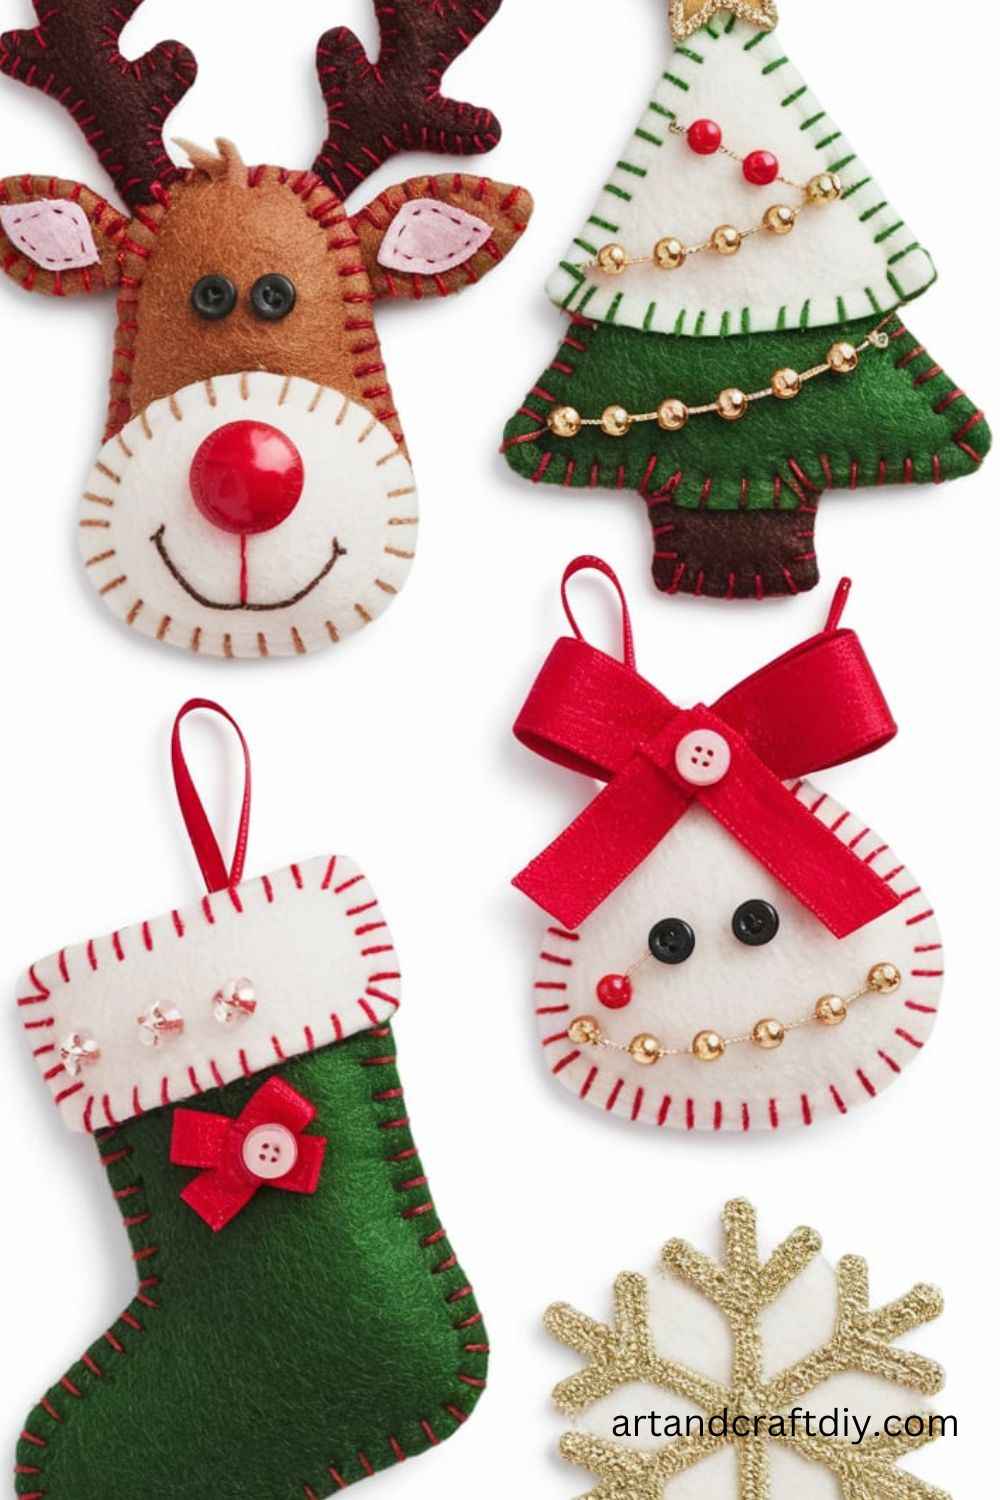
I’ve always had a soft spot for felt crafts because they remind me of my childhood when my grandma used to sew little stars and stockings for our tree. Honestly, working with felt is so forgiving—you can cut, stitch, or even glue and it still turns out adorable. Whenever I start, I grab a bunch of colorful felt sheets, trace simple shapes like trees, bells, or candy canes, and then cut two pieces for each. Sometimes I sew them together with a little stuffing inside, but on lazy days, I just glue the edges and it still looks great. The best part? They’re lightweight and won’t break if you have kids or pets running around.
In my opinion, felt ornaments also make the sweetest little gifts. One year I made mini snowmen and slipped them into Christmas cards—people still talk about it! You can even personalize them with initials or sequins. If you’ve never tried making them, trust me, it’s one of the easiest and most heartwarming Christmas crafts to start with.
Mason Jar Snow Globe
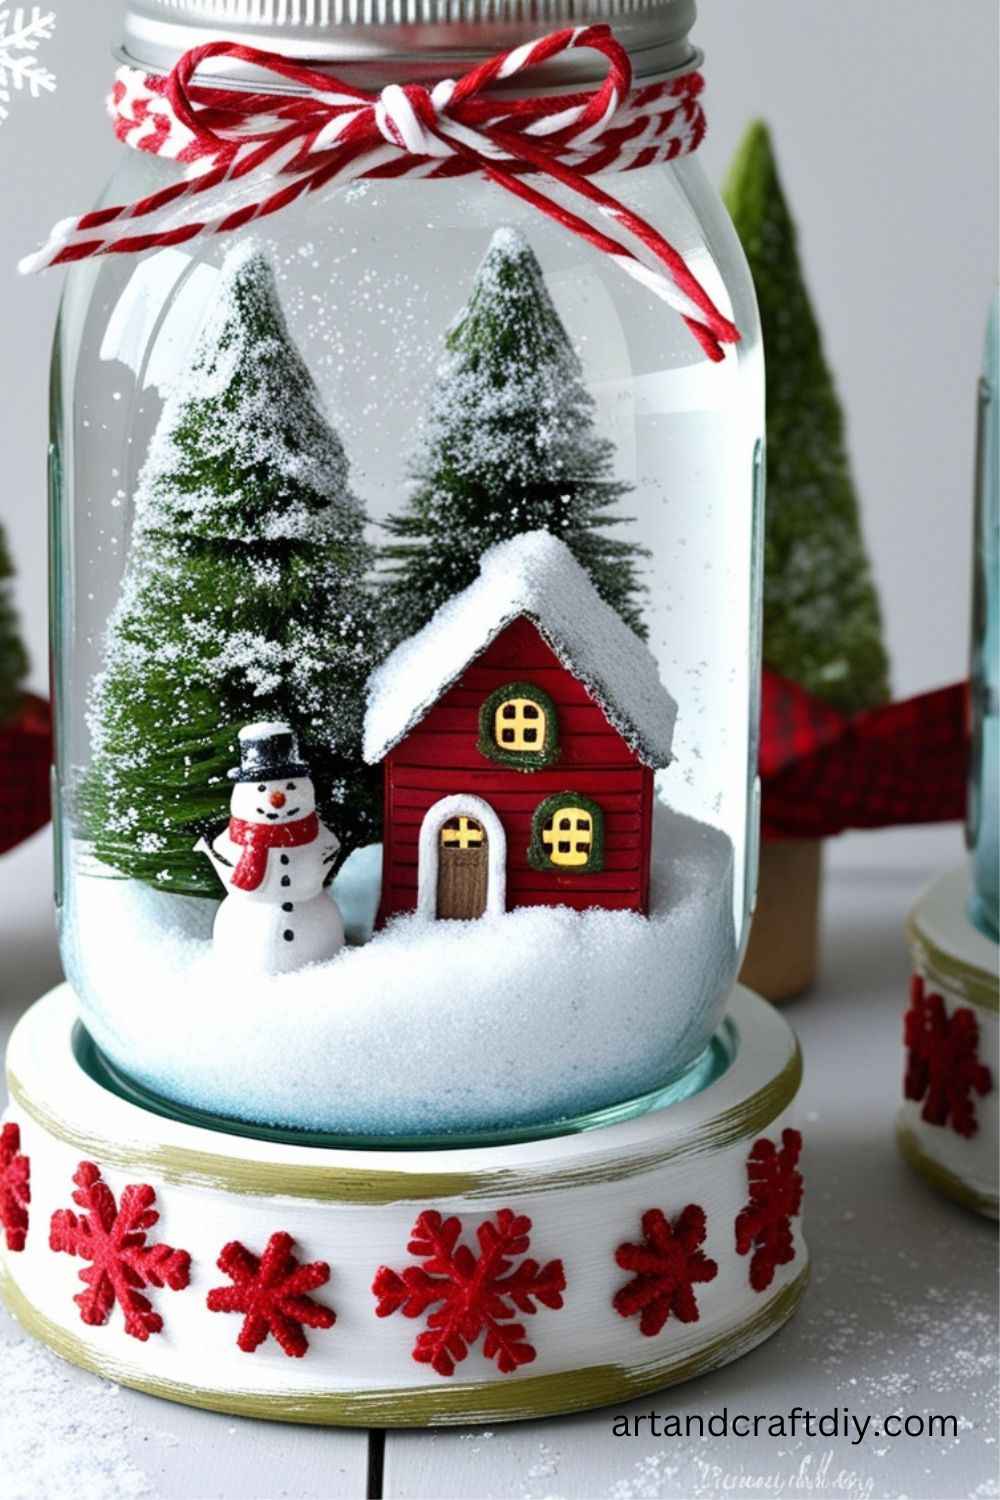
What I love most about these snow globes is how personal they can be. One year I glued a tiny reindeer and a fake tree inside, and my nephew couldn’t stop shaking it at dinner. You can go fancy or keep it simple—either way, these little jars spread joy like nothing else. And honestly, they’re the kind of craft that makes you want to sit back with hot cocoa and just admire your handiwork.
Clothespin Reindeer
Now, this one makes me laugh every time because the first clothespin reindeer I made had googly eyes that were completely lopsided—and yet, it was everyone’s favorite ornament. There’s just something about using everyday wooden clothespins and turning them into little reindeer that feels so charming. I usually glue two clothespins back-to-back for the body and legs, then use one upside down for the head. Add some pipe cleaner antlers, tiny eyes, and a red pom-pom nose, and suddenly Rudolph is ready for the tree.
In my experience, kids absolutely love this craft because it’s simple but full of personality. I’ve hosted little craft nights where we made a bunch of these and laughed ourselves silly because no two reindeer ever look the same. Honestly, the imperfections make them even better—it’s like they each have their own quirky character. If you want a craft that’s easy, fun, and gives you a tree full of unique little faces, this is the one I’d recommend in a heartbeat.
Pinecone Christmas Trees
Pinecones make natural and rustic Christmas tree decorations.
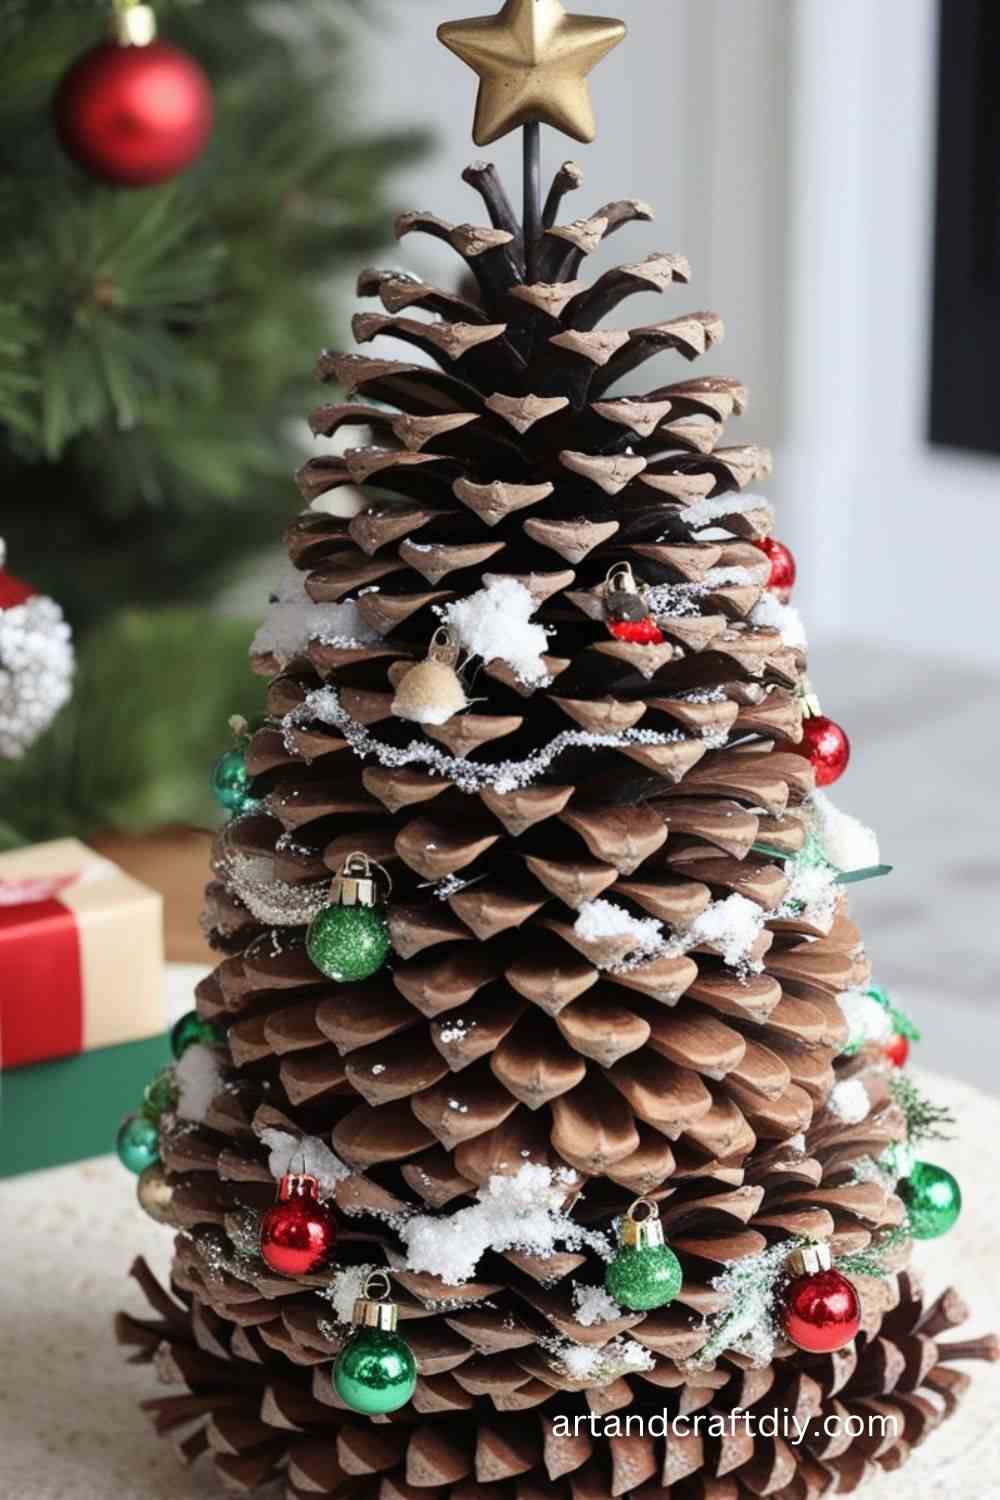
Materials Needed: Pinecones, green paint, glitter, beads, and glue.
Steps:
- Paint the pinecones green and let them dry.
- Sprinkle glitter over the wet paint for sparkle.
- Glue beads or tiny ornaments as decorations.
- Place on a small cardboard base for stability.
Sock Snowman
Turn mismatched socks into charming snowmen.
Materials Needed: White socks, rice, rubber bands, buttons, fabric scraps, and glue.
Steps:
- Fill a sock with rice, dividing it into two sections using rubber bands.
- Tie the top closed to create a snowman shape.
- Add buttons, a fabric scarf, and a sock hat.
- Draw or glue on eyes, a nose, and a mouth.
Paper Plate Santa Claus
Perfect for kids, this craft turns paper plates into Santa faces.
Materials Needed: Paper plates, cotton balls, red construction paper, markers, and glue.
Steps:
- Cut a triangle from red paper for Santa’s hat.
- Glue the hat onto the paper plate.
- Add cotton balls for the beard and hat trim.
- Draw or glue on facial features.
Wine Cork Reindeer
Recycle wine corks into delightful reindeer.
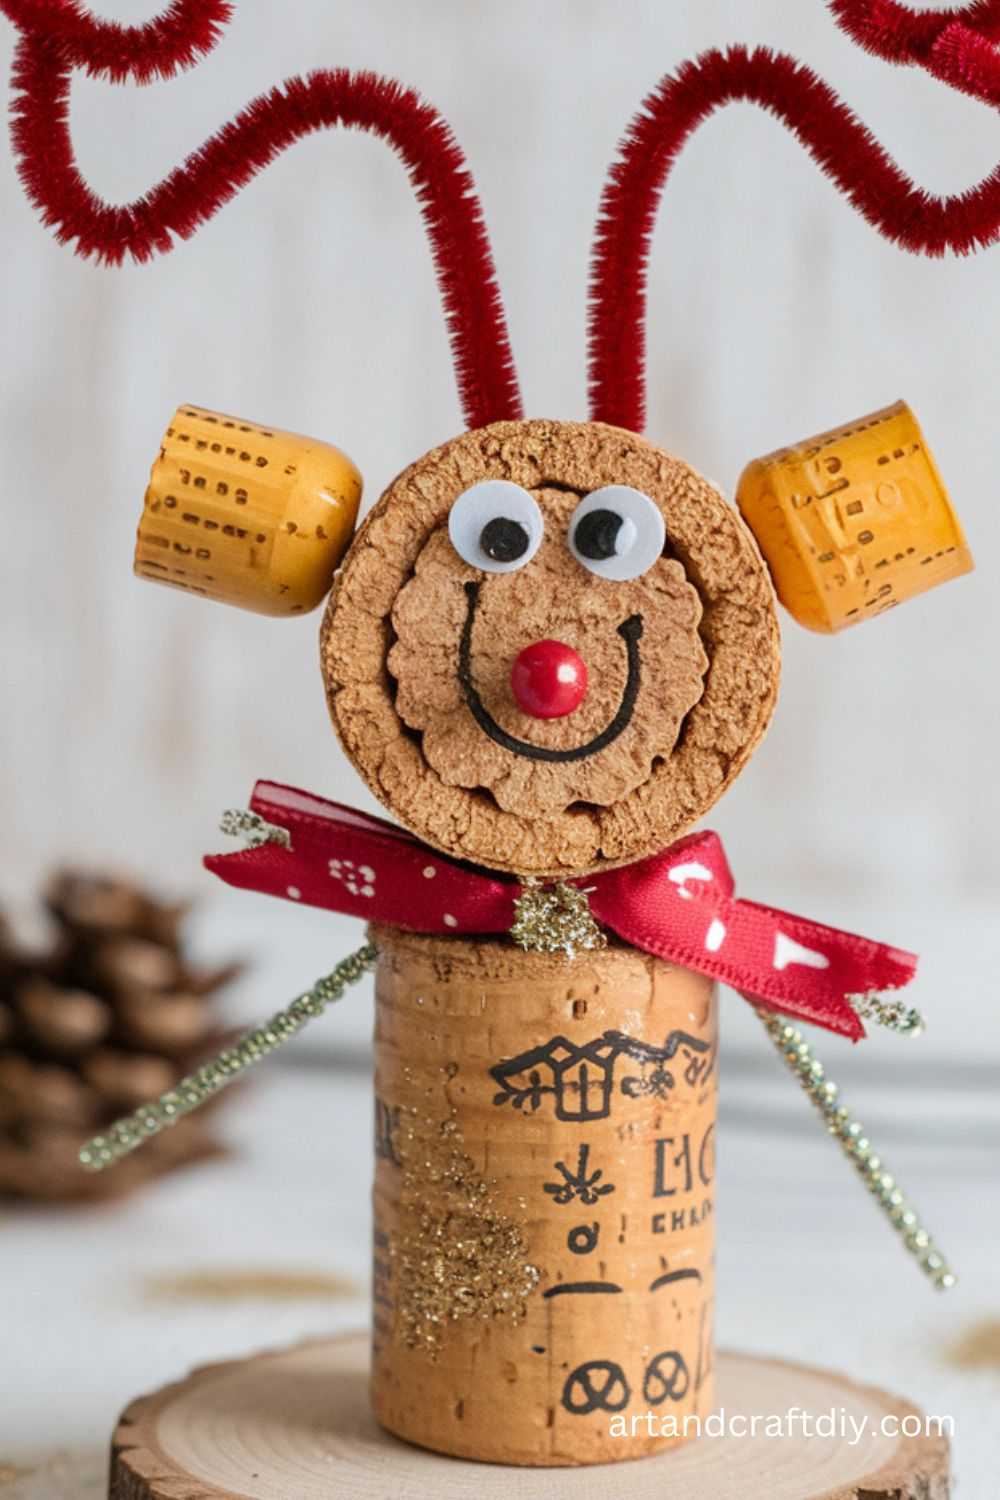
Materials Needed: Wine corks, small twigs, googly eyes, red pom-poms, and glue.
Steps:
- Glue two corks together to form the body and head.
- Attach twig antlers and legs.
- Add googly eyes and a red pom-pom nose.
Pom-Pom Garland
Add a whimsical touch to your decor with a colorful pom-pom garland.
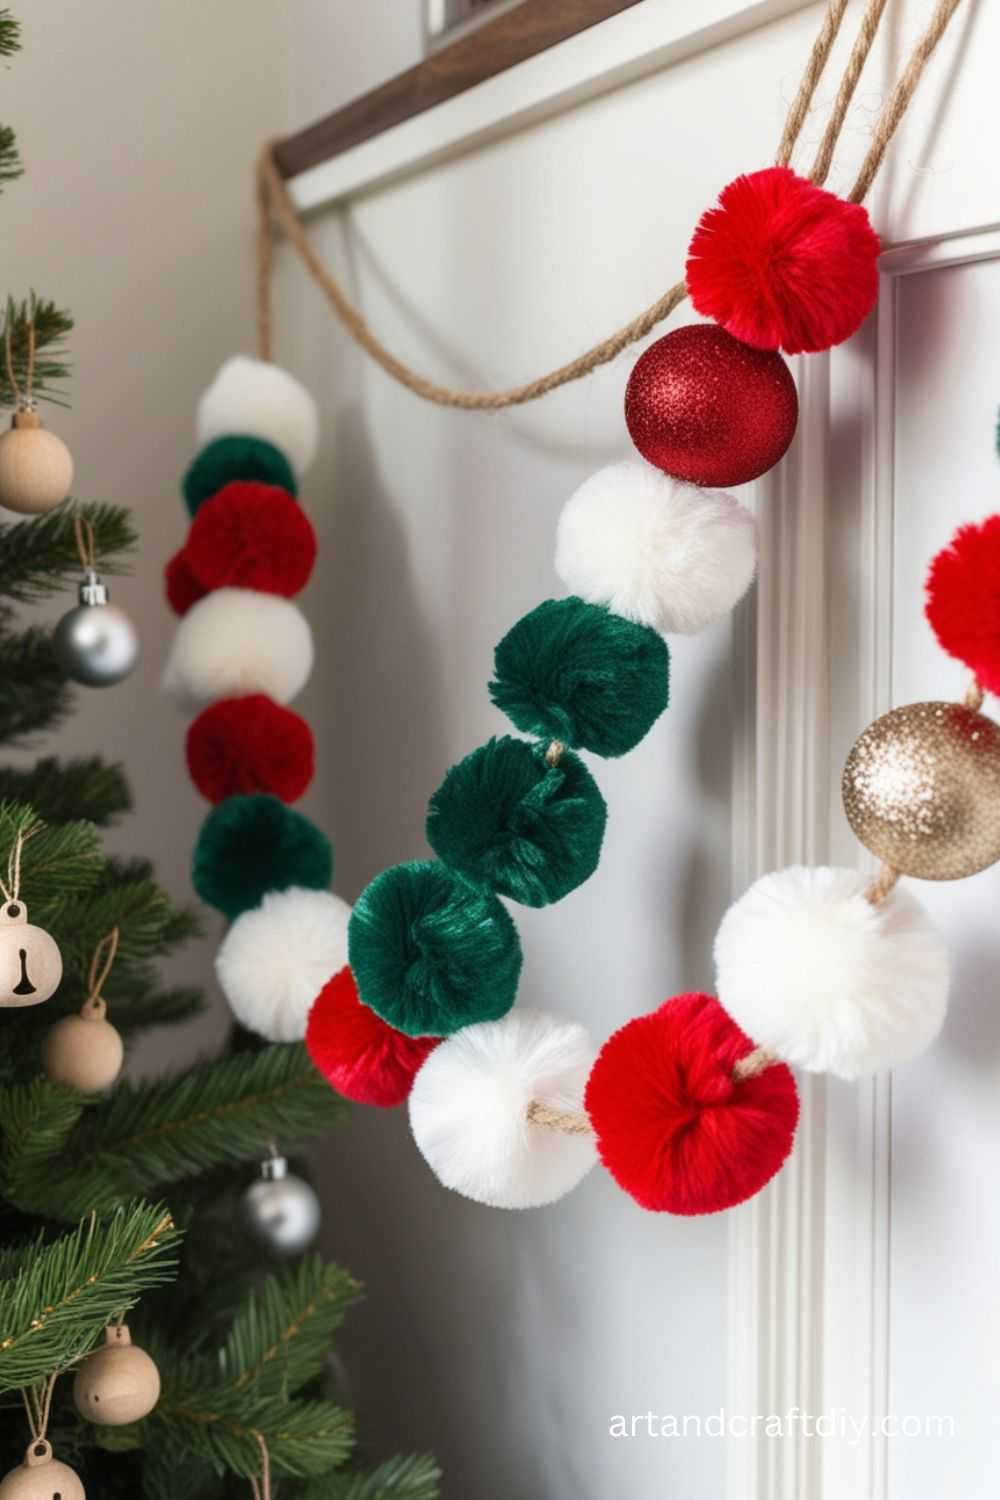
Materials Needed: Yarn, scissors, and a needle.
Steps:
- Wrap yarn around your fingers to create pom-poms.
- Tie the middle with a piece of yarn and cut the loops.
- Fluff and trim into a round shape.
- Thread pom-poms onto a long string or ribbon.
Salt Dough Ornaments
Make personalized ornaments with salt dough.
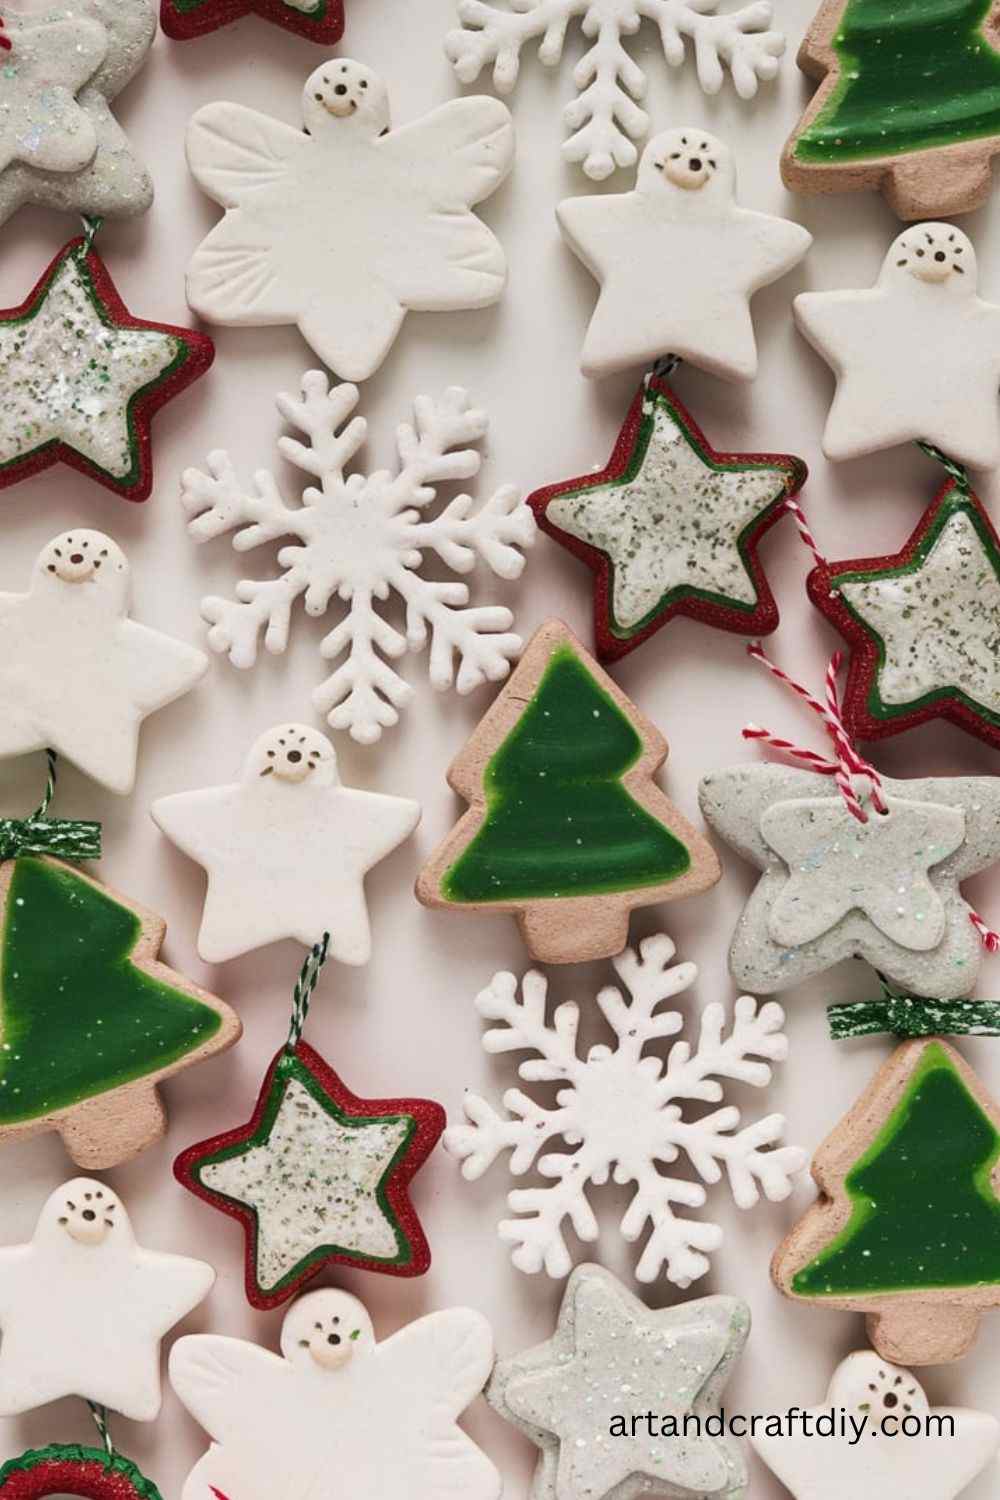
Materials Needed: Flour, salt, water, cookie cutters, and paint.
Steps:
- Mix 2 cups of flour, 1 cup of salt, and water to form a dough.
- Roll out and cut shapes with cookie cutters.
- Bake at 200°F (93°C) until hard.
- Paint and decorate once cool.
Glitter Candle Holders
Glam up your holiday table with glittery candle holders.
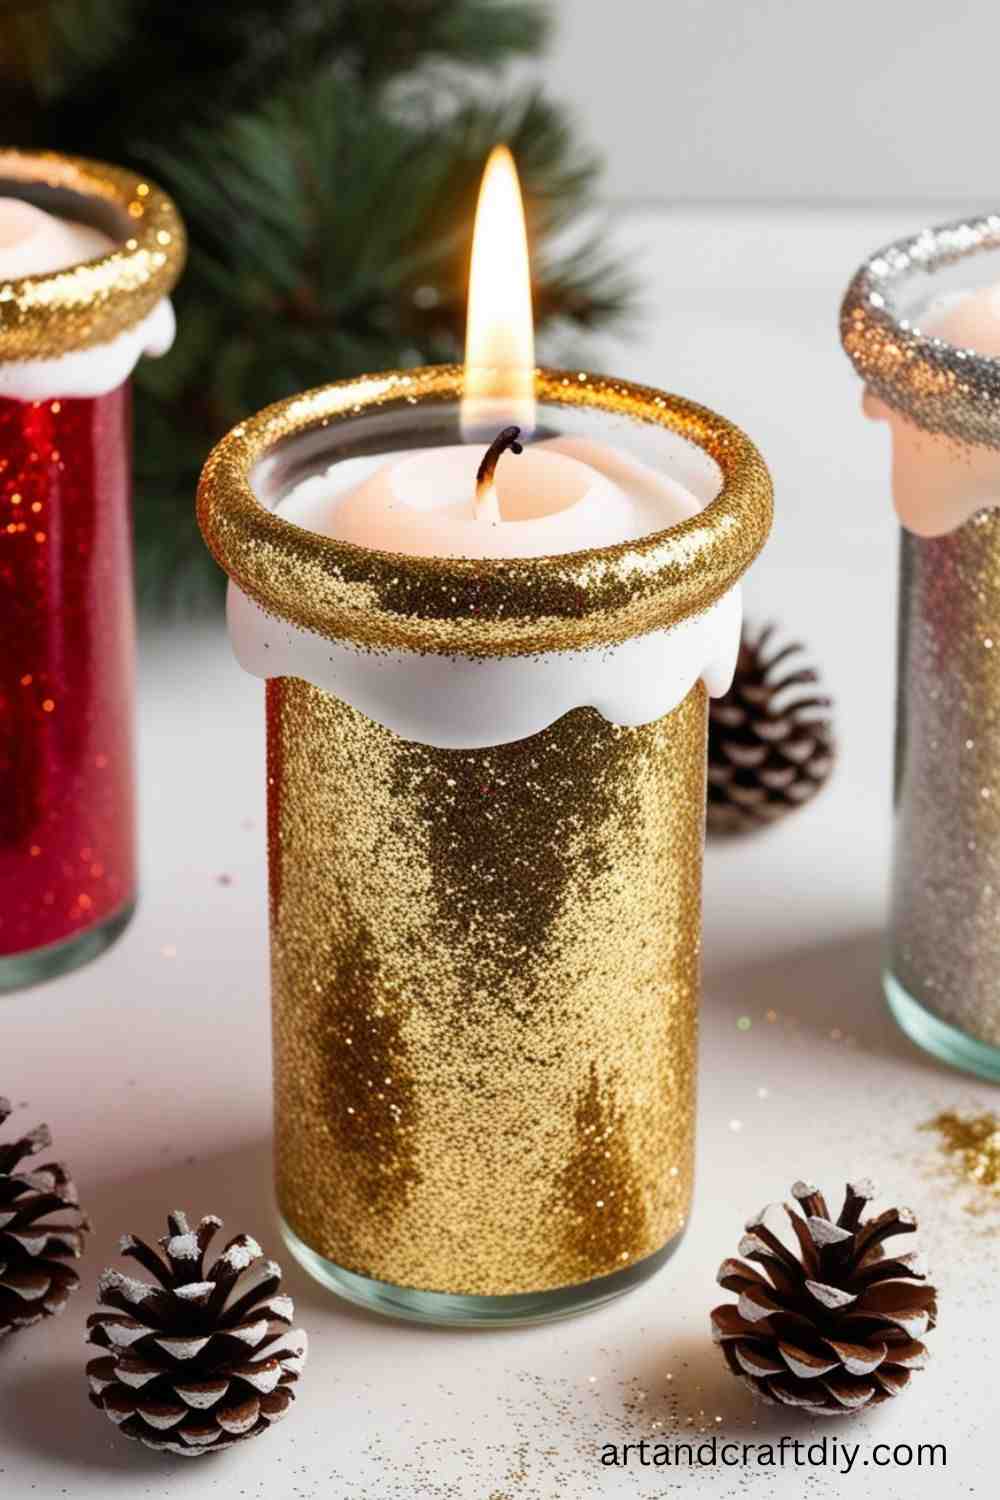
Materials Needed: Glass jars, glue, glitter, and candles.
Steps:
- Apply glue to the outside of a jar.
- Roll the jar in glitter and let it dry.
- Place a candle inside for a shimmering glow.
Button Christmas Tree Art
Create a vibrant Christmas tree using colorful buttons.
Materials Needed: Buttons, canvas or cardstock, glue, and a marker.
Steps:
- Draw a triangle on the canvas or cardstock to outline the tree.
- Arrange buttons within the triangle, layering them for a textured look.
- Glue the buttons in place and let them dry.
- Add a star-shaped button or decoration at the top.
Paper Straw Stars
Turn colorful paper straws into festive stars for your tree.
Materials Needed: Paper straws, scissors, glue, and thread.
Steps:
- Cut the straws into equal lengths.
- Glue the pieces together to form a star shape.
- Add a loop of thread to hang on your tree.
Candy Cane Wreath
A wreath made from candy canes is sweet and decorative.
Materials Needed: Candy canes, hot glue, ribbon, and a cardboard circle.
Steps:
- Arrange candy canes around the cardboard circle, with the hooks pointing outward.
- Glue the candy canes in place.
- Add a bow or ribbon for extra flair.
Wooden Spoon Snowman
Wooden spoons make a fun base for crafting adorable snowmen.
Materials Needed: Wooden spoons, white paint, markers, fabric scraps, and buttons.
Steps:
- Paint the spoon’s head white for the snowman face.
- Draw on eyes, a carrot nose, and a smile.
- Tie a fabric scarf around the handle.
- Add buttons along the handle for decoration.
Twine Ball Ornaments
Rustic twine balls add a cozy feel to your tree.
Materials Needed: Balloons, twine, glue, and glitter.
Steps:
- Inflate balloons to a small size.
- Soak twine in glue and wrap it around the balloon.
- Let it dry, then pop the balloon and remove it.
- Sprinkle glitter on the twine for sparkle.
Cinnamon Stick Stars
These natural stars bring a lovely scent to your holiday decor.
Materials Needed: Cinnamon sticks, hot glue, and twine.
Steps:
- Cut cinnamon sticks into equal lengths.
- Glue the sticks together in a star shape.
- Tie a loop of twine for hanging.
Handprint Wreath
A great project for kids, this wreath captures their handprints in festive colors.
Materials Needed: Green paper, scissors, glue, and ribbon.
Steps:
- Trace and cut out multiple handprints from green paper.
- Arrange the handprints in a circular pattern to form a wreath.
- Glue them together and add a bow.
Painted Rock Christmas Characters
Turn ordinary rocks into festive characters like Santa or snowmen.
Materials Needed: Smooth rocks, acrylic paint, brushes, and markers.
Steps:
- Wash and dry the rocks.
- Paint each rock with a holiday character or symbol.
- Add details like faces or decorations using markers.
Garland of Paper Snowflakes
String together delicate paper snowflakes for a winter wonderland effect.
Materials Needed: White paper, scissors, and string.
Steps:
- Fold paper and cut out snowflake shapes.
- Unfold and flatten the snowflakes.
- Thread them onto string to create a garland.
Jar Lid Christmas Magnets
Upcycle jar lids into cute holiday magnets.
Materials Needed: Jar lids, holiday stickers or photos, glue, and magnets.
Steps:
- Glue a holiday sticker or photo inside the jar lid.
- Attach a magnet to the back of the lid.
- Use on your fridge for festive flair.
Ribbon Christmas Trees
These ribbon trees are simple yet elegant decorations.
Materials Needed: Green ribbon, wooden dowels, beads, and glue.
Steps:
- Tie pieces of green ribbon onto a dowel in decreasing lengths to form a tree shape.
- Glue a bead on top as a tree topper.
- Place in a small stand or use as an ornament.
Egg Carton Bells
Transform egg cartons into charming Christmas bells.
Materials Needed: Egg cartons, paint, glitter, ribbon, and small bells.
Steps:
- Cut out individual cups from an egg carton.
- Paint and decorate the cups.
- Thread ribbon through the top and attach a small bell inside.
Popsicle Stick Sleighs
Mini sleighs make cute decorations or gift tags.
Materials Needed: Popsicle sticks, paint, glue, and string.
Steps:
- Glue popsicle sticks together to form a sleigh shape.
- Paint and decorate the sleigh.
- Add string for hanging.
Glitter Pinecone Ornaments
Add sparkle to natural pinecones for stunning ornaments.
Materials Needed: Pinecones, glue, glitter, and string.
Steps:
- Apply glue to the edges of the pinecone scales.
- Sprinkle glitter over the glue.
- Tie a loop of string for hanging.
Cupcake Liner Angels
Delicate angels made from cupcake liners are ideal for tree decor.
Materials Needed: Cupcake liners, beads, and glue.
Steps:
- Fold a cupcake liner in half for the wings.
- Use another liner for the angel’s dress.
- Attach a bead on top for the head.
DIY Advent Calendar
Create a personalized advent calendar for countdown fun.
Materials Needed: Small envelopes, cardstock, markers, and ribbon.
Steps:
- Number each envelope and fill with treats or notes.
- Attach envelopes to a piece of cardstock.
- Hang the calendar with ribbon.
Holiday Light Bulb Garland
Upcycle old bulbs into a vibrant garland.
Materials Needed: Burnt-out light bulbs, paint, string, and glue.
Steps:
- Paint the light bulbs in festive colors or patterns.
- Tie them to a string with glue for a secure hold.
Gingerbread House Decoration
Build a festive gingerbread house to enjoy and display.
Materials Needed: Gingerbread pieces, icing, candy, and a board.
Steps:
- Assemble the house with icing as glue.
- Decorate with candy and icing.
- Display on a board or platter.
Upcycling for Christmas Crafts: Giving New Life to Old Items
Upcycling is a creative and eco-friendly way to reuse materials you already have, and it’s perfect for adding a personal touch to your Christmas crafts. Rather than throwing away old items, transform them into beautiful holiday decorations or thoughtful gifts. This not only reduces waste but also helps you create one-of-a-kind pieces that are full of character. Here are some easy ideas for upcycling materials into festive Christmas crafts:
1. Repurposing Old Christmas Cards
Old Christmas cards are a goldmine for upcycling, as they often feature beautiful designs and messages. Here are a few ways to give them a second life:
- Gift Tags: Cut out sections of the card to make unique and personalized gift tags. You can punch a hole in the corner and add a ribbon or string for easy attachment.
- Bookmarks: Trim the cards into bookmark-sized strips and laminate them for durability. Decorate with a ribbon at the top for a festive touch.
- New Christmas Cards: Combine multiple old cards to create a new, patchwork-style card. You can cut out parts of different cards and layer them for a fun, mixed-media look.
2. Transforming Sweaters into Stockings
Old sweaters that no longer fit or are worn out can be repurposed into cozy Christmas stockings. Here’s how to do it:
- Materials Needed: Old sweater, scissors, needle and thread (or sewing machine), ribbon (optional).
- Instructions:
- Lay the sweater flat and cut off the sleeves or a portion of the body.
- Using the sleeve or body fabric, cut out two stocking-shaped pieces (one for the front and one for the back).
- Sew the pieces together, leaving the top open.
- Turn the stocking inside out, and sew on a decorative cuff at the top using fabric from the sweater’s hem or another piece of the sweater.
- Optionally, add a ribbon loop to the top for hanging.
- Decorate with buttons, appliques, or other embellishments for a personalized touch.
3. Reusing Glass Jars for Christmas Crafts
Glass jars are versatile and can be easily transformed into a variety of Christmas crafts. Here are a few ideas for reusing them:
- Luminaries: Clean the jars thoroughly, then decorate the outside with paint, glitter, or ribbons. Place a candle inside (a battery-operated tea light is a safe option), and you have an instant festive luminary.
- Gift Holders: Fill the jars with small treats like candies, hot cocoa mix, or homemade cookies. Wrap the lid with twine and add a handmade tag for a thoughtful gift.
- Ornaments: Turn the jars into snow globe-style ornaments by gluing a small figure (like a miniature tree or reindeer) to the inside of the lid, filling the jar with fake snow or glitter, and sealing it shut. Shake for a snowy scene that will delight guests.
By upcycling everyday items, you can make your Christmas decorations and gifts more sustainable, affordable, and full of personality. Happy crafting!
Tips for Crafting with Kids: A Fun and Safe Way to Bond
Crafting with kids is a wonderful way to spark creativity, develop fine motor skills, and create lasting memories as a family. Whether it’s a rainy day or a special occasion, arts and crafts provide an opportunity for children to express themselves and explore their imagination. However, crafting with kids can sometimes be messy and challenging. To ensure that the experience is enjoyable for both parents and children, it’s important to keep safety in mind, choose age-appropriate projects, and work together as a family.
Here are some helpful tips for making the most of your crafting sessions with kids:
1. Prioritize Safety
- Always use child-safe materials: Opt for non-toxic paints, markers, and glues. Make sure scissors and other tools are age-appropriate and designed for kids.
- Supervise closely: Even with safe materials, it’s important to monitor children, especially younger ones, to avoid accidents.
- Set up a safe space: Designate a specific area for crafting that’s easy to clean, such as a table covered with newspaper or a craft mat. Protect floors and furniture from paint spills and glue.
2. Choose Age-Appropriate Crafts
- For toddlers and preschoolers: Simple activities like finger painting, sticker collages, or clay play are great for developing fine motor skills. These crafts also allow for a lot of sensory exploration.
- For elementary-aged kids: Consider projects like building with construction paper, making paper plate masks, or creating friendship bracelets. These crafts engage more complex skills while still being fun and accessible.
- For tweens and teens: DIY projects like customizing T-shirts, creating jewelry, or even basic woodworking are great choices. These crafts encourage independence and more detailed work, allowing kids to express their personality.
3. Get Creative and Work Together
- Collaborate as a family: Crafting is a perfect way to bring everyone together. Create a group project like a family scrapbook, a large mural, or a seasonal wreath. This can help foster teamwork and shared experiences.
- Incorporate each person’s ideas: Let each child bring their unique ideas to the project. Whether they suggest colors or shapes, incorporating their creativity helps them feel valued and encourages self-expression.
- Share the process: Let kids take ownership of certain parts of the project. For example, one person can paint, another can glue pieces together, and someone else can add finishing touches. This makes the craft feel like a collective effort and encourages collaboration.
4. Keep the Crafting Process Enjoyable
- Make it a learning experience: Use crafting as a way to teach kids about shapes, colors, textures, and even history (e.g., making holiday decorations from different cultures).
- Don’t worry about perfection: Crafts are about creativity, not perfection. Encourage your children to embrace mistakes as part of the process and enjoy the experience rather than focusing on the final product.
- Embrace the mess: Crafting can get messy, so be prepared with cleaning supplies nearby. Lay down newspapers, wear old clothes, and keep wipes or a damp cloth handy to clean up spills quickly.
5. Encourage Reusable Crafts
- Opt for reusable materials like fabric, old magazines, or cardboard. These items not only help the environment but also provide endless possibilities for creativity.
- Introduce sustainable crafts that reuse household items, like making bird feeders out of toilet paper rolls or turning old buttons into art pieces.
Crafting with kids is not only a creative outlet but also a bonding activity that can bring families closer together. By following these tips and keeping things safe, fun, and engaging, you’ll create an enjoyable crafting experience for all ages. Happy crafting!
FAQ
What are some easy DIY Christmas crafts for beginners?
There are plenty of simple DIY Christmas crafts you can try, such as creating paper snowflakes, making a wreath from pine cones, or decorating mason jars with festive designs. These projects require minimal materials and are perfect for getting started with DIY holiday decor.
Can I make Christmas ornaments at home?
Yes, making Christmas ornaments at home is a fun and personal way to decorate your tree. Some easy options include salt dough ornaments, painted wooden shapes, or personalized photo ornaments. You can also upcycle old materials like bottle caps or buttons to create unique designs.
How can I make Christmas decorations without spending a lot of money?
You can create beautiful Christmas decorations on a budget by using inexpensive or repurposed materials. For example, you can make a rustic garland using twine and pine cones, or create a festive centerpiece with candles, greenery, and seasonal fruit like apples or oranges.
What materials are needed for DIY Christmas crafts?
The materials you’ll need depend on the type of crafts you’re doing, but common supplies include construction paper, fabric, glue, scissors, paint, markers, ribbon, twine, and natural elements like pinecones, holly, or branches.

Hi, I’m Victoria, an art and craft teacher at Newark City Schools, where I have the joy of working with middle school students to help them explore their creativity and develop their artistic talents. I believe that art is a powerful way for students to express themselves, and I strive to make every lesson a fun, engaging, and inspiring experience.
I created this website to share the art and craft projects, techniques, and resources that I use in my classroom, hoping to inspire both educators and young artists alike. Whether you’re a teacher looking for new ideas or a student eager to try something new, I’m excited to provide creative tools and projects that anyone can enjoy.
When I’m not in the classroom, I love experimenting with different art forms and learning new crafting techniques. My goal is to help others discover the joy of making things with their hands, and I hope my website serves as a space for everyone to explore their creative potential.