
The other day, I was staring at an empty glass jar on my kitchen counter, debating whether to toss it out or keep it. You ever do that—hold onto something “just in case” it could turn into a cute project later? Well, that jar ended up becoming the sweetest little vase after a quick coat of paint and some ribbon I had lying around. That’s the magic of DIY crafts, right? Taking ordinary stuff and turning it into something special with just a little creativity.
I know, sometimes it feels like you need fancy supplies or endless free time (and who really has that?). But honestly, most of the best projects come from the simplest ideas. So if you’ve been wanting to make something fun, useful, or just plain pretty, you’re in the right place. I’ll share easy, doable ideas that’ll actually fit into your busy life.
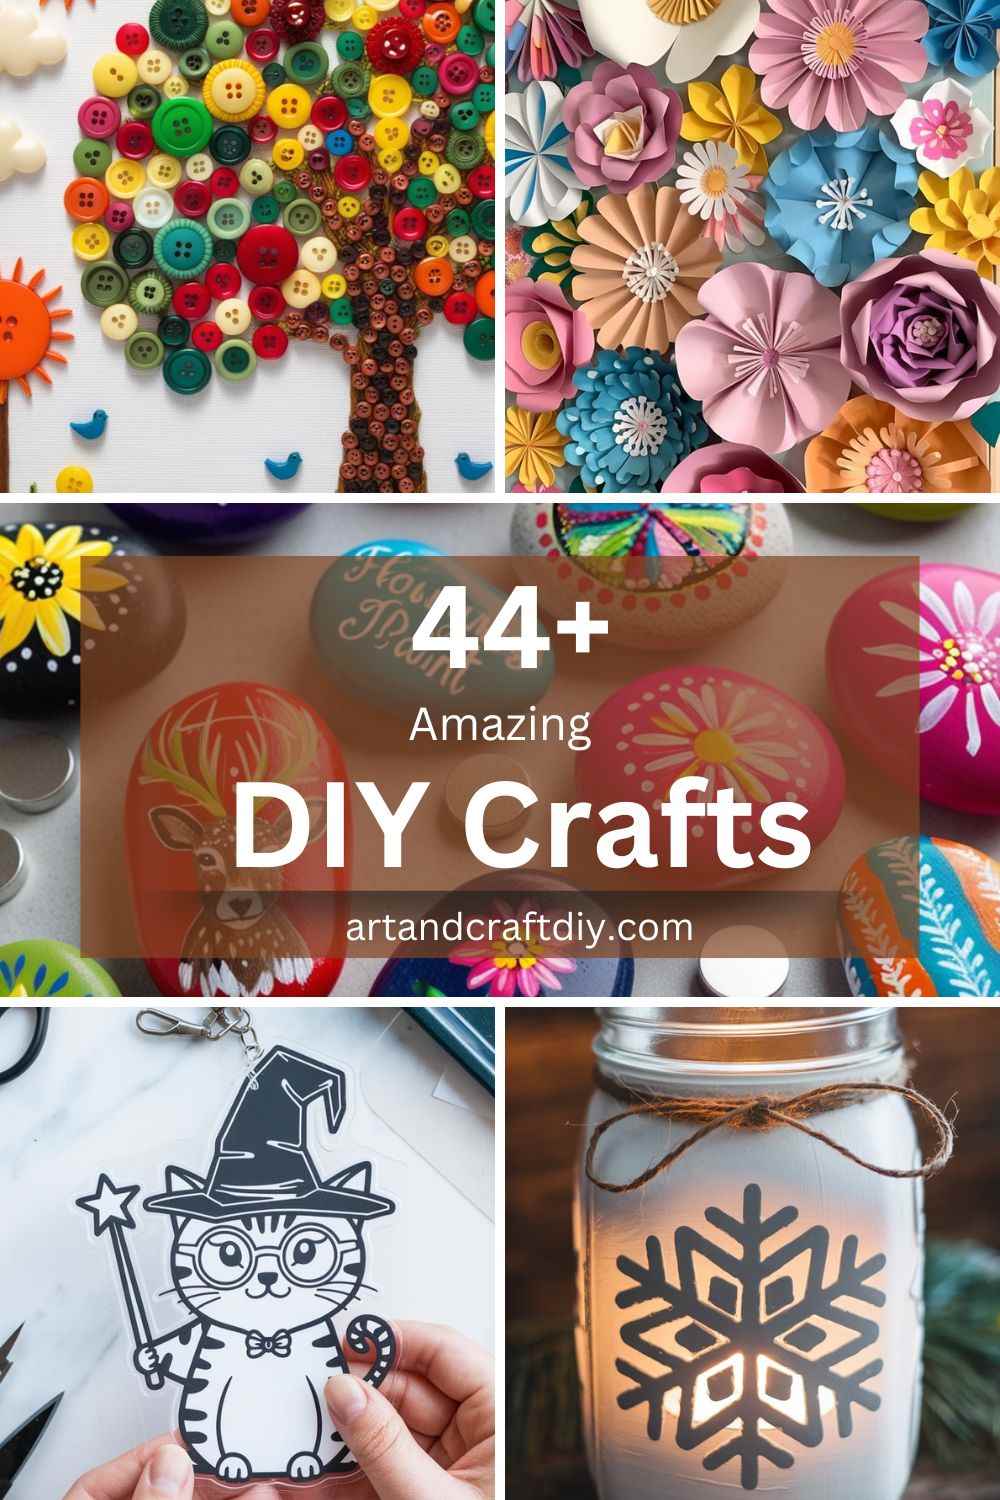
DIY Crafts
DIY (Do-It-Yourself) crafts refer to creative projects that individuals can complete on their own, without the need for professional assistance.
Painted Rock Magnets
I’ll be honest, I never thought painting little rocks could turn into such a fun and quirky project until I actually sat down to do it one rainy afternoon. There’s something really calming about picking up smooth little stones, brushing on bright acrylic paint, and watching them transform into mini masterpieces. Sometimes I go with simple flowers or polka dots, and other times I’ll paint silly faces just to make my fridge look less serious. Once they’re sealed and a magnet is glued at the back, they make the cutest little reminders holding up notes and photos.
To be fair, this project doesn’t need a big investment either—you can literally pick rocks from your backyard or grab a pack of craft magnets online. I’ve even gifted sets of these painted magnets to friends, and they always get that “wow, you actually made these?” reaction. In my opinion, it’s one of the easiest yet most personal DIY crafts you can try.
DIY Mason Jar Lanterns
Now, mason jars are one of those things I hoard without realizing. And the best part? They’re basically begging to be turned into something magical. The first time I made mason jar lanterns, I added little fairy lights inside and painted the jars with frosted glass paint. The glow it gave off was unreal—soft, cozy, and almost fairytale-like. Honestly, it made me feel like I had a Pinterest board come to life right in my living room.
The beauty of this craft is how versatile it is. Sometimes I just pop in a tealight candle and wrap some jute rope around the rim for a rustic vibe. Other times I’ll go overboard with glitter or pressed flowers on the outside. I’ve found these lanterns are perfect for garden dinners or just cozying up my study table at night. If you ask me, this project proves that the simplest jars can actually shine the brightest.
DIY Picture Frames from Popsicle Sticks
This one takes me right back to childhood, because honestly, who hasn’t glued popsicle sticks together in school? But as an adult, I’ve rediscovered how adorable (and affordable) DIY popsicle stick frames can be. The first time I made one for my niece’s picture, I went all out with washi tape and bright markers, and she loved it so much she wanted to hang it on her wall immediately.
What I love about this craft is how open-ended it feels. You can paint the sticks pastel for a soft look, stain them darker for something rustic, or just let kids go crazy with stickers and doodles. To be fair, I’ve used these little frames not just for photos, but also for small inspirational quotes on my desk. In my opinion, popsicle stick frames are proof that even the simplest materials can turn into keepsakes you’ll treasure.
DIY Keychain from Shrink Plastic
Create a fun and personalized keychain using shrink plastic. This is a great gift idea or a fun way to make unique accessories.
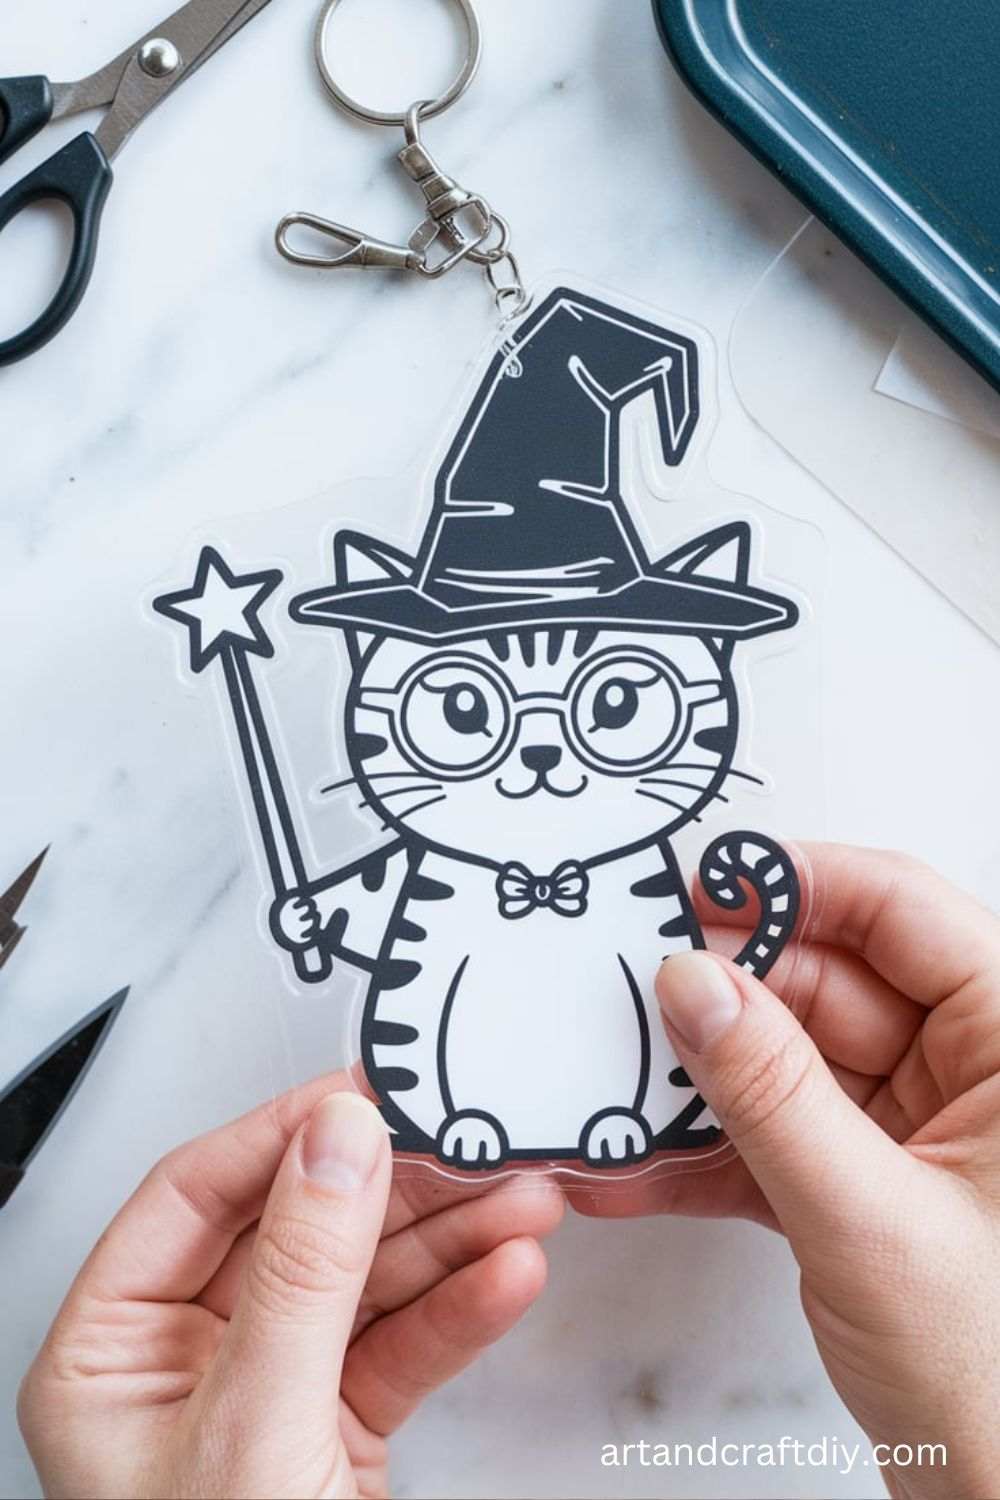
Materials Used:
- Shrink plastic sheets
- Permanent markers or colored pencils
- Scissors
- Hole punch
- Keychain rings
- Oven
Steps:
- Draw or trace your design onto the shrink plastic using markers or colored pencils.
- Cut out the design with scissors.
- Punch a hole at the top for the keychain ring.
- Preheat the oven as per the instructions on the shrink plastic package.
- Place the cutout pieces on a baking sheet and bake them as instructed.
- After baking, allow the keychain to cool.
- Attach the keychain ring and it’s ready to use.
Button Art Picture
Create a beautiful and colorful button art picture that can be framed and hung on your wall. This craft is fun, easy, and perfect for all ages.
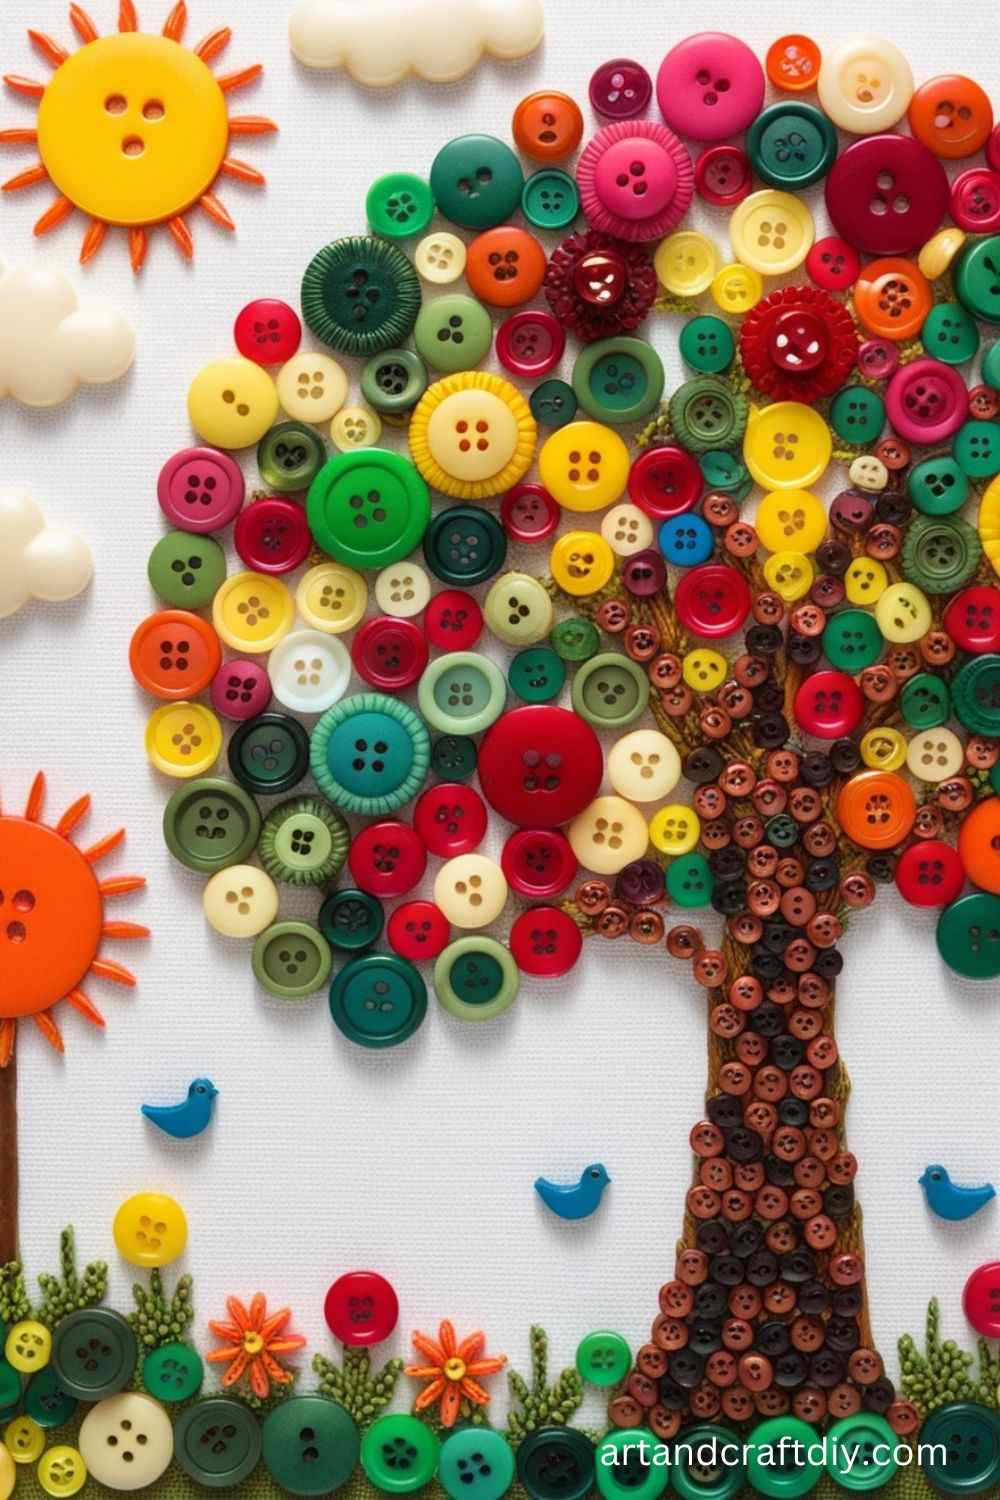
Materials Used:
- Buttons in various colors and sizes
- Canvas or thick cardboard
- Glue gun
- Picture template
Steps:
- Select a template or design for your button art.
- Spread the glue on the canvas or cardboard in sections, and begin placing buttons on it.
- Continue adding buttons, filling the entire design or picture, until it’s complete.
- Press the buttons lightly to ensure they are securely attached.
- Once dry, frame the art and display it.
Decorated Wooden Coasters
Make your own set of coasters using wooden pieces. You can customize them with different designs, making them ideal for your own home or as gifts.
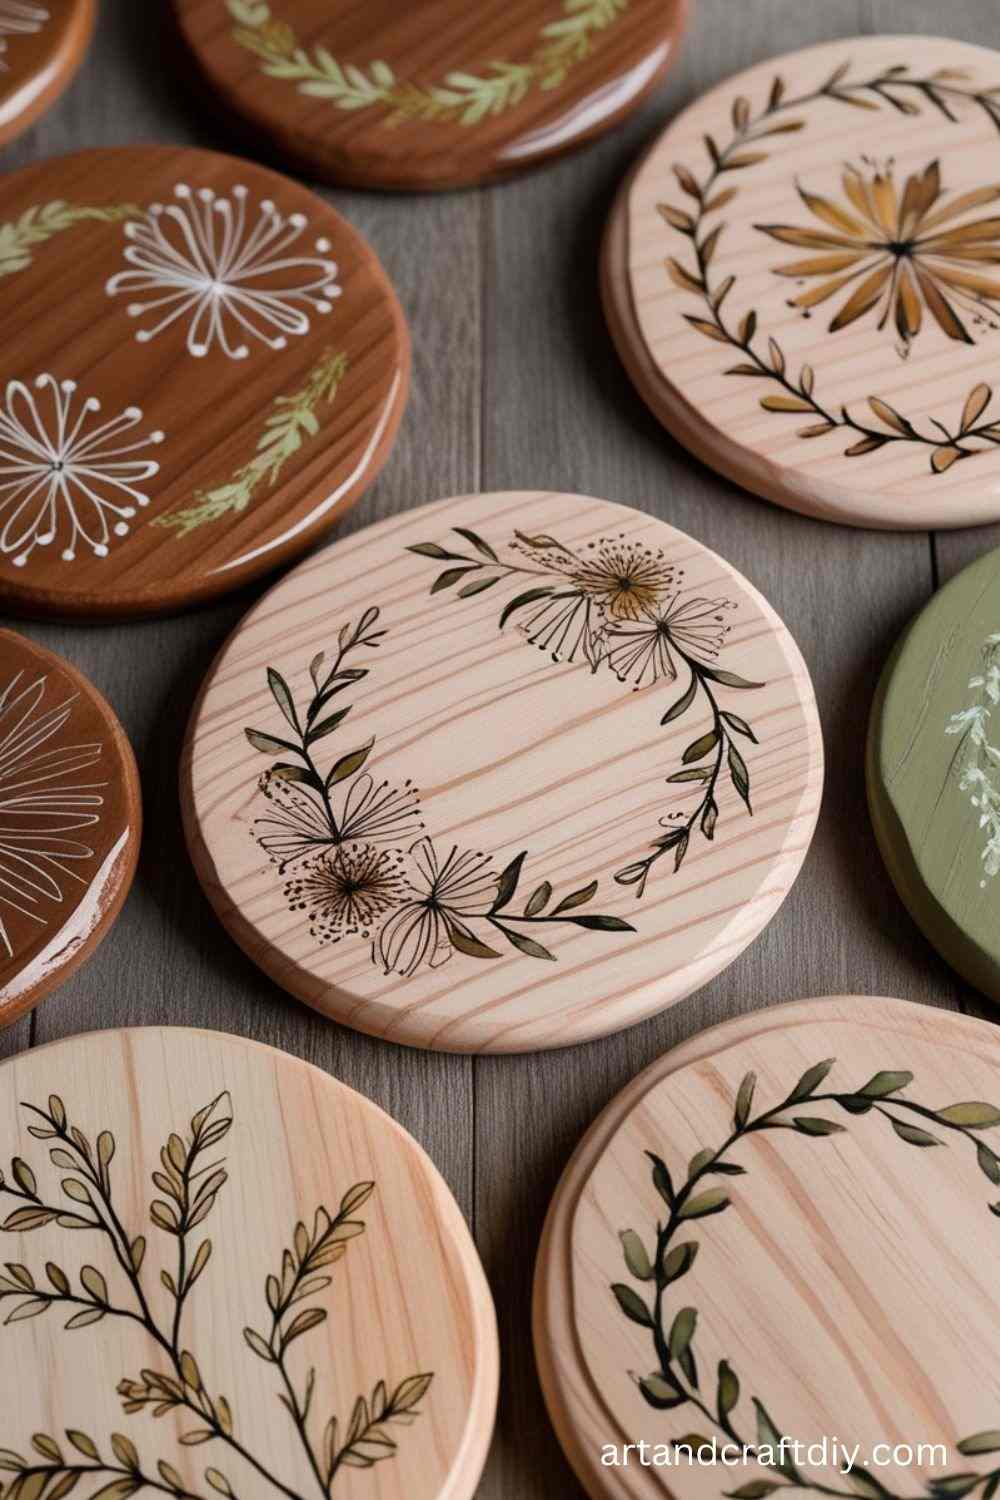
Materials Used:
- Wooden coaster blanks
- Acrylic paints
- Paintbrushes
- Sealer or varnish
- Stencils (optional)
Steps:
- Paint the wooden coasters with a base coat of your desired color.
- Use stencils if you want to add patterns or designs.
- Allow the paint to dry completely.
- Apply a clear sealer to protect the painted design.
- Let the sealer dry and your coasters are ready to use.
Paper Flower Wall Art
Create beautiful paper flowers that can be used to decorate any wall. These flowers are simple to make and can be arranged into a stunning piece of wall art.
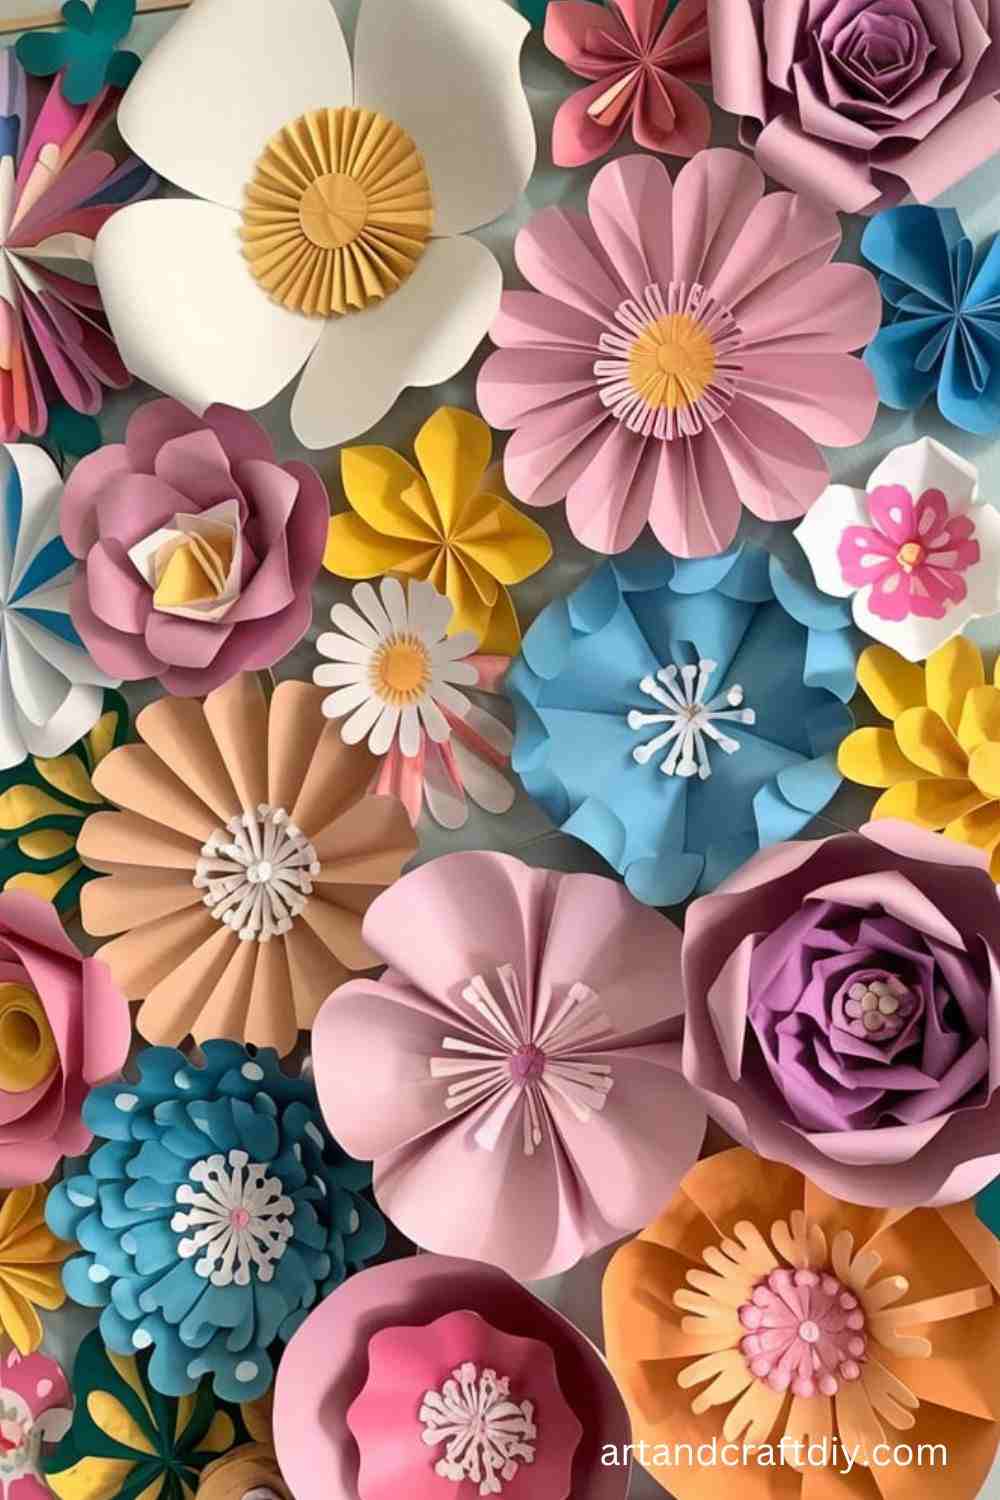
Materials Used:
- Colored paper
- Scissors
- Glue stick
- Pencil
- Green paper for leaves
Steps:
- Cut the paper into petal shapes using scissors.
- Layer the petals and glue them together, starting from the outside and working inward.
- Create multiple flowers of different sizes and colors.
- Cut out leaves from green paper.
- Arrange the flowers and leaves on the wall, using glue or sticky pads to secure them.
Yarn Wall Hanging
This boho-chic craft will add a cozy, creative touch to your living space. You can make a beautiful yarn wall hanging that doubles as a decorative piece.
Materials Used:
- Yarn in various colors
- Wooden dowel or branch
- Scissors
- Tape
Steps:
- Cut several lengths of yarn, varying the colors and lengths.
- Tie each piece of yarn onto the dowel or branch, arranging them in a pattern or design.
- Trim the bottom of the yarn to your desired length.
- Use tape to secure the top of the yarn to the dowel for a cleaner look.
- Hang the completed wall hanging on the wall.
Tin Can Wind Chimes
Create beautiful and musical wind chimes using old tin cans. This upcycled craft project will give you a lovely piece of outdoor decor that makes a soothing sound.
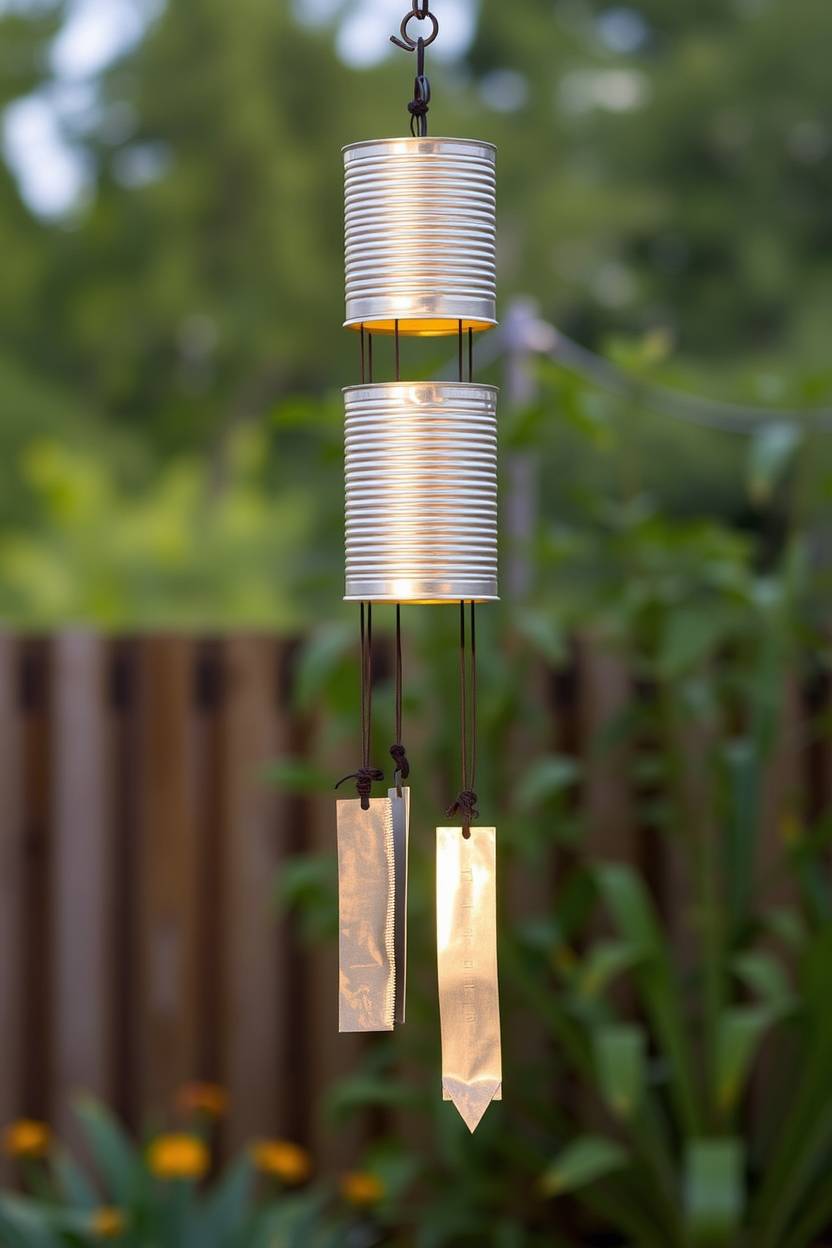
Materials Used:
- Empty tin cans
- String or wire
- Paint
- Beads or other embellishments
- Hammer and nail
Steps:
- Clean the tin cans thoroughly.
- Paint the cans in your favorite colors and allow them to dry.
- Punch holes in the top and bottom of each tin can using a hammer and nail.
- Thread string or wire through the holes and tie a knot at the end.
- Attach the cans at different lengths to create the wind chime effect.
- Add beads or other embellishments to the string.
- Hang the wind chime outside and enjoy the soothing sounds.
Clay Pot Flower Pots
Clay pots are great for planting flowers, but they can also be customized with paint and decorations to make them a unique part of your garden or home.
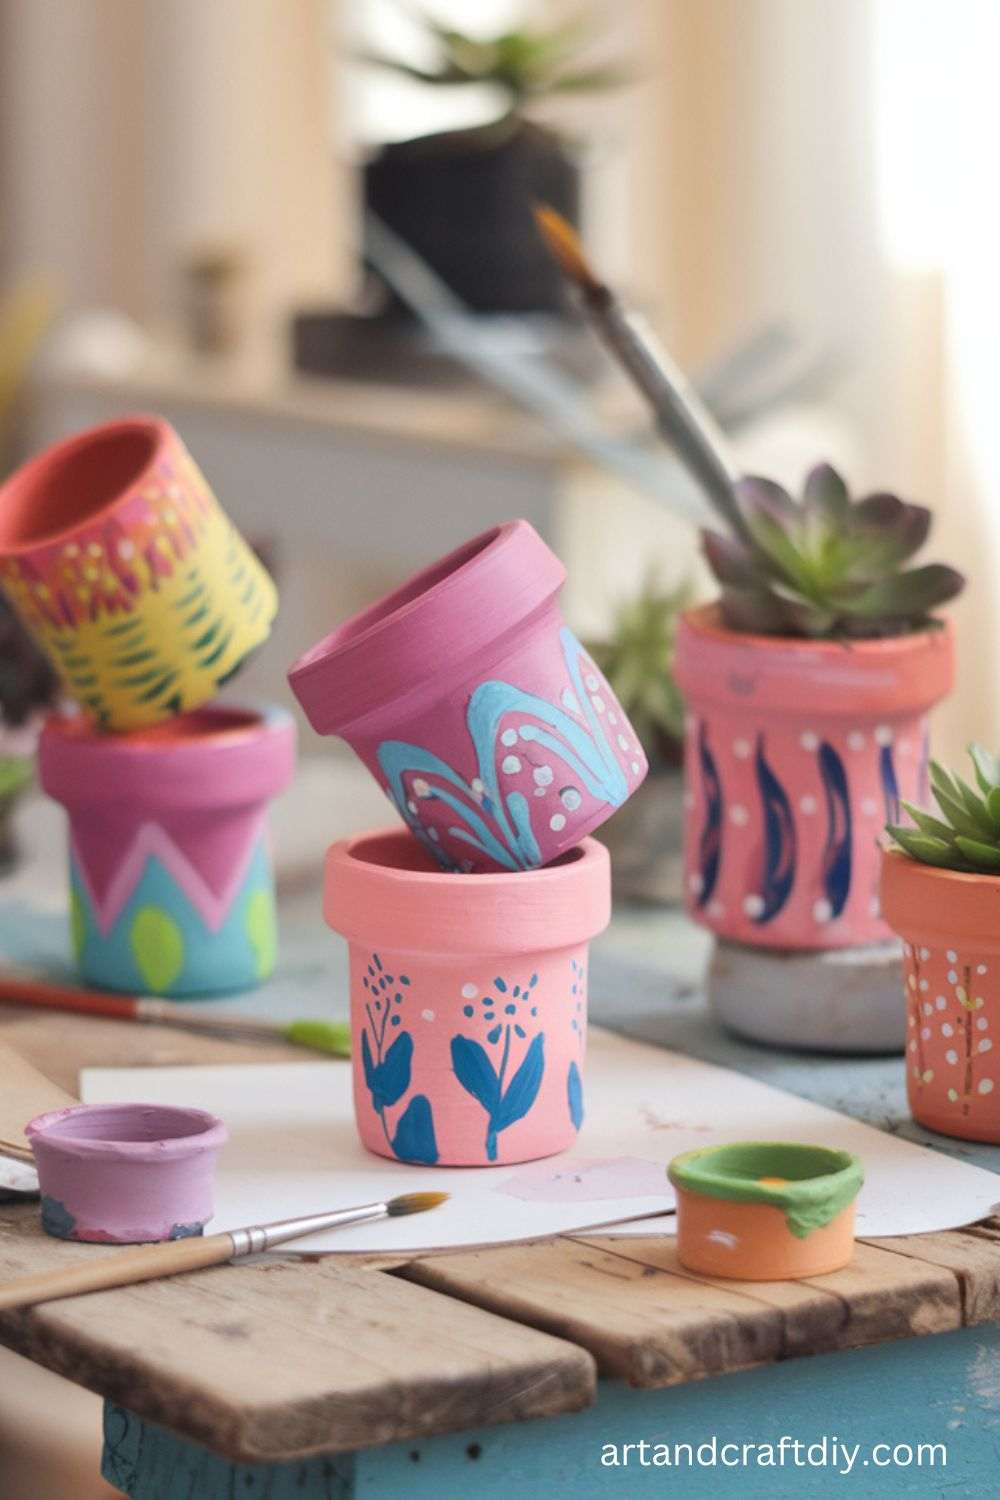
Materials Used:
- Clay pots
- Acrylic paint
- Paintbrushes
- Stencils (optional)
- Varnish (optional)
Steps:
- Clean the clay pots thoroughly.
- Paint the pots with your desired colors and designs.
- If using stencils, apply them to create patterns.
- Allow the paint to dry completely.
- Apply a coat of varnish to protect the painted design.
- Plant your favorite flowers in the pots and place them in your garden or home.
Glitter Slime
Making glitter slime is an enjoyable, squishy, and sparkly DIY project that’s perfect for kids and sensory play.
Materials Used:
- White glue
- Baking soda
- Contact lens solution
- Glitter
- Food coloring (optional)
Steps:
- In a bowl, mix ½ cup of glue with a few drops of food coloring (optional).
- Add 1 tablespoon of baking soda to the mixture and stir.
- Slowly add 1 tablespoon of contact lens solution to the mixture, stirring until the slime begins to form.
- Once the slime is formed, knead it with your hands to make it smooth.
- Add glitter and mix it in for a sparkling effect.
Macramé Plant Hangers
Macramé plant hangers are perfect for displaying your houseplants. The weaving technique used here adds a boho-chic vibe to your décor.
Materials Used:
- Macramé cord
- Wooden ring or dowel
- Scissors
- Plant pot
Steps:
- Cut four equal lengths of macramé cord.
- Fold the cords in half and attach them to a wooden ring by knotting the loops over the ring.
- Divide the cords into four groups, and begin knotting them together using square knots.
- Continue knotting until the hanger reaches your desired length.
- Tie all cords together at the bottom to form a base for the pot.
- Insert the plant pot into the hanger and display it.
Paper Bag Puppets
Create fun and simple paper bag puppets that are perfect for imaginative play. Customize them to look like animals, people, or anything you can imagine.
Materials Used:
- Paper lunch bags
- Markers or crayons
- Craft paper
- Glue
- Scissors
Steps:
- Open up a paper bag and flatten it slightly.
- Draw a face on the front of the bag using markers or crayons.
- Cut out ears, noses, or other features from craft paper, then glue them onto the bag.
- Let the glue dry before using your puppet for playtime.
String Art
String art creates intricate designs and patterns with colored thread. It’s a fun way to make a personalized art piece for your home.
Materials Used:
- Wood board
- Nails
- String or embroidery floss
- Hammer
- Pencil
Steps:
- Draw your desired design or pattern on the wood board using a pencil.
- Place nails along the lines of your design.
- Wrap the string around the nails, creating your pattern.
- Continue wrapping the string to fill in the design.
- Once complete, trim the excess string and enjoy your artwork.
DIY Dreamcatcher
A dreamcatcher is a beautiful craft that symbolizes protection. It’s simple to make, and you can hang it above your bed for a calming effect.
Materials Used:
- Wooden hoop
- String or yarn
- Feathers
- Beads
- Scissors
Steps:
- Wrap the wooden hoop with yarn or string.
- Tie a string from one point of the hoop to another, creating a web-like pattern.
- Continue tying the string until the web is complete.
- Attach beads and feathers at the bottom using knots.
- Hang the dreamcatcher above your bed to capture bad dreams.
DIY Bookmarks
Create your own personalized bookmarks using different materials. This is an easy craft for book lovers who want to make their own unique markers.
Materials Used:
- Cardstock or thick paper
- Stickers, stamps, or markers
- Ribbon (optional)
- Scissors
Steps:
- Cut the cardstock into rectangular shapes, about 2 inches wide and 6 inches long.
- Decorate the bookmark using stickers, stamps, or markers.
- Punch a hole at the top of the bookmark and tie a ribbon for extra flair.
- Use the bookmark in your favorite book!
DIY Terrarium
Create a tiny world inside a glass jar by making your own terrarium. This craft is perfect for plant lovers and adds greenery to your space.
Materials Used:
- Glass jar
- Small plants (succulents, moss, etc.)
- Gravel or pebbles
- Activated charcoal
- Potting soil
Steps:
- Start by adding a layer of gravel or pebbles at the bottom of the glass jar.
- Add a thin layer of activated charcoal to prevent odor.
- Place the potting soil over the charcoal.
- Arrange your small plants inside the jar, making sure they have room to grow.
- Water the plants lightly and place the terrarium in a sunny spot.
Fabric Bookmark with Sewing
Add a handmade, fabric touch to your reading experience by making your own fabric bookmarks. These are simple, personalized, and durable.
Materials Used:
- Fabric scraps
- Scissors
- Needle and thread
- Ribbon
Steps:
- Cut fabric into a rectangular shape, about 2 inches wide and 6 inches long.
- Fold the edges inward and sew them in place to prevent fraying.
- Attach a ribbon at the top of the bookmark for decoration.
- Use your fabric bookmark in your favorite book!
Origami Paper Flowers
Origami is the Japanese art of paper folding. Making paper flowers with origami is a fun and creative way to enjoy this craft.
Materials Used:
- Square paper
- Scissors
Steps:
- Start with a square piece of paper.
- Fold the paper in half diagonally to form a triangle.
- Fold the edges of the triangle towards the center, then unfold.
- Fold the triangle in half again, then tuck the edges into the center.
- Continue folding until you create a flower shape.
- Make several flowers and arrange them together for a bouquet.
DIY Pencil Holder
Repurpose an empty can into a colorful and functional pencil holder. This is a great way to organize your desk or workspace.
Materials Used:
- Empty tin can
- Decorative paper or fabric
- Glue gun
- Scissors
Steps:
- Clean the tin can thoroughly.
- Cut decorative paper or fabric to fit the can’s height and circumference.
- Glue the paper or fabric around the tin can.
- Allow the glue to dry and place your pens, pencils, or markers in the holder.
Personalized T-Shirts
Make your own personalized T-shirts using fabric paint or tie-dye. You can create custom designs for yourself or as gifts.
Materials Used:
- Plain white T-shirt
- Fabric paint or tie-dye kit
- Stencils (optional)
- Plastic tablecloth
Steps:
- Lay the T-shirt flat on a table and protect the surface with a plastic tablecloth.
- Use fabric paint or tie-dye to create a design.
- Allow the shirt to dry completely before wearing.
DIY Friendship Bracelets
Friendship bracelets are simple to make and a fun way to create personalized accessories for friends or yourself.
Materials Used:
- Embroidery floss
- Scissors
Steps:
- Cut several pieces of embroidery floss in different colors.
- Knot the strings together at one end.
- Braid or knot the strings to create a pattern.
- Tie the bracelet around your wrist and knot the ends to secure it.
Paper Plate Masks
Create fun masks for playtime or a costume party by making masks from paper plates. This is a craft that can be customized in endless ways.
Materials Used:
- Paper plates
- Scissors
- Markers or paint
- Elastic band
Steps:
- Cut out eye holes in the paper plate.
- Decorate the mask with markers, paint, or stickers.
- Attach an elastic band to the sides of the mask.
- Wear your mask and enjoy!
DIY Journal Covers
Customize your journals with unique and colorful covers. This simple craft will give your notebooks a personal touch.
Materials Used:
- Plain journal
- Decorative paper or fabric
- Glue stick
- Scissors
Steps:
- Cut the decorative paper or fabric to fit the journal cover.
- Glue the paper or fabric onto the cover.
- Allow the glue to dry completely before using the journal.
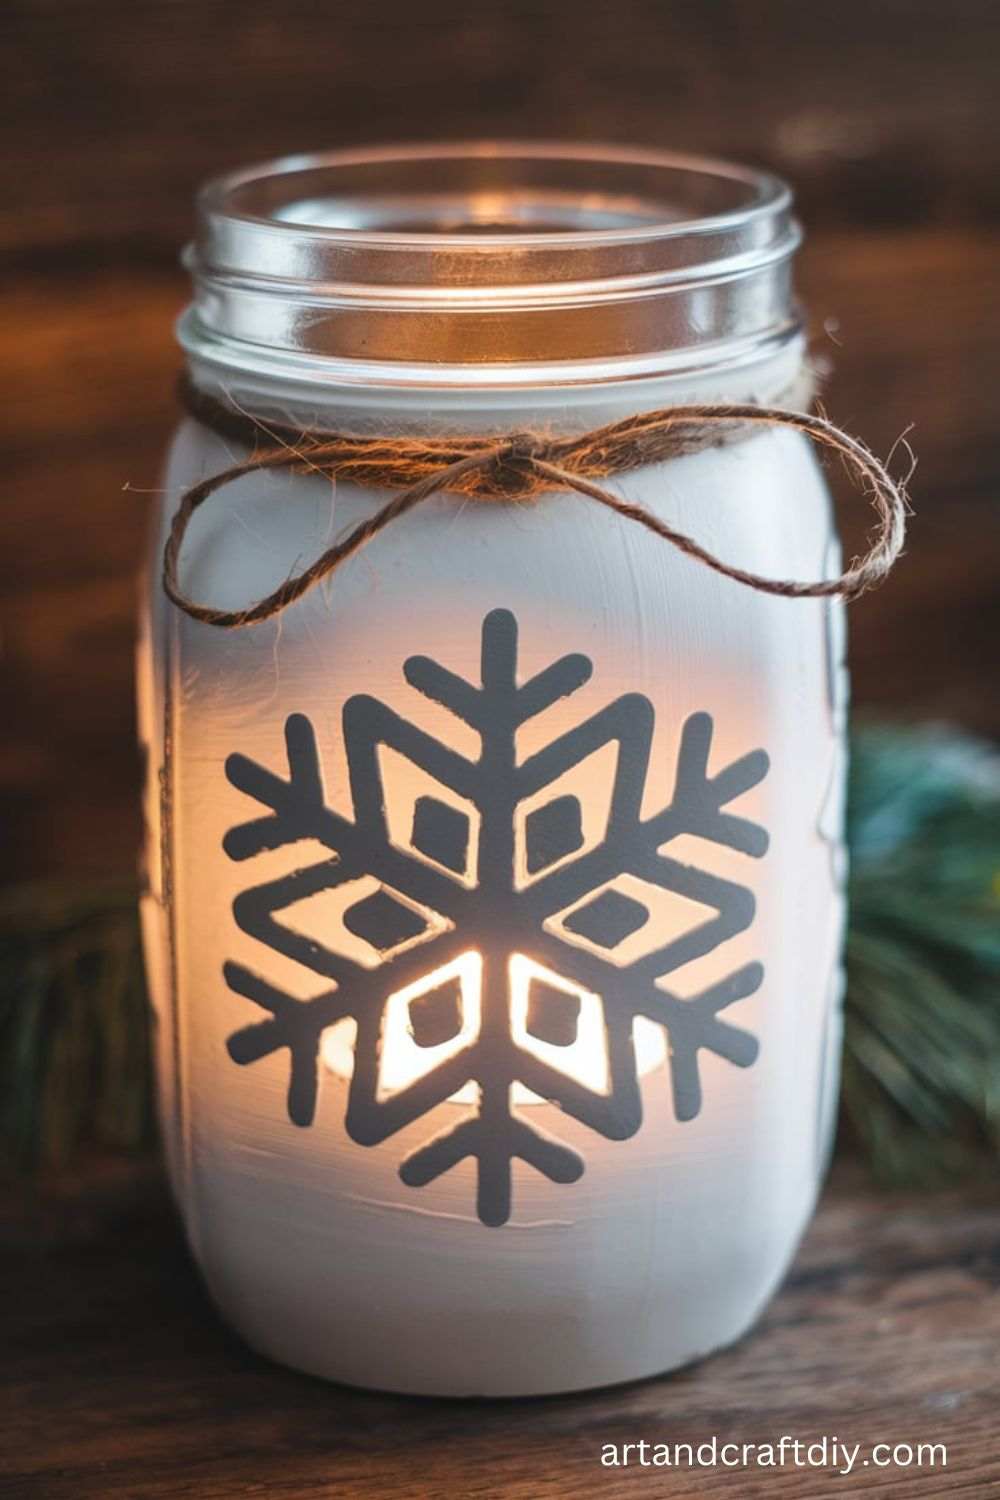
DIY Candle Holders
Turn ordinary glass jars into beautiful candle holders with some paint and decorations. Perfect for creating ambiance at home.
Materials Used:
- Glass jars
- Paint
- Ribbons or twine
- Candles
Steps:
- Clean the glass jars thoroughly.
- Paint the outside of the jars with your desired color.
- Once dry, tie a ribbon or twine around the neck of the jar.
- Place a candle inside and enjoy the soft light.
Homemade Soap Bars
Make your own soap bars by customizing scents, colors, and shapes to suit your preferences.
Materials Used:
- Glycerin soap base
- Soap dye
- Essential oils
- Soap molds
Steps:
- Melt the glycerin soap base in a microwave-safe container.
- Add soap dye and essential oils for color and fragrance.
- Pour the melted soap into molds and let it set.
- Once solidified, remove the soap from the molds and store it for use.
DIY Christmas Ornaments
Create beautiful Christmas ornaments using various crafting materials. These ornaments will add a personal touch to your holiday decorations.
Materials Used:
- Clear plastic ornaments
- Paint, glitter, or beads
- Ribbon
Steps:
- Open the clear plastic ornament and add paint or glitter inside.
- Swirl the ornament to coat the inside with the paint or glitter.
- Add beads or other embellishments for a festive touch.
- Tie a ribbon around the top and hang the ornament.
Decorative Glass Jars
Turn simple glass jars into decorative pieces for your home using paint and embellishments.
Materials Used:
- Glass jars
- Paint
- Embellishments (e.g., ribbon, beads)
Steps:
- Clean the glass jars.
- Paint the jars with your desired color and design.
- Once dry, decorate the jars with ribbons, beads, or lace.
- Use the jars to store items or place them as a decorative centerpiece.
DIY Paper Earrings
Make stylish and lightweight paper earrings with colorful designs. This is an easy craft that anyone can do in an afternoon.
Materials Used:
- Colorful paper
- Earring hooks
- Scissors
- Glue
Steps:
- Cut the paper into small shapes for the earrings.
- Fold or roll the paper into desired shapes.
- Glue the shapes onto earring hooks.
- Let them dry and wear your new earrings!
Clay Jewelry Dishes
Create small jewelry dishes using polymer clay. This craft is perfect for organizing your rings and earrings.
Materials Used:
- Polymer clay
- Rolling pin
- Baking sheet
- Cookie cutters
Steps:
- Roll out the polymer clay to your desired thickness.
- Use a cookie cutter to shape the clay into a small dish.
- Bake the clay according to the instructions on the packaging.
- Let the dish cool, and it’s ready for use.
Crafting Tips and Tricks
Crafting is a creative and fulfilling activity, but sometimes it can be time-consuming or frustrating. Whether you’re a beginner or an experienced crafter, there are tricks to help make your crafting process smoother, more efficient, and enjoyable. Here are some useful crafting tips and tricks to save time, avoid common mistakes, and inspire your next project.
Time-Saving Crafting Hacks
- Organize Your Workspace
Keep your crafting area tidy and well-organized. Use clear bins, labels, or drawers to store materials, so you can quickly find what you need. An organized space will prevent time wasted searching for supplies. - Pre-Cut Materials
If you’re working on a project that requires a lot of cutting, such as scrapbooking or quilting, pre-cut materials in bulk. This can save time when you’re assembling the pieces later. - Use Multipurpose Tools
Invest in tools that have multiple functions. For example, a paper trimmer that can also score and perforate will speed up the process, and a glue gun with adjustable nozzles can help with different types of projects. - Batch Projects
If you’re making multiple items, such as greeting cards or ornaments, batch similar tasks together. For instance, cut all your materials at once or glue all the pieces at once to avoid repeated steps. - Buy Pre-Made Elements
Save time by purchasing pre-made items that can be easily customized, like blank journals, pre-cut wood shapes, or pre-designed card bases. This allows you to focus on the creative aspects rather than starting from scratch.
How to Avoid Common Crafting Mistakes
- Measure Twice, Cut Once
It’s easy to rush through a project, but taking the time to double-check measurements can save you from costly mistakes. Miscalculations can lead to wasted materials and the need for rework. - Test New Techniques First
Before committing to a new crafting technique, try it on a scrap piece of material. This helps prevent wasting your good supplies on a method that may not turn out as expected. - Use the Right Tools for the Job
Don’t make the mistake of using the wrong tools for a task. Whether it’s a sewing machine, hot glue gun, or cutting mat, using the correct tool can prevent frustration and lead to better results. - Don’t Skip Drying Time
Rushing through the drying process, especially with glues or paints, can cause your project to fall apart or smudge. Allowing enough time for materials to fully dry is essential for a lasting result. - Follow Instructions Carefully
Always read through any instructions or patterns carefully before starting a project. Skipping steps or glossing over important details can lead to mistakes and rework.
How to Find Inspiration for Crafting
- Crafting Blogs
Follow blogs dedicated to crafting for a wide variety of project ideas, tutorials, and inspiration. Many bloggers share free patterns, step-by-step guides, and personal stories that can help ignite your creativity. - Pinterest
Pinterest is a goldmine for inspiration. Use it to search for different crafting ideas, project tutorials, and DIY guides. Organize your finds into themed boards for easy reference whenever you need a boost of creativity. - Social Media Platforms
Instagram, TikTok, and Facebook groups are excellent places to find crafting inspiration. Many crafters share videos, tutorials, and photos of their work. Searching relevant hashtags can lead you to trending projects and creative ideas. - Crafting Magazines
Subscribe to crafting magazines, or browse through digital magazines to discover fresh trends and expert tips. Magazines often feature seasonal projects, new techniques, and materials that can keep you on the cutting edge of crafting. - Local Craft Stores
Sometimes, simply walking through a craft store can spark new ideas. Seeing different materials and tools in person can inspire projects you may not have considered otherwise. Many stores also hold workshops and events to help expand your creative horizons.
By using these time-saving hacks, avoiding common mistakes, and tapping into a wide range of inspiration sources, you can make your crafting experience more enjoyable and productive. Happy crafting!
Crafting as a Business
For many, crafting begins as a fun hobby, a way to unwind, express creativity, or even make gifts for friends and family. But with the rise of online marketplaces and social media platforms, it’s now easier than ever to turn a DIY hobby into a profitable small business. If you have a passion for creating handmade products, you might consider leveraging your skills to make money.
Turning your crafting hobby into a business requires not only creative talent but also a strategic approach to marketing, pricing, and branding. Here’s a guide to help you navigate the key steps to building a successful craft business.
1. Start by Defining Your Niche
- Focus on what makes your creations unique.
- Determine the types of crafts you want to specialize in (jewelry, home décor, clothing, stationery, etc.).
- Understand your target audience: Are you aiming for a specific age group or interest group?
2. Set Up an Online Store
- Etsy: One of the most popular platforms for selling handmade goods. It provides an established marketplace where customers expect unique, creative products.
- Social Media Platforms: Instagram, Facebook, and TikTok are excellent tools to showcase your work, connect with customers, and drive traffic to your Etsy shop or website.
- Your Own Website: Building a personal website can also be an option. Platforms like Shopify or Big Cartel allow you to set up an online store without heavy technical knowledge.
3. Marketing Your Crafts
Marketing is essential for getting your products noticed. Here’s how to effectively promote your craft business:
- Social Media Marketing:
- Instagram: Use high-quality images, stories, and reels to showcase your products. Engaging with followers regularly can create a loyal customer base.
- TikTok: Create behind-the-scenes videos, tutorials, or creative showcases to reach a younger, engaged audience.
- Pinterest: Perfect for crafts as it’s a visual platform where users search for inspiration. Pin your creations with strong keywords and tags to make your products discoverable.
- Collaborations: Partner with influencers or other small businesses for cross-promotion, giveaways, or collaborations that expand your reach.
- Email Newsletters: Build an email list to send promotions, updates, and exclusive offers to your customers.
- SEO: Whether on Etsy or your website, using effective keywords in your listings and descriptions helps your products appear in search results.
4. Pricing Your Items
Pricing is one of the most crucial aspects of running a successful craft business. Setting the right price can ensure you make a profit while still being competitive in the market. Here are some factors to consider when pricing your items:
- Material Costs: Consider the cost of all materials needed to make your product. This includes raw materials, tools, and any packaging.
- Time and Labor: Determine an hourly wage for your time. It’s essential to factor in the hours spent designing, making, and packaging your items.
- Overhead: Include costs like shipping, website hosting fees, and any marketing expenses.
- Competitor Pricing: Research how similar items are priced to remain competitive. However, don’t undervalue your work—remember, handmade goods often command a premium due to their unique, high-quality nature.
- Profit Margin: Set a profit margin that ensures you’re earning a fair return on your time and effort. A general rule of thumb is to price your item at 2 to 3 times the cost of materials and labor.
- Offer Different Price Points: Consider offering a variety of items at different price levels, from more affordable products to high-end luxury pieces.
5. Managing Your Craft Business
- Inventory Management: Keep track of your materials, finished products, and sales to avoid overstocking or running out of items.
- Customer Service: Good communication and fast responses to inquiries or issues can create loyal customers.
- Financial Planning: Keep records of your income and expenses. You may need to pay taxes, and you’ll want to track your profits and losses to ensure your business is sustainable.
FAQ
What are DIY crafts?
DIY crafts refer to creative activities that involve making things by hand using simple materials, tools, and techniques. DIY Crafts can range from home décor, gifts, to personalized accessories. DIY stands for “Do It Yourself,” encouraging individuals to create projects independently, often to add a personal touch or save money.
What materials do I need to start DIY crafts?
To get started with DIY crafts, you’ll need basic supplies such as scissors, glue, paint, brushes, fabric, paper, and markers. Depending on the DIY Crafts you’re pursuing, you may also need specialty items like beads, string, or tools like hot glue guns or sewing machines. It’s best to start with the basics and build your collection as your skills grow.
Can I make DIY crafts with things I already have at home?
Yes! Many DIY projects can be made with materials you already have lying around the house. Old clothes, buttons, cardboard, and plastic bottles can all be repurposed into fun and creative crafts. Look for items that are easy to cut, shape, or glue together.
Are DIY crafts difficult for beginners?
Not at all! There are plenty of beginner-friendly DIY crafts that are simple and fun. Start with basic projects like painting rocks, making paper flowers, or creating beaded jewelry. Once you gain confidence, you can try more complex projects.

Hi, I’m Victoria, an art and craft teacher at Newark City Schools, where I have the joy of working with middle school students to help them explore their creativity and develop their artistic talents. I believe that art is a powerful way for students to express themselves, and I strive to make every lesson a fun, engaging, and inspiring experience.
I created this website to share the art and craft projects, techniques, and resources that I use in my classroom, hoping to inspire both educators and young artists alike. Whether you’re a teacher looking for new ideas or a student eager to try something new, I’m excited to provide creative tools and projects that anyone can enjoy.
When I’m not in the classroom, I love experimenting with different art forms and learning new crafting techniques. My goal is to help others discover the joy of making things with their hands, and I hope my website serves as a space for everyone to explore their creative potential.