
You know, the other day I was babysitting my little niece, and she got bored within—oh, maybe five minutes of me setting up her toys. Classic, right? I panicked for a second (because what do you even do with a restless kindergartener?), but then I remembered something my mom used to do with me: simple DIY crafts. Nothing fancy—just paper, glue, and whatever odds and ends we could find around the house. And wow, it worked like magic. She was so focused, cutting and coloring, and honestly, I ended up having just as much fun as she did. That’s the thing about DIY crafts for kindergarteners—they’re not just about keeping kids busy. They spark creativity, calm that endless energy, and give you both sweet little moments together. So if you’ve been struggling to find easy, fun activities, stick around—I’ve got some ideas that’ll save your day (and your sanity).
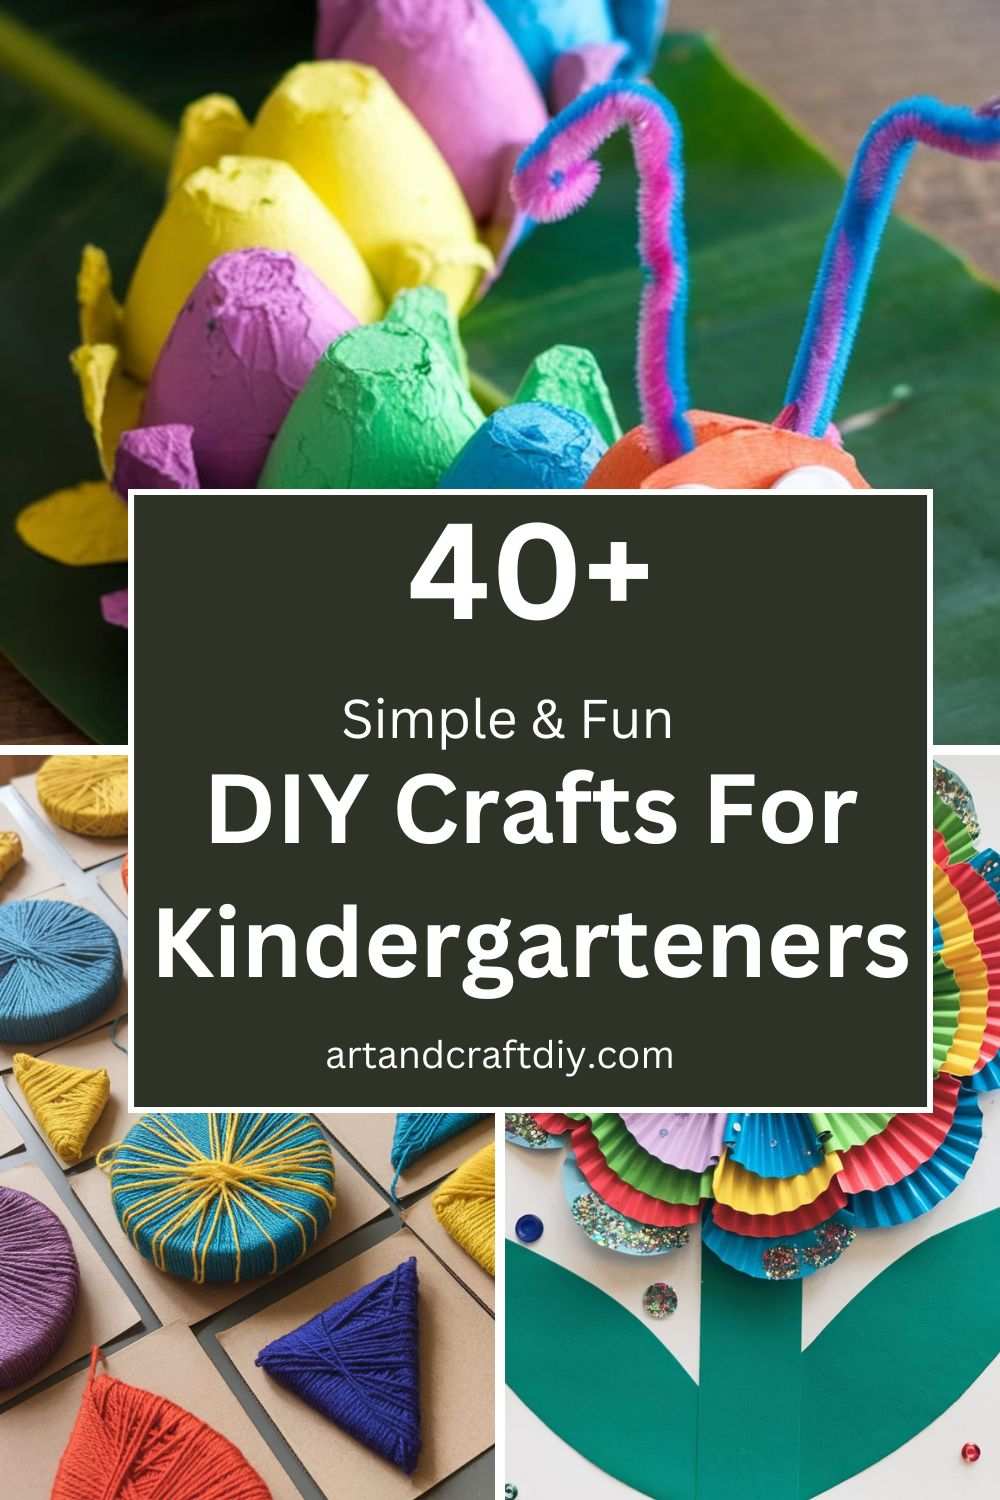
DIY Crafts for Kindergarteners
DIY Crafts for Kindergarteners are fun, hands-on activities that spark creativity, enhance fine motor skills, and encourage imaginative play.
Pom-Pom Spider
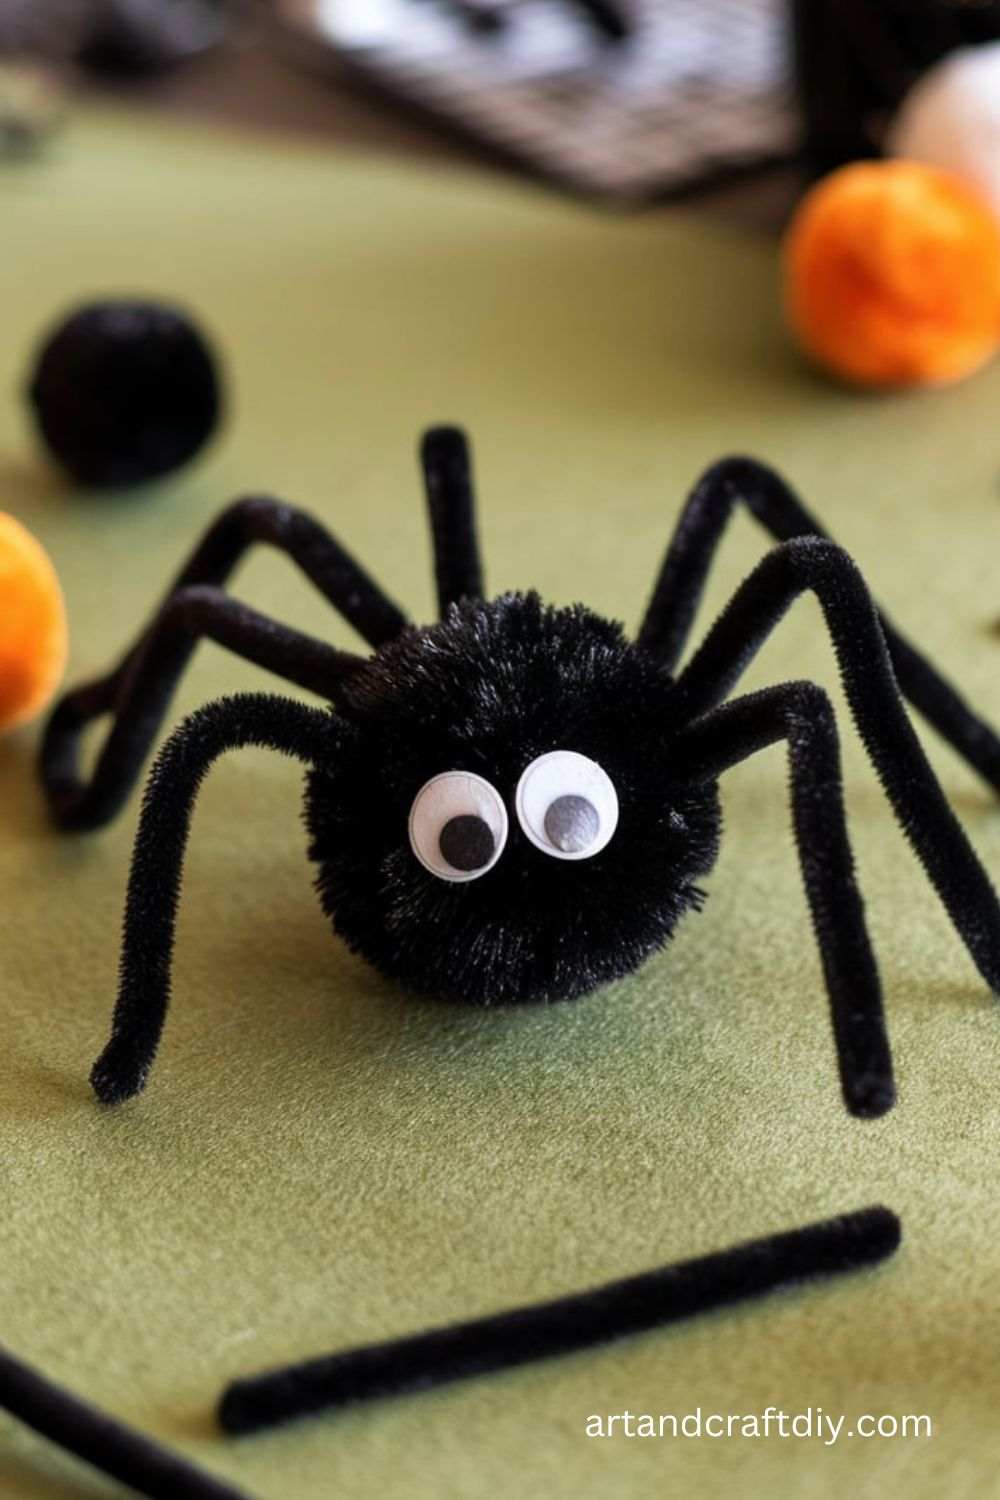
Honestly, I can’t tell you how much fun I’ve had making pom-pom spiders with little kids. There’s something about the way those fuzzy balls just stick together with a bit of glue that’s so satisfying. I usually pick one big black pom-pom for the body and a smaller one for the head, then let the kids poke pipe cleaners in for legs. It’s messy, yes, but in a cute way, and the kids love bending the legs in all directions.
To be fair, the googly eyes are the best part. Watching a kindergartener try to decide where the eyes should go is hilarious—they get so serious! Sometimes they put them upside down or sideways, and I just let it happen. In my opinion, it makes each spider have its own personality. Glue everything down on a paper, and boom! Instant creepy-crawly friend.
Popsicle Stick Puppet
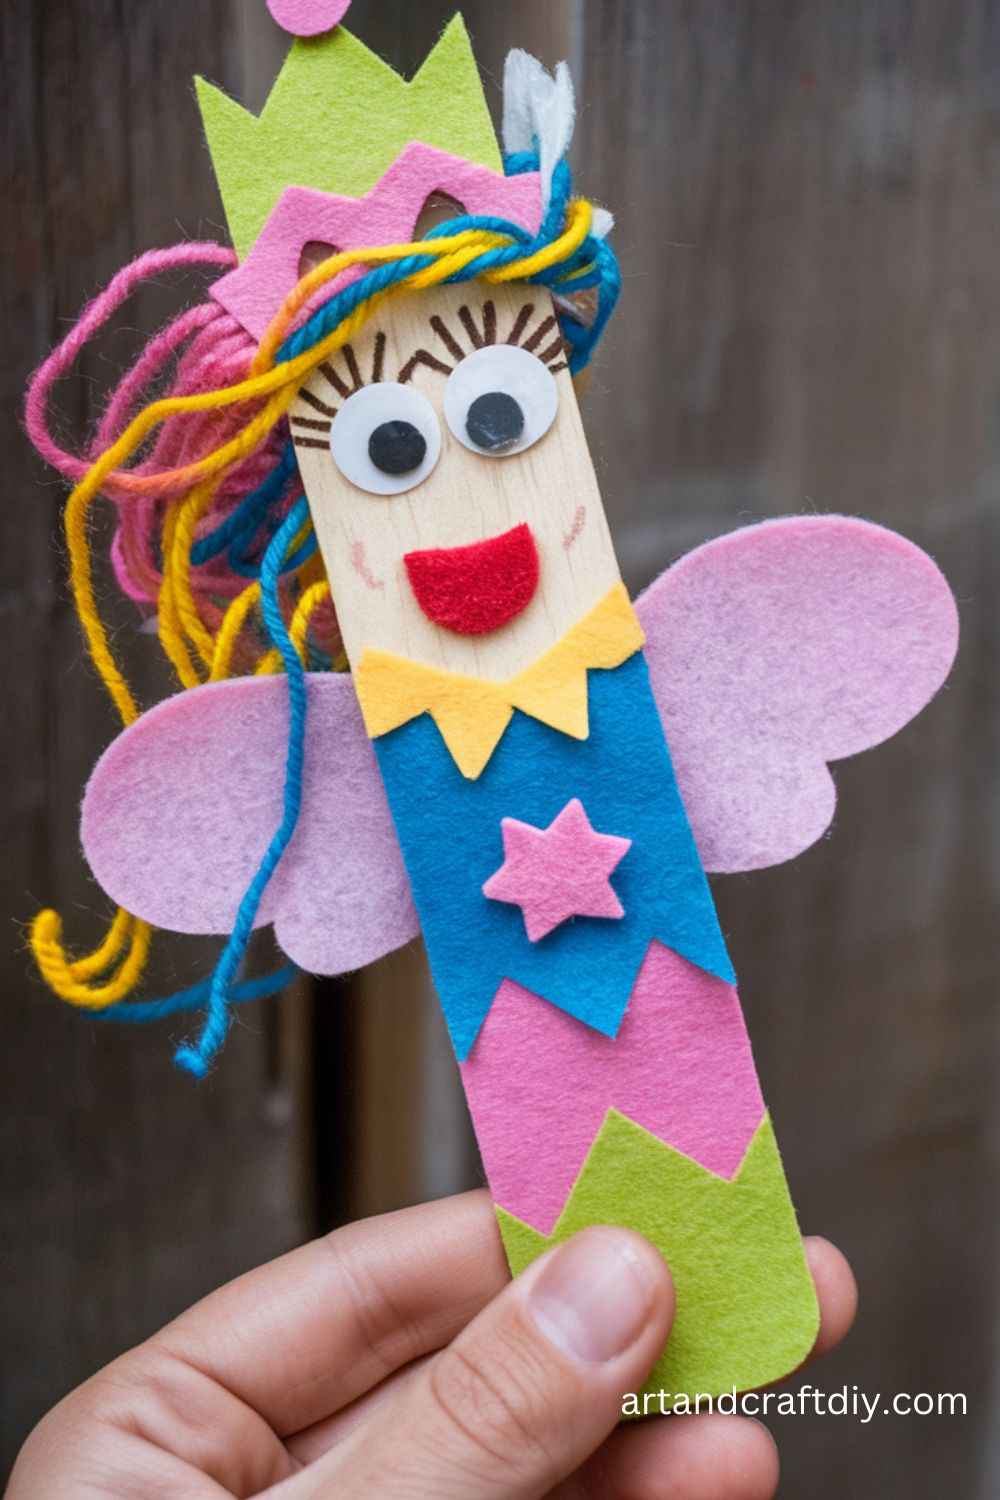
I’ve found popsicle stick puppets are a total win for kindergarten crafts. They’re simple, inexpensive, and the kids’ imaginations go wild. I usually grab a pack of colored sticks and a bunch of markers, felt, or scrap paper. The fun part? You can make anything—a little princess, a monster, even a pet dog. Kids get so proud when they make their own puppet, I swear.
Honestly, I like to let the kids paint first and then add details with glue or markers. One time, a kid glued a googly eye to the stick instead of the puppet, and it was hilarious—it looked like a one-eyed monster stick. In my opinion, letting them experiment is half the fun. Once they’re done, we put on a tiny puppet show, and the excitement is contagious.
Paper Plate Cow Craft
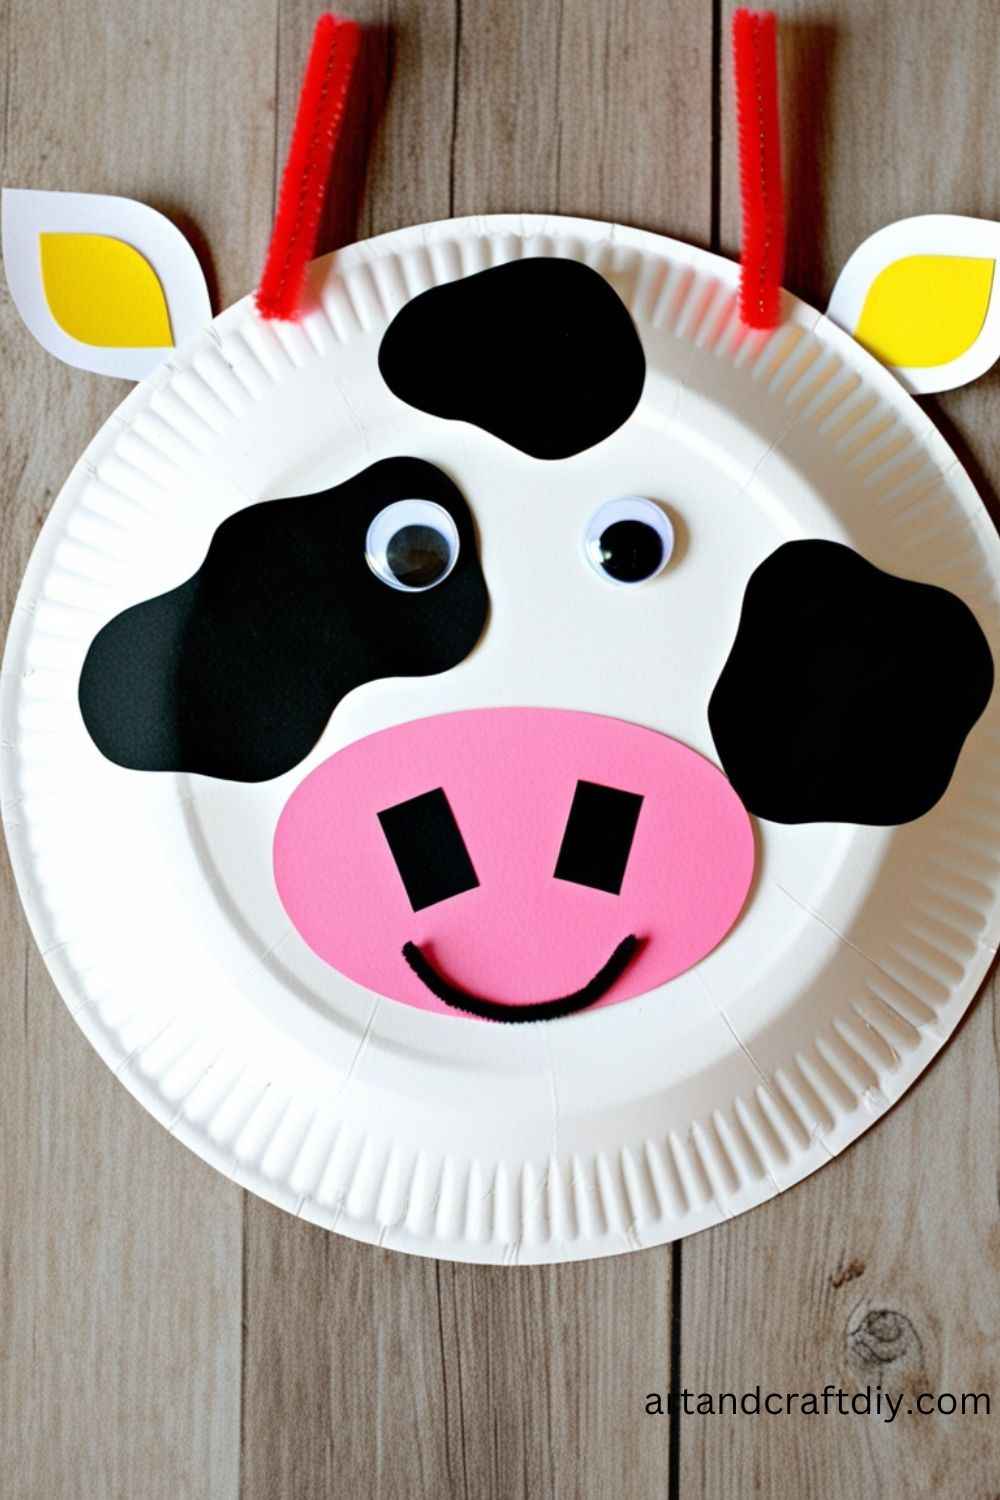
Paper plate cows are one of those crafts that just make me smile every time. I use a white plate, cut out black spots from construction paper, and then attach them randomly. No two cows ever look the same, and kids love that. Honestly, just letting them decide where the spots go is half the joy. Add a pink paper snout and little ears, and it instantly looks adorable.
To be fair, the tail is usually the tricky part. I’ve learned that using yarn or a pipe cleaner works best because it’s flexible and doesn’t fall off. One year, a kid made a cow with a rainbow tail—it looked wild but somehow perfect. In my opinion, this craft is great for motor skills, but more than that, it’s a fantastic chance to let little ones be creative and just have fun with the process.
Painted Rock Animals
Turn ordinary rocks into colorful animals with this simple painting craft.
Materials Used
- Smooth rocks
- Paint
- Brushes
- Googly eyes
Steps
- Wash and dry the rocks to prepare them for painting.
- Let the child paint the rock in animal designs, such as ladybugs, turtles, or fish.
- Once dry, glue googly eyes onto the painted rocks for a playful touch.
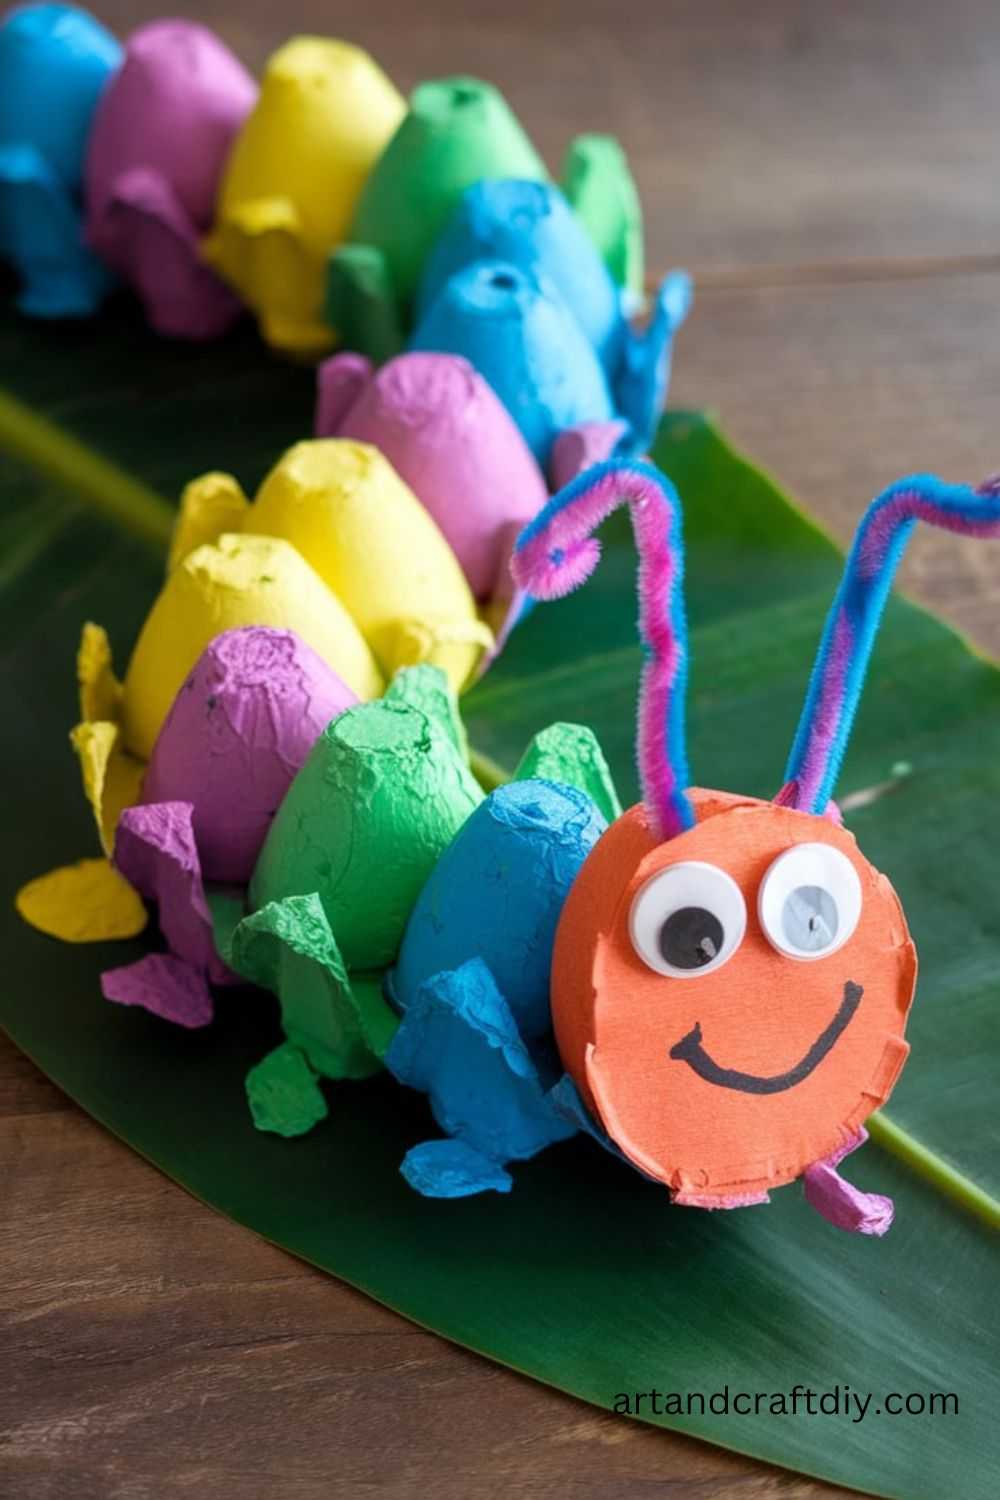
Egg Carton Caterpillar
Turn egg cartons into a wiggly caterpillar to introduce the lifecycle of butterflies while crafting.
Materials Used
- Empty egg carton
- Paint
- Pipe cleaners
- Googly eyes
- Glue
- Scissors
Steps
- Cut a strip of an egg carton to make the caterpillar’s body (around 3-4 cups long).
- Let the child paint the caterpillar in their favorite colors.
- Once dry, glue on googly eyes at one end for the face.
- Attach small pieces of pipe cleaner to the top of the head as antennae.
Paper Bag Puppets
Turn paper bags into playful puppets, great for storytelling and imaginative games.
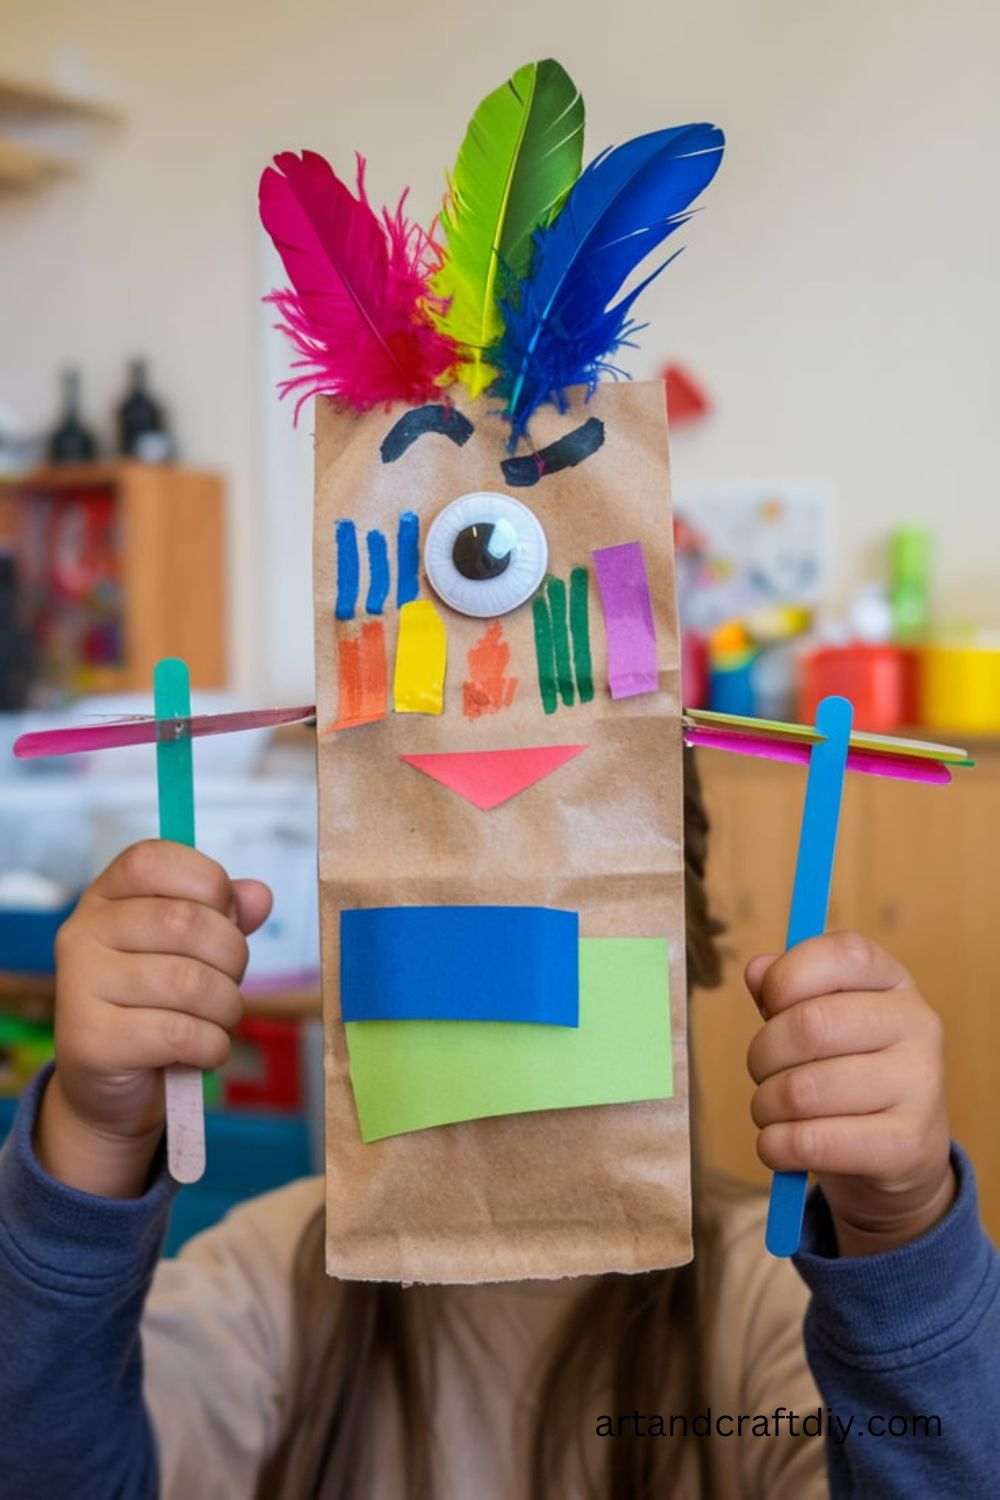
Materials Used
- Paper lunch bags
- Colored paper
- Glue
- Markers
Steps
- Use the folded bottom of the bag as the puppet’s face.
- Cut out features like eyes, noses, and mouths from colored paper and glue them onto the bag.
- Decorate the rest of the bag with patterns or clothes using markers or paper.
Button Tree Art
This button tree craft is a great way to teach color recognition and sorting while creating a lovely piece of art.
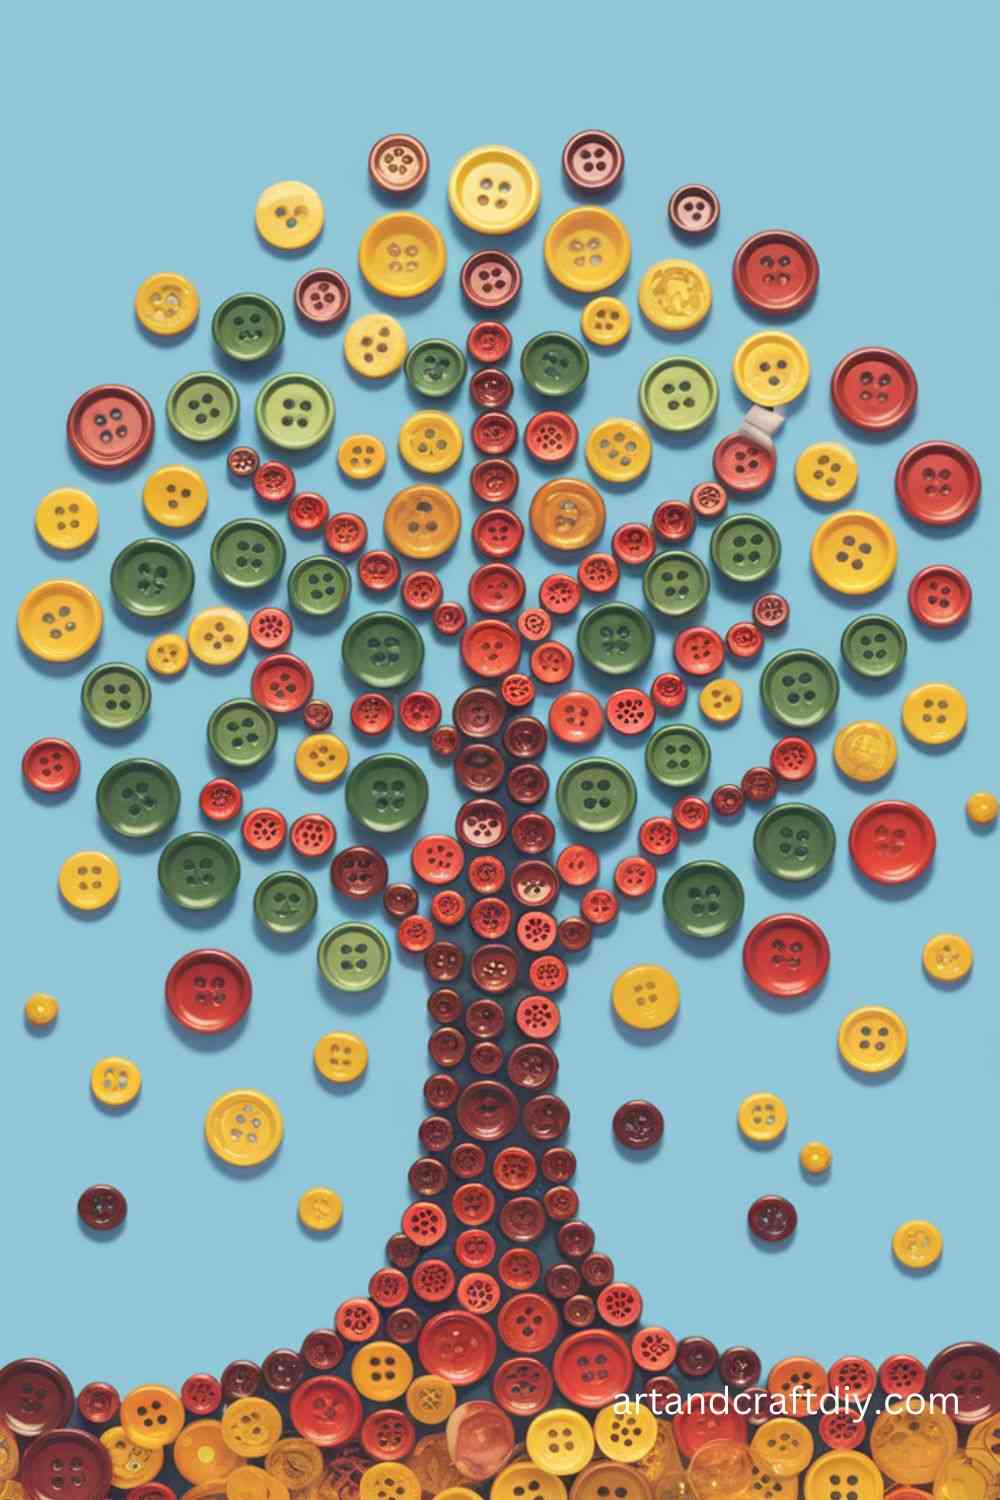
Materials Used
- Buttons in various colors
- Brown construction paper
- Glue
- Scissors
Steps
- Cut out a tree trunk and branches from brown construction paper.
- Glue the tree onto a larger piece of construction paper.
- Let the child glue buttons along the branches to represent leaves.
Yarn-Wrapped Cardboard Shapes
Practice hand-eye coordination with this colorful yarn-wrapping craft.
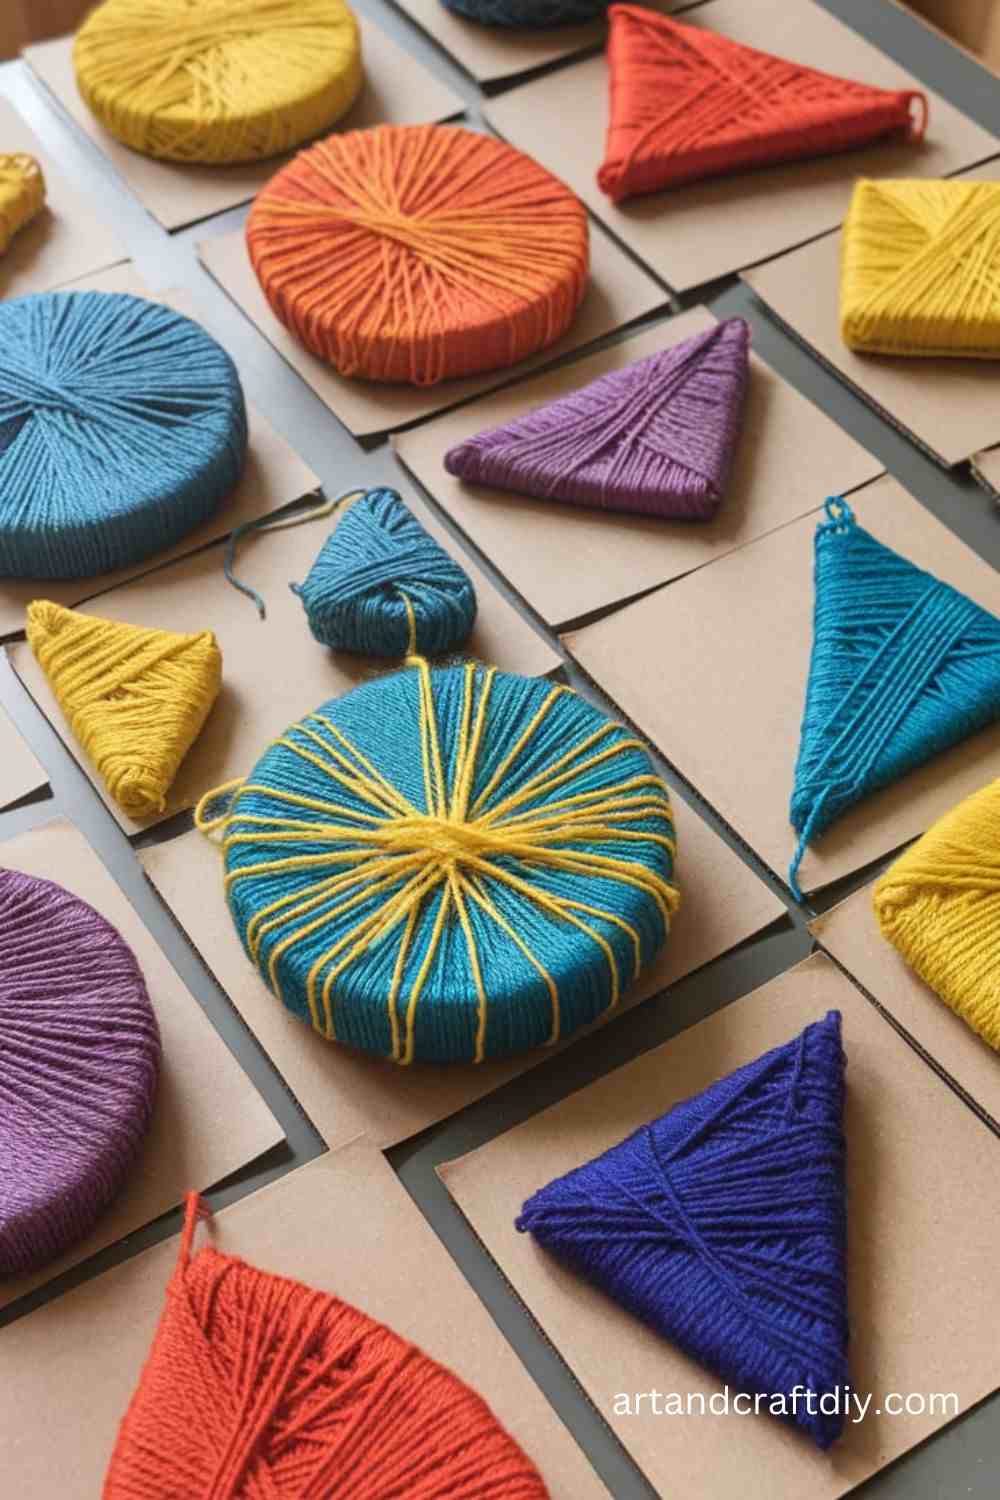
Materials Used
- Cardboard
- Yarn in various colors
- Scissors
Steps
- Cut out shapes like hearts, stars, or circles from cardboard.
- Tie one end of a yarn strand to the shape and start wrapping it around.
- Continue until the entire shape is covered in yarn.
Cupcake Liner Flowers
Make simple yet beautiful flowers using cupcake liners, perfect for a spring-themed craft.
Materials Used
- Cupcake liners
- Glue
- Pipe cleaners
- Scissors
Steps
- Flatten a cupcake liner and fold it in half, then into quarters to form a petal shape.
- Glue multiple folded liners together to create a full flower.
- Attach a pipe cleaner as the stem.
Paper Chain Caterpillar
This colorful paper chain caterpillar helps kids practice cutting and assembling while creating a fun decoration.

Materials Used
- Construction paper in various colors
- Glue stick or tape
- Markers
- Scissors
Steps
- Cut strips of construction paper, about 1 inch wide and 6 inches long.
- Show the child how to create a loop with one strip and secure it with glue or tape.
- Insert another strip through the first loop and secure it to make a chain.
- Repeat until the chain is long enough to form the caterpillar’s body.
- Draw a face on one end of the chain using markers.
Clothespin Butterflies
Clothespin butterflies are a delightful way to teach kids about insects while letting their creativity shine.
Materials Used
- Wooden clothespins
- Coffee filters
- Markers
- Pipe cleaners
- Glue
Steps
- Have the child decorate coffee filters with markers to make vibrant butterfly wings.
- Fold the coffee filter in half and then bunch it in the middle.
- Clip the bunched part with a clothespin to form the body of the butterfly.
- Attach pipe cleaner antennas to the top of the clothespin.
Cardboard Tube Binoculars
Encourage pretend play and exploration with these easy-to-make binoculars using cardboard tubes.
Materials Used
- Two cardboard tubes (from toilet paper rolls)
- Paint or markers
- Glue
- String
Steps
- Paint or decorate the cardboard tubes with markers.
- Glue the tubes together side by side to form binoculars.
- Attach a piece of string to each side for a neck strap.
Felt Animal Masks
Create adorable animal masks using felt, perfect for imaginative play.
Materials Used
- Felt sheets in various colors
- Scissors
- Glue
- Elastic string
Steps
- Cut out a mask shape that fits the child’s face, leaving holes for the eyes.
- Cut out ears, noses, and other animal features from colored felt.
- Glue the features onto the mask to create an animal face.
- Attach an elastic string to secure the mask around the head.
Bubble Wrap Painting
Bubble wrap painting is a sensory craft that produces colorful, textured artwork.
Materials Used
- Bubble wrap
- Paint
- Construction paper
Steps
- Cut a piece of bubble wrap to the desired size.
- Let the child apply paint onto the bubble side of the wrap using brushes or their hands.
- Press the painted bubble wrap onto construction paper to transfer the design.
- Lift it off to reveal the textured pattern.
Paper Cup Wind Chimes
Create whimsical wind chimes using paper cups and string.
Materials Used
- Paper cups
- Paint or markers
- String
- Beads or small bells
Steps
- Let the child decorate the paper cup with paint or markers.
- Poke holes around the rim of the cup and thread string through them.
- Tie beads or bells to the ends of the strings.
- Hang the wind chime in a breezy spot.
Painted Rock Animals
Turn ordinary rocks into colorful animals with this simple painting craft.
Materials Used
- Smooth rocks
- Paint
- Brushes
- Googly eyes
Steps
- Wash and dry the rocks to prepare them for painting.
- Let the child paint the rock in animal designs, such as ladybugs, turtles, or fish.
- Once dry, glue googly eyes onto the painted rocks for a playful touch.
Rainbow Pasta Necklace
Teach color recognition and patterns with this vibrant pasta necklace craft.
Materials Used
- Uncooked pasta (like penne)
- Food coloring
- String
- Ziplock bags
Steps
- Place uncooked pasta in ziplock bags with a few drops of food coloring and shake to coat.
- Let the dyed pasta dry completely.
- Help the child thread the pasta onto a string to create a necklace.
Fork-Stamped Tulips
Make a beautiful field of tulips using forks and paint for a fun stamping activity.
Materials Used
- Plastic forks
- Paint
- Construction paper
Steps
- Dip the back of a fork into paint.
- Press the painted fork onto construction paper to create tulip shapes.
- Add stems and leaves using a paintbrush or green markers.
Paper Plate Fish
This craft introduces kids to ocean life while allowing them to practice their cutting and gluing skills.
Materials Used
- Paper plates
- Crayons or markers
- Construction paper
- Scissors
- Glue
Steps
- Cut a triangle out of one side of the paper plate to form the fish’s tail.
- Let the child color the paper plate to resemble a fish using crayons or markers.
- Cut out fins and scales from construction paper and glue them onto the fish.
- Add googly eyes and a mouth to finish the fish’s face.
Paper Roll Rocket
Blast off into space with a DIY rocket craft that will inspire young astronauts.
Materials Used
- Empty toilet paper rolls
- Construction paper
- Scissors
- Glue
- Markers
Steps
- Decorate the toilet paper roll with markers or construction paper to make the rocket body.
- Cut out a cone from construction paper to make the rocket’s top and glue it to the top of the roll.
- Create rocket fins by cutting out triangles and gluing them to the bottom of the roll.
- Add stars or space designs to the rocket using markers.
Pom-Pom Spider
Create a creepy-crawly spider using soft pom-poms, perfect for Halloween or learning about insects.
Materials Used
- Black pom-poms
- Pipe cleaners
- Googly eyes
- Glue
Steps
- Glue a large black pom-pom onto a piece of paper as the spider’s body.
- Attach smaller black pom-poms for the spider’s head.
- Cut pipe cleaners into six equal parts and glue them to the body for legs.
- Add googly eyes to the head for a fun touch.
Paper Plate Turtle
A simple and creative way to learn about turtles while practicing cutting, gluing, and painting.
Materials Used
- Paper plates
- Green paint or markers
- Brown construction paper
- Glue
- Scissors
Steps
- Paint the paper plate green to form the turtle’s shell.
- Cut out four small legs and a head from brown construction paper and glue them onto the paper plate.
- Add eyes and a smile using markers.
- Draw or cut out details like the turtle’s shell patterns.
Salt Dough Ornaments
This craft allows children to make keepsake ornaments using salt dough, which can be painted and decorated after drying.
Materials Used
- 1 cup flour
- 1/2 cup salt
- 1/4 cup water
- Rolling pin
- Cookie cutters (optional)
- Paint
Steps
- Mix the flour, salt, and water to form dough. Knead until smooth.
- Roll the dough out and cut shapes using cookie cutters.
- Use a straw to poke a hole at the top of each ornament.
- Bake the shapes at 250°F (120°C) for about 2 hours or until hard.
- Once dry, paint the ornaments and add any decorations.
Flower Stamps with Vegetables
Teach kids about the colors and shapes of flowers through vegetable stamping.
Materials Used
- Vegetables (like celery or bell peppers)
- Paint
- Construction paper
Steps
- Cut a celery stalk or bell pepper in half to reveal the texture.
- Dip the vegetable piece into paint and stamp it onto the construction paper.
- Use different vegetable shapes to create a variety of flowers.
- Let the child add stems and leaves with a green marker.
Paper Straw Flowers
These easy paper straw flowers are colorful and simple for little hands to make.
Materials Used
- Paper straws
- Tissue paper
- Scissors
- Glue
Steps
- Cut tissue paper into small squares.
- Let the child scrunch the tissue paper into flower shapes.
- Glue the tissue paper onto one end of a paper straw to create the flower’s head.
- Add leaves or additional decorations to complete the flower.
Toilet Paper Roll Binoculars
A fun craft to explore nature, kids can make their own binoculars for outdoor adventures.
Materials Used
- Two toilet paper rolls
- String
- Glue
- Paint or markers
Steps
- Paint or decorate the toilet paper rolls using markers.
- Glue the rolls together side by side.
- Attach a piece of string to each side to make a neck strap.
- Let the binoculars dry before using them for pretend play.
Nature Collage
This collage craft connects kids with nature as they collect leaves, twigs, and flowers to make a masterpiece.
Materials Used
- Construction paper
- Leaves, twigs, flowers, or seeds
- Glue
Steps
- Go on a nature walk and collect small natural items like leaves and flowers.
- Lay out the collected items on a piece of construction paper.
- Glue the items onto the paper to create a nature collage.
- Encourage the child to arrange the items in patterns or designs.
Paper Plate Frog
Make a cheerful frog with a paper plate, which can also double as a fun storytelling prop.
Materials Used
- Paper plate
- Green paint or markers
- Googly eyes
- Construction paper
Steps
- Paint the entire paper plate green.
- Cut out two circles from construction paper for the frog’s eyes and glue them to the top of the plate.
- Add googly eyes to the paper circles.
- Cut out a frog tongue and glue it below the eyes.
Yarn Pom-Pom Animals
Make cute little animals out of yarn and pom-poms, perfect for imaginative play.
Materials Used
- Yarn
- Pom-poms
- Googly eyes
- Glue
Steps
- Create yarn pom-poms by wrapping yarn around your fingers and tying it in the middle.
- Attach the yarn pom-pom to a larger pom-pom to form the body.
- Glue on googly eyes and add small pieces of yarn for ears, tails, or whiskers.
Recycled Bottle Fish Tank
A unique way to recycle and craft, this fish tank craft gives kids a chance to create their own aquatic world.
Materials Used
- Empty plastic bottle
- Blue tissue paper
- Small fish stickers or cutouts
- Scissors
- Glue
Steps
- Cut the top off a plastic bottle to create a fish tank.
- Line the inside of the bottle with blue tissue paper to mimic water.
- Cut out fish shapes from colored paper and glue them inside the bottle.
- Add small plants or decorations to the tank to complete the look.
Seasonal Crafts: Creative Ideas for Every Season
DIY Crafts for Kindergarteners are a fun and engaging way to celebrate the changing seasons. DIY Crafts for Kindergarteners allow kids and adults alike to express their creativity while also connecting with the natural beauty and themes of each time of year. From snowmen in winter to flowers in spring, here are a few simple and delightful craft ideas that correspond with the different seasons:
1. Snowman Craft (Winter)
A classic winter craft, snowman making is a great way to bring the chill of winter indoors while being creative.
Materials Needed:
- Cotton balls or paper
- Buttons (for eyes, nose, and buttons)
- Markers (for details like eyes, scarf, or hat)
Steps:
- Glue cotton balls in a snowman shape (three stacked circles) on a piece of paper.
- Use buttons to decorate the snowman (two buttons for the body and one for the nose).
- Add markers for facial features, a hat, or scarf.
This craft brings a cozy winter atmosphere and can be enjoyed by children and adults of all ages.
2. Pumpkin Faces (Fall)
This craft celebrates the vibrant colors of autumn and the fun of Halloween. Decorating a pumpkin face can be as simple or intricate as you like.
Materials Needed:
- Orange construction paper
- Scissors
- Glue
- Markers or other decorations (for facial features)
Steps:
- Cut out the shape of a pumpkin from orange construction paper.
- Use markers, stickers, or small cut-out pieces of paper to create eyes, a nose, and a mouth on the pumpkin.
- Glue the pumpkin to a larger sheet of paper to create a fun fall scene.
This activity is perfect for younger children and can be a creative way to get ready for the fall season.
3. Flower Crown (Spring)
The blooming flowers of spring inspire this bright and cheerful craft. A flower crown is a lovely accessory to wear or display as a decoration.
Materials Needed:
- Tissue paper or fabric flowers
- Glue
- Elastic string
Steps:
- Cut flower shapes from tissue paper or use pre-made fabric flowers.
- Arrange the flowers in a circular pattern to form a crown.
- Glue the flowers onto the elastic string, spacing them out evenly.
- Once dry, tie the ends of the string to fit around the head.
This craft is a great way to celebrate the vibrant colors and growth of spring, and it can be a fun project for kids or even adults who enjoy making unique accessories.
Fun and Educational DIY Crafts for Kindergarteners
Crafting can be both fun and educational for young learners. DIY Crafts for Kindergarteners activities not only help develop their creativity but also enhance skills like letter recognition, color sorting, and counting. Below are three simple yet engaging crafts that parents and teachers can try with children to make learning enjoyable.
1. Alphabet Blocks
Creating alphabet blocks is a fantastic way for kids to practice letter recognition in a hands-on manner.
- Materials: Foam blocks, markers
- How to Do It:
- Take foam blocks and write a different letter on each one using markers.
- Encourage children to say the letter aloud and associate it with words starting with that letter.
- As they grow more confident, they can begin forming simple words by arranging the blocks together.
This activity reinforces the alphabet in a playful and interactive way.
2. Color Sorting Craft
This activity helps kids recognize and match colors while improving fine motor skills.
- Materials: Colored paper, scissors, glue
- How to Do It:
- Cut out various shapes from colored paper.
- Ask the child to sort the shapes based on their colors.
- To add more challenge, create a set of color-matching cards and have the child match the cut-out shapes with the corresponding card.
This craft enhances color recognition and encourages organizational skills in a fun, creative way.
3. Number Garden
Creating a “number garden” helps children practice counting while getting creative with colors and shapes.
- Materials: Colored paper, markers, scissors
- How to Do It:
- Cut flower shapes out of colored paper.
- Write numbers on each flower petal, starting from 1 and going up to a number that fits your child’s level.
- Create a garden scene on a larger piece of paper and glue the flowers to it in numerical order.
- As they arrange the flowers, children can practice counting aloud, enhancing their number recognition and sequencing skills.
This craft combines counting and art, making it an enjoyable learning experience.
These fun and educational crafts not only support cognitive development but also foster creativity, offering endless opportunities for hands-on learning.
FAQ
What type of materials are safe for kindergarteners to use for crafts?
Kindergarteners should use non-toxic, child-safe materials such as washable markers, glue sticks, construction paper, foam sheets, cotton balls, and pipe cleaners. Always check for age-appropriate labels on materials.
Can I use scissors with my kindergartener for crafts?
Yes, but make sure to use child-friendly safety scissors that are designed for small hands. Always supervise the child while using scissors.
How can I make crafting fun for my kindergartener?
Incorporate bright colors, simple shapes, and themes that interest your child, like animals or favorite characters. Make the activity interactive by encouraging storytelling or singing related songs while crafting.
How long should crafting activities last for kindergarteners?
Crafting sessions for kindergarteners should generally last between 15 to 30 minutes to keep them engaged without overwhelming them.

Hi, I’m Victoria, an art and craft teacher at Newark City Schools, where I have the joy of working with middle school students to help them explore their creativity and develop their artistic talents. I believe that art is a powerful way for students to express themselves, and I strive to make every lesson a fun, engaging, and inspiring experience.
I created this website to share the art and craft projects, techniques, and resources that I use in my classroom, hoping to inspire both educators and young artists alike. Whether you’re a teacher looking for new ideas or a student eager to try something new, I’m excited to provide creative tools and projects that anyone can enjoy.
When I’m not in the classroom, I love experimenting with different art forms and learning new crafting techniques. My goal is to help others discover the joy of making things with their hands, and I hope my website serves as a space for everyone to explore their creative potential.