
Oh, hey! So, the other day I was sitting by my window, sipping on some pumpkin spice latte, and staring at all these crunchy leaves piling up outside, and I thought, “Why not do something fun with them instead of just raking them away?” Honestly, fall has this magical way of making everything feel cozier, but also, it can be kinda overwhelming with all the decorating ideas out there, right? That’s exactly why I wanted to share some super simple DIY fall crafts that anyone can do — no stress, no fancy tools, just good, creative fun. I know how frustrating it feels when you try a craft and it ends up looking… well, less than perfect. Been there, done that! But stick with me, because by the end of this, you’ll have cute, handmade fall decorations that actually make your home feel warm and festive — and maybe even a little proud-of-yourself moment too.
DIY fall crafts
DIY Fall Crafts are creative, hands-on projects inspired by the beauty and coziness of the autumn season.

Leaf Press Wall Art
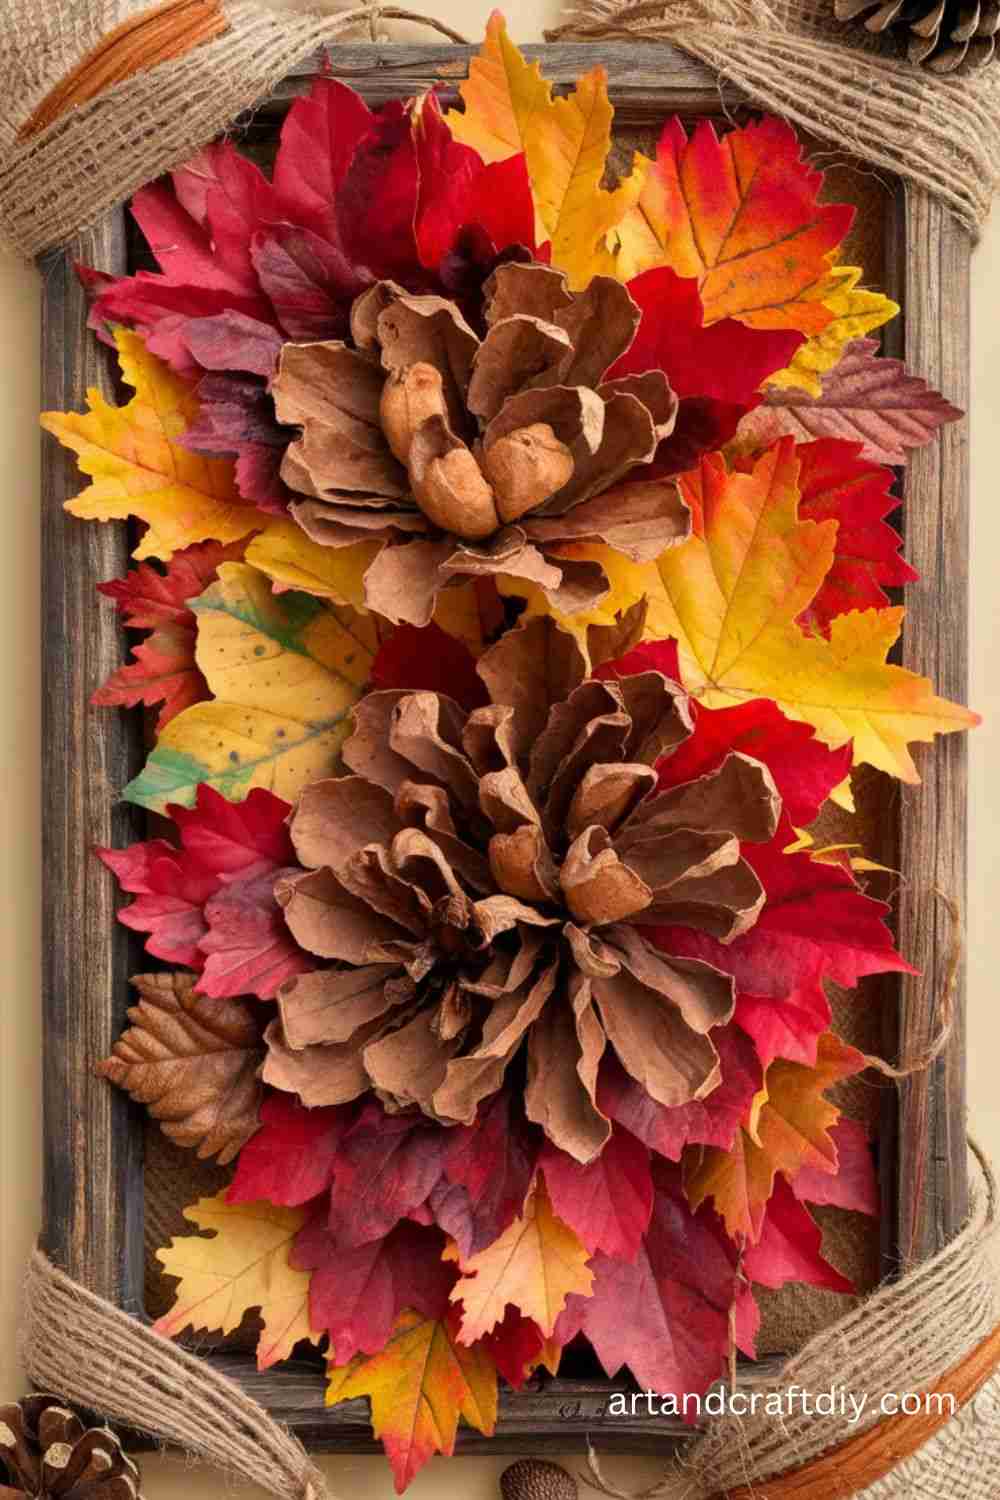
I’ll be honest, leaf press wall art is one of those things that makes me feel like a kid again. Every fall, when the trees around my street start dropping these fiery reds and golden yellows, I just can’t resist picking them up. Some people look at me funny when I’m crouching down, carefully choosing “the perfect leaf,” but in my opinion, that’s half the fun. I’ve found that pressing leaves between old, heavy books for a week or two really locks in their colors. I usually forget I even put them there, and then suddenly stumble upon them later, like a little treasure.
Once they’re ready, I arrange them on thick paper or canvas, sometimes in neat rows, sometimes totally random, depending on my mood. A cheap frame from the craft store works wonders, and suddenly my living room wall looks like an autumn gallery. Honestly, I’ve gifted these to friends, and they think I spent way more effort than I actually did. There’s just something so cozy about seeing those natural colors framed up—like you’ve captured fall itself and brought it indoors.
Pinecone Owls
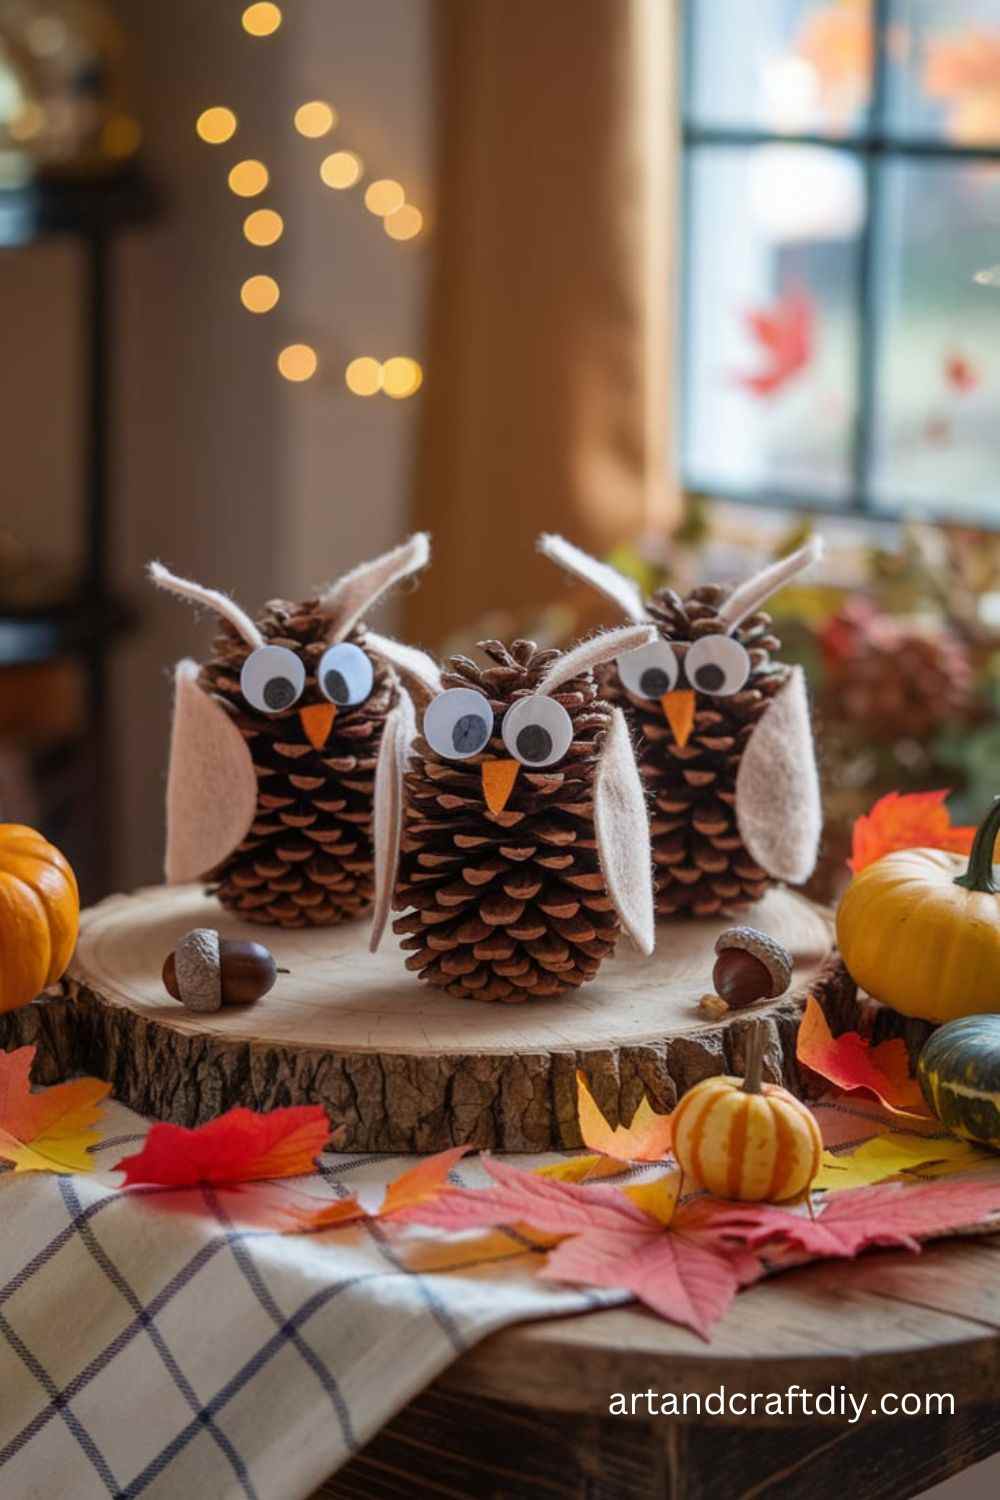
Now, this one makes me laugh because the first time I tried pinecone owls, they ended up looking more like lopsided chickens than owls. To be fair, though, that’s the charm of it. You grab a bunch of pinecones (and if you’re like me, you’ll pick way too many on your walk, thinking you’ll use them all—spoiler, you won’t). Then it’s just about giving them personality with felt, googly eyes, and maybe little feathers if you’re feeling extra. I swear, once you glue those eyes on, they instantly look alive, and it cracks me up every time.
I usually sit at the kitchen table with some hot glue, scraps of felt in autumn colors, and a bit of patience. My niece once made one with a giant beak that looked more like a toucan than an owl, but she was so proud of it. Honestly, these quirky little creatures have become a fall tradition for us. I put them on shelves, scatter them in the entryway, and they always get comments from visitors. In my opinion, they’re one of those crafts where imperfection makes them even better.
Mason Jar Luminaries
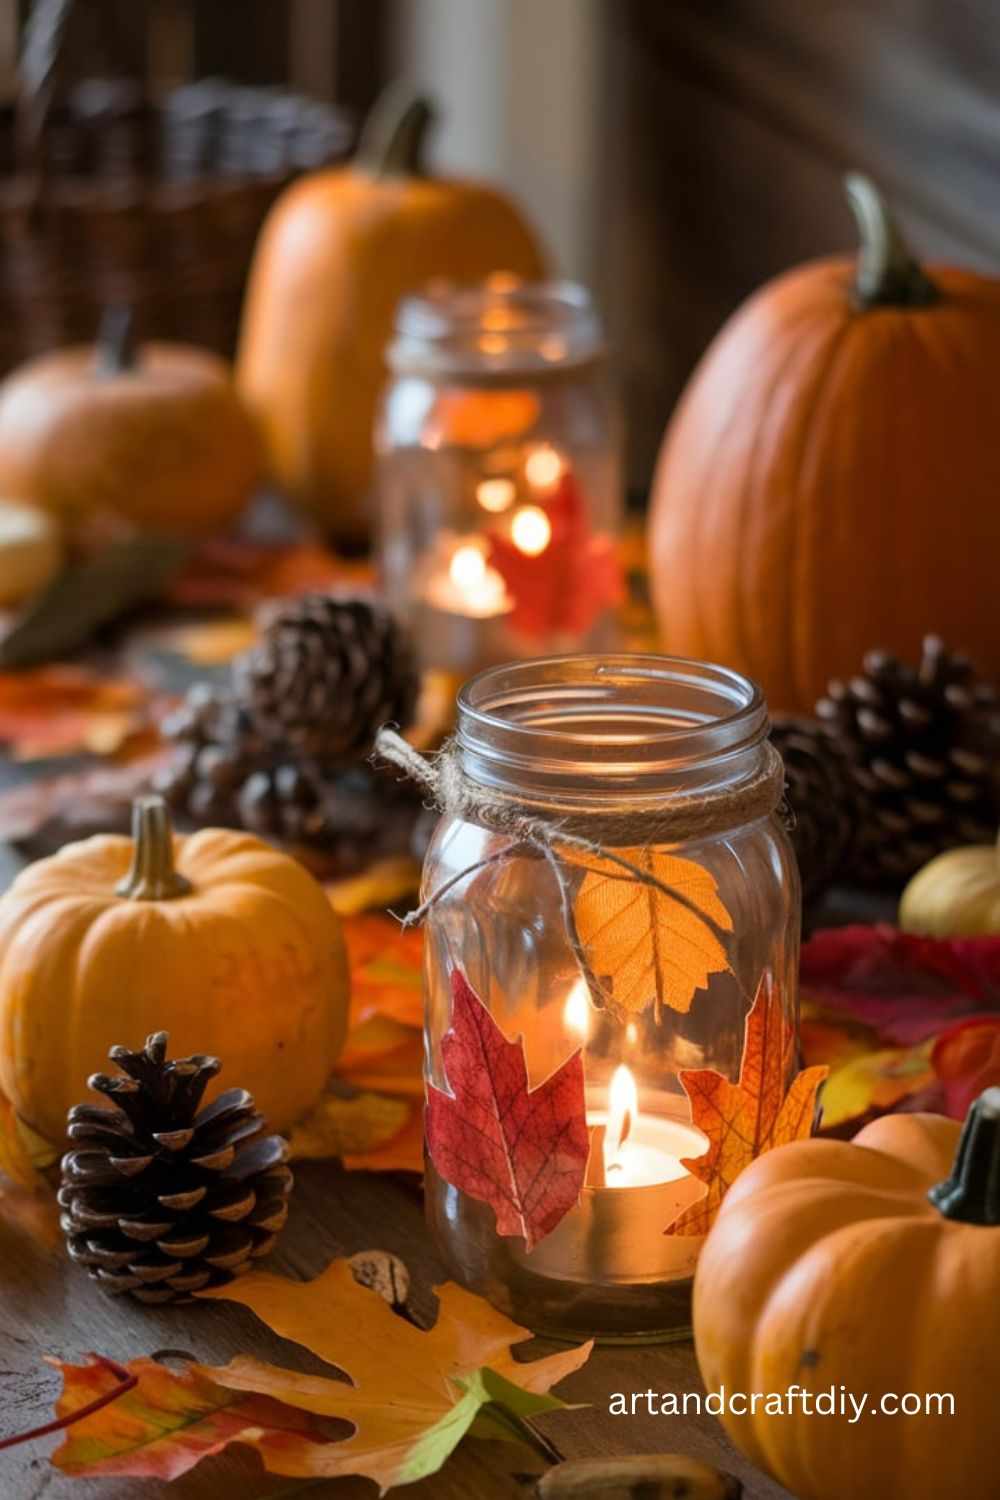
I’ve got such a soft spot for mason jar luminaries. There’s something magical about flickering candlelight mixed with fall colors, and it feels like the easiest DIY win ever. I remember one year, during a power cut, I actually lit the whole room with jars I’d decorated with pressed leaves and tissue paper—it turned what could’ve been annoying into one of the coziest nights I can recall. Honestly, sometimes the simplest ideas stick with you the longest.
All you really need is a clean mason jar, some Mod Podge, and bits of tissue paper or pressed leaves. I like layering warm tones—deep orange, golden yellow, even a splash of burgundy. When the candle glows inside, the colors just melt together in the prettiest way. I’ve also tied twine around the top for a rustic touch, and to me, it feels like instant autumn charm. I set these along the dining table, on the porch, even in the bathroom once (don’t judge—it looked amazing). In my opinion, it’s one of the easiest ways to make your home feel like fall without spending a ton.
Acorn Wreath
Craft a rustic fall wreath using acorns and a little creativity.
Materials Needed:
- Acorns
- Wreath base (foam or wire)
- Hot glue gun
- Ribbon
- Acrylic paint or glitter (optional)
Steps:
- Prepare the Acorns: Clean the acorns and bake them at a low temperature to remove insects.
- Attach Acorns to the Base: Use a hot glue gun to secure the acorns to the wreath base, covering it completely.
- Decorate: Optionally, paint the acorns or add glitter for extra flair.
- Add a Ribbon: Attach a ribbon for hanging, and display your wreath on a door or wall.
Pumpkin Spice Soap Bars
Make your own pumpkin spice soap to bring a cozy aroma to your bathroom.
Materials Needed:
- Soap base (shea butter or glycerin)
- Pumpkin spice essential oil
- Soap molds
- Orange soap dye (optional)
- Microwave-safe bowl
Steps:
- Melt the Soap Base: Cut the soap base into cubes and microwave in 30-second intervals until melted.
- Add Fragrance and Dye: Stir in a few drops of pumpkin spice oil and orange dye.
- Pour into Molds: Carefully pour the mixture into soap molds.
- Let Set: Allow the soap to cool and harden for 24 hours before removing from the molds.
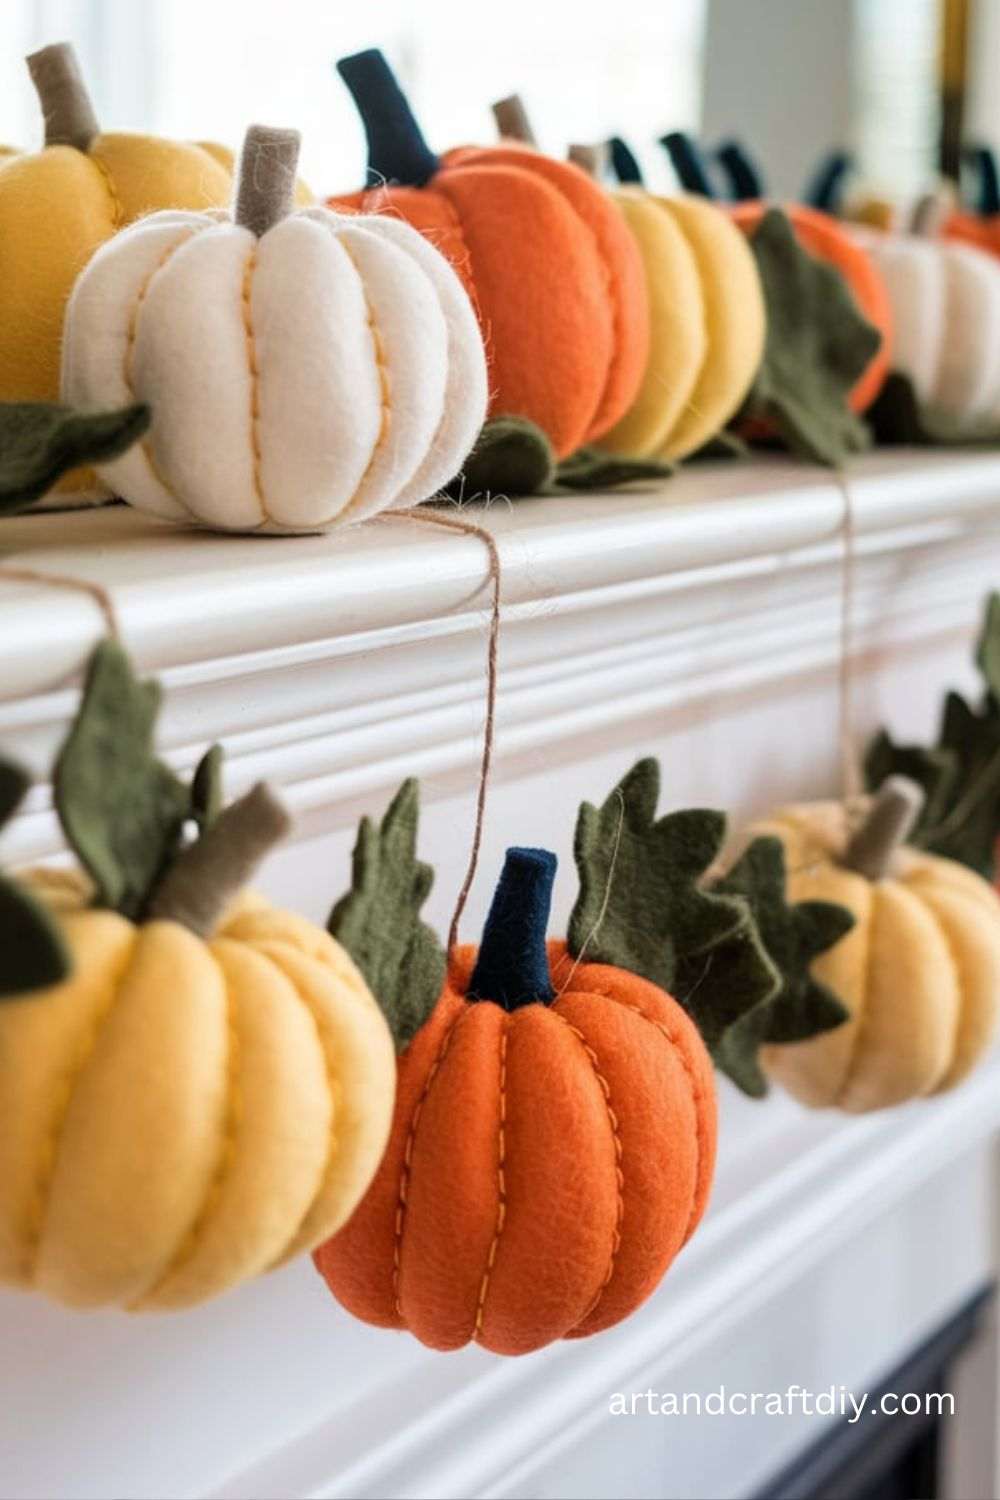
Felt Pumpkin Garland
Create a cheerful garland of felt pumpkins to string across your home.
Materials Needed:
- Orange, green, and brown felt
- Scissors
- Needle and thread
- Twine or ribbon
Steps:
- Cut Felt Shapes: Cut out pumpkin shapes from the orange felt, stems from the brown felt, and leaves from the green felt.
- Assemble Pumpkins: Sew the stem and leaf onto each pumpkin shape.
- String Them Together: Thread the twine through each pumpkin to create a garland.
- Hang Up: Display your garland on a mantel, wall, or staircase.
Corn Husk Dolls
A traditional craft, corn husk dolls are perfect for celebrating the harvest season.

Materials Needed:
- Dried corn husks
- Twine
- Scissors
- Water
Steps:
- Soften the Corn Husks: Soak the husks in water for 30 minutes to make them pliable.
- Create the Head and Body: Fold a few husks in half and tie them tightly with twine to form the head.
- Form Arms: Roll or braid a smaller set of husks for arms and insert them under the head. Tie them in place.
- Add Details: Use additional husks to create skirts or capes. Secure with twine.
- Dry: Let the doll dry completely before displaying.
Painted Pumpkin Rocks
Skip the mess of carving and make pumpkin-themed painted rocks instead.

Materials Needed:
- Smooth, flat rocks
- Acrylic paint (orange, green, black, white)
- Paintbrushes
- Sealer spray
Steps:
- Clean the Rocks: Wash and dry the rocks to remove dirt and debris.
- Paint the Base: Paint the entire rock orange and let it dry.
- Add Details: Use black paint for jack-o’-lantern faces or white for ghostly designs. Add green stems and vines if desired.
- Seal: Spray the painted rocks with a clear sealer to protect the design.
Autumn Leaf Suncatchers
Catch the light with colorful suncatchers inspired by autumn leaves.
Materials Needed:
- Wax paper
- Crayon shavings (fall colors)
- Iron
- Scissors
- String
Steps:
- Prepare Crayon Shavings: Use a cheese grater to create shavings from crayons in fall colors.
- Assemble: Sprinkle the crayon shavings between two sheets of wax paper.
- Melt: Iron over the wax paper on low heat to melt the shavings.
- Cut Shapes: Once cooled, cut the wax paper into leaf shapes.
- Hang: Punch a hole in each shape and string them up near a window.
Fall Button Tree Canvas
Create a charming fall tree with buttons and paint.

Materials Needed:
- Canvas or thick cardstock
- Buttons (fall colors)
- Acrylic paint
- Paintbrush
- Glue
Steps:
- Paint the Tree: Use acrylic paint to draw a tree trunk and branches on your canvas.
- Sort Buttons: Choose buttons in autumn hues like red, orange, yellow, and brown.
- Attach Buttons: Glue the buttons onto the branches to resemble leaves.
- Let Dry: Allow the glue to set before displaying your artwork.
Cinnamon Stick Candles
Add a rustic and fragrant touch to your candle display with cinnamon sticks.
Materials Needed:
- Pillar candles
- Cinnamon sticks
- Twine
- Hot glue gun
Steps:
- Attach Cinnamon Sticks: Use a hot glue gun to adhere cinnamon sticks vertically around the candle.
- Secure with Twine: Wrap twine around the middle for added support and a decorative touch.
- Display: Place your candles on a tray or table for a cozy fall centerpiece.
Twig Photo Frame
Bring the outdoors inside with a natural twig photo frame.
Materials Needed:
- Plain wooden frame
- Twigs of various sizes
- Hot glue gun
- Scissors or pruning shears
Steps:
- Collect and Cut Twigs: Gather twigs and cut them to fit the edges of your frame.
- Attach Twigs: Use hot glue to adhere the twigs around the frame, layering them for a rustic look.
- Finish: Add a photo or fall-themed print and display.
DIY Apple Stamps
Transform apple slices into fun stamps for fall art projects.
Materials Needed:
- Apples
- Acrylic paint
- Paper or canvas
- Knife
Steps:
- Prepare the Apples: Cut apples in half and remove seeds.
- Add Paint: Dip the cut side of the apple into acrylic paint.
- Stamp: Press the painted apple onto paper or canvas to create prints. Experiment with patterns or colors.
Burlap Fall Banner
Decorate your home with a rustic burlap banner.
Materials Needed:
- Burlap fabric
- Twine
- Acrylic paint
- Stencils
- Scissors
Steps:
- Cut Burlap: Cut the burlap into triangular or rectangular pieces.
- Paint Designs: Use stencils to paint letters, pumpkins, or leaves on each piece.
- String Together: Thread the twine through the burlap to create the banner.
- Hang Up: Display the banner on a wall or across a fireplace.
Pumpkin Centerpieces
Craft elegant pumpkin centerpieces using faux pumpkins.
Materials Needed:
- Faux pumpkins
- Floral foam
- Artificial fall flowers and foliage
- Hot glue gun
Steps:
- Prepare the Pumpkin: Cut the top off the pumpkin and hollow it out.
- Insert Foam: Place floral foam inside the pumpkin.
- Add Flowers: Arrange artificial flowers and foliage in the foam, securing with glue if needed.
- Display: Place the centerpiece on a dining or coffee table.
Glittered Acorns
Add sparkle to your fall decor with glittered acorns.
Materials Needed:
- Acorns
- Glue
- Glitter (various colors)
- Paintbrush
Steps:
- Prepare the Acorns: Clean the acorns and let them dry.
- Apply Glue: Use a paintbrush to apply glue to the caps or entire surface of the acorns.
- Add Glitter: Roll the acorns in glitter and let them dry.
- Use as Decor: Display the glittered acorns in bowls, jars, or wreaths.
Pumpkin String Art
Create a unique pumpkin design with string art.
Materials Needed:
- Wooden board
- Nails
- Hammer
- String or embroidery thread (orange, green, brown)
Steps:
- Draw the Design: Sketch a pumpkin outline on the wooden board.
- Place Nails: Hammer nails along the outline, spacing them evenly.
- Wrap String: Tie the string to one nail and weave it around the nails to fill the design.
- Finish: Tie off the string and trim any excess
Pumpkin Spice Potpourri
Fill your home with the warm and inviting scent of autumn using a DIY potpourri blend.
Materials Needed:
- Dried orange slices
- Cinnamon sticks
- Cloves
- Star anise
- Small pinecones
- Essential oils (pumpkin spice or cinnamon)
Steps:
- Prepare Ingredients: Dry orange slices in the oven at low heat for several hours.
- Mix Potpourri: Combine dried orange slices, cinnamon sticks, cloves, star anise, and pinecones in a bowl.
- Add Fragrance: Sprinkle a few drops of essential oil onto the mixture.
- Display: Place the potpourri in a decorative bowl or sachet bag to scent your space.
Wooden Pumpkin Cutouts
Add charm to your home with rustic wooden pumpkins.
Materials Needed:
- Wooden blocks or planks
- Orange and green paint
- Sandpaper
- Twine or raffia
Steps:
- Cut and Sand Wood: Cut wooden blocks or planks into pumpkin shapes. Sand the edges for smoothness.
- Paint: Paint the blocks orange and the tops green for the stem.
- Distress (Optional): Lightly sand the edges for a rustic look.
- Decorate: Wrap twine or raffia around the stems and display them on shelves or tables.
Autumn Leaf Candle Holders
Illuminate your space with candle holders adorned with autumn leaves.
Materials Needed:
- Glass jars
- Mod Podge
- Dried or faux leaves
- Paintbrush
- Tea light candles
Steps:
- Clean the Jars: Ensure the glass jars are clean and dry.
- Attach Leaves: Brush Mod Podge onto the jar and press the leaves onto the surface.
- Seal: Apply another layer of Mod Podge over the leaves to secure them.
- Add Candles: Place tea light candles inside and enjoy the warm glow.
Fall-Themed Coasters
Protect your surfaces with custom coasters featuring fall designs.
Materials Needed:
- Cork coasters or tiles
- Acrylic paint
- Paintbrushes
- Sealant spray
Steps:
- Clean the Coasters: Wipe down the coasters to remove dust.
- Paint Designs: Use acrylic paint to create fall motifs like leaves, pumpkins, or acorns.
- Seal: Once the paint is dry, spray the coasters with sealant for durability.
- Use: Place them on tables to protect surfaces from hot beverages.
Yarn Pumpkins
Make soft and cozy pumpkins with yarn for a modern farmhouse vibe.
Materials Needed:
- Yarn (orange and green)
- Balloons
- Mod Podge
- Scissors
Steps:
- Inflate Balloons: Blow up balloons to your desired pumpkin size.
- Wrap with Yarn: Dip yarn in Mod Podge and wrap it around the balloon, leaving some gaps.
- Dry and Pop: Let the yarn dry completely, then pop and remove the balloon.
- Add a Stem: Use green yarn or a small twig as the stem.
Corn Kernel Votives
Turn corn kernels into a charming base for candle votives.
Materials Needed:
- Clear glass votive holders
- Corn kernels
- Tea light candles
Steps:
- Fill the Holder: Add a layer of corn kernels to the bottom of each glass votive holder.
- Place Candle: Nestle a tea light candle into the kernels.
- Display: Arrange the votives on a table or mantel for a warm fall ambiance.
Pumpkin Spice Sugar Scrub
Pamper yourself with a homemade exfoliating scrub infused with fall scents.
Materials Needed:
- Brown sugar
- Coconut oil
- Pumpkin spice seasoning
- Small jars
Steps:
- Mix Ingredients: Combine 1 cup of brown sugar, ½ cup of coconut oil, and 1 tsp of pumpkin spice seasoning in a bowl.
- Transfer to Jars: Scoop the mixture into small jars for storage.
- Use: Massage the scrub onto your skin and rinse for a smooth finish.
Scarecrow Wine Bottle Craft
Transform an empty wine bottle into a whimsical scarecrow decoration.
Materials Needed:
- Empty wine bottle
- Acrylic paint
- Burlap
- Raffia
- Glue
Steps:
- Paint the Bottle: Paint the bottle to resemble a scarecrow, adding a face and patches for detail.
- Add Burlap Hat: Wrap a piece of burlap around the top of the bottle to create a hat.
- Decorate: Glue raffia to the bottle for “straw hair.”
- Display: Place it on a counter or shelf for a playful fall touch.
Sweater Pumpkins
Repurpose old sweaters into cozy fabric pumpkins.
Materials Needed:
- Old sweaters
- Needle and thread
- Polyfill stuffing
- Twigs (for stems)
Steps:
- Cut Fabric: Cut a circular piece from an old sweater.
- Sew and Stuff: Sew a running stitch around the edge of the circle, pull it slightly to form a pouch, and fill with stuffing.
- Close and Add Stem: Pull the thread tight to close the top, then glue or insert a twig as the stem.
Thanksgiving Gratitude Tree
Encourage gratitude with a decorative tree for writing thankful notes.
Materials Needed:
- Small branches
- Vase
- Paper (fall colors)
- String
- Hole punch
Steps:
- Assemble the Tree: Place small branches in a vase to create a tree shape.
- Cut Leaves: Cut paper into leaf shapes.
- Write Notes: Write things you’re thankful for on the leaves.
- Hang the Leaves: Punch holes in the leaves and tie them to the branches with string.
Eco-Friendly DIY Fall Crafts
As the leaves turn and the air grows crisp, fall is the perfect time to embrace creativity while staying eco-conscious. Crafting with sustainability in mind not only reduces waste but also adds a personal, earthy touch to your seasonal decor. Here are some inspiring eco-friendly DIY fall craft ideas, categorized into Upcycling Crafts and Natural Crafts:
Upcycling Fall Crafts
Breathing new life into old items is a fantastic way to create unique pieces and reduce waste:
- Plush Pumpkins from Old Sweaters
Turn worn-out sweaters into charming, soft pumpkins for your autumn decor. Cut the fabric into pumpkin shapes, stuff them with old fabric scraps or cotton, and sew them up. Add a twig or a cinnamon stick for the stem for an extra cozy vibe. - Cozy Drink Holders
Upcycle sweater sleeves into snug drink cozies for your hot beverages. Simply cut a sleeve to the desired length, hem the edges, and slip it onto your mug or tumbler. - Tin Can Lanterns or Planters
Repurpose empty tin cans by cleaning and painting them. Punch holes to create decorative patterns if using as lanterns, or fill them with soil and fall plants like mums or succulents to use as planters.
Natural Crafts
Celebrate the beauty of fall with crafts made from natural materials found right in your backyard:
- Pinecone Bird Feeders
Coat pinecones in peanut butter or a plant-based alternative, then roll them in birdseed. Hang them in your garden with twine to attract feathered friends while enhancing your outdoor space. - Twig Picture Frames
Gather twigs of similar lengths and glue them onto an old frame or cardboard backing to create rustic picture frames. Use them to display family photos or autumn-themed artwork.
FAQ
What are some easy DIY fall crafts for beginners?
Some beginner-friendly fall crafts include making leaf garlands, decorating pumpkins, creating a wreath from autumn leaves, and painting mason jars with fall colors.
How can I make a simple fall wreath?
To make a simple fall wreath, you can use a foam or wire wreath base, then add faux autumn leaves, acorns, berries, and a decorative ribbon. Hot glue can hold the pieces in place.
Can I use real leaves for DIY fall crafts?
Yes, you can use real leaves, but they may dry out and lose their color over time. If you want to preserve them, you can press them between books or use a sealing method like mod podge.
What supplies do I need for fall-themed crafts?
Basic supplies include paint, brushes, faux leaves, pumpkins, glue guns, mason jars, twine, felt, and any other fall-themed embellishments like acorns, pinecones, or ribbons.
Are there fall crafts that can be made with kids?
Absolutely! Simple crafts for kids include creating leaf prints, painting mini pumpkins, making pinecone animals, or assembling paper bats and ghosts for Halloween decorations.

Hi, I’m Victoria, an art and craft teacher at Newark City Schools, where I have the joy of working with middle school students to help them explore their creativity and develop their artistic talents. I believe that art is a powerful way for students to express themselves, and I strive to make every lesson a fun, engaging, and inspiring experience.
I created this website to share the art and craft projects, techniques, and resources that I use in my classroom, hoping to inspire both educators and young artists alike. Whether you’re a teacher looking for new ideas or a student eager to try something new, I’m excited to provide creative tools and projects that anyone can enjoy.
When I’m not in the classroom, I love experimenting with different art forms and learning new crafting techniques. My goal is to help others discover the joy of making things with their hands, and I hope my website serves as a space for everyone to explore their creative potential.