
You know that moment when you see The Nightmare Before Christmas for the hundredth time and think, “I wish I could bring this spooky, whimsical world into my own home”? Yeah, that was me last week, sitting on my couch with a cup of cocoa, staring at my plain Halloween decorations and feeling… well, kinda uninspired. I totally get it—sometimes the idea of crafting something from scratch feels overwhelming, like, where do you even start? That’s why I got excited about diving into a DIY Nightmare Before Christmas themed Halloween paper craft project. Seriously, it’s one of those things that’s both fun and surprisingly simple once you break it down. And the best part? You don’t need a ton of fancy supplies or mad crafting skills to make something that actually looks amazing. Stick with me, and I’ll show you how to turn plain paper into spooky, whimsical decorations that’ll wow anyone who sees them.
DIY Nightmare Before Christmas Themed Halloween Paper Craft
A DIY Nightmare Before Christmas-themed Halloween paper craft is a creative and fun way to bring the iconic characters and eerie atmosphere of the movie to life using paper.

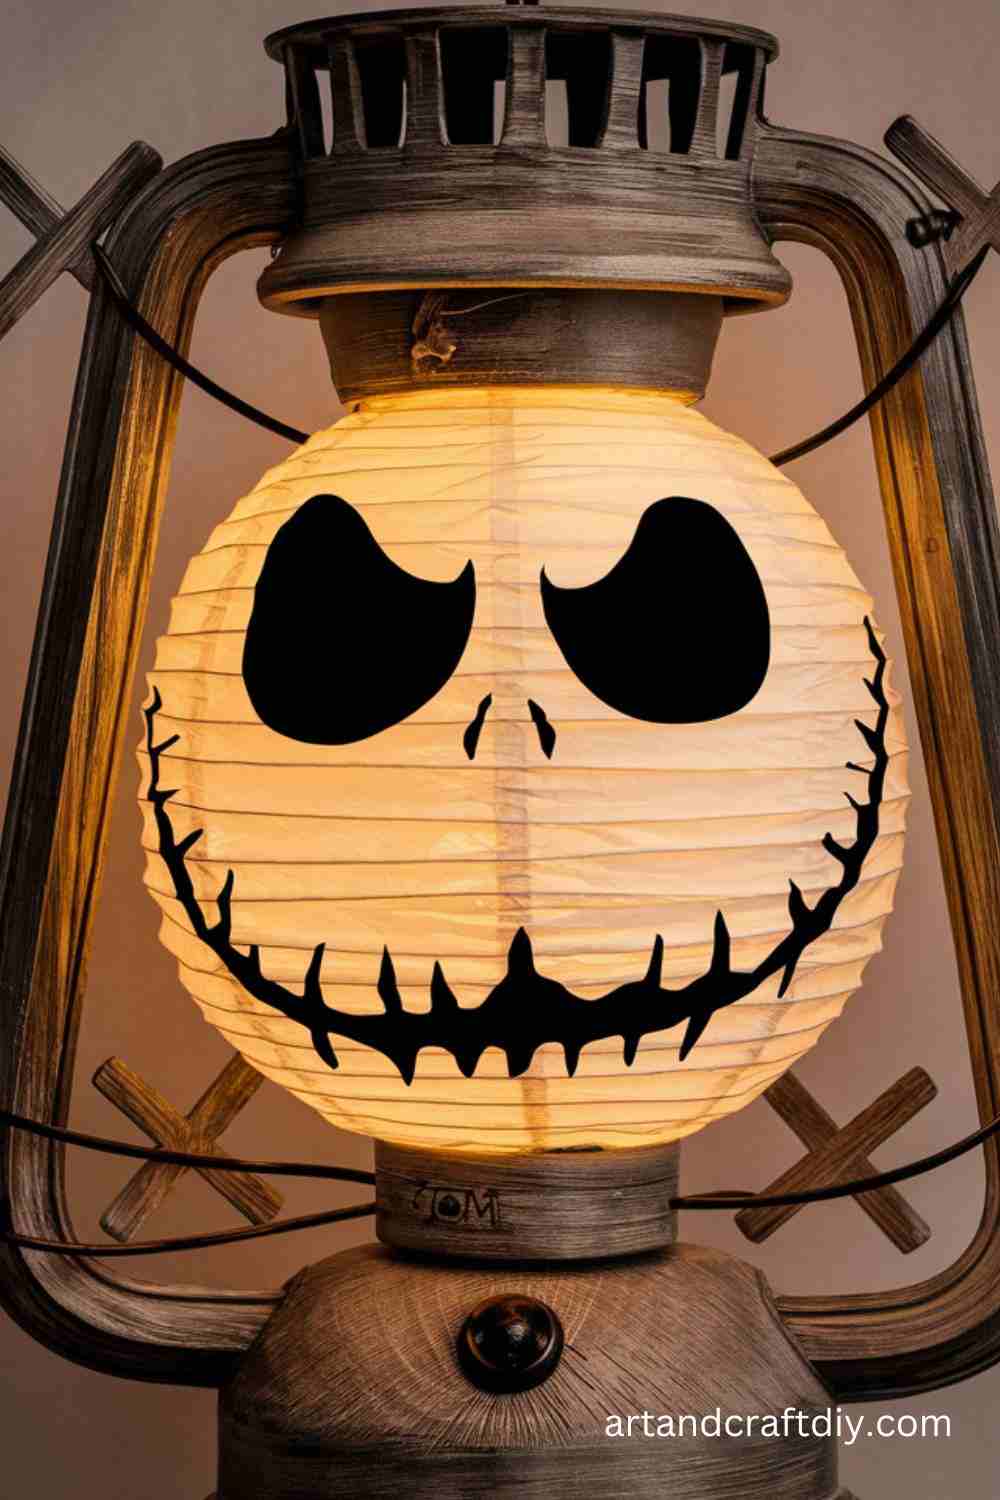
Honestly, making a Jack Skellington paper lantern was way more fun than I expected. I remember the first time I tried to draw his face—it looked totally wonky, and I laughed so hard. To be fair, that’s part of the charm, right? I ended up cutting a square of white cardstock, and yes, I went a little overboard with the scissors, but that gave it this homemade vibe I actually loved. I drew his iconic grin and stitched eyes with a black marker, and even though it wasn’t perfect, it totally screamed “Nightmare Before Christmas.”
The coolest part? Adding a little LED light inside. It made the whole thing glow like magic, and I swear I could almost hear him whisper “what’s this?” if I got too close. I hung it by my window, and every time I walk past, it gives me this silly, giddy feeling. Honestly, making it is half the fun, watching it come alive is the other half.
Sally’s Patchwork Garland
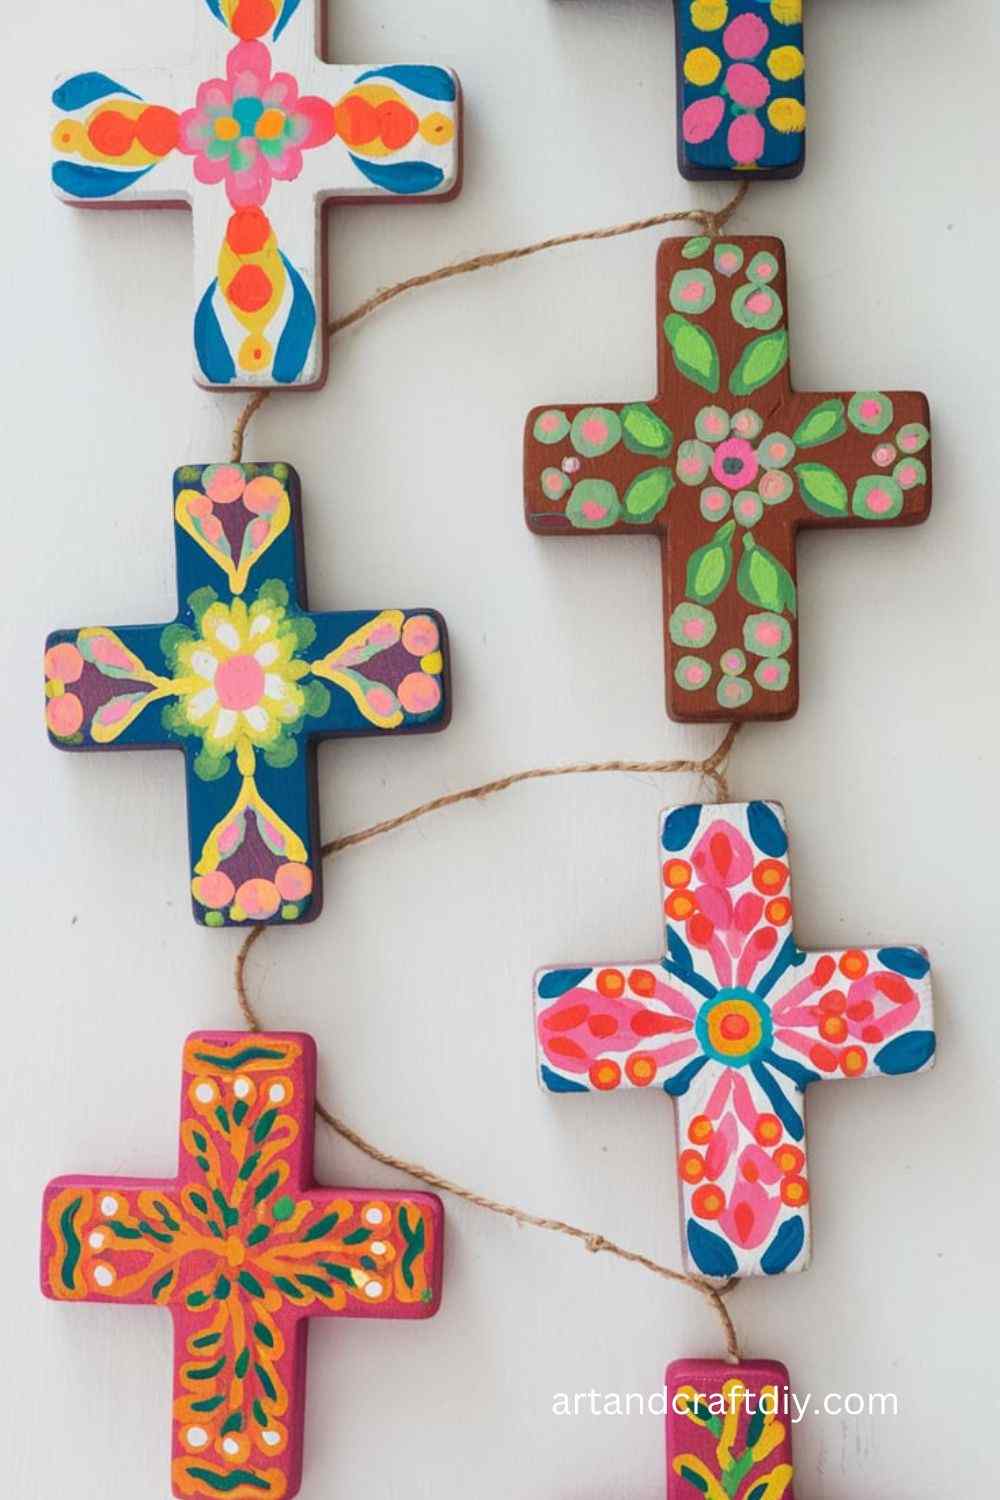
Creating Sally’s patchwork garland honestly brought back all the cozy vibes of Halloween for me. I grabbed scraps of colored paper and some tiny fabric bits I had lying around—nothing fancy, just whatever I could find. I think part of the charm is that you don’t need it to be perfect. I started cutting little rectangles and squares, and honestly, some of them looked a bit messy, but in my opinion, that’s exactly how Sally’s stitched-up look works.
Stringing them together with twine was surprisingly relaxing, almost therapeutic. I even caught myself humming “Making Christmas” while clipping pieces to the string. When I finally hung it across my mantel, I felt this weird sense of pride, like, “Yep, I just made Sally proud.” Guests asked where I bought it, and I couldn’t help but grin, thinking, nope, all me, all homemade. Honestly, this garland is a must for anyone who loves that stitched-together quirky vibe.
Zero’s Ghost Paper Ornament

Zero’s ghost paper ornament was honestly a little tricky at first, but I’ve found that’s part of the fun. I tried a few different shapes before I settled on the classic floating ghost silhouette, and I won’t lie, some of them looked more like weird blobs than a spooky dog. I used white cardstock and a bit of transparent string to make him float, and honestly, watching him dangle made me feel like he was actually hovering over my table.
The little pumpkin nose I glued on made all the difference—I kept giggling every time I looked at it. I hung him with a few other paper ornaments, and the effect was honestly magical. To be fair, it took me a few tries to get the folds right so he would stand upright without tipping over, but honestly, that’s half the fun. Seeing him hover there, all cute and spooky, made me realize paper crafts can actually have personality, which I never thought about before.
Oogie Boogie’s Dice Paper Craft
Make your own set of spooky dice inspired by Oogie Boogie.
Materials Used:
- Green cardstock
- Black marker
- Scissors
- Ruler
- Glue
Steps:
- Cut a square from green cardstock.
- Draw black dots on the sides of the dice, ensuring they resemble Oogie Boogie’s dice pattern.
- Fold the cardstock to form the cube shape and glue the edges together.
- Use them as a fun decoration or even for a Halloween game.
Lock, Shock, and Barrel Masks
Create fun paper masks of the mischievous trio from The Nightmare Before Christmas.
Materials Used:
- Colored cardstock (purple, red, green)
- Glue
- Scissors
- Elastic cord
Steps:
- Draw and cut out the shapes of the masks for Lock, Shock, and Barrel on the cardstock.
- Color each mask with the appropriate colors for the characters.
- Cut holes for the eyes and glue an elastic cord on the sides to hold the mask on your head.
Jack Skellington Pop-up Card
Create a surprise pop-up card featuring Jack Skellington.
Materials Used:
- Black and white cardstock
- Scissors
- Glue
- Marker
Steps:
- Cut a black piece of cardstock for the card base and fold it in half.
- Create a pop-up Jack Skellington by cutting out his face and folding it accordion-style.
- Glue the pop-up mechanism inside the card.
- Draw additional decorations like bats or pumpkins and write a spooky Halloween message.
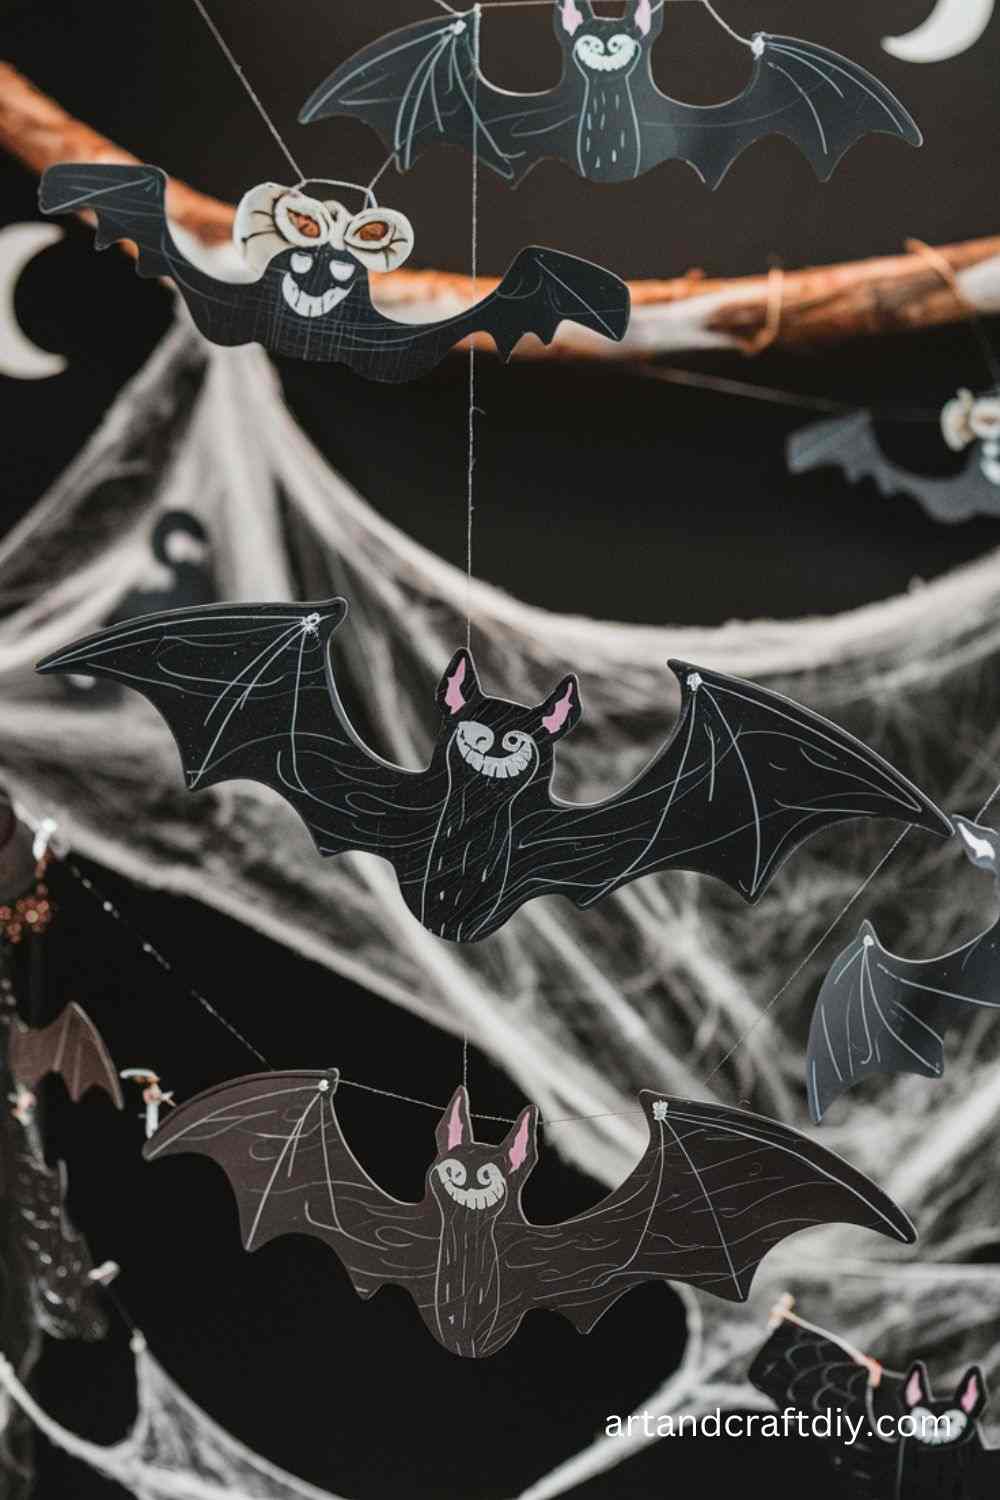
Hanging Bat Garland
A simple and spooky bat garland to complement your Halloween decor.
Materials Used:
- Black cardstock
- Scissors
- String or yarn
- Glue
Steps:
- Cut out several bat shapes from black cardstock.
- Attach the bats to a string using glue, spaced evenly.
- Hang the garland around your home to add a gothic touch.
Spooky Spider Web Paper Craft
A spooky spider web is a must for any Halloween celebration.
Materials Used:
- White or black cardstock
- Scissors
- Glue
- Small plastic spider (optional)
Steps:
- Cut the cardstock into a square and draw a spiderweb design using a pencil.
- Carefully cut along the lines to create the web shape.
- Glue the spider to the center, or simply hang the web for decoration.
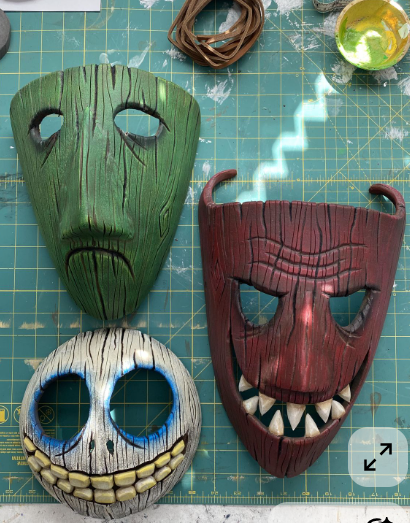
Pumpkin King Mask
Make your own Pumpkin King mask, just like the one Jack Skellington wears in The Nightmare Before Christmas.
Materials Used:
- Orange and black cardstock
- Glue
- Scissors
- Elastic cord
Steps:
- Cut a pumpkin shape out of the orange cardstock, leaving space for eyes and a mouth.
- Cut out the eyes and mouth and glue black cardstock behind the holes.
- Attach an elastic cord to the sides to wear the mask.
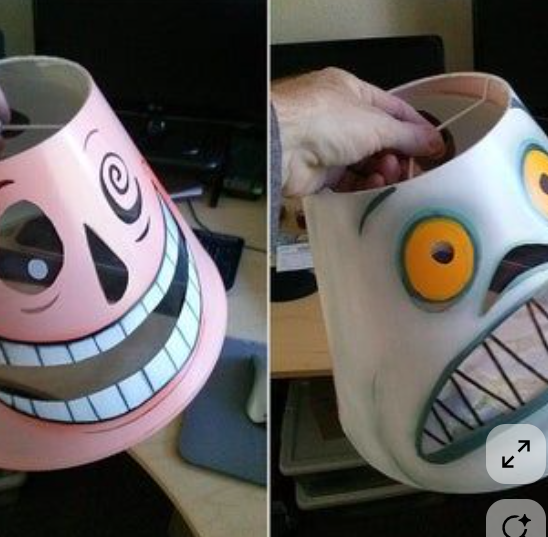
The Mayor’s Double-Faced Mask
Craft a mask with two faces, representing the Mayor’s ever-changing moods.
Materials Used:
- White and black cardstock
- Scissors
- Glue
- Elastic cord
Steps:
- Cut out two large circles from the white cardstock for the base of the mask.
- On one circle, draw a smiling face, and on the other, draw a frowning face.
- Attach the two faces to each other and glue the elastic cord to hold the mask.
Jack Skellington Snowflake
Make a delicate paper snowflake design inspired by Jack Skellington’s face.
Materials Used:
- White cardstock
- Scissors
- Glue
Steps:
- Fold a piece of white cardstock into a triangle and cut out a snowflake design, focusing on Jack Skellington’s face.
- Unfold the paper to reveal the intricate snowflake pattern.
- Hang it as a decoration for a festive touch.
Sally’s Potion Bottles
Create paper potion bottles inspired by Sally’s creepy concoctions.
Materials Used:
- Colored cardstock (purple, green, red)
- Scissors
- Glue
- Black marker
Steps:
- Cut out the shape of a potion bottle from the cardstock.
- Add labels to each bottle, decorating with creepy designs or the names of potions.
- Glue the bottles together to form a set of spooky potion containers.
Bat Wings for Jack Skellington
Create paper wings for Jack to complete your Halloween decor.
Materials Used:
- Black cardstock
- Scissors
- Glue
Steps:
- Cut out large bat wings from black cardstock.
- Attach them to a central point to create a full winged silhouette.
- Hang the wings as part of your spooky display.
Nightmare Before Christmas Wall Art
Create your own Nightmare Before Christmas-inspired art for your walls.
Materials Used:
- Large piece of black poster board
- White chalk or pencil
- Scissors
Steps:
- Draw or stencil an iconic image from The Nightmare Before Christmas, such as Jack Skellington’s face or the Spiral Hill.
- Use white chalk to add details and shading for a more eerie effect.
- Display it prominently as part of your Halloween decor.
Lock, Shock, and Barrel Paper Dolls
Make paper dolls of the mischievous trio: Lock, Shock, and Barrel.
Materials Used:
- Colored cardstock
- Scissors
- Glue
Steps:
- Cut out individual parts for each character (head, body, arms, legs).
- Assemble the parts of each character, gluing them together.
- Use them as decorations or set them up for a fun Halloween display.
Spiral Hill Paper Craft
Create a 3D version of the iconic Spiral Hill from The Nightmare Before Christmas.
Materials Used:
- Black and green cardstock
- Scissors
- Glue
Steps:
- Cut out a spiral shape from the black cardstock to represent the hill.
- Attach the spiral to a green base to simulate the grassy hill.
- Use additional decorations like a paper moon or Jack’s house.
Oogie Boogie Paper Bag
Make a paper bag resembling Oogie Boogie’s shape for storing Halloween candy.
Materials Used:
- Brown paper bag
- Black marker
- Scissors
- Glue
Steps:
- Take a brown paper bag and cut it into the shape of Oogie Boogie.
- Draw his face and details on the bag with a black marker.
- Use it as a candy holder or decorative item.
Jack’s Skull Cupcake Toppers
Add spooky flair to your Halloween cupcakes with Jack Skellington toppers.
Materials Used:
- White and black cardstock
- Scissors
- Glue
Steps:
- Cut out small circles from the white cardstock.
- Draw Jack Skellington’s face on each circle.
- Attach the circles to toothpicks and place them on your cupcakes.
Oogie Boogie’s Dice Garland
Create a garland of dice inspired by Oogie Boogie’s game.
Materials Used:
- Green cardstock
- Black marker
- Scissors
- String
Steps:
- Cut small square pieces of green cardstock to resemble dice.
- Draw numbers or symbols on each dice using a black marker.
- String them together to create a fun and spooky garland.
Sally’s Fabric Rose
Create a paper version of Sally’s fabric rose.
Materials Used:
- Red and green cardstock
- Scissors
- Glue
Steps:
- Cut out petal shapes from red cardstock.
- Layer the petals to form a flower.
- Add a green stem and leaf to complete the flower.
Pumpkin King Shadow Box
Create a shadow box featuring the Pumpkin King’s eerie silhouette.
Materials Used:
- Black cardstock
- Shadow box frame
- Scissors
- Glue
Steps:
- Cut out the shape of Jack Skellington’s silhouette from the black cardstock.
- Place it inside a shadow box frame, layering the silhouette.
- Add additional spooky details like bats or pumpkins around the frame.
Spooky Pumpkin Paper Luminarias
Make spooky paper luminarias featuring Halloween pumpkins.
Materials Used:
- Orange and black cardstock
- Scissors
- Glue
- LED candle
Steps:
- Cut pumpkin shapes from the orange cardstock.
- Attach black cut-out faces to each pumpkin.
- Fold the paper to create a lantern shape and place an LED candle inside.
Jack Skellington Confetti
Make Jack Skellington-shaped confetti for your Halloween party.
Materials Used:
- White cardstock
- Black marker
- Hole punch
Steps:
- Draw Jack Skellington faces on the white cardstock.
- Use a hole punch to cut out the faces as confetti.
- Sprinkle the confetti on your Halloween table or party area.
Oogie Boogie’s Paper Lantern
Create a paper lantern inspired by Oogie Boogie’s spooky design.
Materials Used:
- Green cardstock
- Black marker
- LED candle
- Scissors
Steps:
- Cut a large rectangle from the green cardstock.
- Fold it into a lantern shape and decorate with Oogie Boogie’s face using a black marker.
- Place an LED candle inside for an eerie effect.
Spiral Hill Paper Cut-out
Create a paper cut-out of the iconic Spiral Hill from the movie.
Materials Used:
- Black and white cardstock
- Scissors
- Glue
Steps:
- Cut out a spiraling hill from the black cardstock.
- Attach it to a white background to make it stand out.
- Use it as wall art or part of your Halloween decorations.
Lock, Shock, and Barrel Paper Frames
Create frames with cut-outs of the mischievous trio.
Materials Used:
- Colored cardstock
- Scissors
- Glue
- Frames
Steps:
- Cut the images of Lock, Shock, and Barrel from the colored cardstock.
- Glue them onto frames for a fun, spooky addition to your decor.
Nightmare Before Christmas Ticket Stub
Design your own Nightmare Before Christmas-themed ticket stubs.
Materials Used:
- Yellow cardstock
- Black marker
- Scissors
Steps:
- Cut the cardstock into a ticket shape.
- Write spooky phrases or movie quotes on the stubs.
- Use them as party invitations or Halloween keepsakes.
Sally’s Stitched Heart
Create Sally’s stitched heart for a heartfelt Halloween decoration.
Materials Used:
- Red and white cardstock
- Scissors
- Glue
Steps:
- Cut out a heart shape from the red cardstock.
- Add stitch marks using white cardstock to create Sally’s iconic stitched look.
- Hang it as part of your Halloween decor.
Pumpkin King Card Holder
Create a spooky Pumpkin King card holder.
Materials Used:
- Orange cardstock
- Scissors
- Glue
Steps:
- Cut out a pumpkin shape from orange cardstock.
- Fold it to create a 3D card holder.
- Add spooky decorations like Jack Skellington’s face.
Oogie Boogie Spider Web
Design a paper spider web with Oogie Boogie-inspired designs.
Materials Used:
- Green cardstock
- Scissors
- Glue
Steps:
- Cut out a spider web shape from the green cardstock.
- Decorate it with Oogie Boogie symbols or spider illustrations.
- Hang it in a spooky corner to add Halloween ambiance.
Advanced Tips for Creative Paper Projects
If you’re looking to elevate your paper crafting skills, here are some advanced tips that can add depth, uniqueness, and a personal touch to your projects. These techniques will help transform simple designs into sophisticated creations:
- Layering for a 3D Effect
Adding multiple layers to your design is a fantastic way to create a three-dimensional effect. By using varying heights and depths, you can make certain elements of your design pop. Try cutting out shapes and stacking them with foam tape or other materials to give the illusion of depth. - Personalization
Give your project a personal touch by incorporating names, dates, or unique messages. Whether it’s a birthday card, a wedding invitation, or a keepsake, custom text can make your creation truly special. You can handwrite, stamp, or even use die cuts to achieve the desired effect. - Color Variations
Experiment with different colors and paper textures to make your design stand out. Use contrasting colors to make certain elements pop, or try out a monochromatic scheme for a more subtle, elegant look. Adding patterned or textured paper can also provide extra visual interest to your project. - Glow-In-The-Dark Elements
Add a fun and unexpected twist by incorporating glow-in-the-dark elements. Special paints or adhesives that glow in the dark can be used on certain areas of your project, such as stars or other decorative features. This effect is especially striking for night-time or outdoor events, making your creation stand out even after the lights go out.
These advanced techniques are a great way to take your paper crafting projects to the next level, whether you’re creating cards, invitations, scrapbooks, or other paper-based items.
FAQ
Can I use regular printer paper for this project?
Yes, regular printer paper works fine for this project, but for a more durable craft, you can use thicker cardstock. This will also help if you’re creating 3D pieces or detailed cutouts.
How can I make the characters from “The Nightmare Before Christmas” look more detailed?
To add more detail to the characters, you can use markers, colored pencils, or watercolors to draw extra features or shadows. You can also cut out small pieces of paper to create layered effects, like Jack Skellington’s face or the bat wings on a craft pumpkin.
Do I need a template for the craft?
Templates are optional but can be helpful, especially if you’re looking to recreate specific elements like Jack Skellington’s face, Sally’s patchwork dress, or the iconic pumpkin from the movie. You can find downloadable templates online or create your own based on your vision.
How can I make my paper craft 3D?
To make your craft more three-dimensional, consider using folded paper for elements like Jack’s hands or the spiral hill. You can also layer different cutouts using foam tape or glue to give a raised effect.

Hi, I’m Victoria, an art and craft teacher at Newark City Schools, where I have the joy of working with middle school students to help them explore their creativity and develop their artistic talents. I believe that art is a powerful way for students to express themselves, and I strive to make every lesson a fun, engaging, and inspiring experience.
I created this website to share the art and craft projects, techniques, and resources that I use in my classroom, hoping to inspire both educators and young artists alike. Whether you’re a teacher looking for new ideas or a student eager to try something new, I’m excited to provide creative tools and projects that anyone can enjoy.
When I’m not in the classroom, I love experimenting with different art forms and learning new crafting techniques. My goal is to help others discover the joy of making things with their hands, and I hope my website serves as a space for everyone to explore their creative potential.