
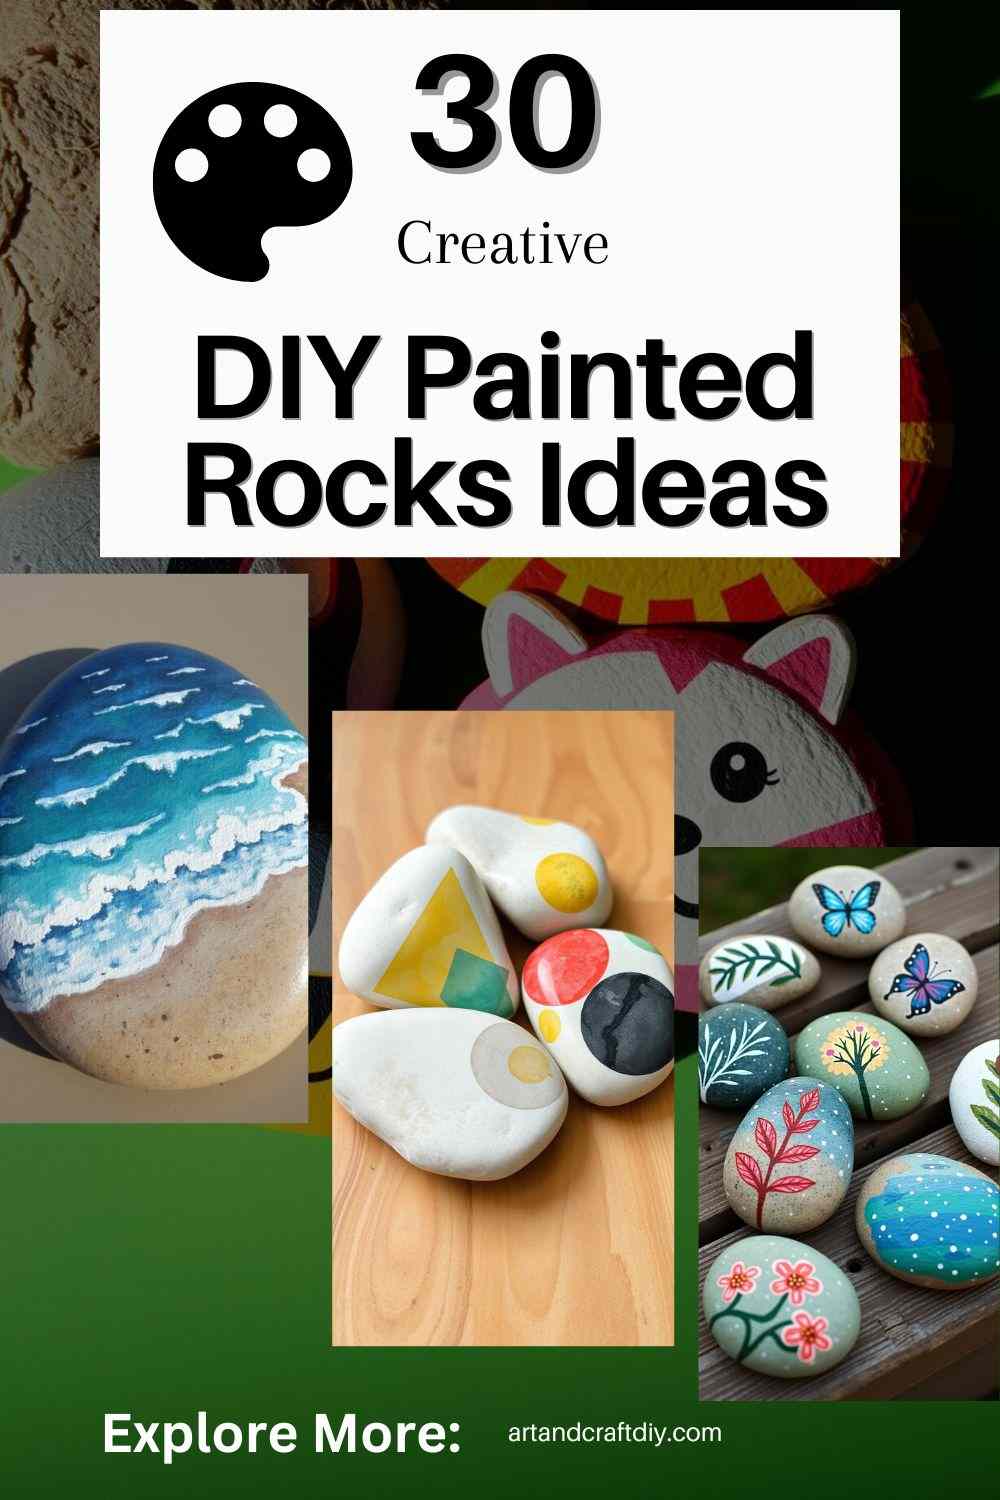
DIY Painted Rocks Ideas are a fun and easy way to get creative. Whether you’re new to painting or have some experience, painting rocks lets you show off your personality and imagination with bright colors and cool designs. It’s not just about making pretty art; painting rocks can also help you relax and feel less stressed. It’s a calming activity that lets you focus and enjoy the process of making something with your own hands.
DIY Painted Rocks Ideas
DIY painted rocks are a fun and creative way to express yourself through art. Whether simple or intricate, painting rocks allows you to relax and create unique designs.
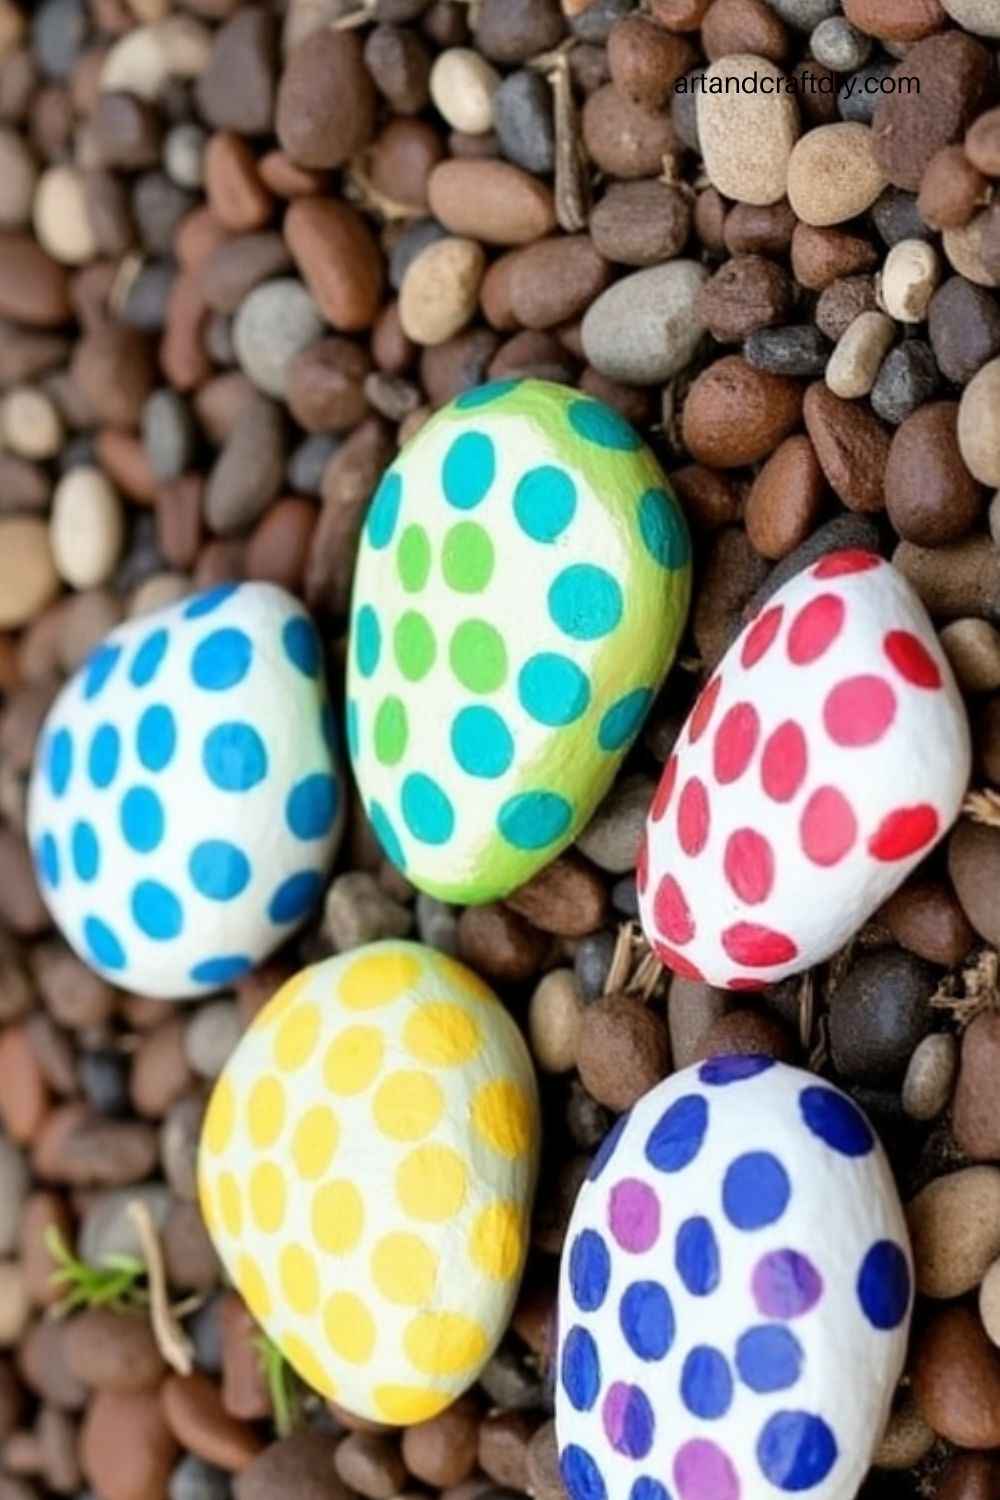
Colorful Polka Dots
Polka dots are simple to paint and give your rocks a fun and vibrant look. You can create a pattern of dots in different sizes and colors for a cheerful, eye-catching design. This is a great idea for beginners or those looking for a quick and easy project.
Tips:
-
Use a round sponge or the back of a paintbrush to create uniform dots.
-
Choose a light-colored base coat for your dots to stand out.
-
Experiment with different dot sizes to add variety.
-
Try using neon or metallic paints for a fun twist.
-
Let the dots dry completely before adding a second layer for a cleaner look.
Inspirational Quotes
Painting positive and uplifting quotes on rocks can be a great way to spread some kindness. You can write your favorite quotes or messages of encouragement and decorate the background with colors or small patterns.
Tips:
-
Use a fine-tipped paint pen or brush to write neat, legible text.
-
Try a variety of fonts and lettering styles for a personalized touch.
-
Make sure the background color complements the text.
-
Choose quotes that inspire positivity, love, or motivation.
-
Seal your painted rock to ensure the quote stays intact.
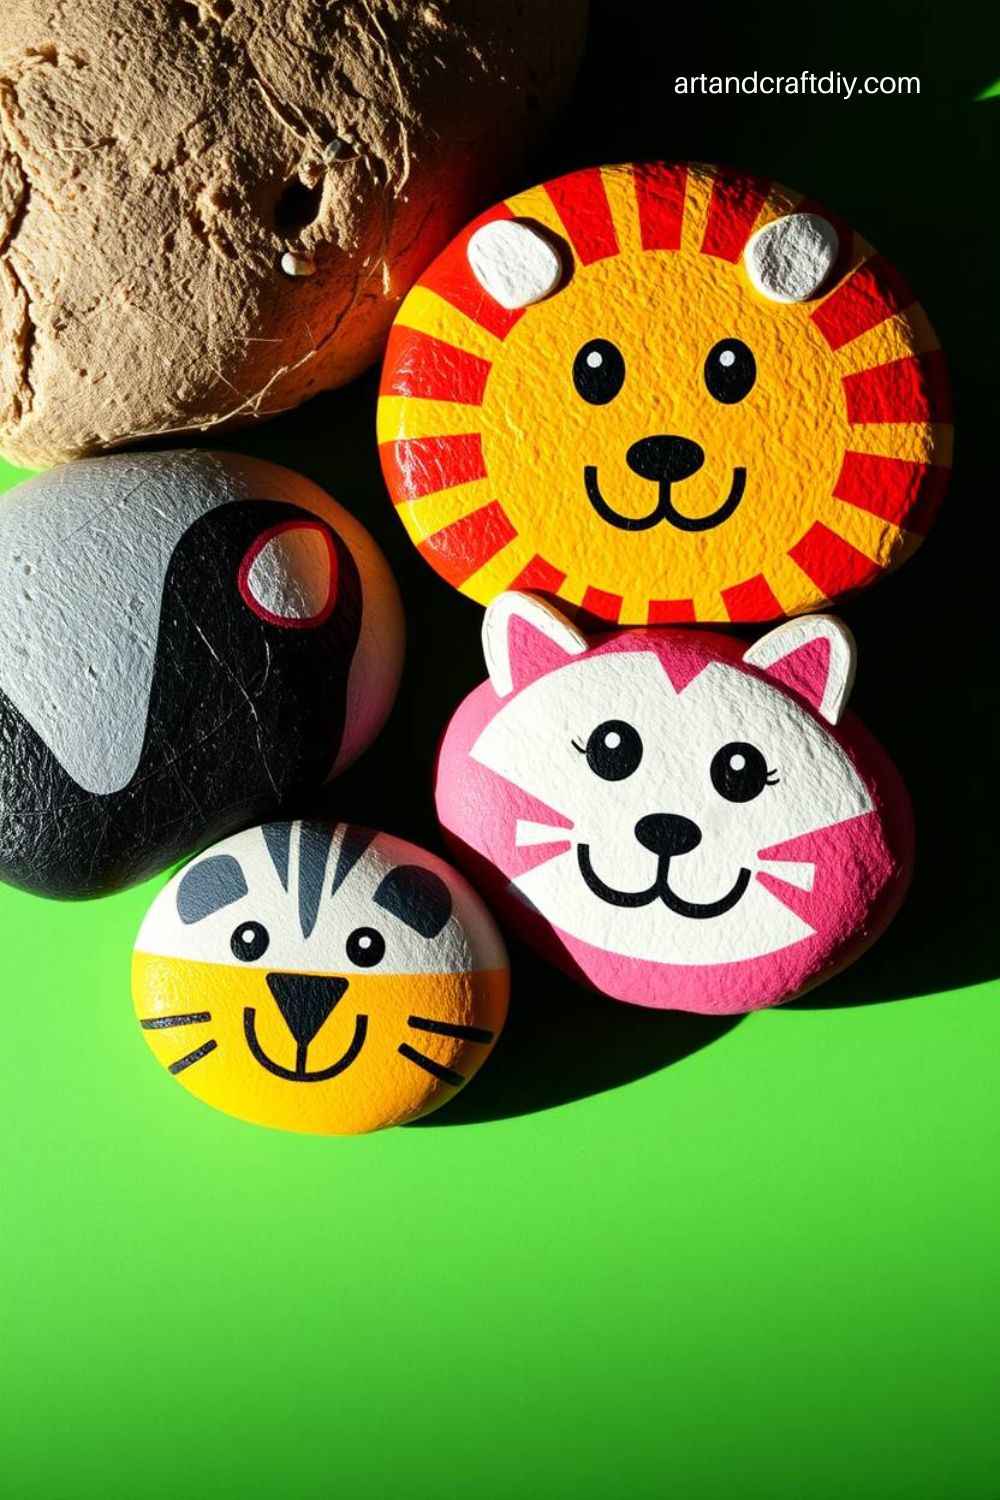
Animal Faces
Painting cute animal faces is an easy and enjoyable way to personalize your rocks. You can paint faces of cats, dogs, owls, or any animal you like. This project is perfect for kids or anyone looking to create whimsical rock art.
Tips:
-
Start with a light base color and add details like eyes, nose, and mouth.
-
Use fine brushes to add small details like fur, whiskers, or feathers.
-
Consider painting the whole rock as the animal’s face for a full effect.
-
Experiment with different color combinations to make the animals stand out.
-
Add a touch of glitter to make the animal faces extra special.
Nature-Inspired Designs
Nature provides endless inspiration for rock painting. You can create landscapes, flowers, trees, or even the night sky. Whether you’re painting a peaceful sunset or a vibrant flower garden, nature-themed rocks will bring beauty to your home or garden.

Tips:
-
Start by painting a simple background, like a sky or grass, before adding more detailed elements.
-
Use soft brushes for blending colors in nature scenes.
-
Add texture to rocks to make the painting look more realistic.
-
Use tiny brushes for delicate details like leaves or flower petals.
-
Use multiple shades of the same color to create depth in nature scenes.
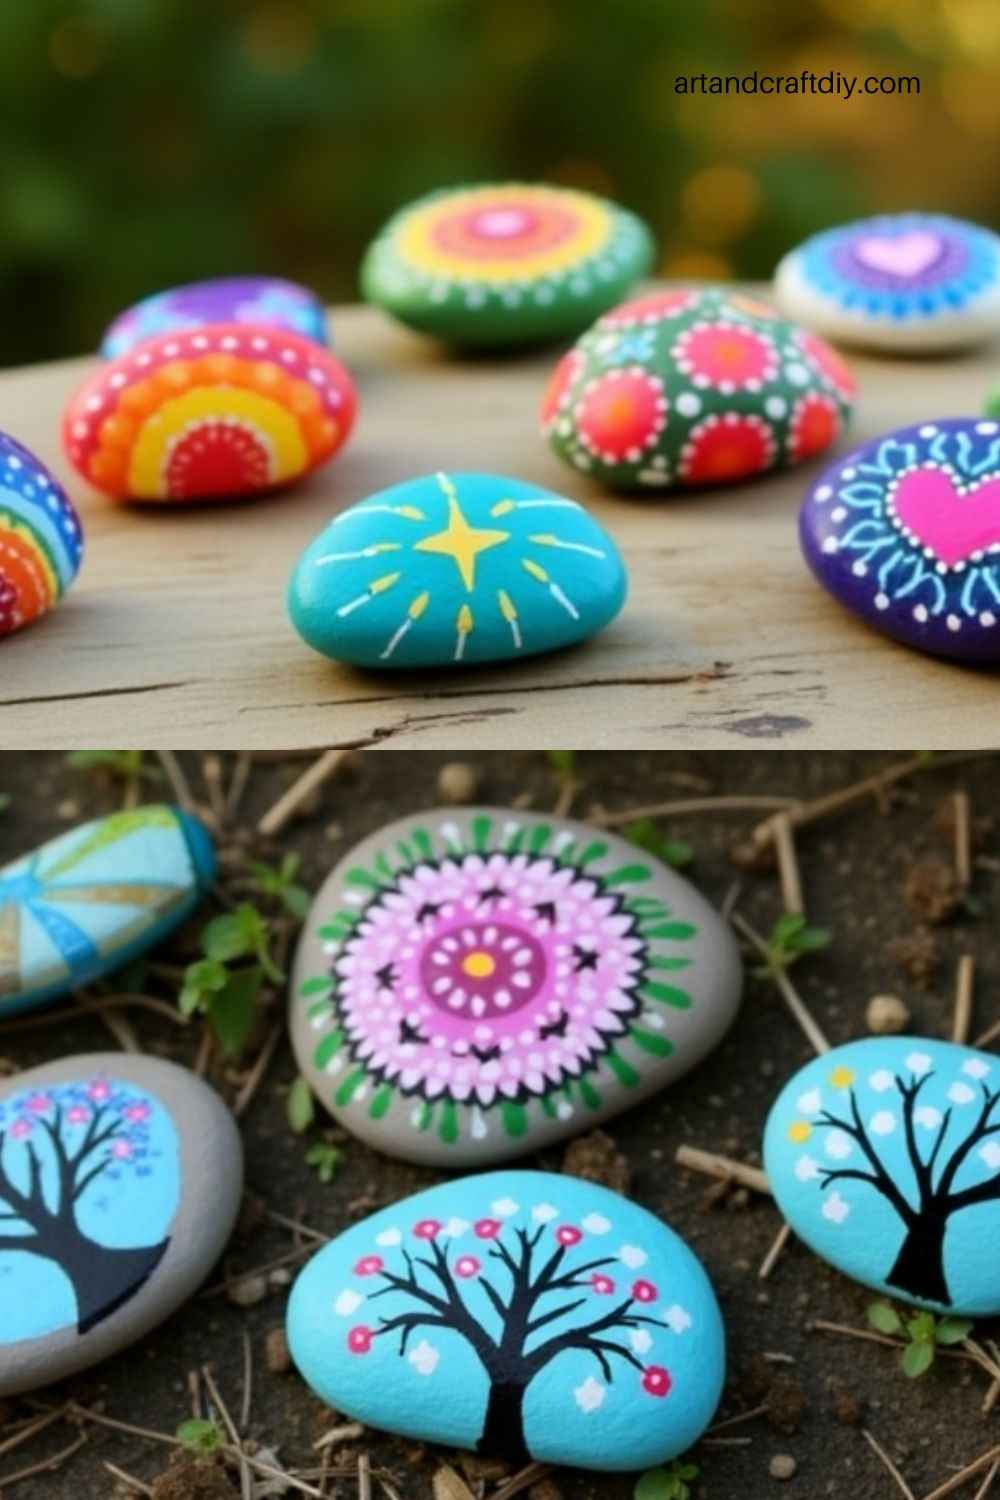
Mandala Patterns
Mandala patterns are a beautiful and meditative way to decorate your rocks. These intricate, circular designs offer a calming and creative challenge, perfect for those who want to focus on detail and precision.
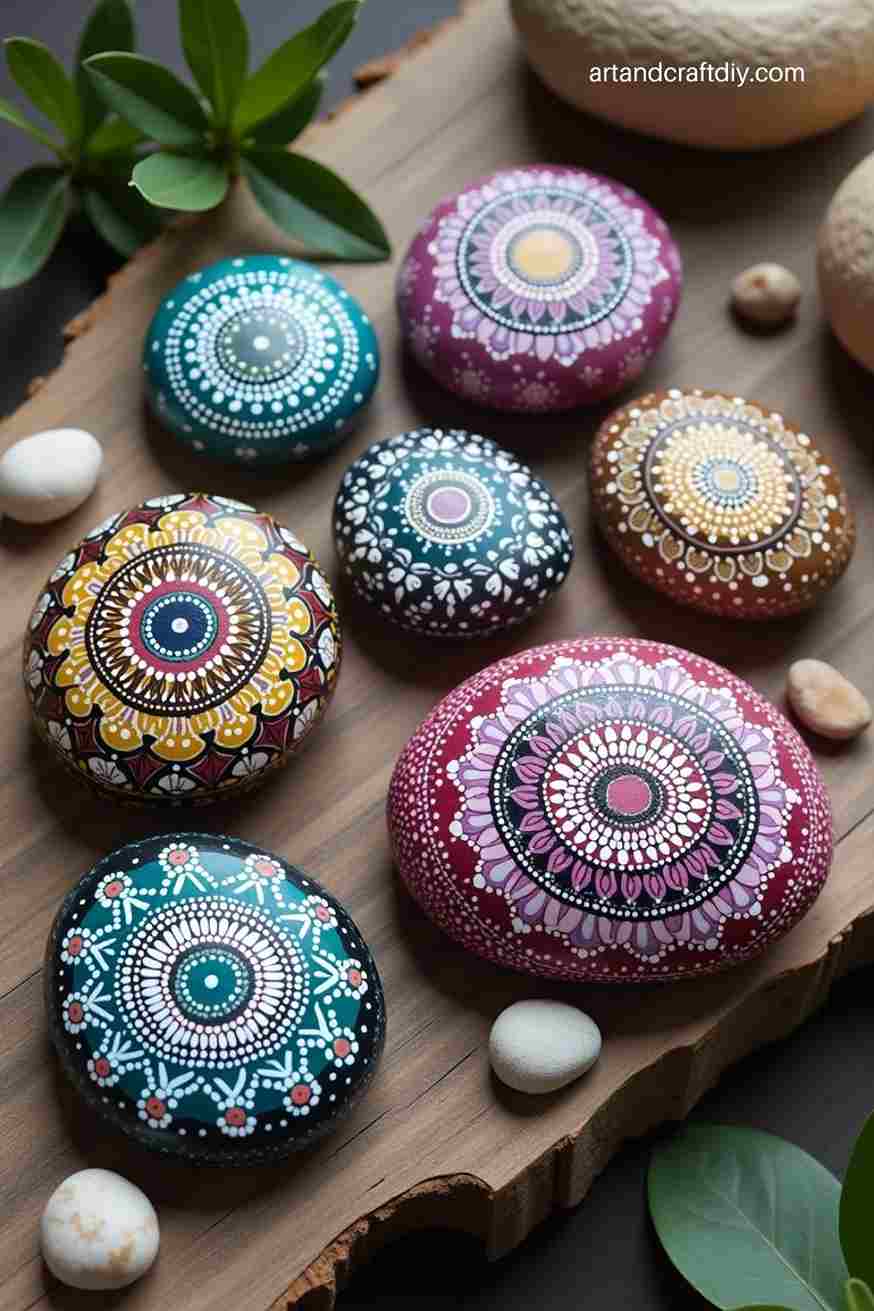
Tips:
-
Start by drawing a light circle guide to help with symmetry.
-
Use dots or lines to build your mandala pattern from the center out.
-
Choose contrasting colors for the inner and outer circles to make the design pop.
-
Be patient and take your time to add intricate details.
-
Consider using metallic paints for a striking finish.
Rainbow Rocks
Brighten up your space with rainbow-colored rocks. These colorful creations are a fun way to add a pop of color to any room or garden. You can paint each rock in the colors of the rainbow, creating a cheerful collection.
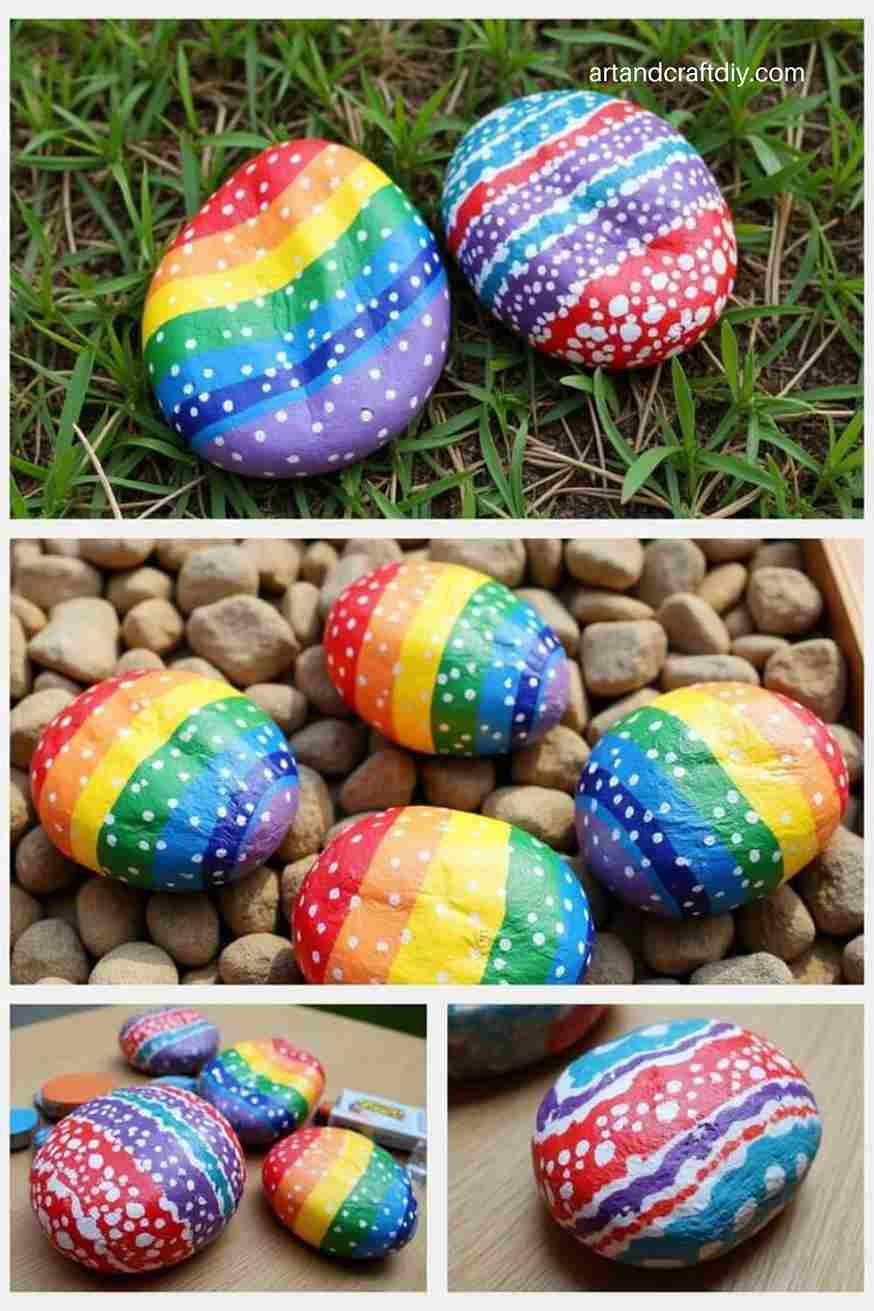
Tips:
-
Use a smooth rock to make painting easier and more uniform.
-
Paint each color of the rainbow in neat stripes or a gradient pattern.
-
Try blending the colors together to create a soft transition between each hue.
-
Make sure each layer is dry before painting the next color.
-
Seal your rocks to keep the bright colors vibrant.
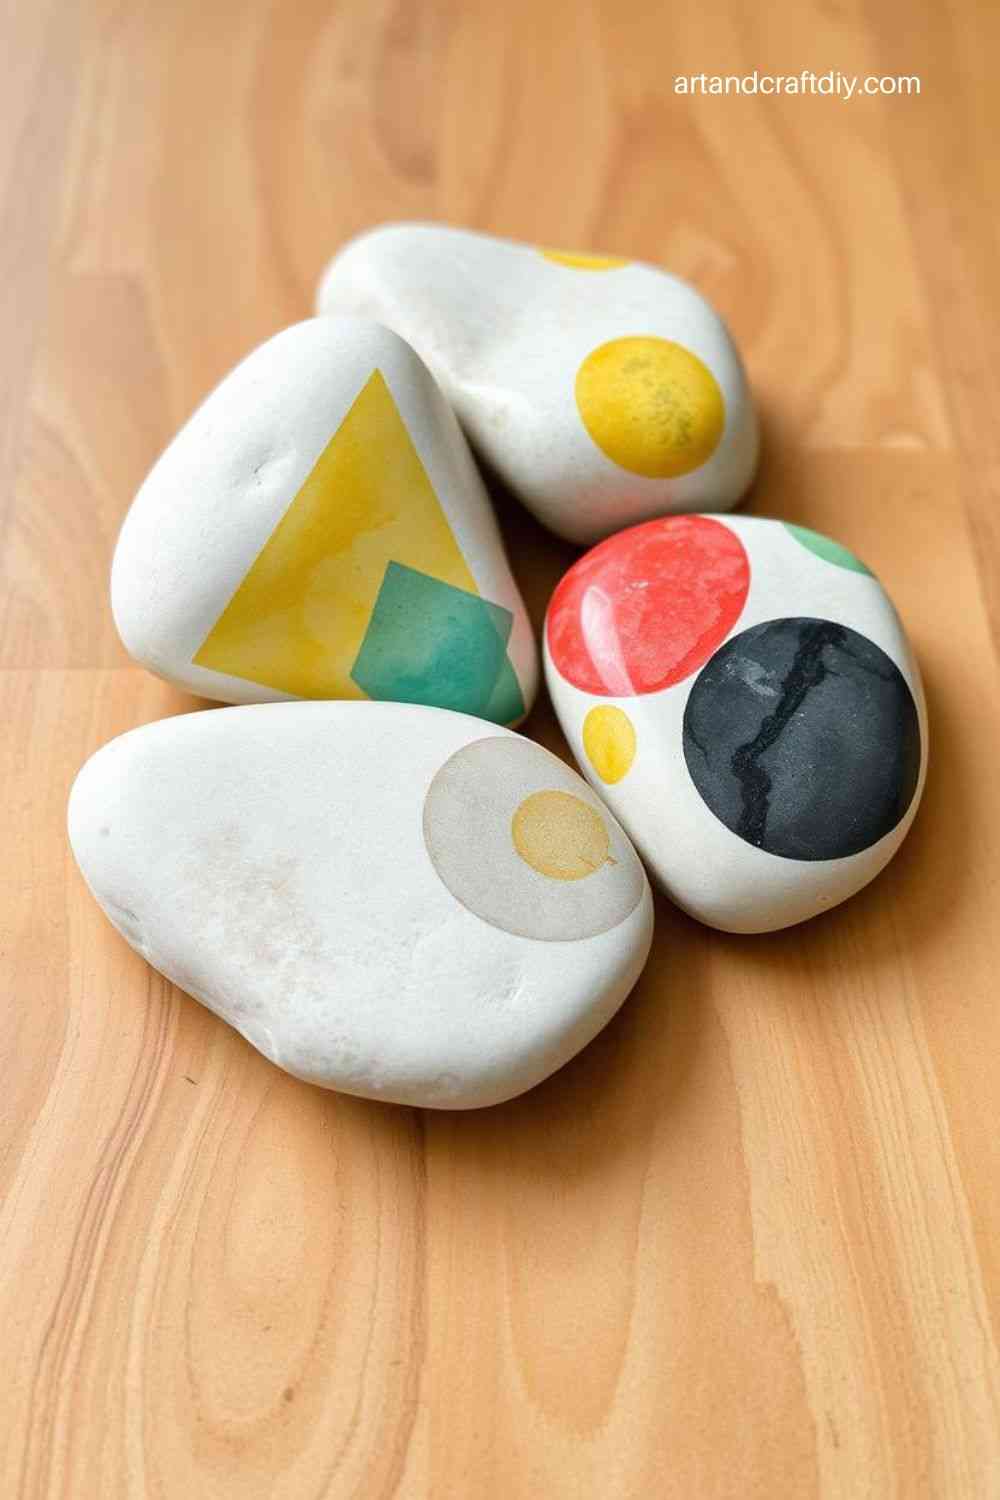
Geometric Shapes
Geometric shapes are perfect for creating a modern, minimalist design on rocks. Triangles, squares, and hexagons can be painted in various colors and patterns to create a bold and stylish look.
Tips:
-
Use painter’s tape to create clean, straight lines for geometric shapes.
-
Experiment with bold color combinations for a contemporary vibe.
-
Try layering different shapes for a more complex design.
-
Use metallic paints to add a modern, sleek touch.
-
Add small details like dots or lines to enhance the geometric pattern.
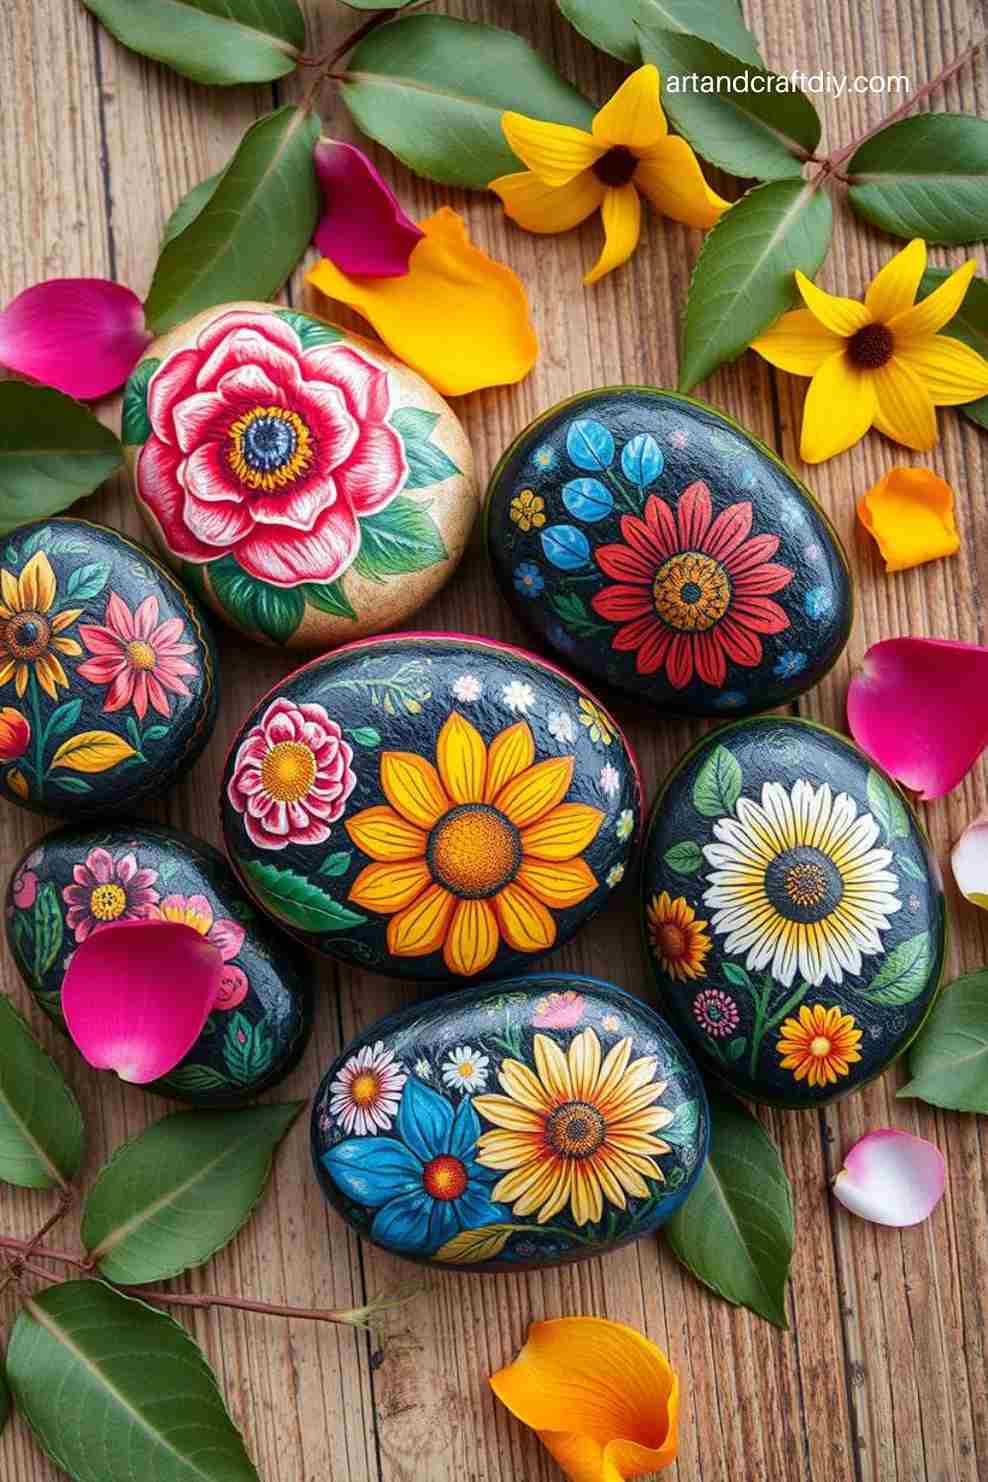
Floral Designs
Floral designs are timeless and perfect for rock painting. You can paint beautiful flowers, vines, or leaves on your rocks, adding a touch of nature wherever you place them. This is a great option for those who enjoy delicate and detailed designs.
Tips:
-
Use a small brush for fine details like flower petals and stems.
-
Paint a soft, neutral background to make the flowers pop.
-
Choose a variety of flower types for a colorful bouquet effect.
-
Add leaves and vines for a more organic look.
-
Use shading to give depth to your flowers and make them look more realistic.
Ocean Waves
Create a calming ocean scene with painted waves. This design is perfect for those who love the sea or want to add a beachy vibe to their home décor. You can paint waves crashing against the shore or a peaceful ocean horizon.
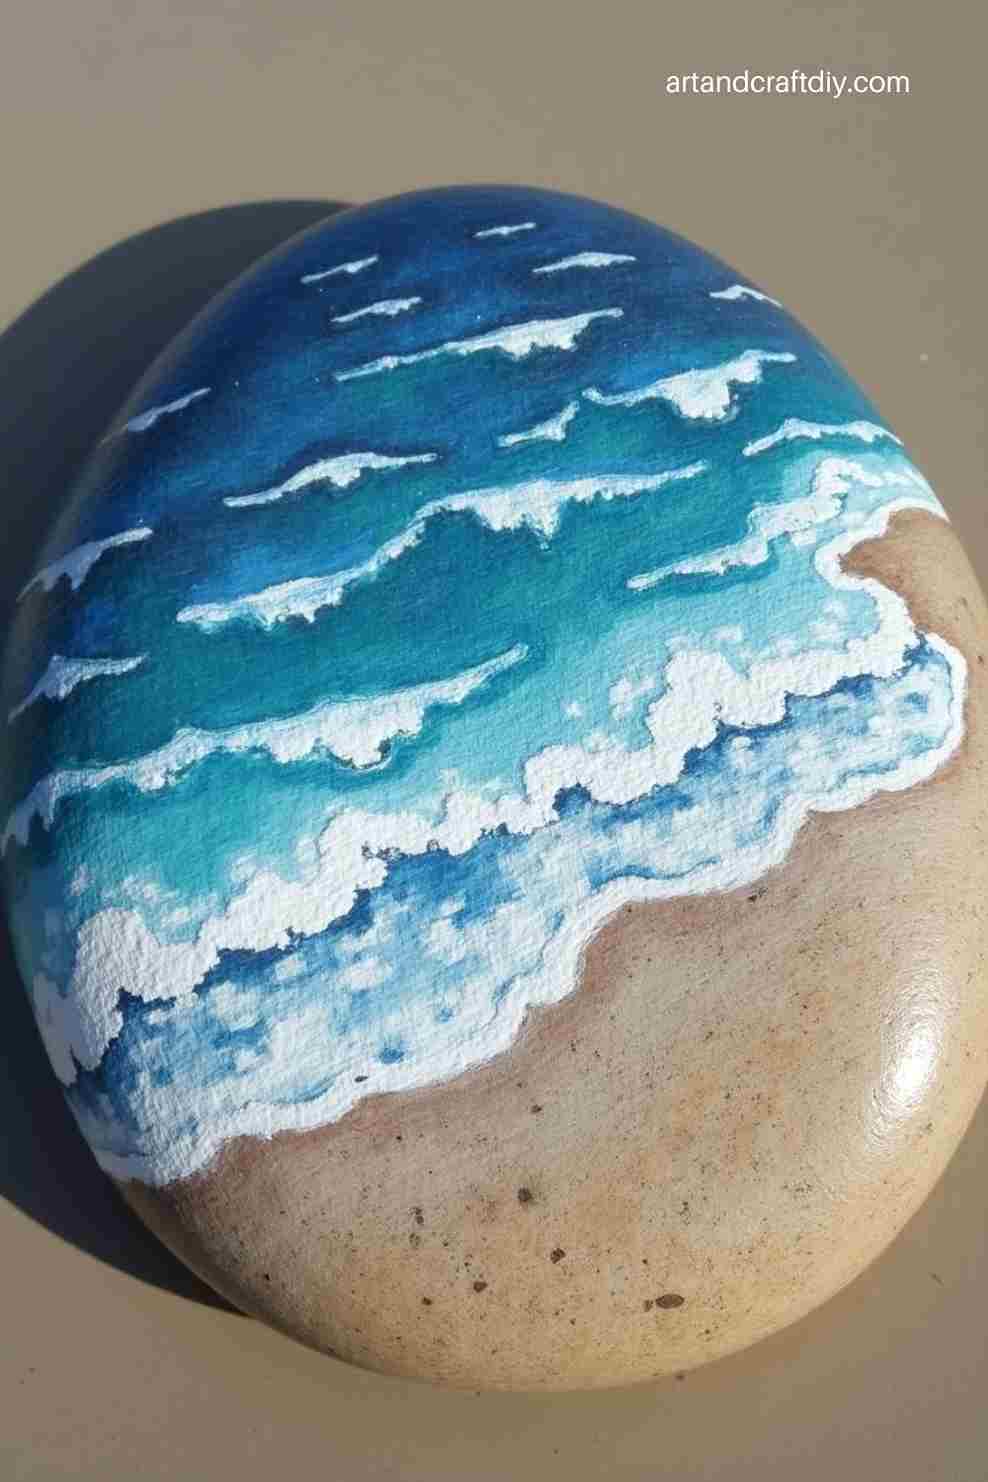
Tips:
-
Start with a light blue base for the water and add darker blue shades for the waves.
-
Use a soft brush to create smooth, flowing wave patterns.
-
Add small details like foam or seafoam for a more realistic effect.
-
Paint a sunset or sun in the background for a complete beach scene.
-
Experiment with different shades of blue and green to mimic the ocean’s colors.
Mini Garden Markers
Painting small rocks with the names of plants or herbs is a clever way to label your garden. These painted rocks make cute and functional markers that help you organize your plants while adding some charm to your garden.
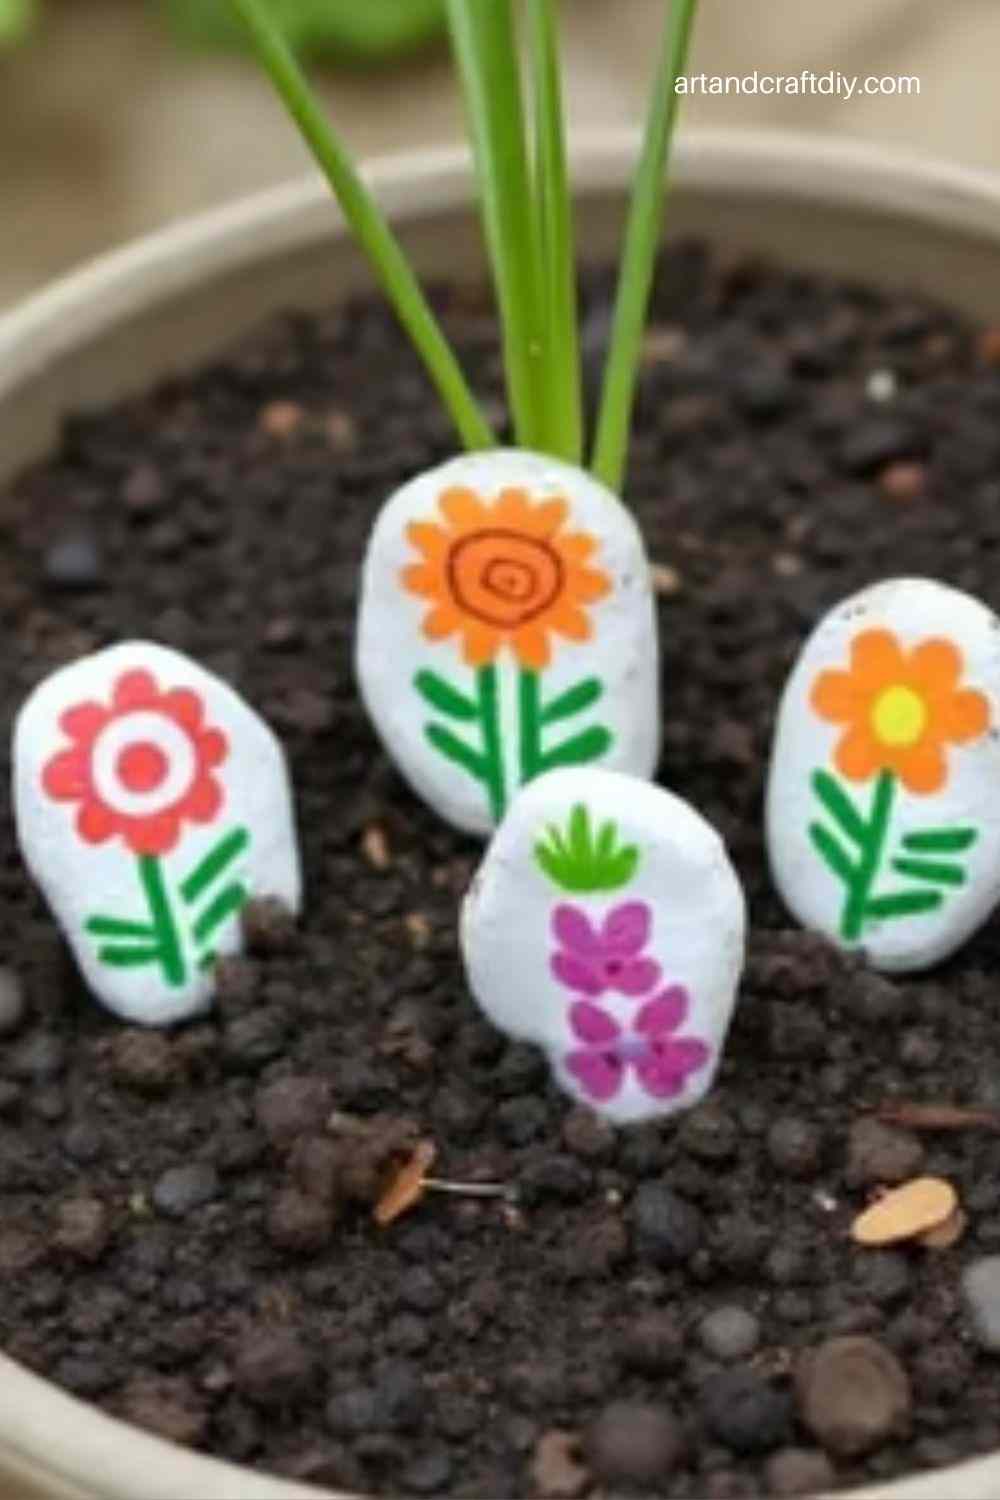
Tips:
-
Use waterproof paint to ensure your labels stay intact outdoors.
-
Paint the rocks in bright colors for easy identification.
-
Write plant names clearly using a fine-tipped paint pen.
-
Add small designs like leaves or flowers to decorate the markers.
-
Seal the rocks with a waterproof sealer to protect them from weathering.
Positive Affirmations
Paint rocks with short, positive messages like “You are loved,” “Stay strong,” or “Believe in yourself.” These rocks can serve as daily reminders of encouragement and positivity.
Tips:
-
Choose words or phrases that have personal meaning or bring comfort.
-
Use bold, easy-to-read letters for the message.
-
Add small details like hearts, stars, or doodles to make the rock more decorative.
-
Experiment with different color combinations for the text and background.
-
Give these rocks as gifts or hide them for others to find as a surprise.
Abstract Art
If you enjoy free-form designs, abstract rock painting is a perfect option. You can paint colorful, swirling patterns or random shapes, letting your creativity run wild. Abstract art is all about expressing emotions and ideas through shapes and colors.
Tips:
-
Focus on color and form rather than making recognizable shapes.
-
Use a variety of paintbrushes to create different textures and effects.
-
Layer colors to add depth and richness to the design.
-
Don’t be afraid to try unusual color combinations or patterns.
-
Let the paint dry before adding new layers or details for a clean look.
Ladybug Rocks
Ladybugs are simple yet adorable creatures that make a great design for painted rocks. You can paint a cute ladybug with its signature red body and black spots or create a whole family of ladybugs on several rocks.
Tips:
-
Start with a bright red base for the ladybug’s body.
-
Use a small black paintbrush or pen to add the spots and other details.
-
Add a black head and small antennae for a complete look.
-
Paint multiple ladybugs on different rocks to create a fun collection.
-
Consider adding flowers or leaves as a background to enhance the design.
Seasonal Rocks
Celebrate the changing seasons with painted rocks that represent different times of the year. You can paint snowflakes for winter, pumpkins for fall, flowers for spring, and suns for summer, bringing the essence of each season to life.
Tips:
-
Focus on seasonal colors (reds, oranges, yellows for fall, pastels for spring).
-
Include seasonal symbols like snowmen, leaves, or beach balls.
-
Create simple designs that capture the feeling of the season.
-
Use a variety of shapes and sizes of rocks for different seasonal pieces.
-
Display your rocks according to the time of year for added charm.
Galaxy Rocks
Painting a galaxy on a rock is a fun and creative way to make a truly unique piece of art. With a dark background and splashes of paint, you can create a beautiful representation of the stars and planets.
Tips:
-
Start with a black or dark blue base for the night sky.
-
Use a sponge or brush to dab on different colors like purple, blue, and pink for a cosmic effect.
-
Add small white dots or flicks of white paint for stars.
-
Consider adding glitter for extra sparkle and shine.
-
Seal your rock to protect the galaxy design from fading.
Animal Footprints
Painting animal footprints on rocks can create a fun and playful design. You can paint the tracks of different animals like dogs, cats, or even dinosaurs, leaving a trail across the rock.
Tips:
-
Use a fine-tipped brush or a small stamp to create the footprint shapes.
-
Experiment with different animals for variety.
-
Paint the footprints in contrasting colors to make them stand out.
-
Create a pattern or trail of footprints leading across the rock.
-
Seal the rocks to preserve the design and prevent fading.
Displaying and Using Painted Rocks
Once your painted rocks are complete, it’s time to show them off! Painted rocks can be used in a variety of ways, from decorating your home to spreading kindness in your community. Whether you create a beautiful rock garden or give your painted stones as thoughtful gifts, the possibilities are endless for showcasing your creations.
Ideas for Displaying Your Painted Rocks
-
Rock Garden
Create a unique rock garden by placing your painted rocks among plants and flowers. Their vibrant colors will stand out beautifully in the natural surroundings. This is a great way to add a personal touch to your outdoor space. -
Home Décor
Painted rocks can be used as decorative accents inside your home. Display them on bookshelves, coffee tables, or in a decorative bowl. They make beautiful, low-maintenance décor that adds a pop of color and charm to any room. -
Nature Walks or Pathways
Use your painted rocks to line a walkway or pathway in your garden. The painted designs will add visual interest and guide guests as they stroll through your outdoor space. You can also paint rocks to mark specific areas, like garden beds or flower patches. -
Plant Pot Decorations
Use small painted rocks to decorate the base of your potted plants. You can arrange them creatively around the pot, adding a fun and whimsical touch to your plants. -
Rock Tray Centerpiece
Place a collection of painted rocks in a decorative tray to create a unique centerpiece. Add candles, small plants, or other decorative items to complete the look. This display works well in living rooms, dining areas, or even on your kitchen counter.
Painted Rocks for Gifting or Community Kindness
-
Gift for Loved Ones
Painted rocks make thoughtful and personalized gifts for friends and family. You can paint a special message, image, or design that holds meaning for the recipient, making it a cherished keepsake. These small gifts can be perfect for birthdays, anniversaries, or any special occasion. -
Rock Hiding for Others to Find
Spread kindness in your community by hiding painted rocks for others to discover. Many communities have rock painting groups that encourage people to hide their creations in public places for others to find. This simple act of kindness can bring a smile to someone’s face and brighten their day. -
Rock Art for Charity
Use painted rocks as part of a charity event or fundraiser. You can sell or auction off your creations, with the proceeds going to a good cause. These unique pieces of art can attract attention and raise awareness for charitable organizations. -
Encouraging Messages for Strangers
Write uplifting messages or affirmations on your painted rocks and leave them in places where people can easily find them, such as park benches, local cafes, or libraries. The encouraging words can have a positive impact on those who stumble upon them. -
Holiday Gifts
Painted rocks are a great alternative to traditional holiday gifts. Personalize the rocks with festive designs like Christmas trees, pumpkins, or Easter eggs. They make wonderful additions to holiday stockings, gift baskets, or as standalone presents.
Whether you choose to display your DIY Painted Rocks Ideas at home, gift them to loved ones, or hide them for others to find, your creations will bring joy and creativity wherever they go.
FAQ
What type of paint should I use for painting rocks?
For DIY Painted Rocks Ideas, acrylic paint is the best choice as it’s durable, vibrant, and dries quickly. You can also use acrylic markers for detailed designs. Make sure to use outdoor-grade paint if you plan to display your rocks outside.
How do I prepare the DIY Painted Rocks Ideas?
Before painting, clean your rocks thoroughly to remove any dirt or debris. You can wash them with soap and water, then let them dry completely. For a smooth surface, you can also lightly sand the rocks.
Can I use regular paintbrushes for painting rocks?
Yes, you can use regular paintbrushes, but for more detailed designs, it’s helpful to have fine-tipped brushes or paint pens. These tools allow for more precision and control when creating intricate designs.
Do I need to seal my DIY Painted Rocks Ideas?
Yes, sealing your painted rocks is important for protection, especially if they will be kept outdoors. A clear acrylic sealer or spray can protect your artwork from weather damage and make the paint last longer.

Hi, I’m Victoria, an art and craft teacher at Newark City Schools, where I have the joy of working with middle school students to help them explore their creativity and develop their artistic talents. I believe that art is a powerful way for students to express themselves, and I strive to make every lesson a fun, engaging, and inspiring experience.
I created this website to share the art and craft projects, techniques, and resources that I use in my classroom, hoping to inspire both educators and young artists alike. Whether you’re a teacher looking for new ideas or a student eager to try something new, I’m excited to provide creative tools and projects that anyone can enjoy.
When I’m not in the classroom, I love experimenting with different art forms and learning new crafting techniques. My goal is to help others discover the joy of making things with their hands, and I hope my website serves as a space for everyone to explore their creative potential.