
I still remember the first time I pressed a flower. It was this tiny purple wildflower I found on a walk, and I stuck it inside my old diary between two pages. Weeks later, when I opened it, there it was—delicate, flat, and somehow even more beautiful. Funny how something so simple can feel like a little treasure, right? If you’ve ever tucked a bloom inside a book just to save the moment, you already get the magic of DIY pressed flowers crafts. They’re like nature’s way of giving us keepsakes that last longer than a vase of fresh flowers.
I know—life gets busy, and sometimes we don’t think we have time for “crafty” stuff. But honestly, pressing flowers is easy, calming, and kinda addictive. In this article, I’ll share super doable ideas that turn those pretty petals into art you’ll actually use (and maybe even gift). Sounds good?
DIY Pressed Flowers Crafts
DIY pressed flower crafts involve the process of collecting and preserving flowers by pressing them flat, usually between the pages of a book or with a flower press.

Pressed Flower Bookmark
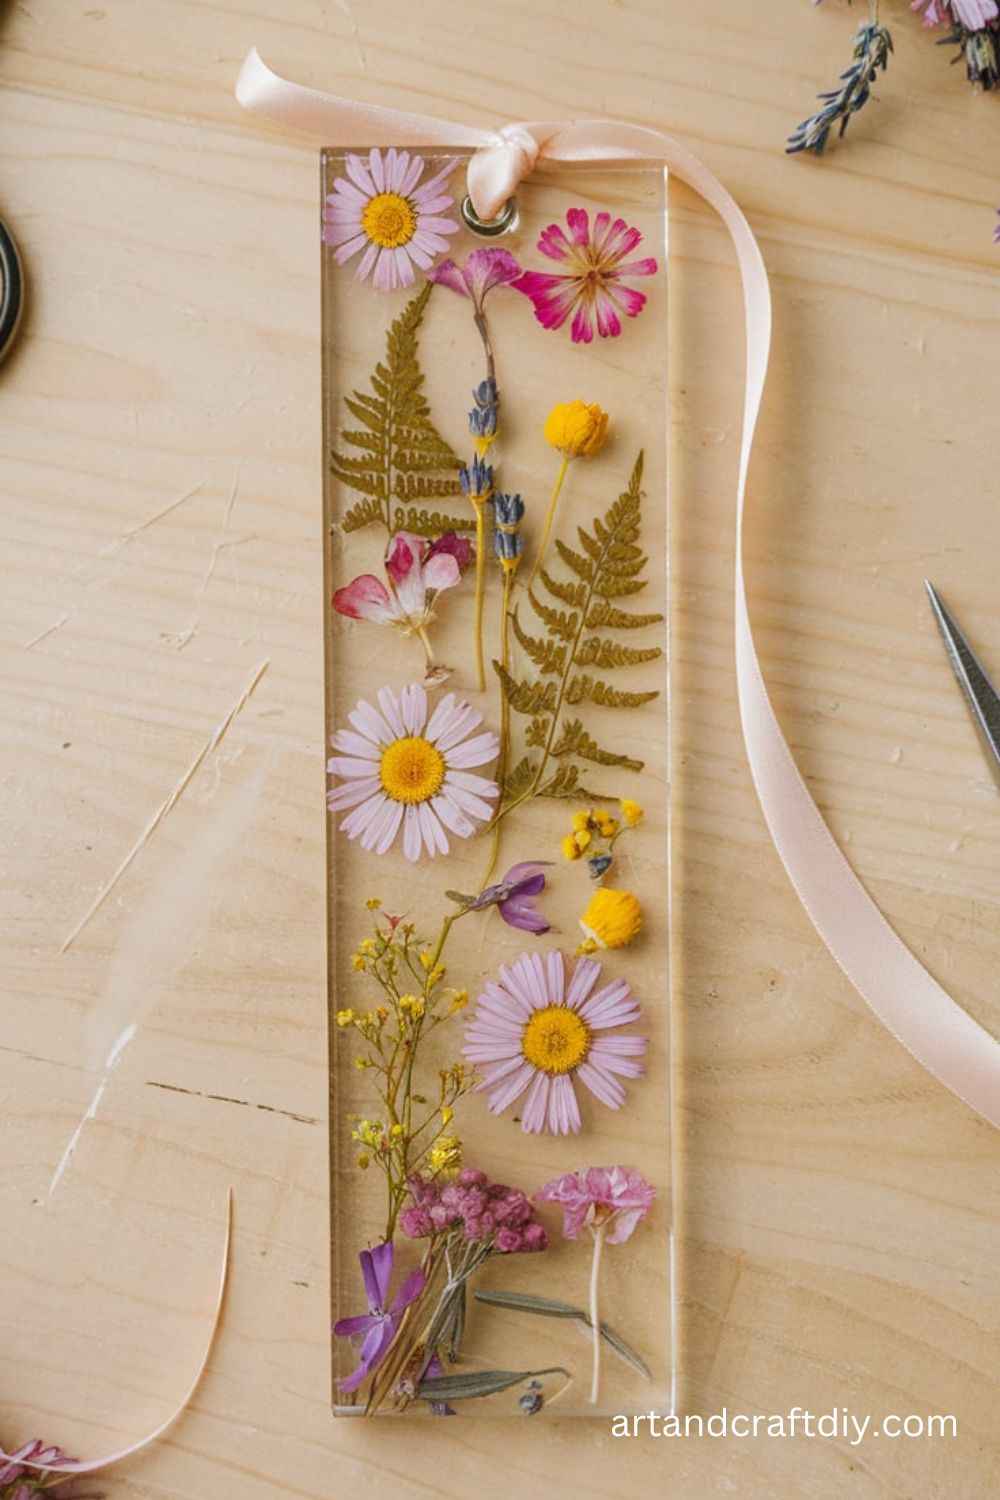
I still remember the first time I made a pressed flower bookmark—I slipped a tiny violet from my grandmother’s garden inside an old dictionary, and when I found it months later, it felt like uncovering a treasure. There’s something so magical about preserving a piece of nature and then using it to mark your spot in a book you love. For me, it makes reading feel even more personal, like I’m carrying a little memory between the pages. Honestly, every time I flip open a novel and see a pressed daisy smiling back at me, it just brightens my mood.
The process isn’t complicated at all. I usually take a simple strip of cardstock, arrange the flowers however I like, and then seal them with clear contact paper. Sometimes I even add a tiny ribbon on top for a sweet finish. In my opinion, these bookmarks also make the most thoughtful handmade gifts—small, personal, and packed with meaning.
Pressed Flower Coasters
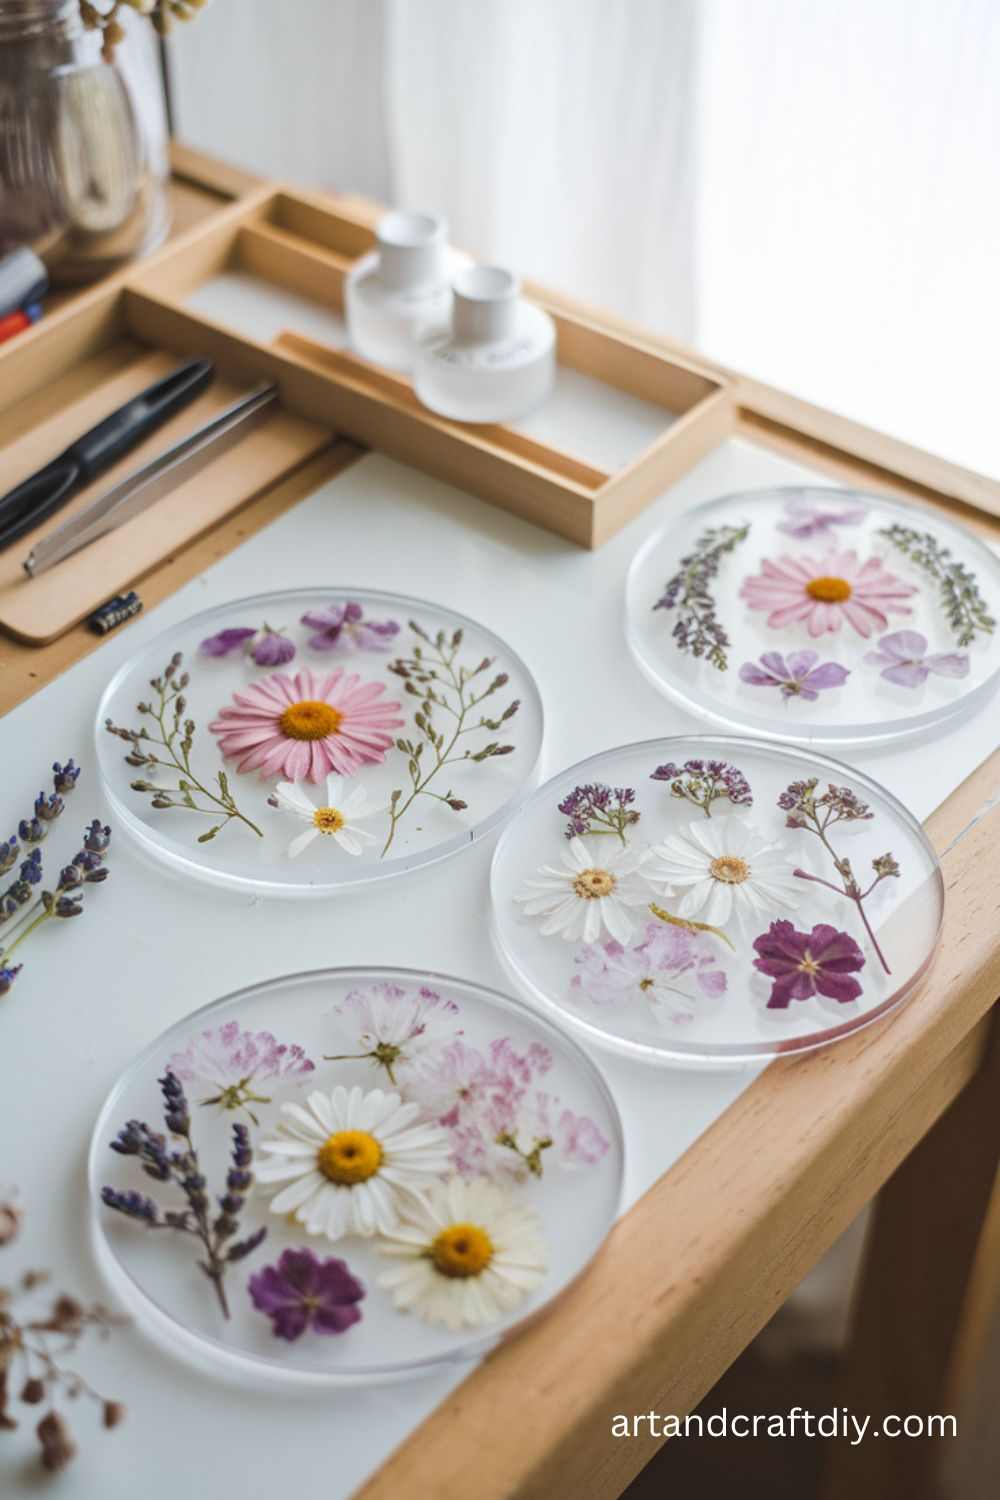
Now, pressed flower coasters? That’s where I had my “wow, this looks so fancy” moment. The first set I made ended up on my coffee table, and guests couldn’t stop asking where I bought them. To be fair, they look like something straight out of a boutique, but in reality, they’re just resin poured over pressed blooms. I’ve found that using a mix of wildflowers and ferns makes them feel a bit more whimsical, almost like you’ve trapped a mini garden under glass.
The trick, at least for me, is patience. Resin takes time to set, and if you rush, you’ll get bubbles (learned that the hard way). But once you get the hang of it, the results are stunning. I think these coasters are a perfect example of how pressed flowers aren’t just delicate—they can actually be practical. Honestly, every time I set down my mug on one, it feels a little extra special.
Pressed Flower Cards
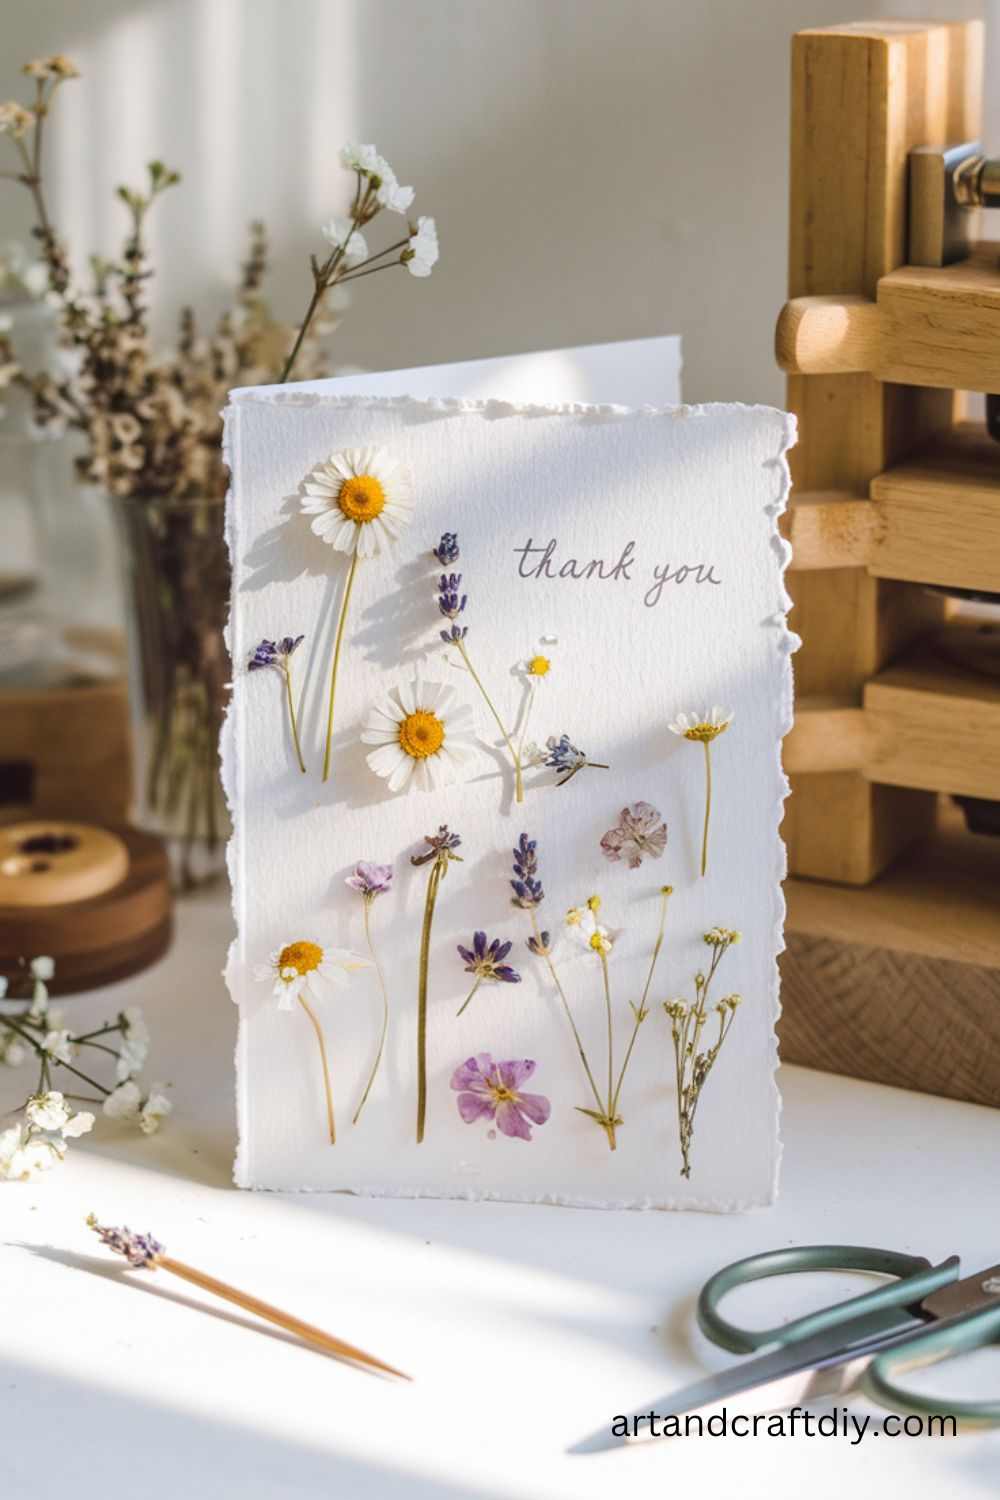
I have such a soft spot for pressed flower cards. There’s just something about sending a handmade card with real flowers that feels more heartfelt than any store-bought version. I once gave one to a friend for her birthday, and she told me she kept it pinned to her wall for years because it felt too beautiful to toss. That kind of reaction makes the effort so worth it. Honestly, a card with petals and leaves says “I care” in the most natural way possible.
When I make mine, I usually start with plain blank cards and arrange the flowers in simple patterns—sometimes just one blossom in the center, other times a scattered bunch. A tiny dab of glue holds everything in place, and then I let it dry completely. In my opinion, it’s not about perfection; it’s about capturing a moment in time and sharing it. To me, pressed flower cards are little works of art you can send in the mail.
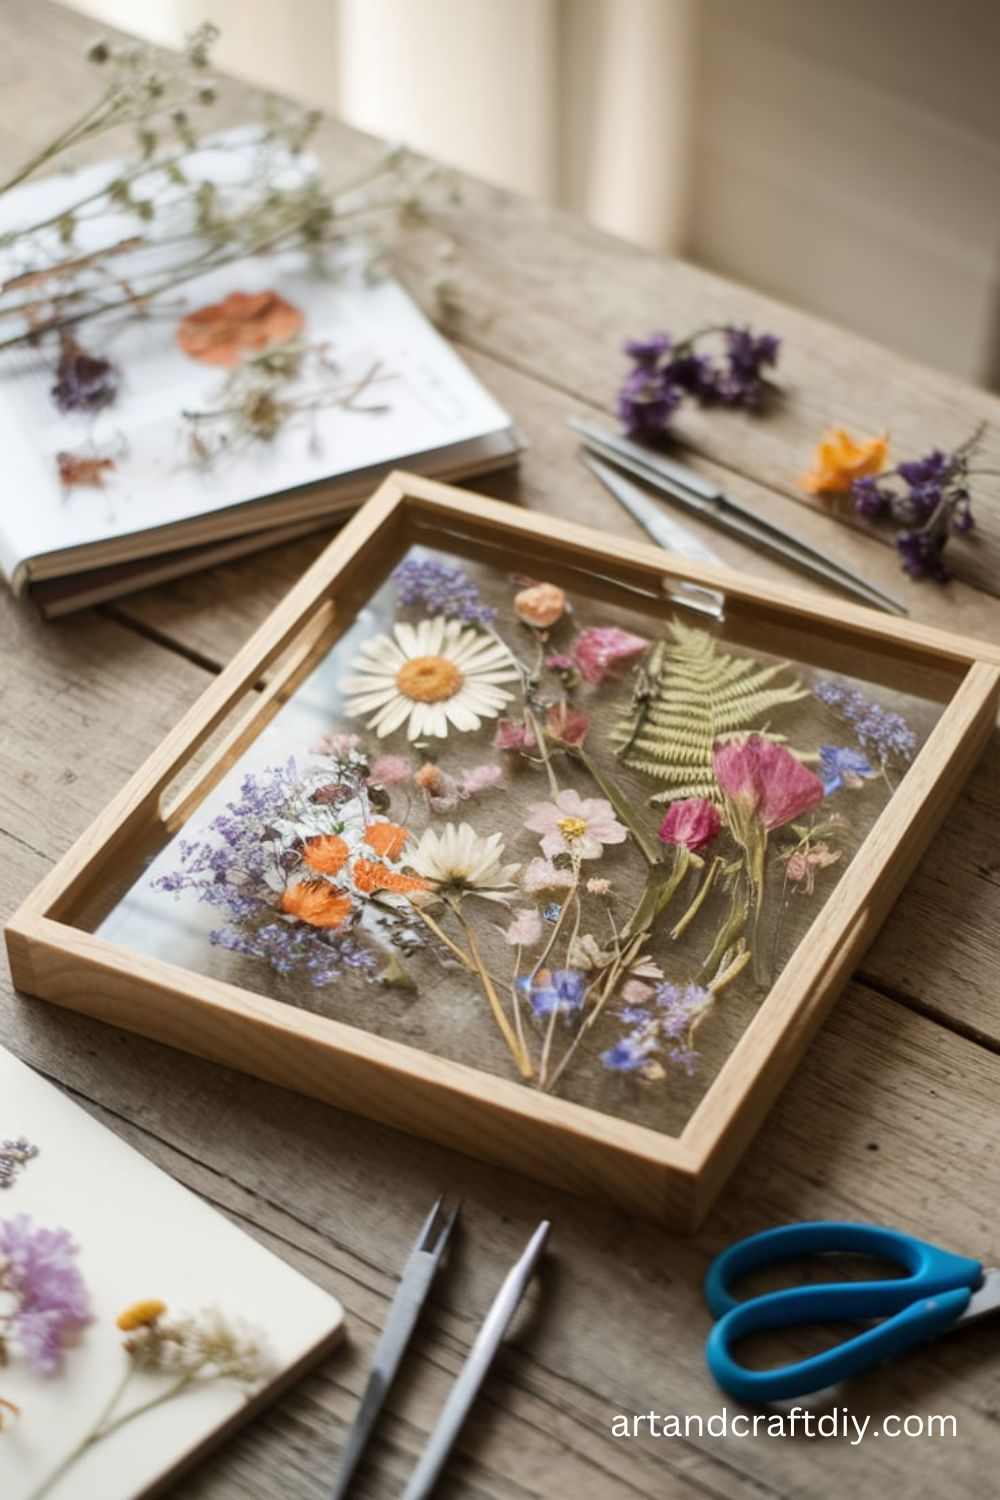
Pressed Flower Tray
Pressed flower trays add a beautiful, natural design to your home decor. They can serve as serving trays or decorative pieces.
Materials:
- Pressed flowers
- Tray (wooden or acrylic)
- Mod Podge or resin
- Paintbrush
- Scissors
Steps:
- Press your flowers for a few days, ensuring they’re thin and dry.
- Place the pressed flowers on the tray, arranging them in your desired pattern.
- Apply a layer of Mod Podge or resin to secure the flowers to the tray.
- Let the first layer dry and then apply additional layers for durability.
- Once completely dry, your pressed flower tray is ready for use or display.
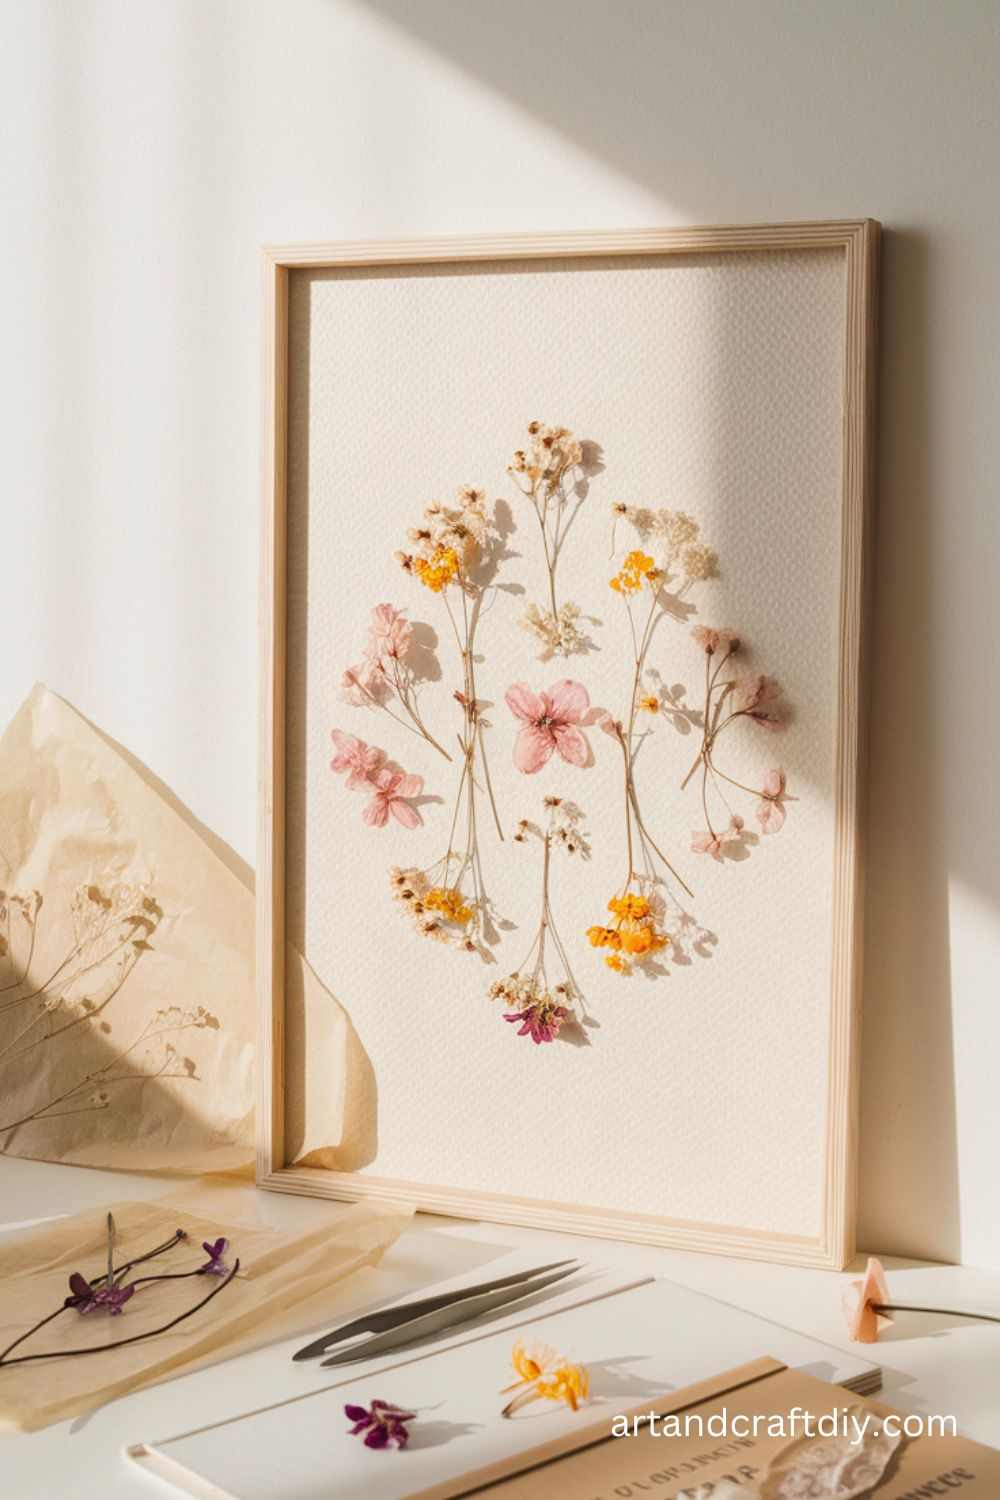
Pressed Flower Wall Art
Pressed flowers can be used to create stunning wall art that brings nature into your home.
Materials:
- Pressed flowers
- Picture frame
- Paper or fabric backing
- Craft glue
- Scissors
Steps:
- Arrange your pressed flowers on a piece of paper or fabric that fits into the frame.
- Use glue to secure the flowers in place, creating a design that fits your style.
- Let the glue dry completely.
- Place the flower design into the picture frame and secure it.
- Hang your pressed flower art on the wall for a natural, elegant look.
Pressed Flower Mirror Frame
A pressed flower mirror frame adds a beautiful, botanical touch to any room. It’s a simple way to incorporate nature into your home.
Materials:
- Pressed flowers
- Mirror with a plain frame
- Mod Podge or glue
- Paintbrush
Steps:
- Choose your pressed flowers and arrange them around the frame of the mirror.
- Use a small paintbrush to apply Mod Podge or glue to the back of the flowers.
- Press the flowers onto the frame in your desired design.
- Allow the glue to dry, and apply additional layers of Mod Podge to seal the flowers.
- Your pressed flower mirror frame is now ready to hang and enjoy.
Pressed Flower Journal
A pressed flower journal is a beautiful and functional item, perfect for capturing memories in a creative way.
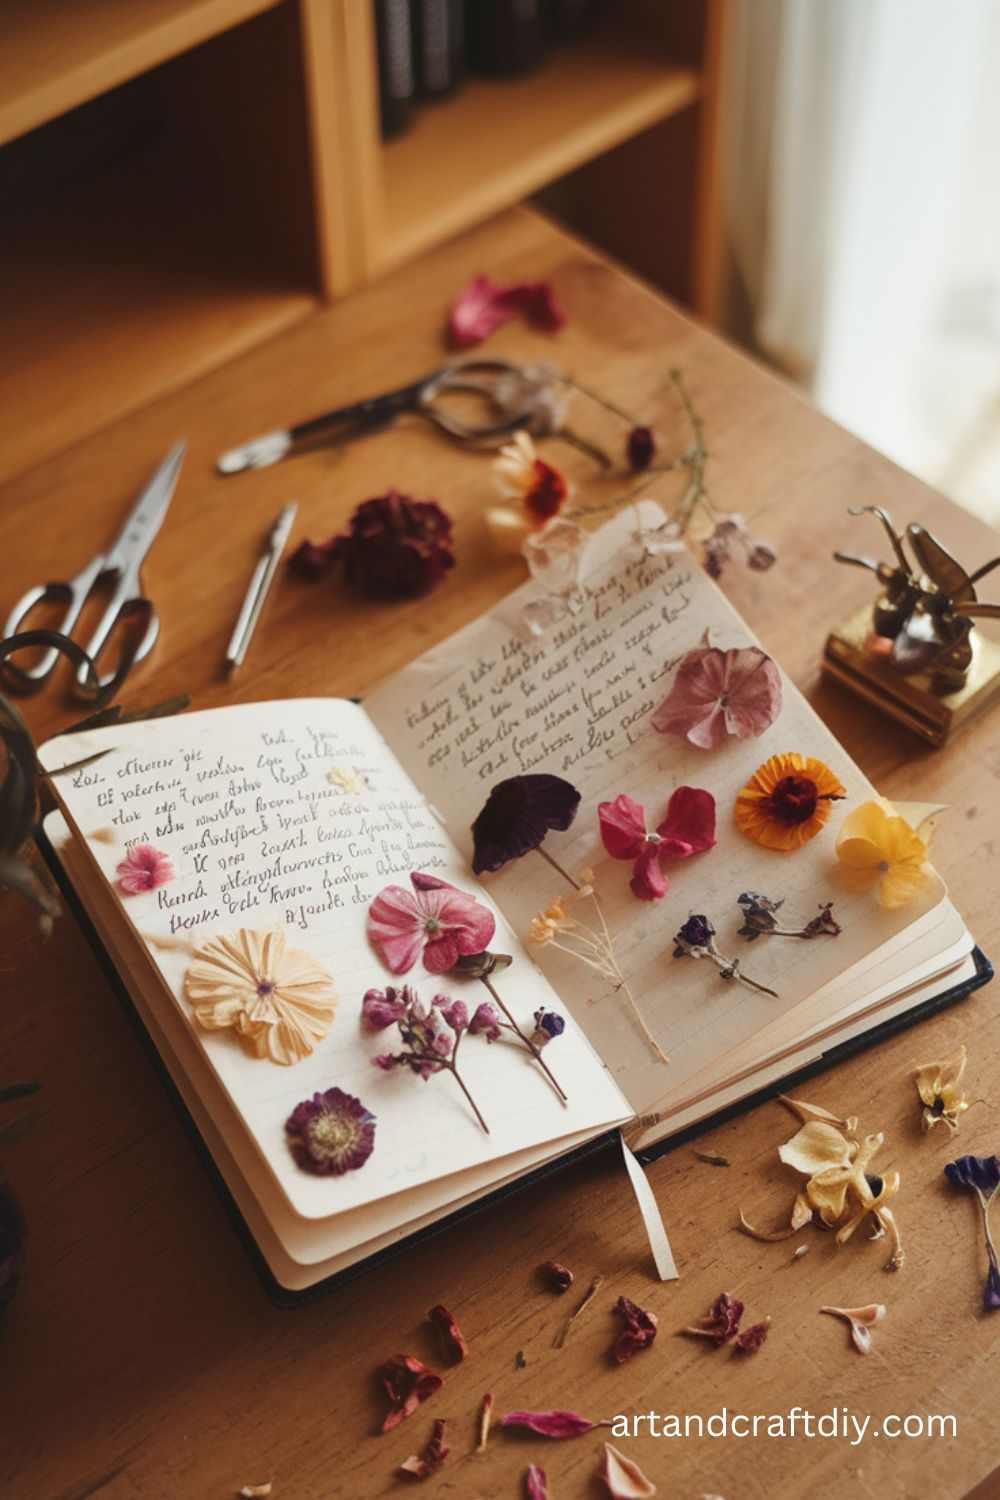
Materials:
- Pressed flowers
- Blank journal
- Craft glue
- Scissors
Steps:
- Press your flowers until they are flat and ready to use.
- Open your journal to the page where you’d like to place the flowers.
- Arrange the pressed flowers in a creative design on the page.
- Apply glue to the back of each flower and press it onto the page.
- Allow the glue to dry completely before closing the journal.
Pressed Flower Potpourri
Pressed flowers can be used to create potpourri, which will fill your home with a lovely floral scent.
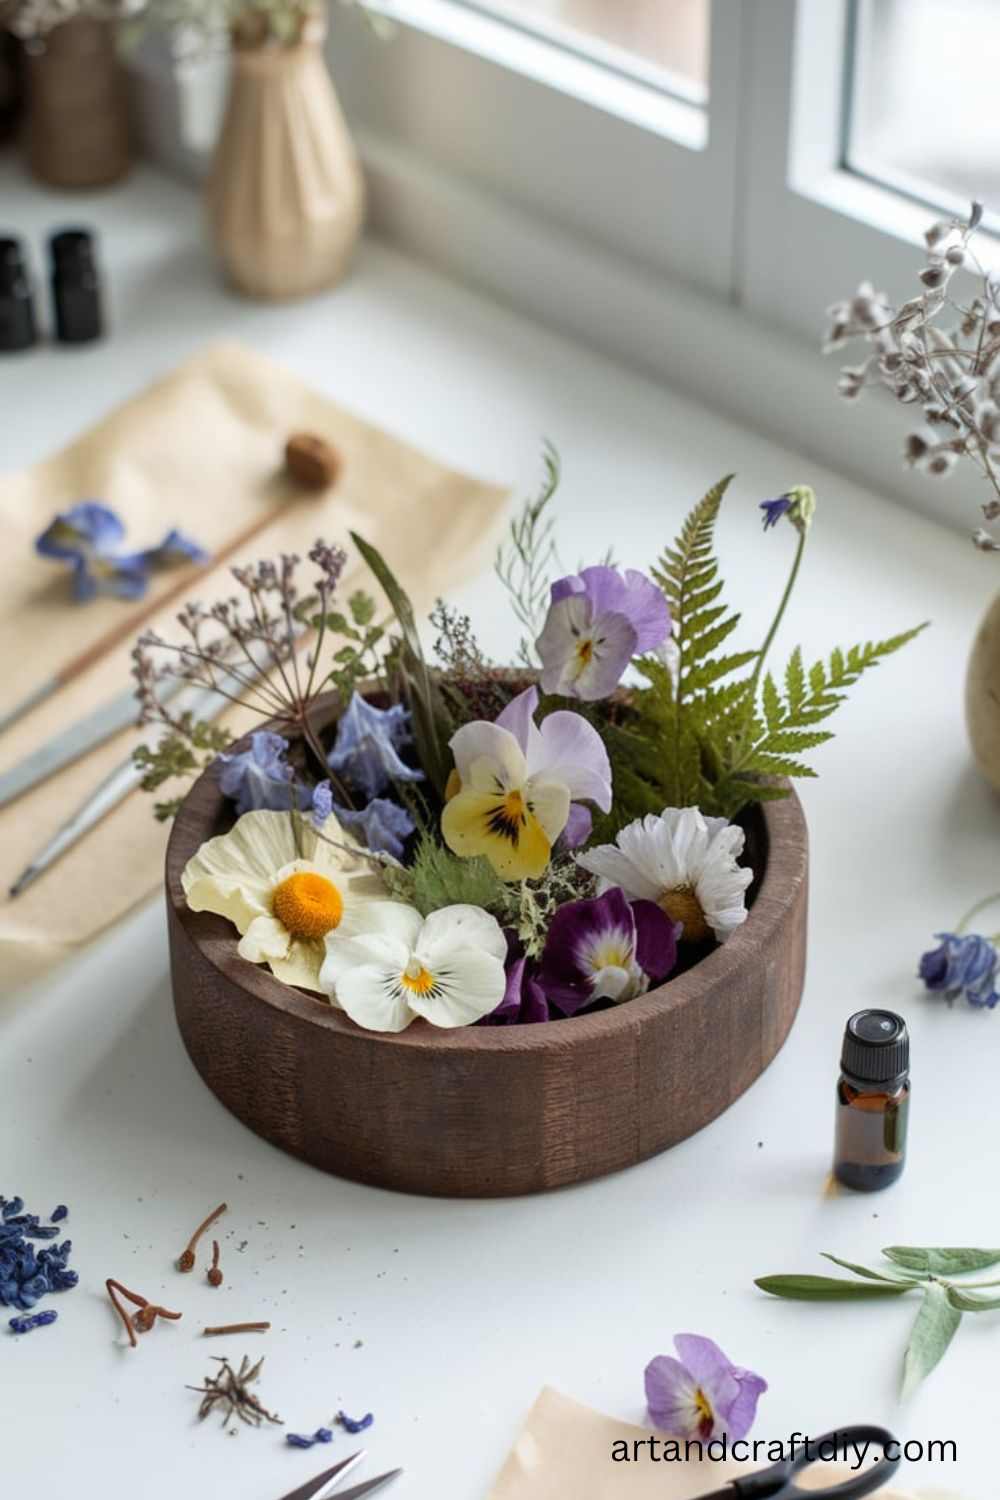
Materials:
- Pressed flowers
- Dried herbs or spices (like lavender or cinnamon)
- Scented oils (optional)
Steps:
- Gather a variety of pressed flowers and dried herbs or spices.
- Mix the flowers and herbs in a bowl, adding a few drops of essential oils if desired.
- Store your mixture in a decorative bowl or jar.
- Place it around your home for a fresh, floral scent.
Pressed Flower Magnets
Create small pressed flower magnets that can be displayed on your fridge or magnetic board.
Materials:
- Pressed flowers
- Small magnets
- Hot glue gun
- Craft glue
Steps:
- Select small, thin pressed flowers.
- Use glue to attach the flowers to the magnets.
- Apply a layer of Mod Podge or resin over the flowers for protection.
- Let the glue or resin dry completely before placing the magnets on your fridge.
Pressed Flower Phone Case
Create a custom phone case decorated with pressed flowers for a personalized touch.
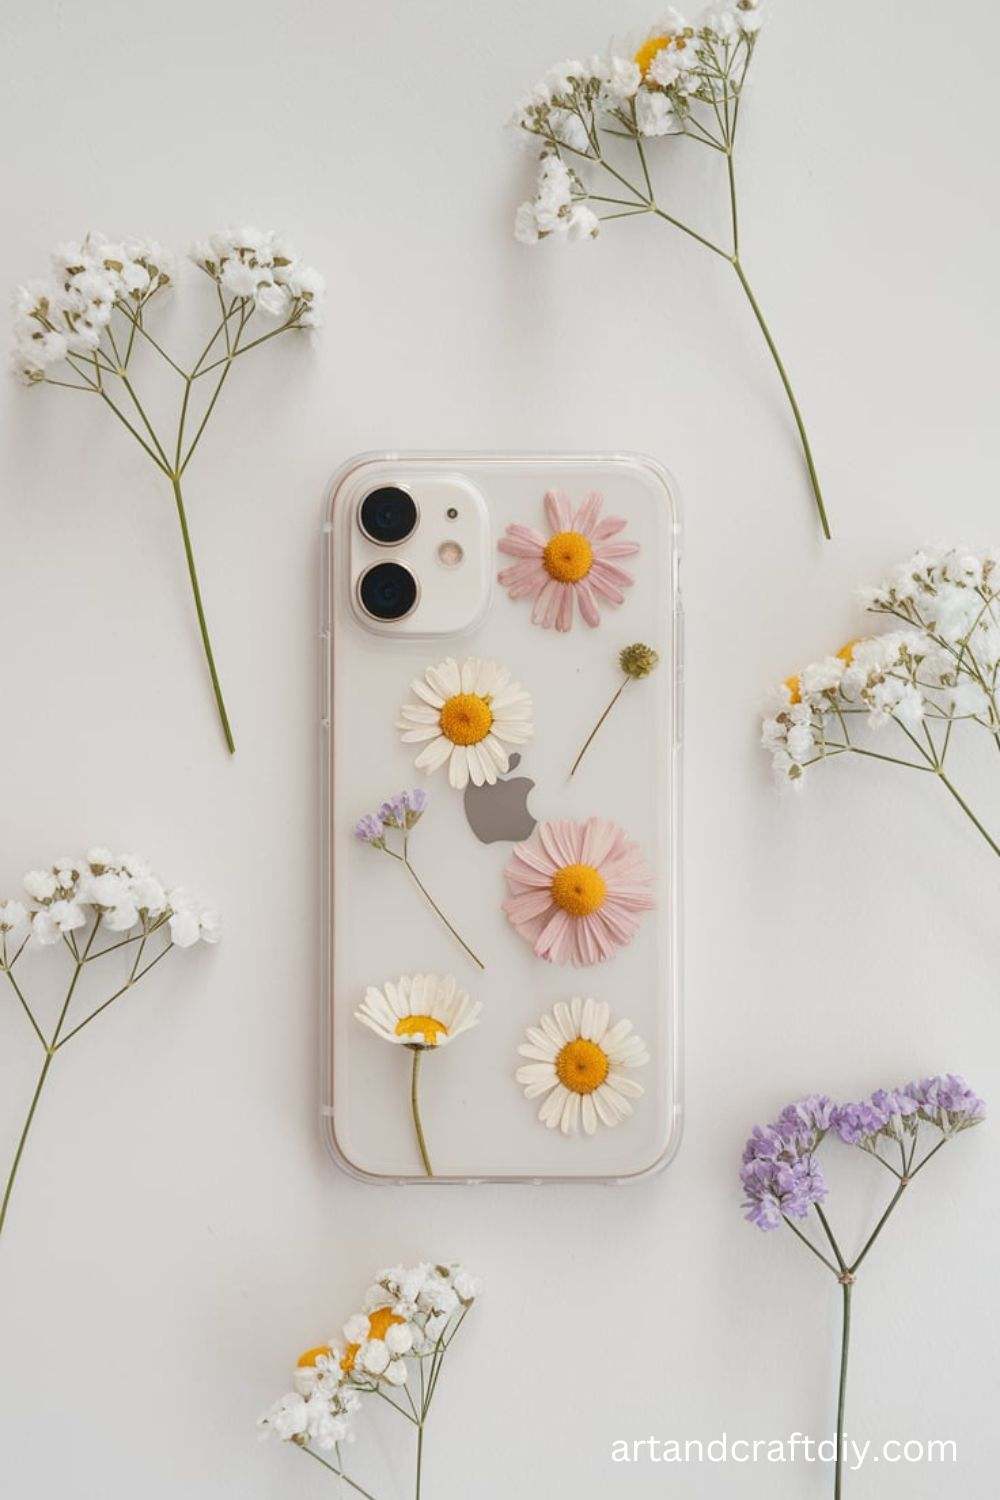
Materials:
- Pressed flowers
- Clear phone case
- Mod Podge or resin
- Paintbrush
Steps:
- Press your flowers flat and arrange them on the phone case.
- Apply a thin layer of Mod Podge or resin to the back of each flower.
- Press the flowers onto the phone case and let the glue dry.
- Once dry, apply additional layers of Mod Podge or resin to seal the flowers.
- Your unique pressed flower phone case is ready!
Pressed Flower Jewelry
Pressed flowers can be transformed into beautiful jewelry pieces, such as necklaces, earrings, or rings.
Materials:
- Pressed flowers
- Clear jewelry resin
- Jewelry molds
- Stir stick
- Jewelry findings (chains, hooks, etc.)
Steps:
- Choose small, delicate flowers to press.
- Mix the resin according to the instructions on the package.
- Place the flowers into jewelry molds and pour resin over them.
- Let the resin cure completely before removing the piece from the mold.
- Attach the jewelry findings to create your pressed flower jewelry.
Pressed Flower Candle Holder
Create a natural candle holder using pressed flowers for a soft and romantic atmosphere.
Materials:
- Pressed flowers
- Glass candle holder or jar
- Mod Podge or glue
- Paintbrush
Steps:
- Select your pressed flowers and arrange them on the candle holder.
- Apply glue or Mod Podge to the back of the flowers.
- Press the flowers gently onto the candle holder and let it dry.
- Once dry, seal with additional layers of Mod Podge to protect the flowers.
Pressed Flower Soap
Pressed flowers can be embedded in homemade soaps for a beautiful and fragrant touch.
Materials:
- Pressed flowers
- Glycerin soap base
- Soap mold
- Essential oils (optional)
Steps:
- Melt the glycerin soap base in the microwave or a double boiler.
- Pour a small amount of soap into a mold.
- Arrange the pressed flowers on top and pour the remaining soap over them.
- Let the soap cool and harden before removing it from the mold.
Pressed Flower Picture Frame
A pressed flower picture frame is an elegant way to display your favorite photos.
Materials:
- Pressed flowers
- Picture frame
- Craft glue
- Scissors
Steps:
- Press flowers until they’re completely flat.
- Arrange the flowers around the edges of the picture frame.
- Glue the flowers in place, allowing them to dry.
- Insert your favorite photo, and your pressed flower picture frame is ready.
Pressed Flower Vases
Pressed flowers can add beauty to a simple glass vase, making it a decorative centerpiece.
Materials:
- Pressed flowers
- Glass vase
- Mod Podge or resin
- Paintbrush
Steps:
- Choose your flowers and press them until they are flat.
- Use a paintbrush to apply Mod Podge to the back of the flowers.
- Press the flowers onto the vase.
- Seal with additional Mod Podge layers and allow it to dry.
Pressed Flower Tote Bag
Create a personalized tote bag adorned with pressed flowers for a unique accessory.
Materials:
- Pressed flowers
- Plain fabric tote bag
- Fabric glue
- Paintbrush
Steps:
- Arrange the pressed flowers on the tote bag.
- Use fabric glue to adhere the flowers.
- Allow the glue to dry before using the tote bag.
Pressed Flower Wall Hanging
Pressed flowers can be used to create beautiful wall hangings for a rustic or boho look.
Materials:
- Pressed flowers
- Branch or wooden dowel
- String or twine
- Craft glue
Steps:
- Arrange the pressed flowers on the branch or wooden dowel.
- Use glue to secure them in place.
- Attach string to each end of the dowel to create a hanging loop.
- Hang your pressed flower wall hanging in a desired spot.
Pressed Flower Lampshade
Create a beautiful, natural lampshade by decorating it with pressed flowers.
Materials:
- Pressed flowers
- Plain lampshade
- Craft glue
- Scissors
Steps:
- Arrange the pressed flowers on the lampshade.
- Use glue to secure the flowers in place.
- Allow the glue to dry before using the lampshade.
Pressed Flower Pillows
Add a botanical flair to your cushions with pressed flower designs.
Materials:
- Pressed flowers
- Fabric pillow cover
- Fabric glue
Steps:
- Arrange your pressed flowers on the pillow cover.
- Use fabric glue to secure them.
- Let the glue dry before inserting the pillow.
Pressed Flower Keychains
Create keychains with pressed flowers for a functional and decorative accessory.
Materials:
- Pressed flowers
- Clear keychain resin
- Jewelry findings (keychain rings)
Steps:
- Arrange the pressed flowers in keychain resin molds.
- Pour resin over the flowers and let it cure.
- Attach keychain rings to complete your keychain.
Pressed Flower Scrunchies
Create beautiful fabric scrunchies by embedding pressed flowers in the fabric.
Materials:
- Pressed flowers
- Fabric scrunchie
- Fabric glue
Steps:
- Arrange your pressed flowers on the scrunchie.
- Use fabric glue to adhere the flowers in place.
- Let the glue dry before wearing the scrunchie.
Pressed Flower Magnifying Glass Handle
Give a magnifying glass a floral touch by decorating the handle with pressed flowers.
Materials:
- Pressed flowers
- Magnifying glass
- Craft glue
Steps:
- Press your flowers until they’re flat.
- Arrange the flowers on the handle of the magnifying glass.
- Glue the flowers in place and let them dry.
Pressed Flower Place Cards
Pressed flowers make elegant place cards for special occasions like weddings or dinner parties.
Materials:
- Pressed flowers
- Blank place cards
- Craft glue
Steps:
- Arrange the pressed flowers on the blank place cards.
- Glue them in place.
- Write guest names on the cards and place them at each setting.
Pressed Flower Bottle Decoration
Decorate glass bottles or jars with pressed flowers to create unique vases or candle holders.
Materials:
- Pressed flowers
- Glass bottle or jar
- Craft glue
Steps:
- Arrange the pressed flowers on the glass bottle.
- Glue them in place and allow the glue to dry.
Pressed Flower Wall Decor
Design large wall pieces with pressed flowers to create botanical-inspired art.
Materials:
- Pressed flowers
- Large canvas or paper
- Craft glue
Steps:
- Arrange the flowers on a large canvas.
- Glue them in place and let the glue dry.
Pressed Flower Decorative Plates
Create decorative plates with pressed flowers to add a natural touch to your table settings.
Materials:
- Pressed flowers
- Plain ceramic plates
- Mod Podge
Steps:
- Arrange the pressed flowers on the plate.
- Apply Mod Podge to adhere the flowers to the plate.
- Allow it to dry completely before using as decor.
Pressed Flower Resin Tray
Make a decorative resin tray with pressed flowers for a functional yet artistic piece.
Materials:
- Pressed flowers
- Resin
- Tray mold
Steps:
- Arrange the pressed flowers in a tray mold.
- Pour resin over the flowers and let it cure.
Pressed Flower Hairpins
Create hairpins adorned with pressed flowers for a lovely, nature-inspired accessory.
Materials:
- Pressed flowers
- Hairpins
- Craft glue
Steps:
- Arrange the pressed flowers on the hairpins.
- Use glue to secure them in place.
- Let the glue dry before using them in your hair.
Pressed Flower Picture Collage
Create a collage with pressed flowers to form a stunning piece of wall art.
Materials:
- Pressed flowers
- Large piece of paper or canvas
- Craft glue
Steps:
- Arrange the flowers on the canvas or paper to form a design.
- Glue the flowers in place, then allow the glue to dry.
Pressed Flower Christmas Ornaments
Add a seasonal touch to your Christmas tree by making ornaments with pressed flowers.
Materials:
- Pressed flowers
- Clear ornament balls
- Ribbon
- Craft glue
Steps:
- Arrange the pressed flowers inside the clear ornament balls.
- Use glue to secure them in place.
- Tie a ribbon at the top for hanging and display your holiday beauty.
Tips for Preserving Color and Vibrancy in Pressed Flowers
- Pick Fresh Flowers: The fresher the flowers, the better the colors will hold up during the pressing process. Flowers that are just starting to bloom often retain their vibrancy the best.
- Dry Flowers Quickly: The faster the flowers dry, the less time they have to lose their natural pigments. Press them immediately after picking, or place them in a flower press or between parchment paper and heavy books to ensure they dry evenly.
- Avoid Over-Pressing: Over-pressing can lead to color fading or browning. Keep an eye on the flowers and check them periodically to avoid flattening them too much.
- Use Absorbent Paper: Use blotting paper or tissue paper to absorb excess moisture, which helps preserve the flowers’ vibrancy. Change the paper regularly to avoid mold or mildew.
- Consider Light Exposure: Once the flowers are pressed, keep them out of direct sunlight. Prolonged exposure to sunlight can cause colors to fade, so store them in a dark, cool place until they are ready to be used.
2. Best Flowers for Long-Lasting Results
Some flowers retain their color and structure better than others when pressed. Here are a few of the best options:
- Pansies: These have vibrant colors and sturdy petals, making them ideal for pressing.
- Roses: With careful pressing, roses can maintain their colors and shapes well, particularly when freshly bloomed.
- Lavender: The small, sturdy flowers retain color and fragrance, making them perfect for pressing.
- Violets: They press easily and retain their shape and color, making them a popular choice for floral art.
- Black-eyed Susans: These flowers have bold colors that last after pressing, making them ideal for adding pops of brightness to designs.
3. How to Avoid Damaging Delicate Flowers During the Pressing Process
- Handle with Care: Delicate flowers like orchids or poppies require extra care. Avoid bending or crumpling the petals as you arrange them in the press.
- Use Thin Paper: For more delicate blooms, use thin blotting paper or rice paper, which allows the flowers to dry more gently and evenly.
- Use a Flower Press: A flower press can apply uniform pressure and prevent crushing delicate flowers. If you don’t have a press, use heavy books or weighted objects to apply gentle, even pressure.
- Avoid Moisture: Too much moisture can lead to mold or mildew. Be sure to use absorbent paper and check on the flowers periodically to ensure they are drying properly.
- Start with a Light Press: Begin with a light press, and gradually increase the pressure as the flowers begin to dry. This gradual approach helps prevent the flowers from being crushed too early in the process.
4. Experimenting with Different Designs
DIY Pressed Flowers Crafts opens up a world of creative possibilities. Here are some ideas for experimenting with flower designs:
- Shapes and Patterns: Try pressing flowers in specific shapes, such as hearts, circles, or even leaves arranged in symmetrical patterns. Using different flowers or petals of the same flower can create interesting textures.
- Combinations: Mix flowers of different colors, sizes, and shapes to create stunning compositions. Combine contrasting colors, such as yellow and purple, or experiment with a monochromatic design using a single color family.
- Layering: Layer different flower types or petals to create depth in your design. You can also create 3D effects by arranging flowers at varying levels of thickness, adding dimension to your piece.
- Framing or Collaging: Once pressed, you can arrange your flowers into a collage, or frame them as individual pieces of art. Experiment with arrangements for cards, bookmarks, or decorative wall hangings.
By following these tips, you can create beautiful, vibrant, and long-lasting DIY Pressed Flowers Crafts while keeping your delicate blooms intact. Let your creativity flow as you experiment with new combinations, and have fun making unique floral art!
Troubleshooting Common Flower Pressing Issues
1. Flowers Losing Color or Becoming Too Brittle
It’s common for flowers to lose some color or become brittle during the pressing process, but there are ways to minimize this:
- Choose the Right Flowers: Some flowers are more prone to color loss or brittleness than others. Delicate petals or flowers with high water content, such as roses or daisies, tend to lose color faster. Try using sturdier flowers like pansies or lavender.
- Pre-Drying: Before pressing, consider drying flowers by hanging them upside down for a few days or using a desiccant (like silica gel) to remove moisture. This can help preserve their color and prevent them from becoming too fragile.
- Pressing Method: Ensure you’re pressing flowers properly by using blotting paper or parchment paper between the flowers and the weight. A flower press with multiple layers can help distribute pressure evenly.
- Environmental Factors: Too much light during the drying process can cause fading. Try to store pressed flowers in a dark, dry place to retain their colors longer. Also, avoid excessive humidity, which can lead to mold or mildew, making the flowers brittle.
2. Flowers Still Too Thick After Pressing
If your flowers are too thick and don’t press flat after using the flower press, try the following methods to achieve better results:
- Increase Pressure Gradually: If the flowers haven’t flattened enough, apply additional pressure over time. You can add more weight to the press or replace the blotting paper with fresh, dry sheets if they’ve absorbed too much moisture.
- Repressing: Sometimes flowers need a second round of pressing to fully flatten. If they still seem thick, remove them carefully from the press, allow them to dry for a few days, and then press again.
- Using a Better Pressing Technique: If the flowers are thick, ensure that you are using a pressing system that evenly distributes pressure. A clamp-style press with bolts can be more effective than a book-style press for flowers that are particularly thick or heavy.
- Drying Time: Some flowers might need a longer drying time. Make sure that the flowers are fully dry before pressing to avoid them remaining thick or soggy.
3. Flowers Not Pressing Evenly
If your flowers are not pressing evenly, here are some tips for improving the process:
- Even Distribution: Make sure the flowers are placed evenly within the press. Arrange the flowers in a single layer without overlapping them. If they are too large, consider trimming the edges so they fit better within the press.
- Check the Pressing Surface: Ensure the surface where the flowers are pressed is flat and smooth. Uneven surfaces can cause parts of the flower to press more than others, leading to an uneven result.
- Add Extra Layers of Paper: Place extra layers of blotting paper or parchment paper between the flowers to help with even absorption of moisture and pressure. Sometimes thicker flowers need more paper layers to press evenly.
- Rotate the Flowers: If some parts of the flower remain thicker than others, try rotating the flowers or repositioning them within the press to ensure even contact with the paper.
- Replace Paper Regularly: As the flowers release moisture, the paper absorbs it. If the paper becomes too damp or discolored, it can cause uneven pressing. Replace the blotting paper regularly to maintain even pressure and moisture absorption.
By following these steps, you can address common issues and improve the outcome of your DIY Pressed Flowers Crafts , helping to preserve their beauty and form for display or crafting purposes.
FAQ
What is DIY Pressed Flowers Crafts ?
DIY Pressed Flowers Crafts involves collecting flowers, flattening them using a press or another method, and then using them in art projects like greeting cards, bookmarks, framed art, and more.
How do I press flowers for crafting?
To press flowers, place them between sheets of parchment paper or newspaper, then put them under a heavy book or a flower press. Leave them for 1-2 weeks to ensure they are fully dried and flattened.
What flowers work best for pressing?
Flowers with flat petals and sturdy stems are ideal for pressing, such as daisies, pansies, violets, marigolds, and lavender. Thicker flowers like roses and sunflowers can also be pressed, but they may require more time.
Can I press flowers without a flower press?
Yes, you can press flowers using heavy books, or even a DIY method with a wooden frame and parchment paper. Just make sure there is even pressure to prevent the flowers from bending or distorting.

Hi, I’m Victoria, an art and craft teacher at Newark City Schools, where I have the joy of working with middle school students to help them explore their creativity and develop their artistic talents. I believe that art is a powerful way for students to express themselves, and I strive to make every lesson a fun, engaging, and inspiring experience.
I created this website to share the art and craft projects, techniques, and resources that I use in my classroom, hoping to inspire both educators and young artists alike. Whether you’re a teacher looking for new ideas or a student eager to try something new, I’m excited to provide creative tools and projects that anyone can enjoy.
When I’m not in the classroom, I love experimenting with different art forms and learning new crafting techniques. My goal is to help others discover the joy of making things with their hands, and I hope my website serves as a space for everyone to explore their creative potential.