
You know, the first time I tried making a wooden cross for a craft project, I honestly had no idea what I was doing. I remember staring at that plain piece of wood thinking, “Okay… now what?” It felt a little overwhelming, not gonna lie. But once I started experimenting with simple DIY Wooden Cross Designs For Crafts, everything clicked — the shapes, the textures, even the tiny details I never thought I’d notice. And honestly, it was kind of magical seeing a plain piece of wood transform into something meaningful and beautiful. If you’ve ever felt nervous about trying your hand at wooden crafts, I get it. It can feel tricky at first, like you’re about to mess it up. But here’s the thing: with just a few tips and creative ideas, you can make DIY wooden cross designs that look amazing and actually bring a sense of calm and pride while crafting.
DIY Wooden Cross Designs For Crafts
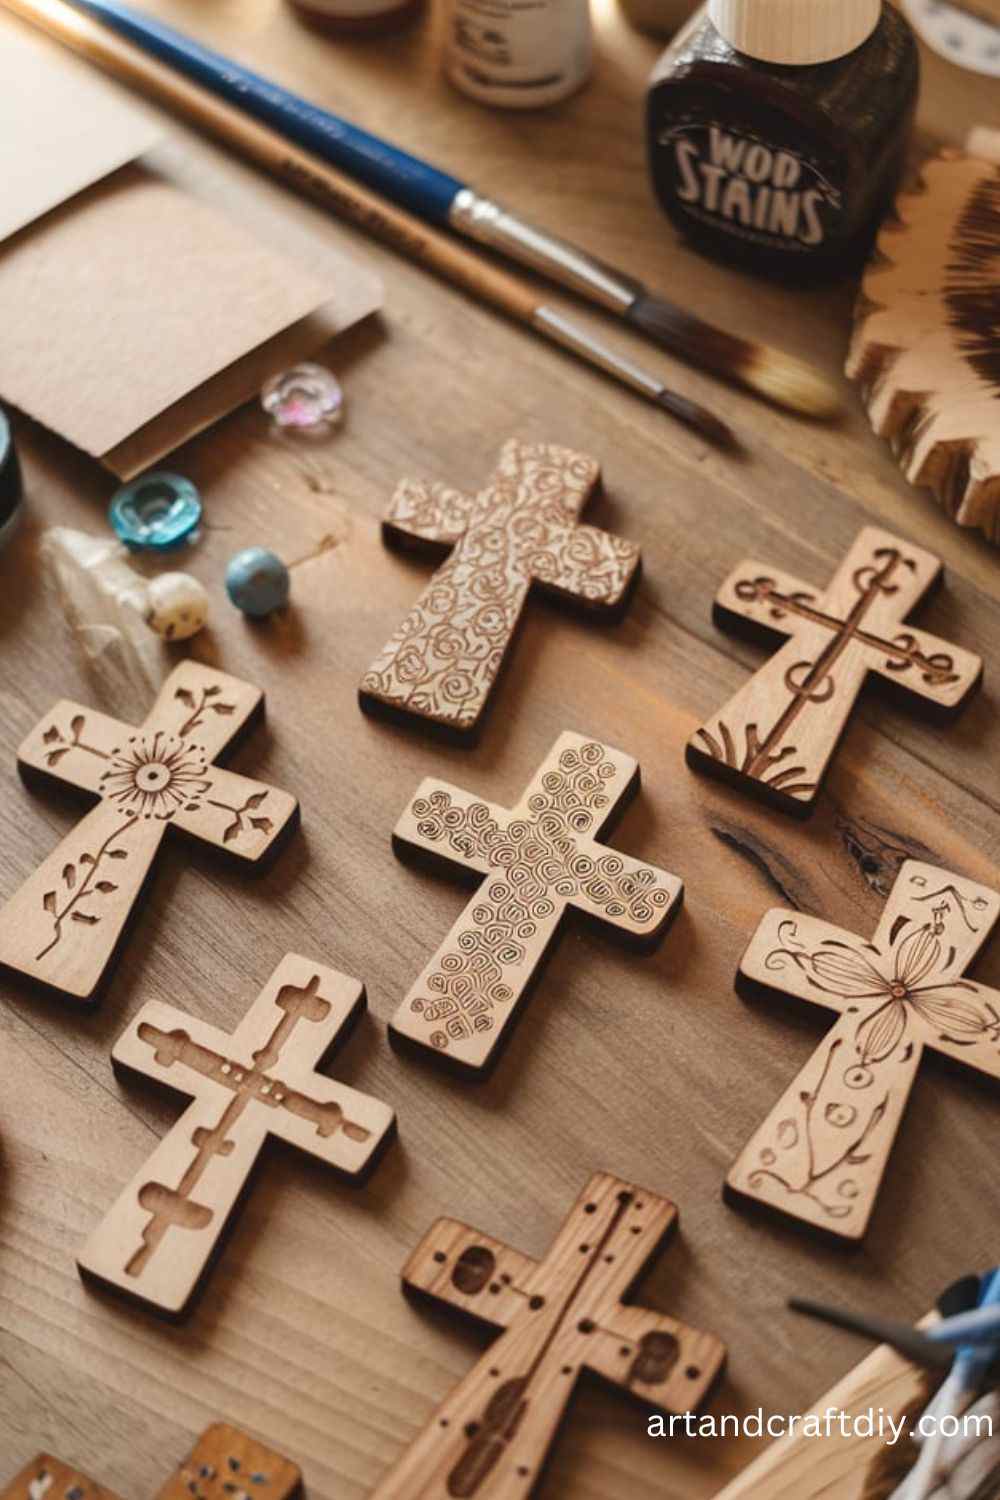
DIY wooden cross designs are a popular choice for craft enthusiasts, offering a versatile medium for creating personalized and meaningful decorations.

Rustic Wooden Cross Wall Hanging
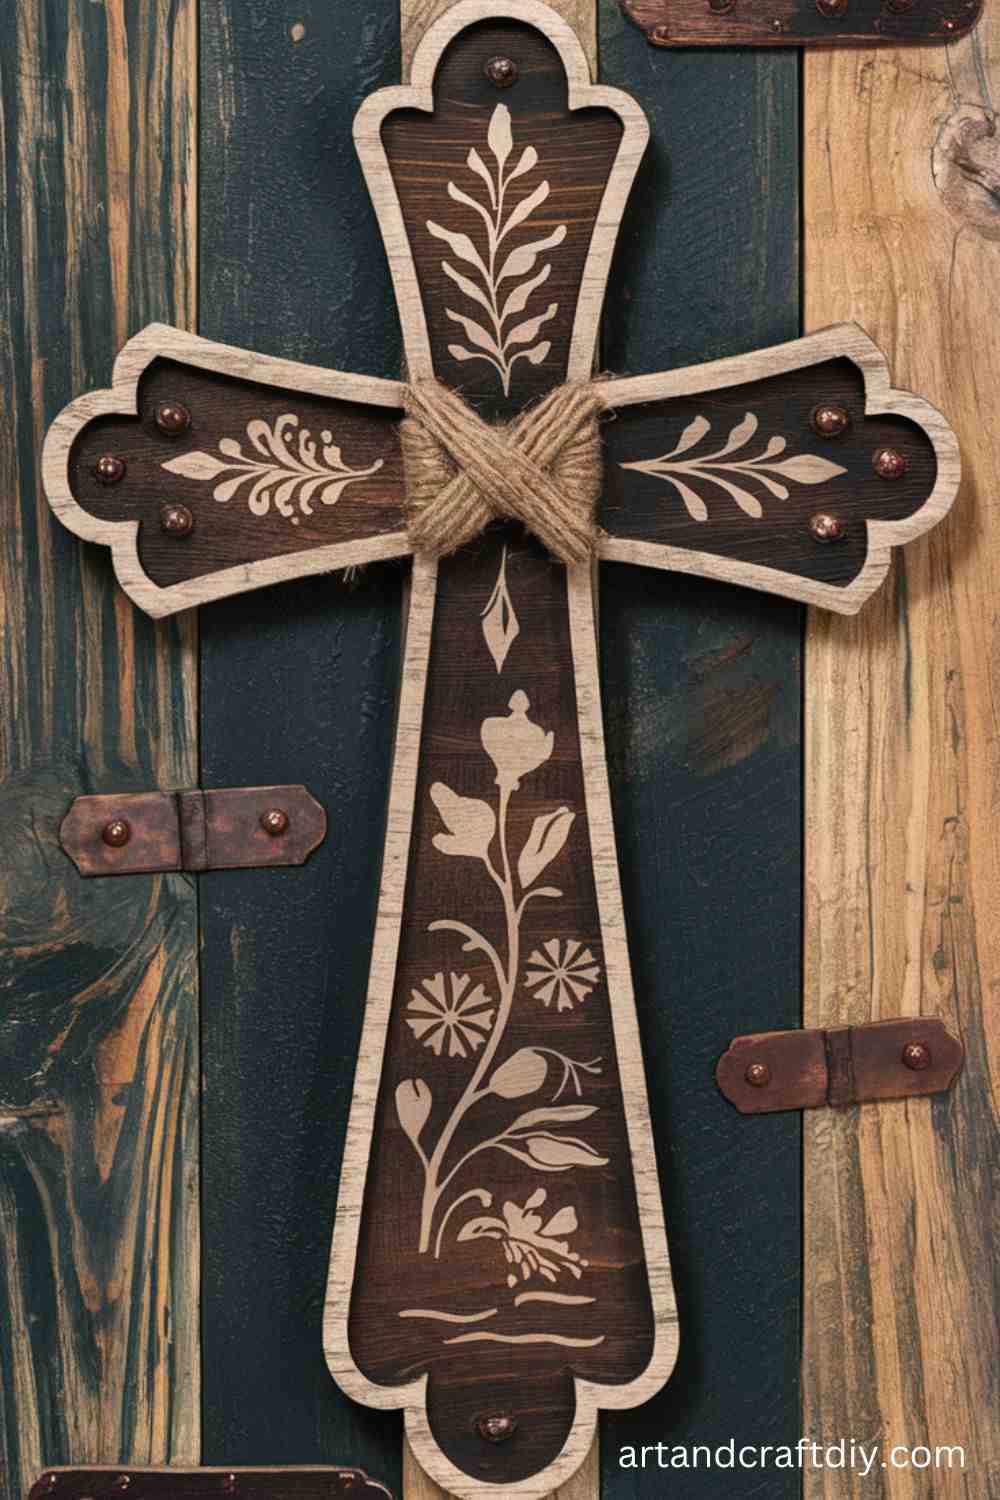
Honestly, I’ve always been drawn to that old, weathered look when it comes to wooden crosses. There’s just something so comforting about wood that’s got a bit of character, like it’s lived a life before it ended up on your wall. I remember the first time I made one for my living room—I just grabbed some leftover planks from a project, sanded the rough bits, and didn’t worry too much about perfection. To be fair, it turned out way more charming than I expected.
I’ve found that staining it lightly or even leaving it raw gives it this rustic, farmhouse feel that’s perfect over a mantel or hallway. You can also layer smaller pieces on top for some depth. Personally, I like adding a little twine for hanging—it’s simple, inexpensive, and somehow makes it feel more “mine.” You’ll be surprised how much personality a plain wooden cross can bring to a space.
Wooden Cross Table Centerpiece
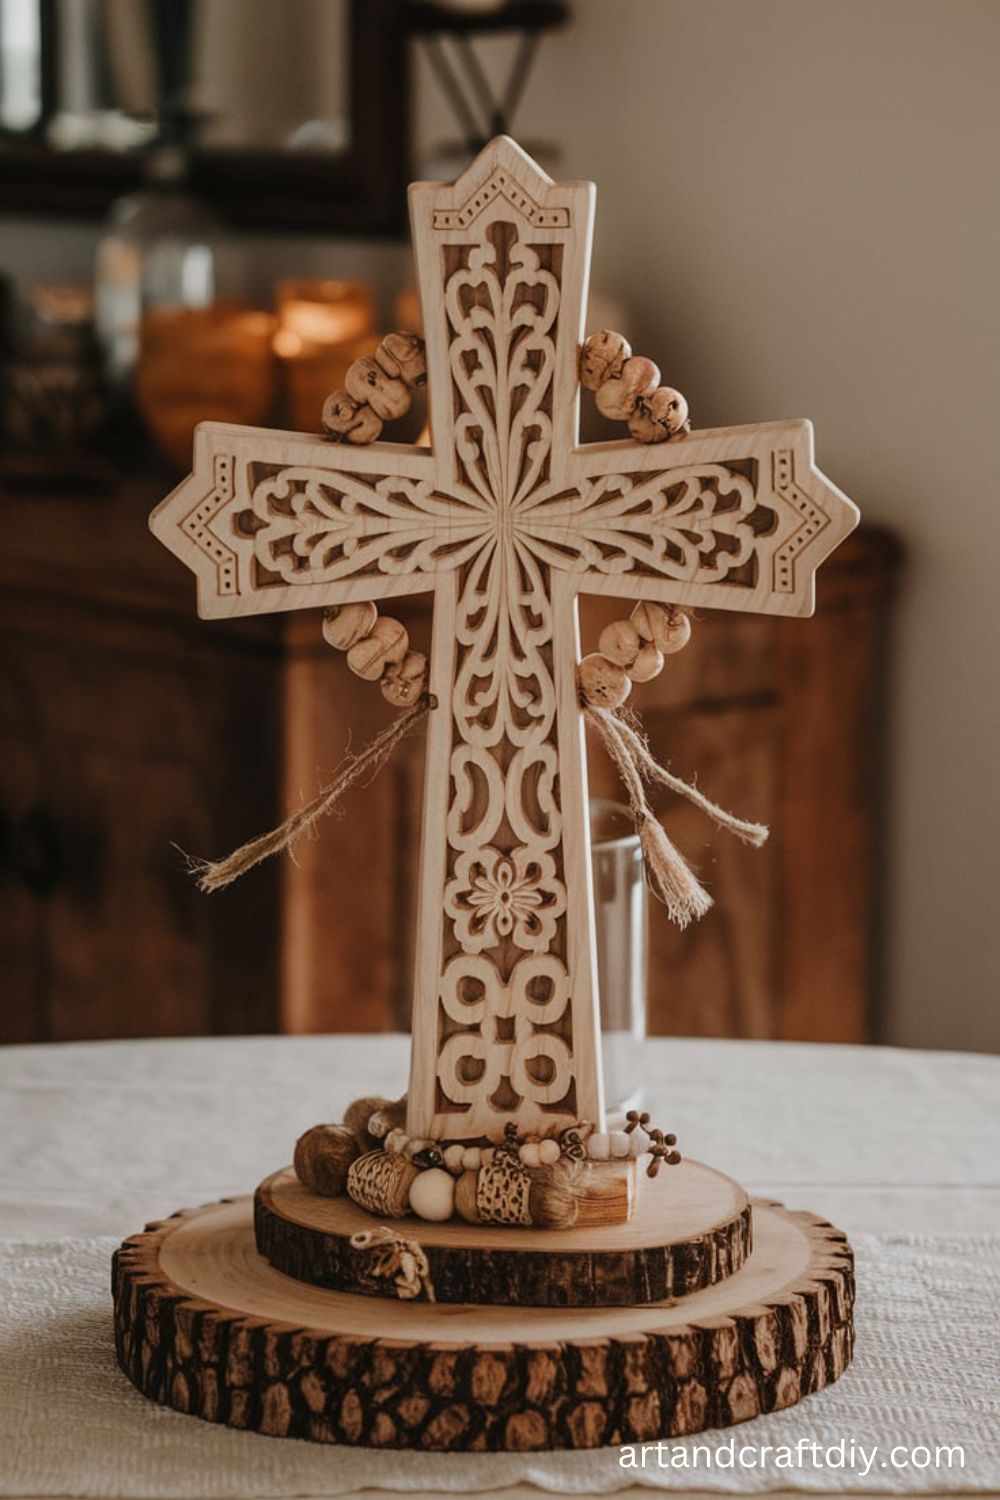
Creating a wooden cross for a table centerpiece has been one of my favorite little projects. To me, it feels like bringing a tiny altar vibe into a regular dining setup, without going overboard. I usually pick a lighter wood so it doesn’t feel heavy or too dark on the table. I remember one time, I tried painting it white and honestly, it looked so fresh with some seasonal flowers around it.
I like to keep it simple—sometimes just the cross with a small vase of wildflowers on each side. I’ve also tried carving shallow patterns or adding metallic accents, and honestly, it always sparks conversation with guests. In my opinion, the best part is you can adjust the size to suit any table, from a small coffee table to a large dining table. Honestly, making it yourself makes it feel way more personal than anything store-bought.
Engraved Wooden Cross
Engraving a personal message or Bible verse on a wooden cross makes this craft a meaningful gift or keepsake.
I’ll admit, I was a little intimidated the first time I tried engraving a wooden cross. But honestly, it’s not as scary as it sounds. I started with a simple design using a woodburning tool, and to my surprise, the imperfections gave it more character. I remember one little slip I made that actually turned into a kind of artistic flourish—it’s true, mistakes can be beautiful sometimes.
I’ve found that planning your design lightly in pencil first really helps. You can personalize it with names, dates, or small quotes, and honestly, it makes the cross feel like it tells a story. I like keeping mine minimal—sometimes just a tiny flower motif or a single word, because less can definitely be more. In my opinion, an engraved wooden cross makes an amazing gift because it feels thoughtful and handmade, and honestly, seeing someone’s reaction when they receive it is priceless.
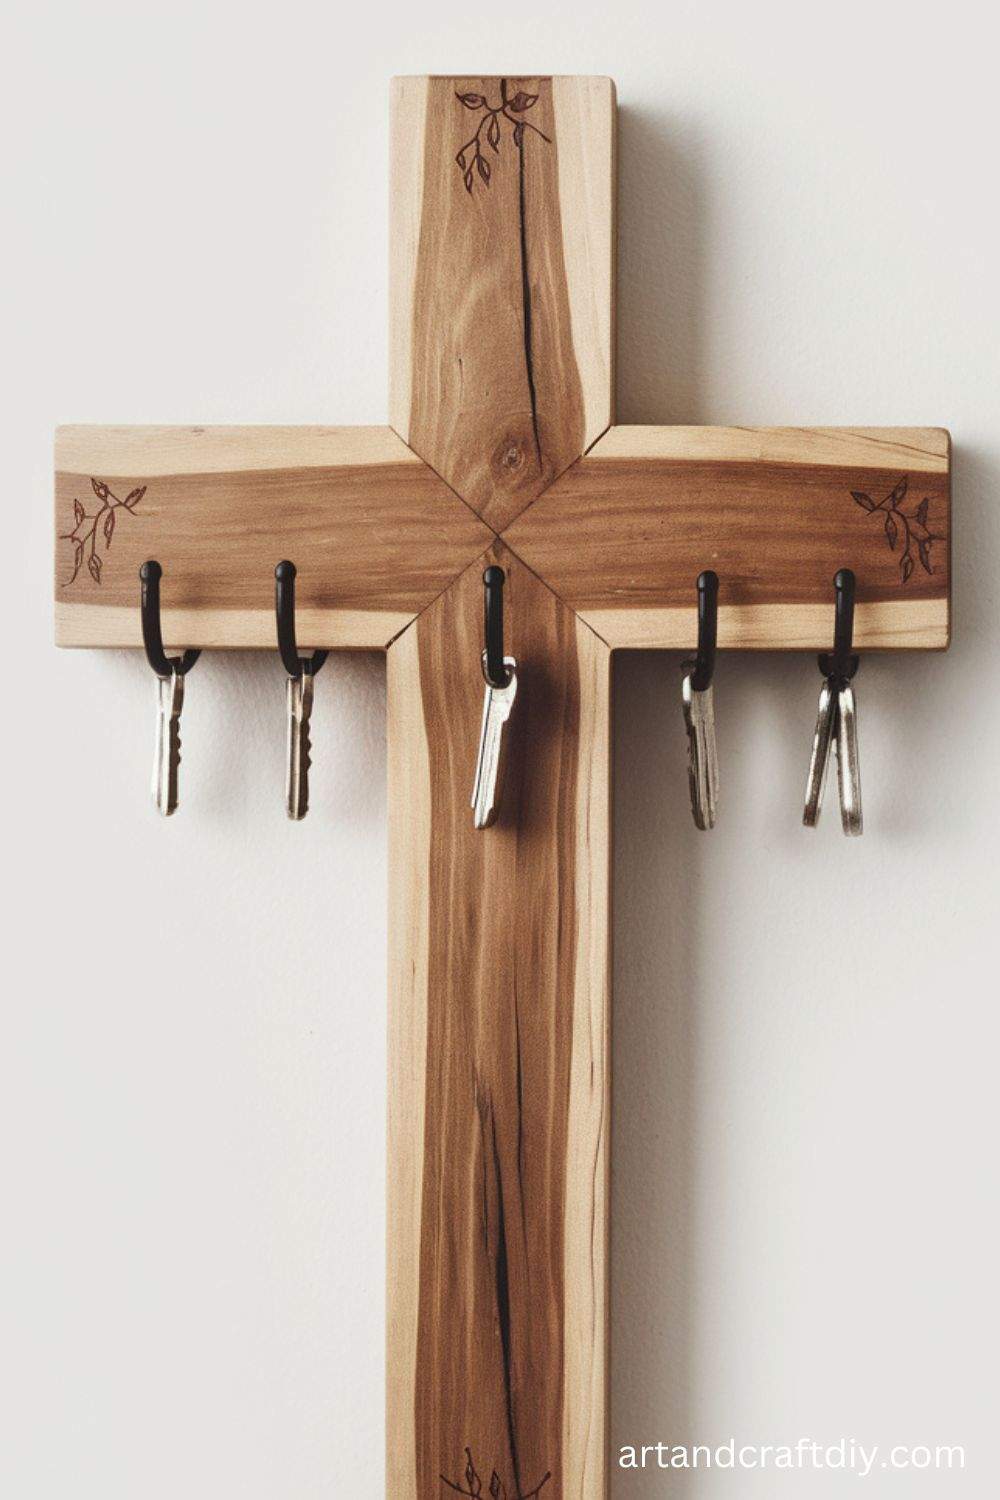
Wooden Cross Key Holder
This wooden cross can be a functional piece of art, helping organize your keys while still adding a decorative touch to your entryway.
Materials Needed:
- Wooden cross base
- Small key hooks
- Screws
- Drill
- Paint or stain
Steps:
- Choose or cut a wooden cross base to your desired size.
- Sand the wood for a smooth finish.
- Paint or stain the wood according to your preference.
- Attach key hooks to the lower part of the cross using screws and a drill.
- Hang it by the top of the cross, and use it to organize your keys.
Miniature Wooden Cross Necklace
A small wooden cross can be used as a pendant for a necklace, making a simple and meaningful piece of jewelry.
Materials Needed:
- Small wood pieces
- Saw (for shaping)
- Sandpaper
- Necklace chain
- Drill
- Paint or stain
Steps:
- Cut a small piece of wood into the shape of a cross.
- Sand the edges to remove any rough spots.
- Drill a small hole at the top of the cross for the necklace chain.
- Stain or paint the cross, and let it dry.
- Thread the chain through the hole, and your necklace is ready!
Wooden Cross Bookmark
Create a unique, handmade bookmark by carving a cross out of wood. It’s a perfect gift for book lovers or those looking for a simple, spiritual token.

Materials Needed:
- Thin wooden strips
- Saw
- Sandpaper
- Wood burning tool or markers
- Clear varnish
Steps:
- Cut a thin strip of wood into a rectangular shape, about 6 inches long.
- Use a saw to cut out a small cross shape at the top of the rectangle.
- Sand all edges to make the wood smooth.
- Decorate the cross with a wood burning tool or markers.
- Apply a clear varnish to protect the design, and allow it to dry.
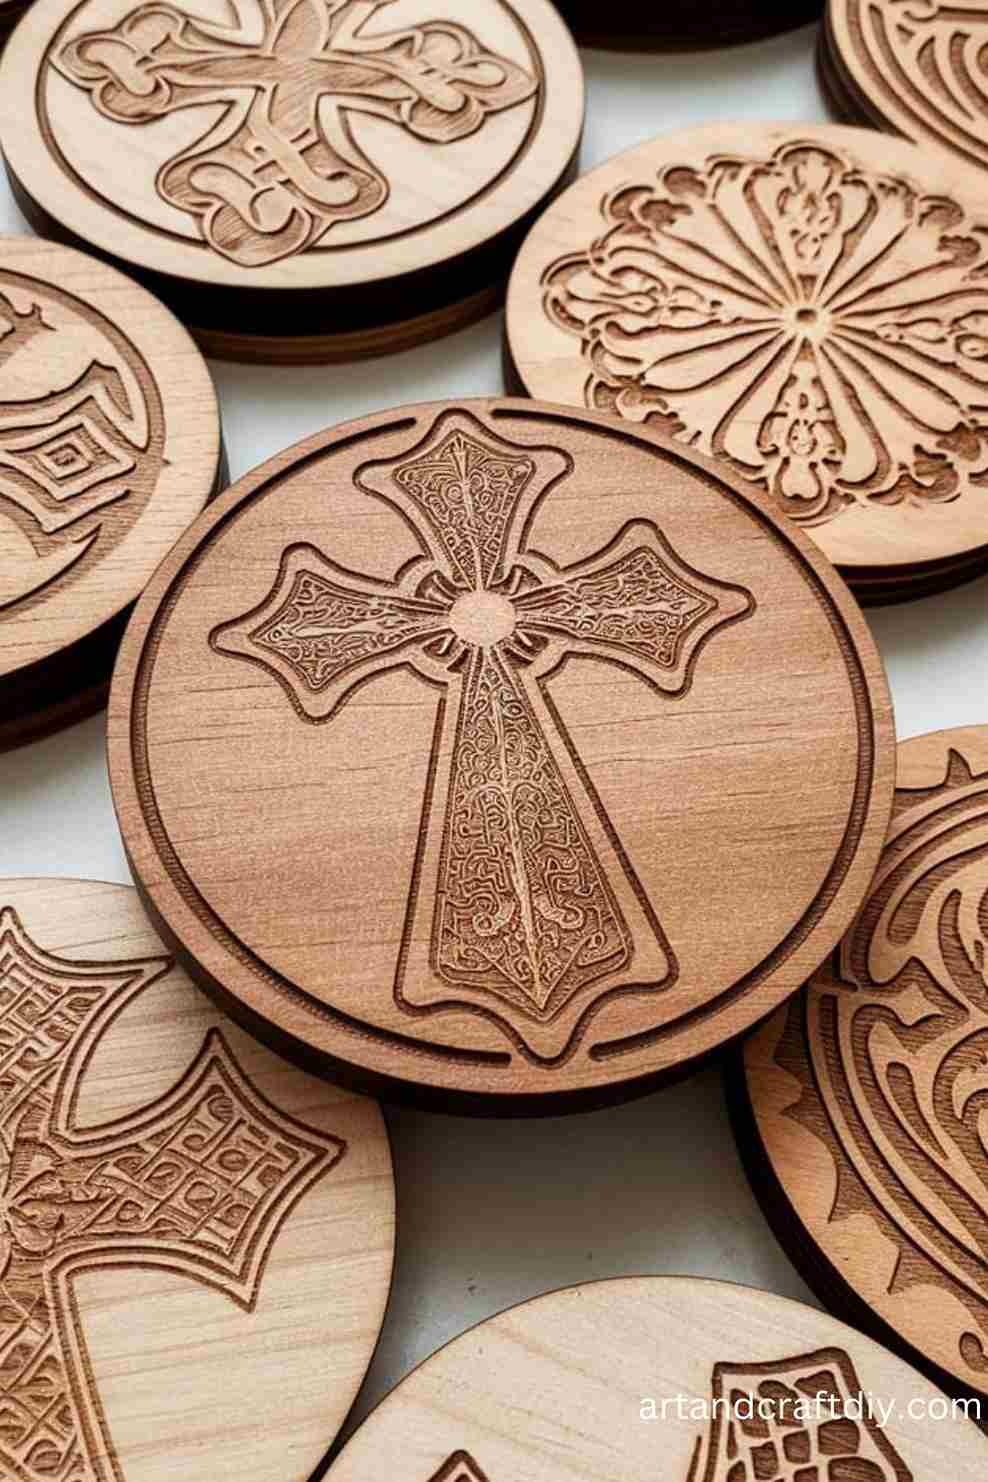
Wooden Cross Coasters
Wooden coasters with a cross design are functional yet stylish, perfect for your coffee table.
Materials Needed:
- Thin wooden rounds or squares
- Saw (if cutting your own shapes)
- Sandpaper
- Paint or stain
- Wood glue
Steps:
- Cut wooden rounds or squares to your desired coaster size.
- Sand the edges to smooth the surface.
- Paint or stain the coasters as desired, allowing them to dry fully.
- Use wood glue to add a small cross design to each coaster.
- Let the glue dry, and your coasters are ready for use.
Wooden Cross Magnets
Tiny wooden crosses can be turned into magnets for your refrigerator, creating a daily reminder of faith.
Materials Needed:
- Small wooden cross blanks
- Paint or markers
- Magnets
- Hot glue gun
Steps:
- Paint or decorate your small wooden cross blanks.
- Attach a small magnet to the back of each cross using a hot glue gun.
- Allow the glue to dry, and then place the magnet on your fridge.
Cross-Shaped Wooden Photo Frame
This cross-shaped photo frame is an ideal craft for weddings, baptisms, or religious celebrations.

Materials Needed:
- Wooden photo frame
- Saw (if cutting your own cross shape)
- Paint or stain
- Photo insert
Steps:
- Cut your wood into a cross shape or use a pre-made frame.
- Sand and smooth the edges.
- Paint or stain the frame to match your theme.
- Insert your favorite photo into the frame and display it.
Wooden Cross Candle Holder
Create a cross candle holder to hold small tea lights or votive candles. This DIY project brings both spirituality and functionality to your home decor.

Materials Needed:
- Wood (for base and arms)
- Saw
- Sandpaper
- Tea light holder or small glass votive
- Wood glue
Steps:
- Cut the wood into the shape of a cross, with a stable base at the bottom.
- Sand the wood to ensure it is smooth and even.
- Attach the tea light holder or glass votive to the center of the cross.
- Apply wood glue to secure the cross structure.
- Once dry, place a candle inside the holder and enjoy.
Wooden Cross Wall Art
Create a stunning wall art piece by painting or decorating a large wooden cross.
Materials Needed:
- Large wooden cross
- Paint or stain
- Brushes or sponges
- Decorative elements (beads, sequins, fabric)
Steps:
- Sand the wooden cross to a smooth finish.
- Paint or stain the cross with your desired colors.
- Once the paint is dry, you can decorate the cross with beads, sequins, or fabric for texture.
- Mount the cross on your wall and enjoy the piece of art.
Wooden Cross Ornaments
Craft a small, delicate wooden cross ornament for your Christmas tree or as a year-round decoration.
Materials Needed:
- Small wood scraps
- Saw
- Sandpaper
- Paint or stain
- Ribbon
Steps:
- Cut the wood into a small cross shape.
- Sand down any rough edges.
- Paint or stain the cross, allowing it to dry.
- Attach a small ribbon at the top for hanging.
- Hang the cross on your tree or anywhere in your home.
Hand-Painted Wooden Cross
A hand-painted wooden cross adds a personal touch, allowing you to create intricate designs or messages.
Materials Needed:
- Wooden cross blank
- Paint
- Brushes
- Sandpaper
Steps:
- Sand the wooden cross to a smooth finish.
- Plan your design and begin painting with fine brushes.
- Add multiple layers of paint, allowing each to dry before adding the next.
- Once complete, hang the cross or gift it.
Wooden Cross Garden Stake
Transform your garden with a spiritual touch by creating a wooden cross garden stake.
Materials Needed:
- Wood
- Saw
- Sandpaper
- Paint or stain
- Garden stake or long dowel
Steps:
- Cut the wood into a cross shape.
- Sand the edges for a smooth finish.
- Paint or stain the cross with weather-resistant finishes.
- Attach the wooden cross to a garden stake or dowel.
- Insert the stake into your garden for a spiritual display.
Wooden Cross Mobile
A wooden cross mobile can make a beautiful piece of nursery decor or a unique hanging ornament.
Materials Needed:
- Small wooden crosses
- Twine or string
- Wooden dowels
- Hot glue gun
Steps:
- Cut wooden dowels to the desired lengths.
- Attach the crosses to the dowels using twine or string.
- Use hot glue to secure each piece, ensuring the mobile stays balanced.
- Hang the mobile above a crib or in a room for a decorative touch.
Wooden Cross with Bible Verse
Craft a meaningful cross by combining woodwork and scripture for a personal gift or home decor piece.
Materials Needed:
- Wood
- Saw
- Sandpaper
- Paint
- Wood burning tool (optional)
Steps:
- Cut the wood into a cross shape.
- Sand the edges for smoothness.
- Paint or stain the cross.
- Use a wood burning tool to engrave a Bible verse, or write it with paint.
- Let it dry and display.
Wooden Cross Candle Stand
Create a cross-shaped candle stand to hold one or more candles.
Materials Needed:
- Wood
- Saw
- Sandpaper
- Candle holder cups
- Nails or glue
Steps:
- Cut wood to shape the arms of the cross.
- Sand the pieces for a smooth finish.
- Attach candle holder cups to the arms of the cross.
- Secure the pieces using nails or wood glue.
- Place candles in the holders.
Wooden Cross Tray
Make a unique cross-shaped serving tray for family gatherings or special occasions.
Materials Needed:
- Wood planks
- Saw
- Sandpaper
- Nails
- Handles
Steps:
- Cut wood planks to form a cross shape.
- Sand the edges for a smooth finish.
- Assemble the planks and secure with nails.
- Attach handles to each end of the cross for easy carrying.
Wooden Cross Puzzle
Create a wooden cross puzzle for kids or as a decorative piece for your home.
Materials Needed:
- Wood
- Saw
- Sandpaper
- Paint or markers
Steps:
- Cut the wood into the shape of a cross.
- Cut the cross into puzzle pieces using a saw.
- Sand the edges of the pieces.
- Decorate each piece with paint or markers.
Wooden Cross Wall Clock
Design a functional wall clock in the shape of a cross, combining timekeeping with religious symbolism.
Materials Needed:
- Wood
- Saw
- Sandpaper
- Clock mechanism
- Paint
Steps:
- Cut the wood into a cross shape.
- Sand the cross to make it smooth.
- Paint the cross if desired.
- Install the clock mechanism in the center of the cross.
- Add clock hands and numbers.
Wooden Cross Picture Holder
Craft a wooden cross that can hold your favorite photo or artwork.
Materials Needed:
- Wood
- Saw
- Sandpaper
- Picture frame clips
- Paint
Steps:
- Cut the wood into a cross shape.
- Sand it to smooth the edges.
- Attach picture frame clips to hold a photo.
- Paint or decorate as desired.
Wooden Cross Wreath
Create a wreath that features a wooden cross at its center, ideal for holidays or special events.
Materials Needed:
- Wooden cross
- Wreath base (vine or foam)
- Flowers, ribbon, or foliage
Steps:
- Attach the wooden cross to the center of the wreath base.
- Decorate with flowers, ribbons, or foliage.
- Hang the wreath on your door or wall.
Wooden Cross Tea Tray
Make a beautiful tea tray in the shape of a cross, perfect for serving guests with elegance.
Materials Needed:
- Wood
- Saw
- Sandpaper
- Nails
- Handles
Steps:
- Cut the wood into a cross shape.
- Sand all edges to make the tray smooth.
- Attach handles to each side.
- Secure the pieces together using nails or glue.
Wooden Cross Coiled Rope Art
Combine wood and rope to create a cross design that features a rustic and nautical feel.
Materials Needed:
- Wood cross
- Coiled rope
- Hot glue gun
Steps:
- Glue the coiled rope onto the wooden cross to form a decorative design.
- Let the glue set completely before displaying.
Wooden Cross Paperweight
Make a functional yet spiritual paperweight in the shape of a cross.
Materials Needed:
- Wood
- Saw
- Sandpaper
- Paint
Steps:
- Cut the wood into a cross shape.
- Sand the edges.
- Paint the cross as desired.
Wooden Cross Step Stool
Construct a cross-shaped step stool for added functionality and religious significance.
Materials Needed:
- Wood
- Saw
- Sandpaper
- Screws
Steps:
- Cut the wood into pieces for the cross-shaped design.
- Sand the pieces for smoothness.
- Assemble the pieces and secure with screws.
Wooden Cross Door Hanger
Create a beautiful wooden cross to hang on your door for welcoming guests.
Materials Needed:
- Wood
- Saw
- Sandpaper
- Paint or stain
- Ribbon
Steps:
- Cut the wood into a cross shape.
- Sand the edges.
- Paint or stain the cross.
- Attach a ribbon for hanging.
Wooden Cross Sculpture
Craft a unique wooden cross sculpture that can serve as a spiritual centerpiece.
Materials Needed:
- Wood
- Saw
- Sandpaper
- Wood glue
Steps:
- Cut the wood into various cross pieces.
- Sand the pieces smooth.
- Glue them together to form a cross sculpture.
Wooden Cross Shelf
Design a functional shelf shaped like a cross to display small items or decor.
Materials Needed:
- Wood
- Saw
- Sandpaper
- Screws
Steps:
- Cut the wood to form a cross with shelving arms.
- Sand the pieces smooth.
- Attach the pieces together, securing them with screws.
Wooden Cross Christmas Tree
Create a miniature wooden cross Christmas tree, combining holiday decor with faith-based artistry.
Materials Needed:
- Wood
- Saw
- Sandpaper
- Paint or stain
- Glue
Steps:
- Cut the wood into cross pieces.
- Assemble the pieces into a Christmas tree shape.
- Paint or decorate as desired.
- Display it during the holiday season
Ideas for Using Wooden Crosses in Crafts
DIY Wooden Cross Designs For Crafts are versatile and meaningful elements that can be creatively used in a variety of craft projects. Whether for home décor, gift-giving, or seasonal celebrations, these simple yet powerful symbols bring warmth, beauty, and a touch of spirituality to any setting. Here are some inspiring ways to incorporate wooden crosses into your crafting endeavors:
1. Home Décor
- Wall Hangings: Wooden crosses can be hung on walls in living rooms, entryways, or bedrooms, creating a simple yet elegant focal point.
- Shelf Accents: Place small wooden crosses on shelves or mantels for a rustic and spiritual vibe in your home.
- Centerpieces: Incorporate a wooden cross into a centerpiece for dining tables or altars, surrounded by candles, flowers, or seasonal elements.
2. Gift Giving
- Personalized Gifts: Customizing wooden crosses with names, dates, or special messages makes them meaningful gifts for weddings, baptisms, or baby showers.
- Holiday Gifts: During Christmas or Easter, wooden crosses can be personalized with religious symbols, scriptures, or family names to create cherished keepsakes.
- Memorial Gifts: Wooden crosses can be engraved with words of remembrance or comforting messages, making them a thoughtful gift for someone grieving the loss of a loved one.
3. Religious Symbolism
- Symbols of Faith: Wooden crosses can serve as a reminder of one’s faith and spirituality, adding a personal touch to places of prayer or meditation.
- Prayer Altars: Small wooden crosses can be used in home prayer altars, offering a tactile and visual connection to one’s spiritual practices.
- Remembrance: A wooden cross is a timeless symbol of devotion, making it a meaningful gift for baptisms, confirmations, or other religious milestones.
4. Seasonal Décor
- Easter Décor: During Easter, wooden crosses can be painted, decorated, or adorned with florals and ribbon to celebrate the season of resurrection.
- Christmas Ornaments: Wooden crosses can be turned into beautiful ornaments for Christmas trees, painted with festive colors or adorned with glitter and jewels.
- Fall and Spring Décor: Incorporate wooden crosses into seasonal displays by decorating them with autumn leaves, pumpkins, or spring flowers to add a spiritual touch to your décor.
Wooden crosses are not just crafting elements; they are symbols rich in meaning. Whether used in home décor, as gifts, or for religious expression, these versatile pieces can enhance the beauty of any space while carrying a deeper significance.
FAQ
What materials do I need to create a DIY Wooden Cross Designs For Crafts?
To create a DIY Wooden Cross Designs For Crafts, you will need:
- Wooden planks or dowels (depending on your design)
- Saw (if you need to cut the wood)
- Sandpaper for smoothing edges
- Paint, stain, or varnish (optional for finishing)
- Nails, screws, or wood glue for assembly
- Decorative items (ribbons, beads, or fabric) for embellishment
How do I make a simple DIY Wooden Cross Designs For Crafts?
To make a simple DIY Wooden Cross Designs For Crafts:
- Cut two pieces of wood – one longer for the vertical part and one shorter for the horizontal part.
- Sand the edges of the wood to smooth out any roughness.
- Use wood glue or nails to attach the two pieces at the center, forming a cross shape.
- Optionally, paint or stain the cross to finish.
Can I use recycled wood for making DIY Wooden Cross Designs For Crafts?
Yes, you can use recycled wood for making wooden crosses. Reclaimed wood adds character and uniqueness to your design. Just make sure to properly clean and sand the wood before use.

Hi, I’m Victoria, an art and craft teacher at Newark City Schools, where I have the joy of working with middle school students to help them explore their creativity and develop their artistic talents. I believe that art is a powerful way for students to express themselves, and I strive to make every lesson a fun, engaging, and inspiring experience.
I created this website to share the art and craft projects, techniques, and resources that I use in my classroom, hoping to inspire both educators and young artists alike. Whether you’re a teacher looking for new ideas or a student eager to try something new, I’m excited to provide creative tools and projects that anyone can enjoy.
When I’m not in the classroom, I love experimenting with different art forms and learning new crafting techniques. My goal is to help others discover the joy of making things with their hands, and I hope my website serves as a space for everyone to explore their creative potential.
todos sao muito lindos, teria como disponibilizar os arquivos para cortar na cnc router?