
Last year, a few days before Halloween, I found myself knee-deep in glitter, glue sticks, and construction paper with my kids—and honestly? It was chaos. Pumpkins rolling off the table, googly eyes sticking to the dog (don’t ask), and me wondering why I ever thought “Halloween family craft ideas” would be fun on a school night. But here’s the thing… in the middle of the mess, we laughed so much. The kind of laughter that makes your cheeks hurt. And when the crafts finally came together—wonky bats, lopsided ghosts, and all—it felt like we’d created more than decorations. We’d made memories.
If you’ve ever felt that mix of excitement and overwhelm trying to do something special with your family for Halloween, I get it. That’s exactly why I’m sharing some simple, fun craft ideas here—nothing too complicated, just creative little projects to bring everyone together. Sound good? Let’s dive in.
Halloween Family Craft Ideas
Halloween Family Craft Ideas are a fun way to get everyone together, laugh a little, and make spooky-cute memories. From simple DIYs to creative projects, these crafts turn the season into something special you can share at home.
Pumpkin Painting
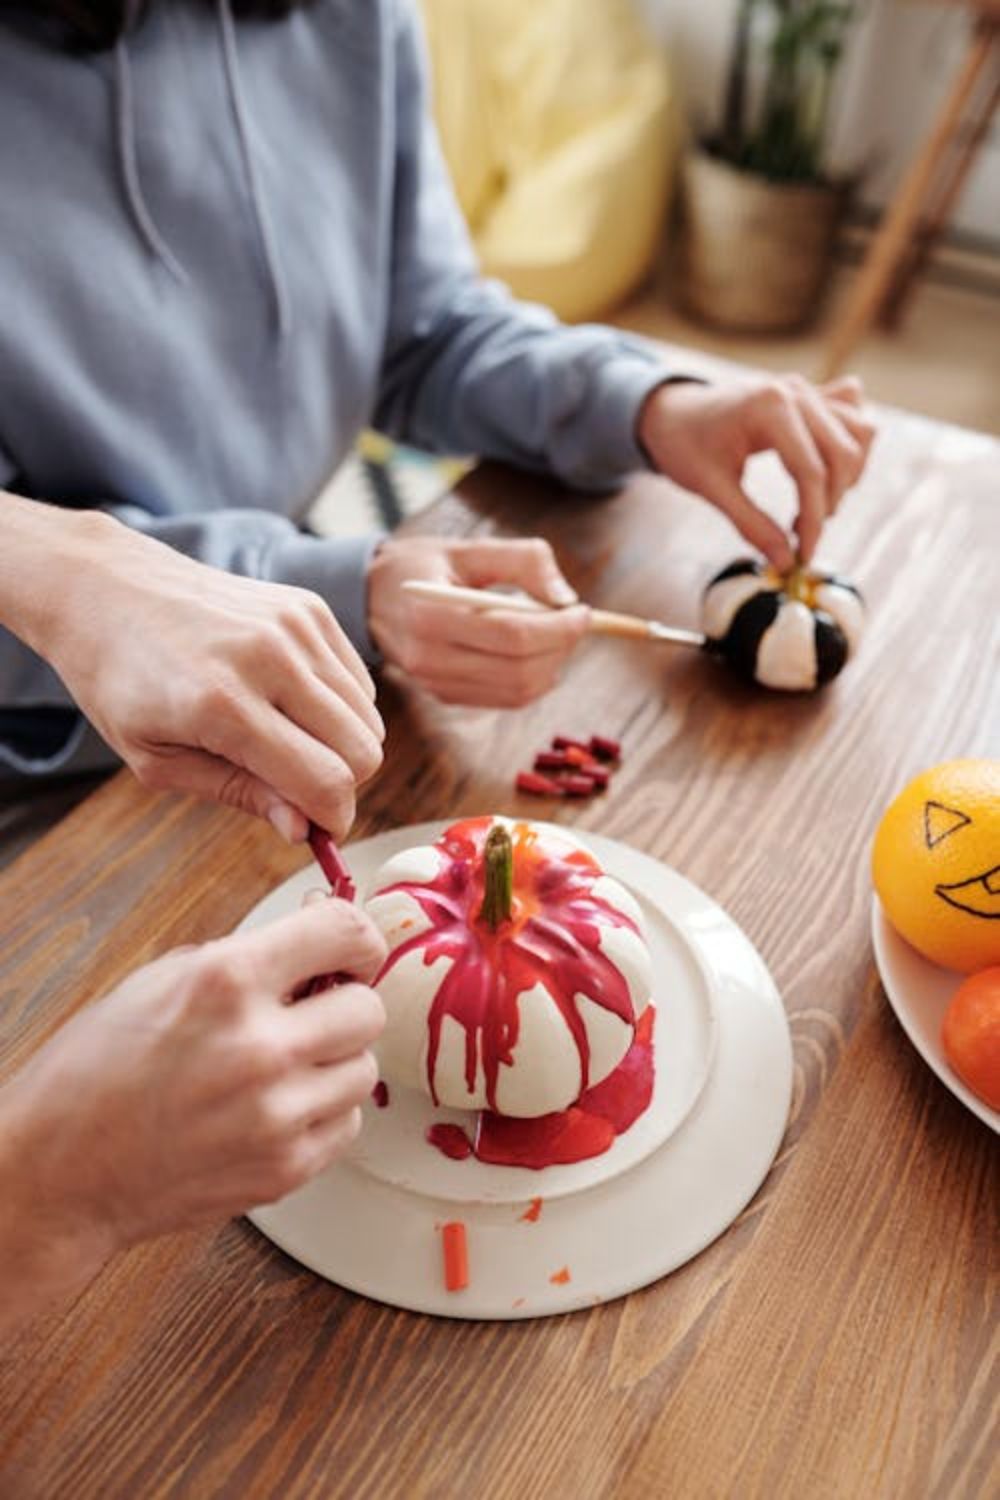
Pumpkin carving always stressed me out a little, especially when kids were involved. So a few years ago, I swapped knives for paintbrushes, and honestly, it’s been a game changer. Pumpkin painting is less mess, safer for kids, and way more creative in my opinion. I love laying out a bunch of acrylic paints, markers, glitter, and stickers, then just letting everyone go wild. One year, my niece turned her pumpkin into a unicorn with glitter glue and pipe cleaners—it was ridiculous and adorable at the same time.
The best part is you don’t even need fancy supplies; old paints from your craft box will work just fine. To be fair, I sometimes buy those little cheap foam brushes because they spread paint so smoothly. If you’re short on time, let the base coat dry overnight and decorate the next day. It feels less rushed, and the pumpkins last longer than carved ones.
Paper Plate Ghosts
There’s something about paper plate ghosts that takes me right back to kindergarten art class. They’re so easy that even toddlers can manage them, but still fun enough for older kids (and let’s be honest—me too). All you need are some white paper plates, scissors, black markers, and streamers or tissue paper for the tails. The first time we made them, my little cousin decided his ghost needed glasses and a mustache, which cracked everyone up.
I like to hang these ghosts from the ceiling with fishing line so they look like they’re floating around. They’re super light, so even a ceiling fan breeze makes them “fly.” One year, I hung about ten of them in the hallway, and it felt like you were walking through a ghost parade. Cheap, quick, and charming—that’s exactly my kind of Halloween craft.
DIY Bat Garland

Bat garlands have been one of my go-to crafts because they’re simple but give a huge impact to Halloween décor. I cut out bat shapes from black cardstock (sometimes I cheat and use a stencil I saved from Pinterest). A hole punch and some string, and suddenly you’ve got this spooky chain of bats that looks like they’re swooping across the wall. I remember once I strung them above the doorway, and my neighbor thought they were store-bought—nope, just scissors and paper.
The best part is you can make them as big or small as you want. Honestly, I like mixing sizes so it feels more natural, like a real bat swarm. If you’re short on time, let the kids help with cutting—they might not be perfect, but that actually makes them cuter. I’ve found that adding a little glitter glue on the wings makes them stand out when the light hits at night.
Handprint Spiders
Handprint spiders are one of those crafts that turn into keepsakes before you even realize it. The first time I did this with my nephew, I didn’t think much of it. We just dipped his hands in black paint, stamped them on paper with overlapping palms, and drew little eyes. Now, years later, I still have that “spider” taped inside my Halloween folder. It’s like a snapshot of his tiny hands frozen in time.
These are messy, to be fair, but kids absolutely love the paint part. You can turn them into a banner by stringing the handprints together or just let them decorate the fridge. I’ve found googly eyes add a fun touch, and sometimes we add sparkly thread as a “web.” Don’t stress if the hands aren’t perfect—honestly, the smudges make them look creepier anyway.
Mason Jar Lanterns

Mason jar lanterns are one of my personal favorites because they’re practical and magical at the same time. I’ve painted jars with orange and black acrylics, glued on tissue paper, or even wrapped them with gauze to look like little mummies. Drop a tea light inside—battery-operated ones are best—and suddenly you’ve got instant Halloween glow. One year, I lined our porch with them, and trick-or-treaters kept asking where I bought them. That was a proud DIY moment.
I like experimenting with different jar sizes, too. Small baby food jars look cute as little ghost lanterns, while big jars make great pumpkin faces. To be fair, the hardest part is waiting for the paint to dry before adding details. My trick is to work on a bunch of jars at once so there’s always another one ready while one dries. It turns into this cozy, assembly-line style craft night.
Candy Corn Wreath

Candy corn wreaths sound messy, but they’re honestly one of the most satisfying crafts I’ve done. You just need a foam wreath base, a hot glue gun, and (yep) lots of candy corn. I know, some people hate eating it, but gluing it? That’s a whole other level of fun. The first time I made one, I underestimated how many bags I’d need. Spoiler: it takes way more than you think.
Once it’s done though, it looks amazing—bright, colorful, and perfectly Halloween. I like adding a black ribbon bow at the top to finish it off. To be fair, it’s not exactly a forever decoration (humidity makes the candy sticky), but for one season it’s perfect. My tip: spray a clear sealant over it if you want it to last longer. Just don’t let the kids sneak pieces off, or you’ll end up with bald patches on your wreath.
Toilet Paper Roll Mummies
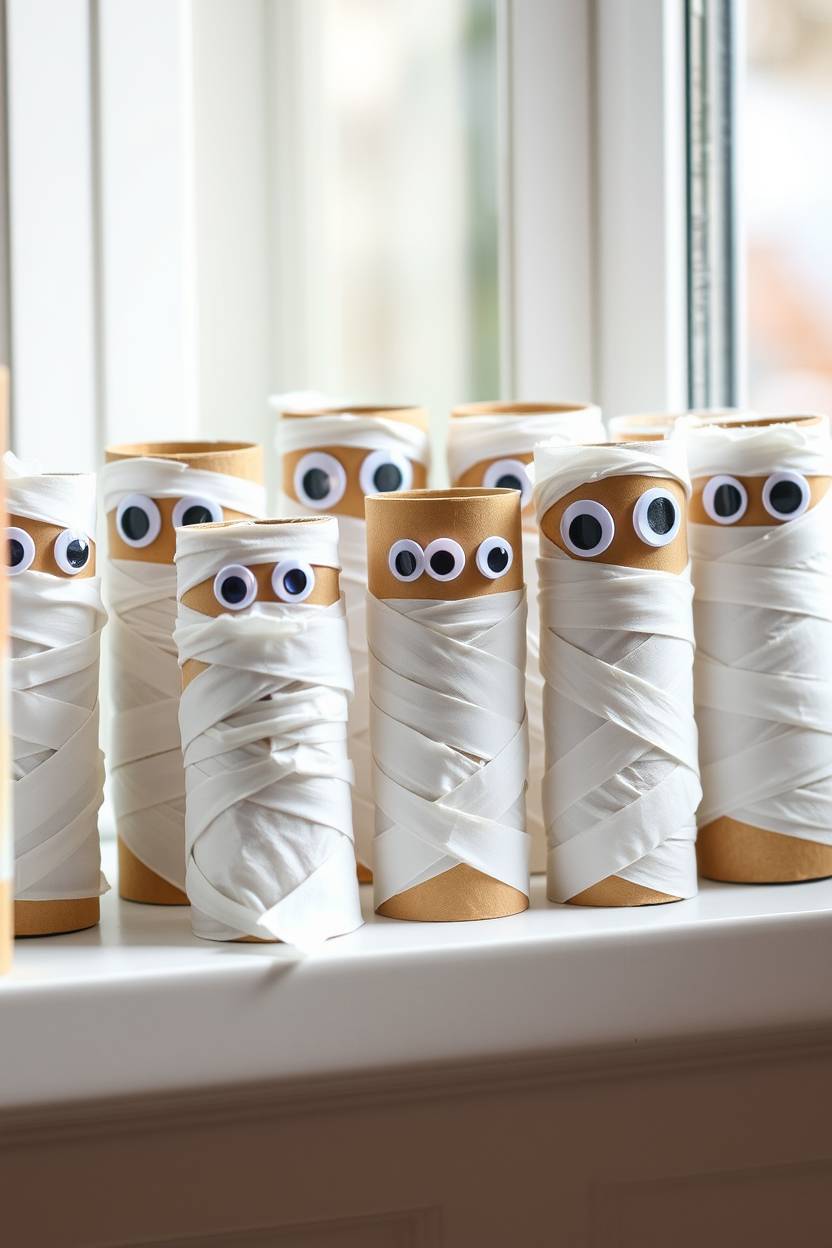
I swear toilet paper roll mummies are the craft I’ve repeated most over the years. They’re quick, cute, and require almost nothing—empty rolls, white tissue or gauze, googly eyes, and glue. I once made about twenty of them for a school craft fair table, and kids were obsessed. The best part? They double as little treat holders if you stuff candy inside.
To be fair, the wrapping part can get a bit fiddly, especially if you’re using actual toilet paper. I’ve found tissue paper or crepe streamers hold up better. The eyes are what really sell it though—crooked, silly, or oversized, they always make people laugh. I like lining them up on a windowsill so it looks like a tiny army of mummies guarding the house. Cheap and cheerful, exactly how I like my Halloween crafts.
Felt Pumpkin Patches
Making felt pumpkin patches is one of those rainy-day crafts I adore. You cut out little orange pumpkins from felt, then add green stems and black triangle faces if you want them to be jack-o’-lanterns. I once made a whole set and stuck them on a felt board so the kids could “arrange the patch” however they wanted. It’s like a Halloween version of felt storyboards.
Honestly, the textures make this one extra fun. Felt is soft, durable, and forgiving if you’re not the neatest cutter. I like making pumpkins of different sizes so kids can mix and match them. To be fair, this craft does take a little prep work if you’re cutting everything yourself. But once the shapes are ready, it keeps kids busy for ages. And let’s be honest, sometimes that’s the best part of a family craft night.
Popsicle Stick Haunted Houses
Popsicle stick haunted houses are one of those crafts that always look more complicated than they actually are. I keep a stash of popsicle sticks for random projects, and this one’s my favorite use. You glue them together into little house shapes, paint them black or purple, then add spooky details like spider webs or tiny ghosts. I once made one with my niece, and she insisted on adding glitter windows—honestly, it worked.
The fun part is that every house comes out different. Sometimes they’re crooked, sometimes lopsided, and sometimes surprisingly sturdy. To be fair, the glue can take forever to dry, so I usually use a hot glue gun if I’m short on patience. I like setting them up in a little “haunted village” on the mantle with LED candles behind them. They end up looking way fancier than the supplies would suggest.
Leaf Print Pumpkins
Leaf print pumpkins are one of those nature-meets-Halloween crafts that I love. You collect leaves from outside, coat them in paint, and press them onto paper pumpkins (or even real ones if you’re brave). The imprints always come out differently, which is half the fun. I remember doing this with my cousin, and she got so excited when her leaf made a perfect, veiny print.
I like mixing metallic paints with traditional orange and black—it gives this classy yet spooky vibe. To be fair, it can get messy fast, so I recommend laying down newspaper everywhere. I’ve found that big maple leaves give the coolest texture, but smaller leaves add nice details too. It’s a fun way to sneak a little nature walk into the craft, and kids get to see how art can come from the simplest things.
Glow-in-the-Dark Slime
Slime is already a hit with kids, but glow-in-the-dark slime? That takes it to another level. I remember the first time we made it, the lights went out, and everyone gasped at the glowing goo. It was like instant Halloween magic. You can use regular slime recipes with clear glue, then add glow-in-the-dark paint or powder. Stir it up, and you’ve got spooky, squishy fun.
To be fair, slime can get messy, so I usually set some rules before we start (like no slime in hair or carpets). I like giving everyone their own little jars to store it—it feels like a potion bottle. And when you pull it out during a Halloween party, it’s the kind of craft that doubles as entertainment. Honestly, I still find it satisfying to squish, glow or not.
Witch Hat Cone Crafts
This is one of those crafts that’s way easier than it looks. You just roll black cardstock into a cone, tape or glue it, and you’ve got the base of a witch hat. Add a circle brim, decorate with ribbon, glitter, or even stickers, and you’re done. I once made these as place settings for a Halloween dinner, and guests couldn’t stop talking about them. They look so festive without much effort.
The best part is personalizing each hat. Some end up looking elegant, others completely silly. To be fair, the cones sometimes collapse if you don’t tape them tight, so I learned to double up on the glue. I’ve found that kids especially love making mini versions for dolls or stuffed animals. It turns into this goofy little fashion show of spooky hats, which is just as fun as the craft itself.
Egg Carton Bats
Egg carton bats are a total classic. You cut a section of the carton into three bumps, paint it black, add googly eyes, and glue on some wings. Simple, quick, and adorable. I remember the first batch we made had eyes so big, they looked more like owls—but nobody minded. They’re just fun to make.
I like hanging them upside down with string so it looks like they’re sleeping bats. To be fair, painting the egg carton can take a couple coats if you want it really dark, but kids don’t usually care about perfection. Sometimes I let them add little fangs with white paint pens, which makes them even sillier. Honestly, this is one of those crafts I never get tired of because the results always make me smile.
Monster Rock Painting
Monster rock painting is such a quirky craft, and I love it because the rocks already have personality. I usually grab a bunch from the garden, wash them, and let everyone pick “their rock.” Then it’s just paint, googly eyes, and whatever weird details come to mind. One year, my nephew painted one bright green with ten eyes and named it “Steve.” Steve still lives on my bookshelf.
I’ve found that bright, bold colors work best, and letting the kids make up stories about their monsters makes it even more fun. To be fair, the paint sometimes chips, so a clear coat helps if you want them to last. You can scatter them around the yard for a “monster hunt,” which always makes trick-or-treaters smile. Honestly, they’re as fun to display as they are to create.
Spooky Candle Holders
Spooky candle holders might just be the easiest “grown-up looking” craft I’ve ever done. You take old jars or glasses, wrap them with black lace, gauze, or even tissue paper, and pop a candle inside. Boom—instant haunted glow. I once made a set for a dinner party, and people thought I’d bought them from a boutique store. That’s the kind of reaction I live for.
The fun part is experimenting. I’ve painted spiders on some, glued on bat cutouts, and even dripped red candle wax down the sides for a creepy vibe. To be fair, real candles make me nervous around kids, so I always stick to LED tea lights. They’re safer and still give that flickering effect. Honestly, once you’ve made these, you’ll never want to buy overpriced Halloween candle holders again.
Tips for Crafting with Kids
Crafting with kids during Halloween can be one of the best ways to spark their imagination and create special memories. But to make it fun and stress-free, a little planning goes a long way. Here are some helpful tips to keep in mind:
-
Use safe, non-toxic materials
Always pick supplies that are child-friendly, like washable paints, non-toxic glue, and safety scissors. This keeps the activity fun without any worries. -
Set up a mess-friendly space
Crafts can get messy, so cover the table with old newspapers, a plastic sheet, or an old tablecloth. Having wipes or tissues nearby makes cleanup much easier. -
Encourage creativity (no wrong way to craft!)
Let kids use their imagination, even if their pumpkin looks more silly than spooky. The goal is fun, not perfection. -
Save crafts as keepsakes or décor for future years
Many crafts can be stored and reused as decorations. It’s a great way to look back at how your kids’ skills and creativity grow year after year.
FAQ
What age group are these Halloween Family Craft Ideas suitable for?
Most Halloween Family Craft Ideas can be adapted for all ages. Younger kids can work on simple projects like paper plate pumpkins, while older kids and adults can try more detailed ones like mason jar lanterns or haunted house models.
Do I need expensive supplies for these Halloween Family Craft Ideas?
Not at all! Many projects use everyday items like paper plates, toilet paper rolls, jars, and cardboard. A few low-cost craft basics like glue, paint, and scissors are usually enough.
Can these Halloween Family Craft Ideas double as party activities?
Yes! Crafts like mask-making, decorating trick-or-treat bags, or painting pumpkins are perfect for keeping kids entertained at Halloween parties.
How can I keep the mess under control?
Set up a designated craft space with old newspapers, table covers, or plastic sheets. Keep wet wipes or tissues handy to make cleanup easy.

Hi, I’m Victoria, an art and craft teacher at Newark City Schools, where I have the joy of working with middle school students to help them explore their creativity and develop their artistic talents. I believe that art is a powerful way for students to express themselves, and I strive to make every lesson a fun, engaging, and inspiring experience.
I created this website to share the art and craft projects, techniques, and resources that I use in my classroom, hoping to inspire both educators and young artists alike. Whether you’re a teacher looking for new ideas or a student eager to try something new, I’m excited to provide creative tools and projects that anyone can enjoy.
When I’m not in the classroom, I love experimenting with different art forms and learning new crafting techniques. My goal is to help others discover the joy of making things with their hands, and I hope my website serves as a space for everyone to explore their creative potential.