
You know, last Halloween I decided to try a few Halloween mummy craft ideas with my niece—and let me tell you, it was messy, hilarious, and surprisingly cute. We had googly eyes rolling off the table, glue stuck to everything, and toilet paper everywhere (basically, a craft disaster in the best way possible). But honestly? It turned out to be one of my favorite memories. If you’ve ever wanted to make something spooky but not too scary, or if you just love a good DIY project that’s simple and fun, you’re in the right place. Whether you’re crafting with kids or just looking to decorate your space on a budget, these mummy-themed ideas will wrap you right into the Halloween spirit (pun totally intended). So grab your scissors, a bit of tape, and maybe a snack—because we’re about to get crafty, mummy-style!
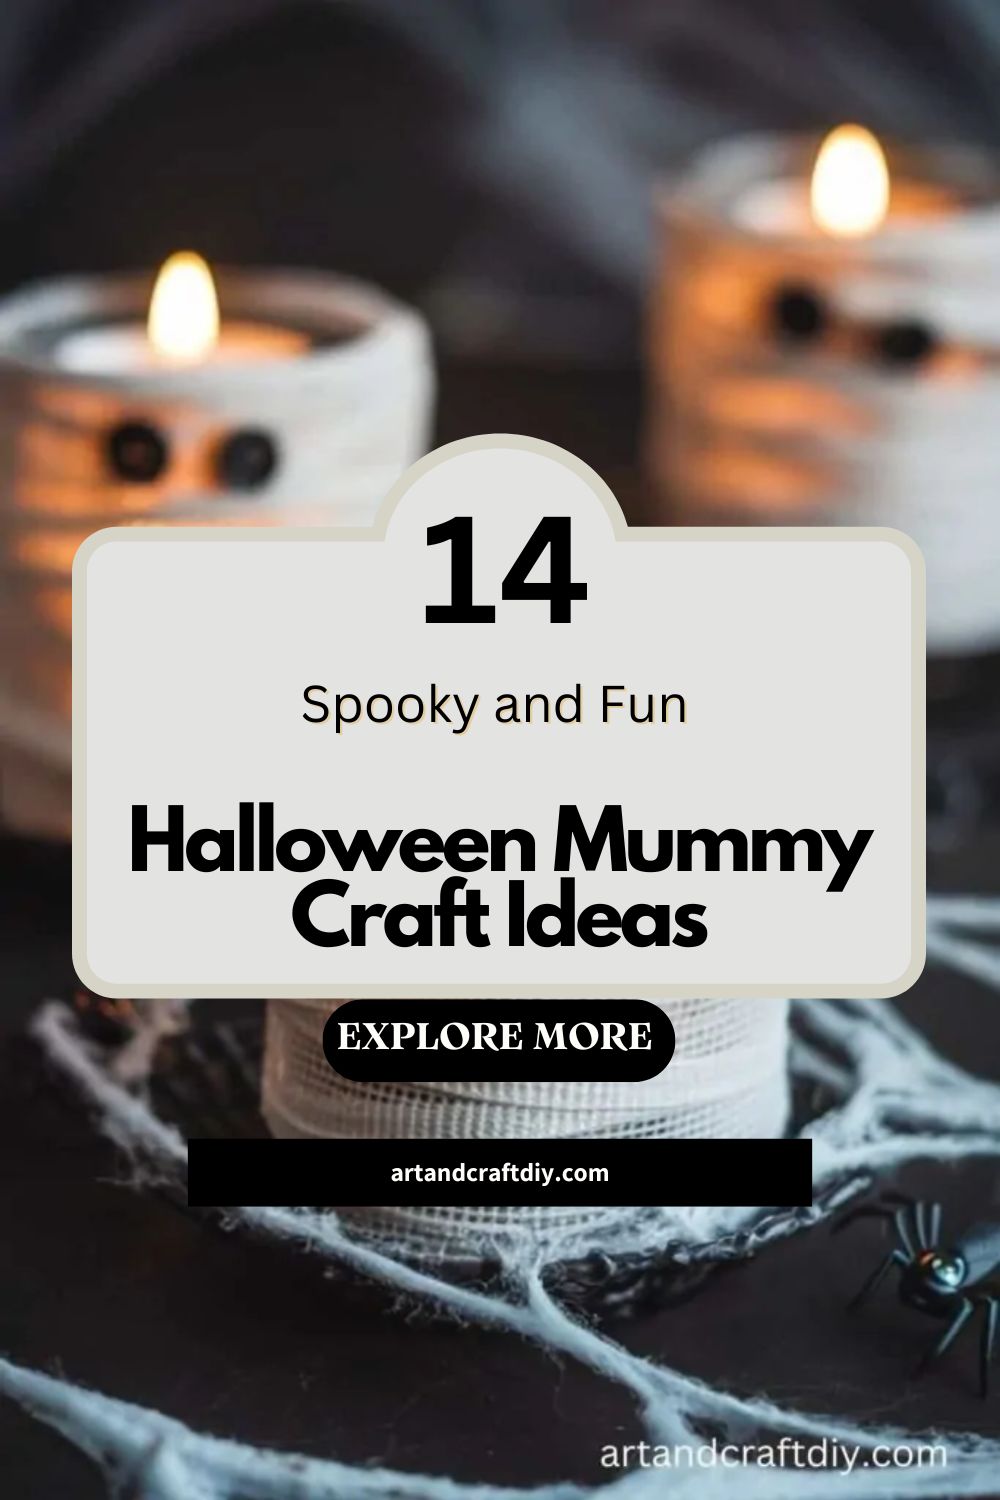
Halloween Mummy Craft Ideas
Halloween Mummy Craft Ideas are a fun and spooky way to get creative for the season. Using simple materials like gauze, jars, and paper rolls, you can make cute or creepy mummies perfect for decorating your home or party.
Mummy Mason Jars
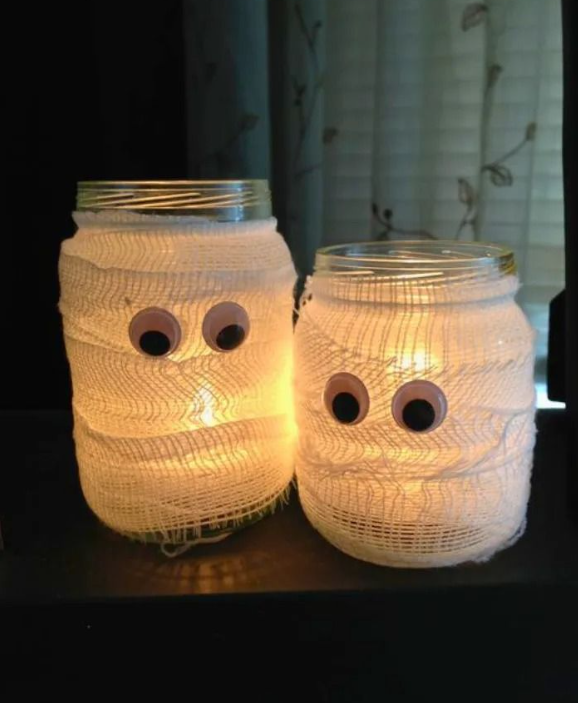
Okay, so I have to start with my all-time favorite—Mummy Mason Jars! Honestly, these are the easiest yet cutest Halloween crafts I’ve ever done. I remember making them last year with my niece, and she couldn’t stop giggling when we wrapped the jars in white gauze. You just need some gauze or white medical tape, googly eyes, and a mason jar (or any old jar you’ve got lying around). Wrap, stick, glow—done! They look amazing when you drop in a little LED candle. The soft glow through the “mummy wrap” gives off that perfect spooky-but-cute vibe.
In my opinion, this one’s perfect for adding a little Halloween charm to your table or window sill. I’ve found that grouping a few together looks even better, especially if you vary the jar sizes. It’s one of those crafts that looks like you spent hours on it—but really, you didn’t.
Mummy Candle Holders
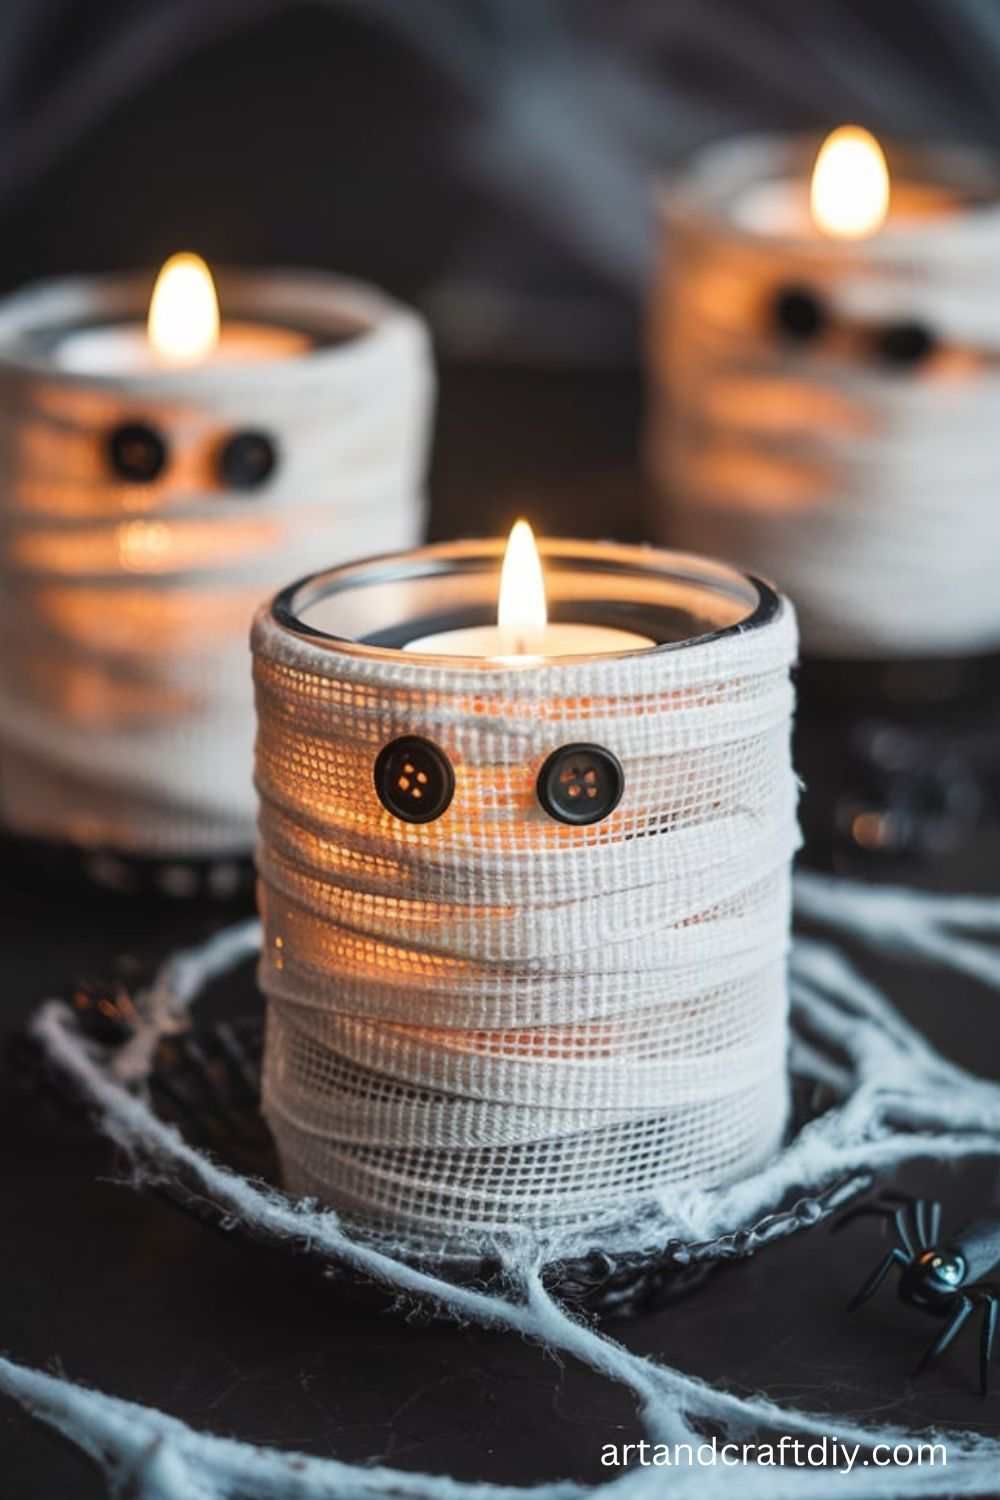
I made these once when I was short on time, and wow, they turned out surprisingly fun. You can basically take any glass candle holder (even an old drinking glass), wrap it with white crepe paper or gauze, and stick on a couple of googly eyes. I used double-sided tape instead of glue—way less messy, to be fair. When you light the candle inside, it gives off this eerie flicker that looks like the mummy is alive!
I love how customizable this one is. You can add little bats, spiders, or even a bow tie to make your mummy fancy. One year, I made a few in different colors—purple, orange, and classic white—and lined them up on the porch. People passing by actually stopped to take pictures! It’s cheap, fast, and gives that cozy-spooky Halloween glow that I adore.
Mummy Pumpkins
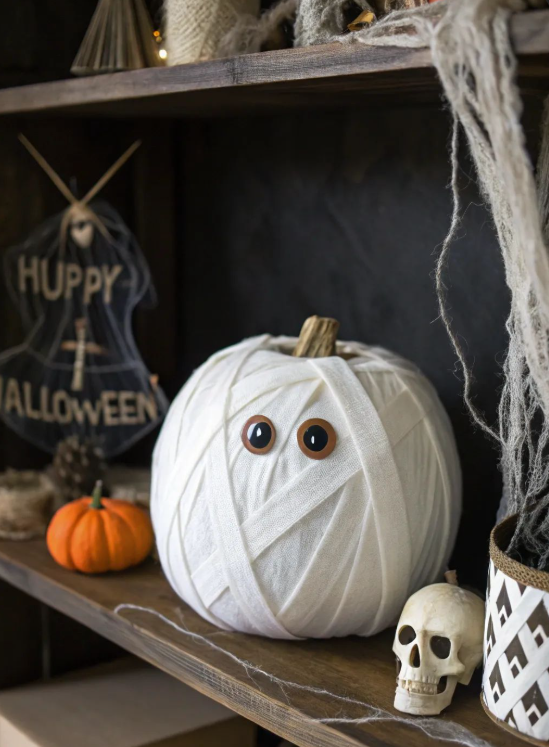
So, you know how everyone carves pumpkins for Halloween? Well, I’m terrible at carving. Like, truly terrible. So I started wrapping my pumpkins instead! Mummy Pumpkins are my lazy-but-creative solution. I just grab some white gauze or strips of fabric, wrap them around a mini pumpkin, and stick on a pair of goofy eyes.
Last year, I even used a big one as my porch centerpiece. It was such a hit because it looked spooky without being messy or smelly like carved pumpkins can get. I’ve found that hot glue helps the fabric stay put better than tape, especially if it’s windy. Plus, you can add little accessories like tiny hats or fake spiders. It’s quick, adorable, and perfect if you’re not in the mood for all that carving cleanup drama.
Mummy Wreath
View this post on Instagram
Now, this one is a little extra, but I swear it’s worth it. I made a Mummy Wreath for my front door last Halloween, and everyone who came over commented on it. You just wrap a foam wreath form (or even a pool noodle shaped into a circle) with white fabric strips or cheesecloth. Then, pop on some big googly eyes peeking out from the “bandages.”
To be fair, I didn’t expect it to turn out as good as it did. I added some fake cobwebs and a few tiny plastic spiders for an extra creepy touch. Hanging it on the door instantly made my home look like a Halloween wonderland. It’s one of those crafts that’s easy to make but looks like something from a fancy decor shop. Trust me, it’s totally worth the hour you’ll spend making it.
Mummy Door Decor
If you’ve ever wanted to freak out your visitors in the funniest way, Mummy Door Decor is for you. I tried this when I was feeling too lazy to do a full porch setup. You basically wrap white streamers or tissue paper around your front door, leaving a little gap for eyes. Then stick on two big paper eyes (I made mine from paper plates—DIY queen move, right?).
It’s so simple but surprisingly effective. My neighbors actually thought I’d bought it from a store. I’ve found it’s a great idea if you live in an apartment too, because it doesn’t take up much space. The best part? You can pull it off in ten minutes flat. Add a small “Keep Out!” sign for fun, and boom—instant Halloween charm without the stress.
Mummy Rocks
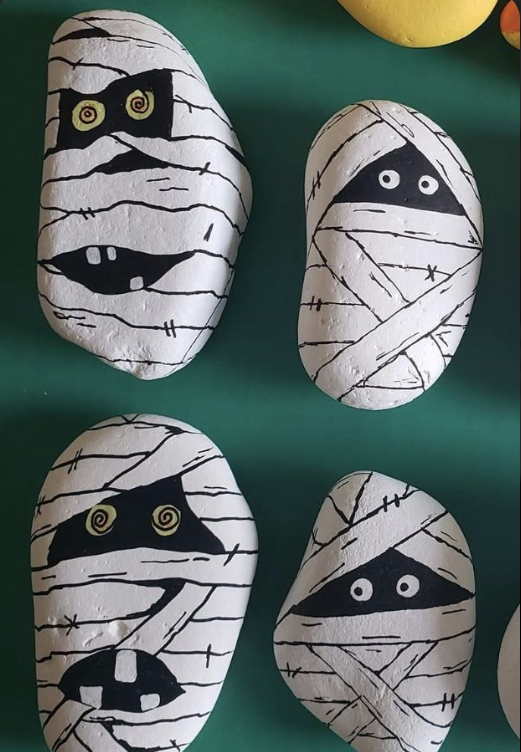
This one is kind of nostalgic for me. I did it with my nephew when he was five, and we ended up making a whole “mummy family” of painted rocks. All you need are smooth rocks, white paint, and a black marker. Paint the rocks white, draw a few “bandage” lines, and glue on small eyes.
It’s ridiculously cute and easy, especially if you like crafts that don’t require a ton of supplies. I placed my mummy rocks in my garden, and they looked hilarious peeking out from the plants. In my opinion, this one’s great for kids or anyone who just wants a quick Halloween afternoon activity. Honestly, sometimes the simplest crafts bring the most smiles.
Mummy Paper Roll Characters
Okay, who doesn’t have empty toilet paper rolls lying around? I turned a bunch of them into mini mummies last year, and they were so fun to make. Wrap them in strips of white paper, tape on googly eyes, and draw little mouths if you want. I even gave one a bow and another a tiny hat—it became a whole mummy family!
These look adorable on shelves or as table decorations. To be fair, they also make great crafts for kids’ parties. I remember my niece made hers with rainbow-colored bandages. It totally ruined the spooky vibe, but it was too cute to complain about. The best part? It’s free, easy, and eco-friendly—what’s not to love?
Mummy Candy Jars

Every Halloween, I love setting up a candy station, and Mummy Candy Jars make it look extra special. Just wrap white gauze or tape around a jar, add eyes, and fill it with candies. I use clear jars so the colorful candies peek through the bandages—it’s a nice contrast.
I’ve found it’s also a sneaky way to control candy portions. When the jars are smaller, I don’t go overboard (which happens a lot, trust me). You can even tie a small ribbon or tag around them for gifting. My friends loved getting these as party favors last year. They’re so easy that I make new ones every season.
Mummy Balloons
Mummy Balloons are one of those crafts that sound silly until you try them. I took some white balloons, drew “bandages” with a marker, and glued paper eyes on them. You can also wrap thin strips of tissue around for a real bandaged look.
I hung a bunch from my ceiling last year, and it looked like floating mummies were taking over the room! Honestly, the reaction from my guests was priceless. Kids especially loved swatting at them. Just don’t use too much tape or they’ll pop (learned that the hard way). In my opinion, this is one of the cheapest yet most effective decor tricks for Halloween.
Mummy Photo Frames
I adore personalized crafts, and Mummy Photo Frames are one of my top picks. I took some old photo frames, wrapped the borders with white fabric strips, and glued little eyes peeking out from one corner. You can stick a spooky family photo or even a Halloween drawing inside.
It’s such a cozy touch for your table or wall. I gave one to my best friend as a gift, and she still keeps it up every Halloween. I’ve found that using fabric instead of paper makes it last longer, so you can reuse it each year. It’s one of those subtle crafts that blend spooky with sentimental—my favorite combo.
Mummy Gift Bags
I once made these for my Halloween party guests, and they were such a hit! I took plain paper bags, wrapped them with strips of tissue, and glued on eyes. Fill them with candies, stickers, or tiny toys. I even wrote everyone’s names in a spooky font on the back.
Honestly, the kids went wild for them. I’ve found that using black or orange bags underneath the white wrap gives it a cooler layered look. Plus, it’s super affordable if you’re hosting a big crowd. It’s those little personalized touches that make Halloween feel extra special, don’t you think?
Mummy Lanterns
If you love warm lighting, Mummy Lanterns are a total win. You can use glass jars, plastic cups, or even paper lanterns. Wrap them in cheesecloth or tissue, glue on eyes, and place a battery-operated light inside. The way they glow through the “bandages” is so cozy!
I lined my walkway with these last year, and the effect was magical. I even added fake cobwebs around them for an extra creepy touch. In my opinion, they’re perfect for both indoor and outdoor setups. It’s one of those crafts that’s easy to make but looks professional when lit up at night.
Mummy Garland
I never thought I’d be so obsessed with Mummy Garland until I made one! I cut out small mummy shapes from cardstock, wrapped each with tissue strips, and strung them together with twine. It looked adorable hanging across my fireplace.
It’s a cute alternative to traditional Halloween banners. You can even mix in little bats or pumpkins between mummies for a fun twist. I’ve found that it’s a perfect craft to do with friends—everyone can make their own little mummy, and it becomes a collaborative masterpiece. Honestly, it brings such a handmade, homely vibe to your Halloween setup.
Mummy Slime Jars
Kids go crazy for this one. I filled small jars with homemade slime (green and orange look best) and decorated the jars like mummies. White tape, eyes, done! It’s a great mix of creepy and fun.
I gave these out as party favors last Halloween, and they were a total hit. To be fair, they take a little more prep time, but the result is worth it. I’ve found that labeling each jar with cute Halloween stickers makes them even more appealing. Plus, you’ll feel like the coolest host ever when kids squeal over their “mummy slime.”
Mummy Treat Boxes
And finally—Mummy Treat Boxes! These are my go-to for Halloween gifts. I buy small cardboard boxes, wrap them with tissue or gauze, stick on eyes, and fill them with cookies or candies. Simple, quick, and ridiculously adorable.
I remember making a batch for my coworkers once, and they couldn’t stop smiling. It’s such a sweet way to spread Halloween cheer. In my opinion, crafts like these remind us that the best decorations are the ones made with a little creativity and a lot of heart.
Tips for Crafting Mummy Magic
Share how to make mummy crafts safe, neat, and fun by using simple materials and creative touches. These tips will help you create spooky yet adorable mummies that everyone will love.
Tips:
-
Use fabric strips or gauze for a realistic look.
-
Add glow-in-the-dark paint for a spooky effect.
-
Reuse household items like jars and rolls.
-
Supervise kids when using hot glue or scissors.
-
Mix and match colors — white, gray, and black tones work best.
FAQ
What materials do I need for mummy crafts?
You can use gauze, fabric strips, paper rolls, jars, glue, scissors, googly eyes, and markers.
Can kids make these mummy crafts?
Yes! Most crafts are kid-friendly, but adult supervision is recommended for scissors or hot glue.
How can I make my mummy crafts glow in the dark?
Use glow-in-the-dark paint or stickers on your mummies for a spooky nighttime effect.
Can I reuse household items for mummy crafts?
Absolutely! Jars, toilet paper rolls, balloons, and scrap paper work perfectly for DIY mummies.

Hi, I’m Victoria, an art and craft teacher at Newark City Schools, where I have the joy of working with middle school students to help them explore their creativity and develop their artistic talents. I believe that art is a powerful way for students to express themselves, and I strive to make every lesson a fun, engaging, and inspiring experience.
I created this website to share the art and craft projects, techniques, and resources that I use in my classroom, hoping to inspire both educators and young artists alike. Whether you’re a teacher looking for new ideas or a student eager to try something new, I’m excited to provide creative tools and projects that anyone can enjoy.
When I’m not in the classroom, I love experimenting with different art forms and learning new crafting techniques. My goal is to help others discover the joy of making things with their hands, and I hope my website serves as a space for everyone to explore their creative potential.