
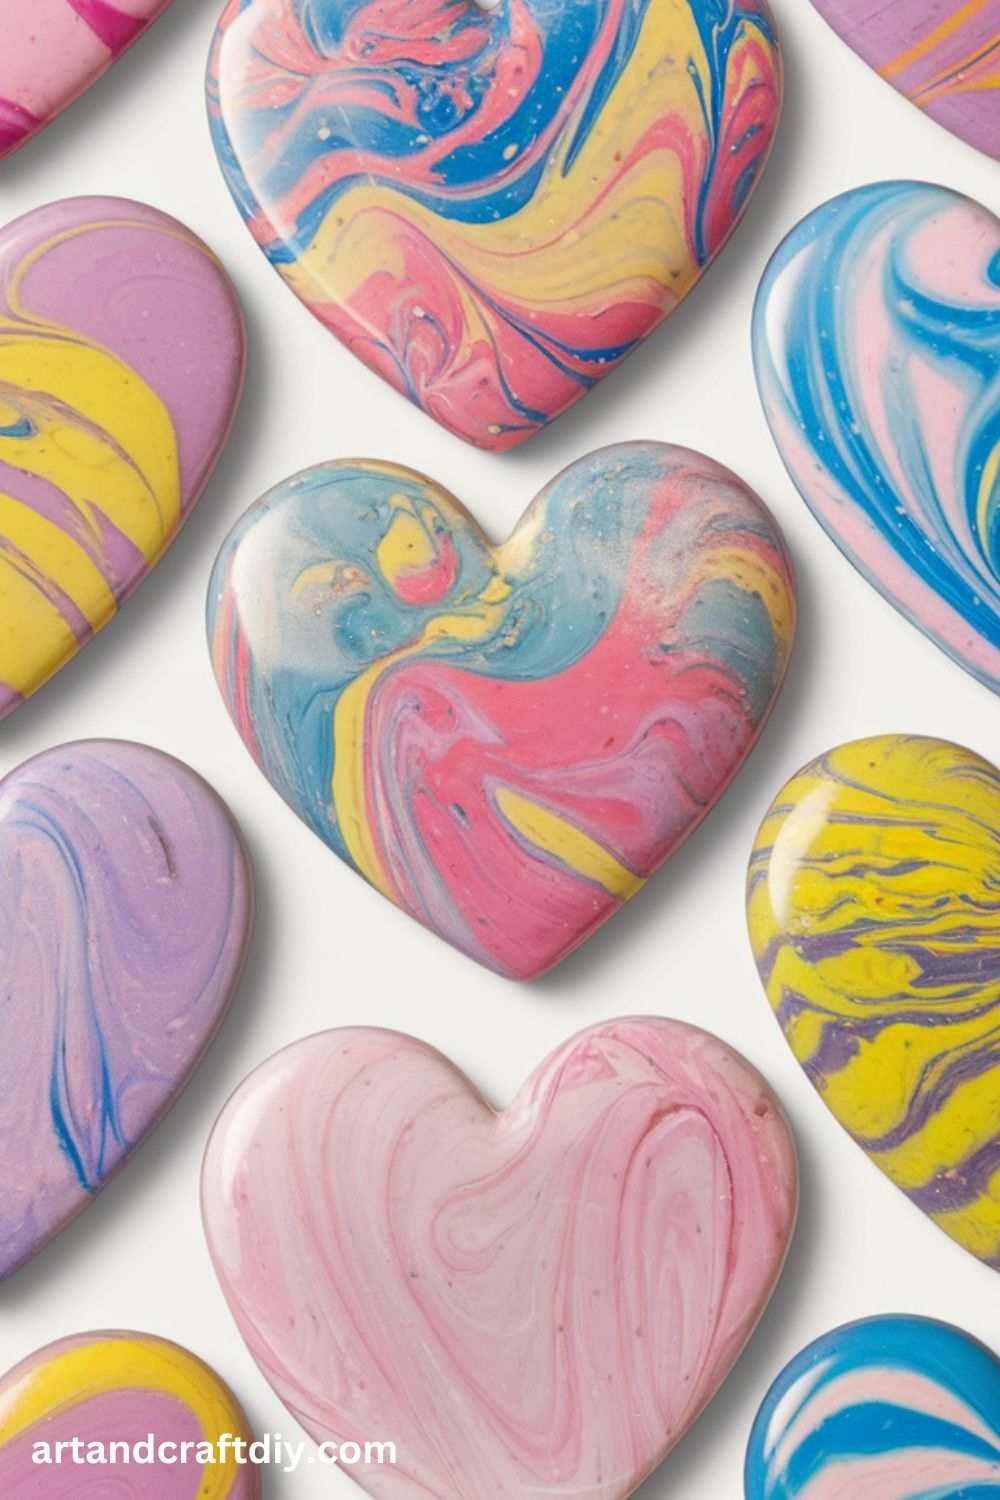
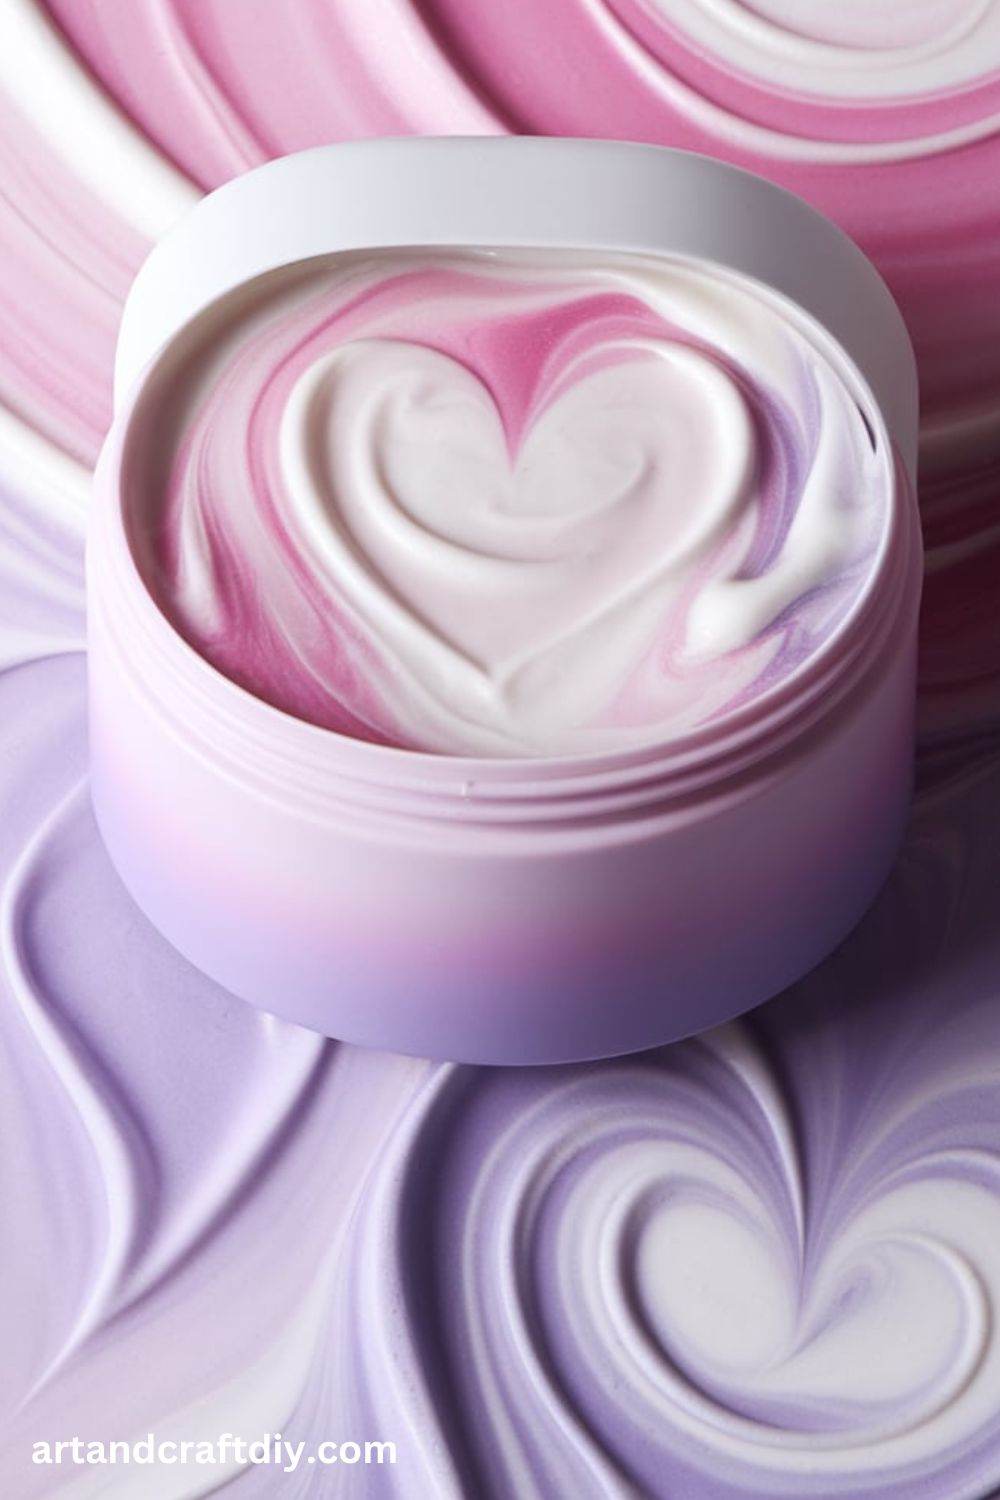
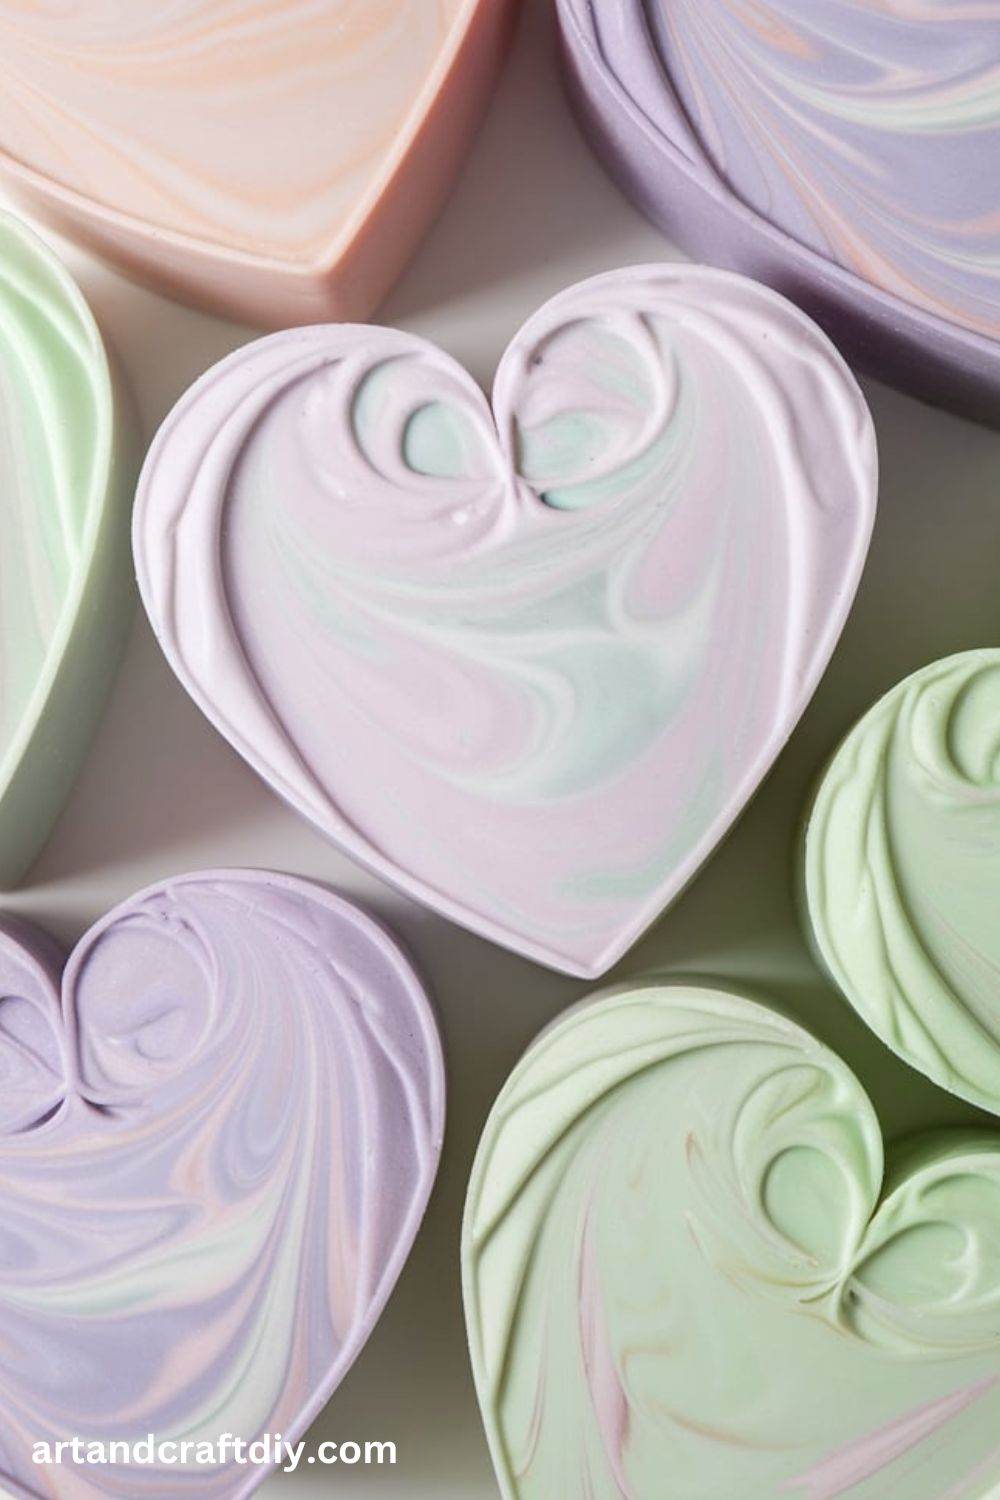
Shaving cream marbled hearts are a fun and creative craft that combines the artistry of marbling with a heart-shaped twist. This simple yet mesmerizing activity involves swirling shaving cream and food coloring to create beautiful, unique patterns. The result is an eye-catching, personalized design that’s perfect for crafting cards, gifts, or home décor. It’s an excellent activity for all ages, from kids who will enjoy the tactile experience of manipulating the colors to adults who will appreciate the relaxing nature of the process. Whether you’re celebrating Valentine’s Day, Mother’s Day, or simply looking for a DIY project to add a creative touch to your space, shaving cream marbled hearts make for a fun and heartfelt project.
Shaving cream marbled hearts offer endless opportunities for creativity and personalization, making them a popular choice for a variety of occasions. The process is straightforward yet allows for unique results each time, which makes it a wonderful activity for family gatherings, school projects, or even a solo creative session. The vibrant colors swirl together in unexpected ways, resulting in one-of-a-kind designs that can be used to make everything from greeting cards and gift tags to framed artwork.
Shaving Cream Marbled Hearts
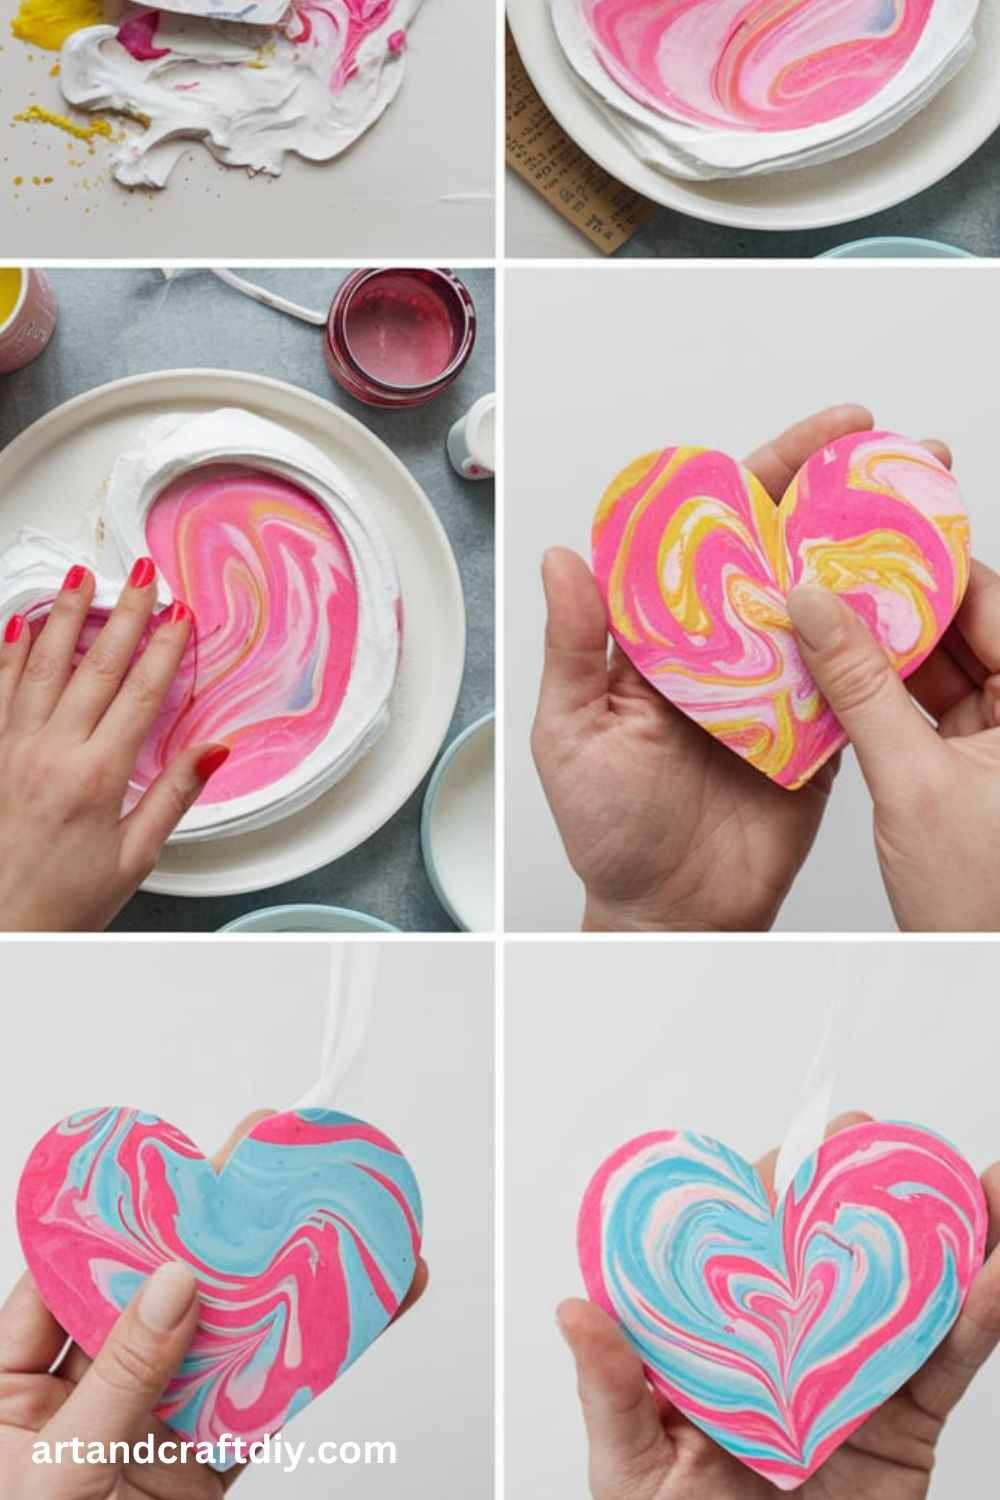
Shaving Cream Marbled Hearts is a fun and creative DIY art technique that involves using shaving cream to create a marbled effect on paper or other materials. The process typically includes squirting shaving cream onto a surface, adding drops of ink or food coloring, swirling them together with a stick or comb to create a marbled design, and then pressing paper or a surface onto the mixture to transfer the design. The result is a beautiful, one-of-a-kind marbled heart pattern, making it a great craft for Valentine’s Day or any occasion that calls for a personalized, artistic touch!

Classic Shaving Cream Marbled Hearts
This project uses basic materials and creates a beautiful marbled effect inside heart-shaped cutouts.

Materials:
- Shaving cream
- Food coloring (various colors)
- Toothpick
- Paper (preferably cardstock)
- Scissors
Steps:
- Spray a generous amount of shaving cream onto a flat surface.
- Add drops of food coloring in different colors on top of the shaving cream.
- Use a toothpick to swirl the colors together, creating a marbled effect.
- Place your heart-shaped stencil onto the shaving cream.
- Press the stencil gently into the cream and pull it away.
- Carefully lift the stencil off, leaving a marbled heart pattern behind.
- Let the design dry and cut around the heart shape to create your marbled heart.
Shaving Cream Marbled Heart Cards
This DIY project is perfect for creating personalized greeting cards with a beautiful marbled heart design.

Materials:
- Shaving cream
- Food coloring
- Cardstock
- Spoons
- Toothpick
- Paper towels
Steps:
- Spread shaving cream over a shallow tray.
- Add drops of food coloring randomly onto the cream.
- Swirl the colors with a toothpick to create a marbled effect.
- Gently press a piece of cardstock onto the marbled cream.
- Lift the cardstock and scrape off excess shaving cream using a spoon.
- Let the card dry, and you’ll have a beautiful marbled heart card.
Colorful Shaving Cream Marbled Heart Magnets
This project turns marbled hearts into fun refrigerator magnets, perfect for any occasion.
Materials:
- Shaving cream
- Food coloring
- Magnet sheets
- Cardstock
- Scissors
- Toothpick
Steps:
- Prepare a tray with a thin layer of shaving cream.
- Add several colors of food coloring to the shaving cream.
- Use a toothpick to swirl the colors together for a marbled effect.
- Dip small heart-shaped pieces of cardstock into the shaving cream.
- Press gently and lift up to reveal the design.
- Let the hearts dry and glue magnets to the back of the cardstock.
- Place them on your fridge as decorative magnets.
Ombre Shaving Cream Marbled Hearts
Create stunning ombre effects with marbled hearts for a smooth gradient look.
Materials:
- Shaving cream
- Food coloring
- Cardstock
- Watercolor brush
- Plastic tray
Steps:
- Fill a tray with shaving cream and add a few drops of food coloring in a gradient pattern (darker at one end, lighter at the other).
- Use a toothpick to swirl the colors together gently, achieving an ombre look.
- Press the cardstock onto the marbled cream.
- Lift the paper gently and scrape off the excess cream.
- Let dry and cut into heart shapes for a lovely ombre effect.
Shaving Cream Marbled Heart Coasters
Make decorative and functional heart-shaped coasters with shaving cream marbling.

Materials:
- Shaving cream
- Food coloring
- Ceramic or wooden coaster blanks
- Toothpicks
- Scraper or spoon
Steps:
- Spray a layer of shaving cream on a flat surface.
- Add food coloring drops and use a toothpick to create swirls.
- Press the coaster blanks gently into the marbled cream.
- Lift the coaster and scrape off excess shaving cream.
- Allow the coasters to dry before using them as fun, marbled decor.
Shaving Cream Marbled Heart Wall Art
Transform your wall into a gallery with beautiful, marbled heart art.

Materials:
- Shaving cream
- Food coloring
- Canvas board
- Toothpicks
- Cardstock
Steps:
- Spread a layer of shaving cream onto a large flat surface.
- Drop food coloring in random patterns and swirl with a toothpick.
- Gently press a piece of cardstock onto the marbled cream.
- Let the design dry, then carefully cut out heart shapes.
- Glue the hearts onto a canvas to create a stunning marbled heart wall art.
Shaving Cream Marbled Heart Bookmarks
Create a set of personalized bookmarks with marbled hearts for a unique and practical gift.

Materials:
- Shaving cream
- Food coloring
- Paper or cardstock
- Toothpicks
- Ribbon (optional)
Steps:
- Spread shaving cream across a flat surface.
- Add food coloring and swirl to create marbled patterns.
- Place strips of paper or cardstock into the marbled cream.
- Scrape off excess shaving cream, leaving the colorful marbled design.
- Cut the bookmarks into desired sizes and add a ribbon if desired.
Shaving Cream Marbled Heart Soap Bars
Make your own marbled heart soap bars for a fun, crafty experience.
Materials:
- Shaving cream
- Soap base
- Food coloring
- Silicone heart molds
- Toothpicks
Steps:
- Melt the soap base in a microwave or double boiler.
- Add a few drops of food coloring to create different colors.
- Pour the colored soap into the silicone molds.
- Spray shaving cream on top and swirl with a toothpick.
- Let the soap harden, then pop the marbled heart soap bars out of the molds.
Shaving Cream Marbled Heart Ornaments
Create beautiful marbled heart ornaments to hang on your Christmas tree or use as a gift.
Materials:
- Shaving cream
- Food coloring
- Clear plastic or wooden heart ornaments
- Toothpicks
Steps:
- Cover a flat surface with shaving cream.
- Drop various food coloring onto the shaving cream.
- Use a toothpick to swirl the colors together.
- Dip your heart-shaped ornament into the marbled cream.
- Let the ornament dry completely before hanging it.
Shaving Cream Marbled Heart Placemats
Make a set of marbled heart placemats for a unique touch to your dining table.

Materials:
- Shaving cream
- Food coloring
- Plastic placemats or paper
- Toothpicks
Steps:
- Spread a thin layer of shaving cream on a flat surface.
- Add food coloring and swirl together.
- Press the placemat (or paper) onto the cream, making sure the heart design is visible.
- Lift it off, scrape away excess cream, and let dry.
- Enjoy your beautiful marbled heart placemats!
Shaving Cream Marbled Heart Stickers
This project is perfect for creating customized marbled heart stickers.
Materials:
- Shaving cream
- Food coloring
- Sticker paper
- Scissors
- Toothpicks
Steps:
- Spray shaving cream onto a flat surface.
- Add several drops of food coloring and swirl with a toothpick.
- Press a piece of sticker paper onto the marbled cream.
- Lift it carefully, scrape off excess shaving cream, and let it dry.
- Cut out heart shapes and use them as stickers.
Shaving Cream Marbled Heart Keychains
Create personalized keychains with marbled heart designs.
Materials:
- Shaving cream
- Food coloring
- Clear acrylic keychain blanks
- Toothpicks
Steps:
- Spread shaving cream on a flat surface.
- Add drops of food coloring and swirl gently with a toothpick.
- Dip the keychain blanks into the marbled cream.
- Scrape off excess shaving cream and let dry.
- Attach the dried marbled heart keychains to key rings.
Shaving Cream Marbled Heart Gift Tags
Make beautiful marbled heart gift tags for any special occasion.
Materials:
- Shaving cream
- Food coloring
- Cardstock
- Scissors
- Hole punch
Steps:
- Spread a thin layer of shaving cream onto a flat tray.
- Add food coloring and swirl it gently with a toothpick.
- Press the cardstock onto the marbled cream, making sure to leave the design intact.
- Let the cardstock dry and cut it into small gift tags.
- Punch a hole in the top and thread a ribbon through for easy attachment.
Shaving Cream Marbled Heart Picture Frames
Create custom picture frames with a marbled heart effect.
Materials:
- Shaving cream
- Food coloring
- Wooden picture frame
- Toothpicks
- Scissors
Steps:
- Spread a layer of shaving cream on a flat surface.
- Drop different food colors onto the shaving cream.
- Swirl the colors together with a toothpick.
- Gently press the wooden frame into the marbled cream.
- Let the frame dry completely before placing your picture inside.
Shaving Cream Marbled Heart Candle Holders
Craft a beautiful marbled heart candle holder for a romantic ambiance.
Materials:
- Shaving cream
- Food coloring
- Glass candle holders
- Toothpicks
Steps:
- Spread shaving cream onto a flat surface.
- Add a few drops of food coloring to the cream.
- Use a toothpick to swirl the colors together.
- Dip the glass candle holders into the marbled cream.
- Let the holders dry completely before using them for candles.
Shaving Cream Marbled Heart Postcards
Create unique postcards with marbled heart designs for sending special messages.
Materials:
- Shaving cream
- Food coloring
- Cardstock
- Toothpicks
- Postcard template
Steps:
- Spread shaving cream on a flat tray.
- Add food coloring and swirl with a toothpick.
- Press the cardstock onto the marbled cream.
- Lift it off, scrape away excess shaving cream, and let it dry.
- Cut out the postcard shape and send it to loved ones!
Shaving Cream Marbled Heart Wall Decals
Turn marbled hearts into peel-and-stick wall decals.
Materials:
- Shaving cream
- Food coloring
- Clear contact paper
- Scissors
- Toothpicks
Steps:
- Spread shaving cream on a flat surface and add drops of food coloring.
- Swirl the colors gently with a toothpick.
- Press a piece of clear contact paper onto the marbled cream.
- Lift it off and scrape away excess cream.
- Let it dry and cut out heart shapes to use as wall decals.
Shaving Cream Marbled Heart Table Runner
Design a marbled heart table runner for special occasions.
Materials:
- Shaving cream
- Food coloring
- White fabric
- Toothpicks
Steps:
- Spread shaving cream onto a flat surface.
- Add drops of food coloring to create a colorful pattern.
- Swirl the cream with a toothpick.
- Press the fabric gently onto the marbled cream.
- Lift the fabric and scrape off the excess shaving cream before allowing it to dry completely.
Shaving Cream Marbled Heart Mugs
Create personalized mugs with a marbled heart design for gifts.
Materials:
- Shaving cream
- Food coloring
- White ceramic mugs
- Toothpicks
Steps:
- Spray a layer of shaving cream onto a flat surface.
- Add food coloring in various colors.
- Use a toothpick to swirl the colors together.
- Dip the ceramic mugs into the marbled shaving cream.
- Let the mugs dry completely before using or gifting.
Shaving Cream Marbled Heart Plates
Craft beautiful marbled heart plates for a unique dining experience.
Materials:
- Shaving cream
- Food coloring
- White ceramic plates
- Toothpicks
Steps:
- Spread shaving cream over a flat surface.
- Add food coloring and swirl with a toothpick.
- Press the ceramic plates gently onto the marbled cream.
- Lift them off and scrape away excess shaving cream.
- Let the plates dry fully before using them for serving.
Shaving Cream Marbled Heart Scrapbook Pages
Make marbled heart scrapbook pages for your treasured memories.
Materials:
- Shaving cream
- Food coloring
- Scrapbook paper
- Scissors
- Toothpicks
Steps:
- Spread shaving cream onto a flat surface.
- Add food coloring and swirl to create marbled patterns.
- Press scrapbook paper into the marbled cream.
- Lift it off, scrape away excess cream, and let it dry.
- Cut out heart shapes and arrange them on scrapbook pages.
Shaving Cream Marbled Heart Wall Art Collage
Create a beautiful collage of marbled hearts for your wall.
Materials:
- Shaving cream
- Food coloring
- Canvas or poster board
- Toothpicks
- Cardstock
Steps:
- Spread shaving cream onto a flat surface.
- Add drops of food coloring and swirl with a toothpick.
- Press cardstock onto the cream to make marbled hearts.
- Allow the hearts to dry, cut them out, and arrange them on a canvas for a wall collage.
Shaving Cream Marbled Heart Notebooks
Create unique notebooks with a marbled heart cover.
Materials:
- Shaving cream
- Food coloring
- Blank notebooks
- Toothpicks
Steps:
- Spray shaving cream onto a flat surface.
- Add food coloring and swirl with a toothpick.
- Press the notebook cover into the cream.
- Lift the cover off, scrape away excess cream, and let it dry completely.
- You now have a custom marbled heart notebook!
Shaving Cream Marbled Heart Tote Bags
Design custom tote bags with a marbled heart pattern.
Materials:
- Shaving cream
- Food coloring
- Canvas tote bags
- Toothpicks
Steps:
- Spray shaving cream on a flat surface.
- Add food coloring and swirl with a toothpick.
- Press the canvas tote bag into the marbled cream.
- Lift it up, scrape off excess cream, and let it dry.
- Your tote bag is now ready to use.
Shaving Cream Marbled Heart Wall Stickers
Create peel-off marbled heart wall stickers for room decoration.
Materials:
- Shaving cream
- Food coloring
- Clear contact paper
- Scissors
- Toothpicks
Steps:
- Spread shaving cream on a flat surface and add food coloring.
- Swirl the colors together with a toothpick.
- Press clear contact paper into the marbled cream.
- Let it dry, then cut out heart shapes.
- Stick them to the walls as colorful decorations.
Shaving Cream Marbled Heart Post-It Notes
Design unique post-it notes with marbled heart designs.
Materials:
- Shaving cream
- Food coloring
- Post-it notes
- Toothpicks
Steps:
- Spread shaving cream on a flat surface.
- Add food coloring and swirl with a toothpick.
- Press the post-it notes onto the marbled cream.
- Lift them carefully and scrape off excess cream.
- Let them dry before using as decorative sticky notes.
Shaving Cream Marbled Heart Jewelry
Craft marbled heart jewelry pieces for a stylish, handmade accessory.
Materials:
- Shaving cream
- Food coloring
- Jewelry blanks (e.g., pendants, earrings)
- Toothpicks
Steps:
- Spread shaving cream onto a flat surface.
- Drop food coloring and swirl with a toothpick.
- Dip jewelry blanks into the marbled cream.
- Lift them up, scrape off excess cream, and let dry.
- Add chains or earring hooks to complete your marbled heart jewelry.
Shaving Cream Marbled Heart Gift Wrapping
Use marbled hearts to create unique, personalized gift wrap.
Materials:
- Shaving cream
- Food coloring
- Plain gift wrap paper
- Toothpicks
Steps:
- Spray shaving cream onto a flat surface.
- Add food coloring and swirl gently.
- Press the gift wrap paper into the marbled cream.
- Lift it off, scrape away excess cream, and let it dry.
- Your marbled heart gift wrap is ready to use!
Shaving Cream Marbled Heart Window Clings
Make marbled heart window clings for festive decorations.
Materials:
- Shaving cream
- Food coloring
- Clear plastic sheets
- Toothpicks
Steps:
- Spread shaving cream onto a flat surface.
- Add food coloring and swirl gently with a toothpick.
- Press clear plastic sheets into the marbled cream.
- Let them dry, then cut out heart shapes.
- Stick the marbled hearts to your windows for decorative clings.
Shaving Cream Marbled Heart Bowl Decor
Create a stunning decorative bowl filled with marbled hearts.
Materials:
- Shaving cream
- Food coloring
- Small ceramic bowls
- Toothpicks
Steps:
- Spread shaving cream on a flat surface.
- Add food coloring and swirl it gently with a toothpick.
- Press small ceramic bowls into the marbled cream.
- Lift the bowls off, scrape away excess cream, and let dry.
- Fill the bowls with marbled hearts to use as decor pieces.
Creative Variations for Marbled Heart Art
Marbling is a beautiful and versatile technique that allows you to explore a variety of creative possibilities. Whether you’re a beginner or an experienced artist, there are numerous ways to add depth, personal touches, and unique flair to your marbled designs. Here are some creative variations to try with your marbled heart art:
- Layered Marbling: Add dimension by creating multiple layers of marbling. Each layer can feature different colors, textures, or patterns, making your artwork more dynamic and intricate.
- Shaped Prints: Use stencils or freehand cutting to create heart shapes or other designs within your marbled artwork. This allows you to incorporate specific motifs, enhancing the visual interest of the piece.
- Gift Ideas: Marbled hearts make fantastic gifts! Turn your marbled creations into thoughtful greeting cards, bookmarks, or framed art pieces. These personalized gifts are perfect for special occasions like Valentine’s Day, birthdays, or anniversaries.
The Fun & Ease of Creating Marbled Heart Designs with Shaving Cream
Creating marbled heart designs with shaving cream is a fun, hands-on craft that’s perfect for kids and adults alike. This simple technique uses inexpensive materials to produce beautiful, swirling patterns that look stunning on paper or fabric. Whether you’re making Valentine’s Day cards, wall art, or gift tags, this DIY project is a delightful way to get creative without any prior artistic skills.
Why You’ll Love This Craft
✅ Super Easy & Messy Fun – No special skills required! Just swirl, press, and reveal gorgeous patterns.
✅ Budget-Friendly – Uses simple household items: shaving cream, food coloring, and paper.
✅ Unique Every Time – No two designs are the same, making each piece a one-of-a-kind creation.
✅ Great for All Ages – Kids love the tactile experience, and adults enjoy the relaxing, meditative process.
✅ Perfect for Gifts & Decorations – Create handmade cards, bookmarks, or framed artwork.
FAQ
Can I use gel shaving cream instead of foam?
No, foam shaving cream works best for this project because it creates a smooth surface for marbling. Gel shaving cream does not provide the same texture.
Will the Shaving Cream Marbled Hearts colors stain my hands?
Food coloring may stain your hands slightly, but it will wash off with soap and water. Wearing gloves can help prevent staining.
How long does it take for the paper to dry?
It usually takes about 30 minutes to an hour for the paper to dry completely, depending on the thickness of the cardstock and the amount of moisture.
Can I use watercolor paper instead of cardstock?
Yes, watercolor paper works well because it absorbs the paint and shaving cream mixture nicely, creating vibrant patterns.

Hi, I’m Victoria, an art and craft teacher at Newark City Schools, where I have the joy of working with middle school students to help them explore their creativity and develop their artistic talents. I believe that art is a powerful way for students to express themselves, and I strive to make every lesson a fun, engaging, and inspiring experience.
I created this website to share the art and craft projects, techniques, and resources that I use in my classroom, hoping to inspire both educators and young artists alike. Whether you’re a teacher looking for new ideas or a student eager to try something new, I’m excited to provide creative tools and projects that anyone can enjoy.
When I’m not in the classroom, I love experimenting with different art forms and learning new crafting techniques. My goal is to help others discover the joy of making things with their hands, and I hope my website serves as a space for everyone to explore their creative potential.