I still remember walking along the beach last summer, pockets bulging with tiny treasures—those little sea shells you can’t resist picking up, even though you’re not sure what you’ll actually do with them. (Tell me I’m not the only one?) They sat in a jar on my dresser for months, looking pretty but also making me feel a little guilty—like, shouldn’t I use them for something fun? That’s where small sea shell craft ideas DIY come in. Honestly, it’s way easier than it sounds, and you don’t need to be super “crafty” to make something cute. Think picture frames, candle holders, even simple jewelry—stuff that feels personal and carries a bit of that salty air home with you. If you’ve got a random pile of shells sitting around too, I’m gonna share some really easy, creative ways to turn them into little keepsakes you’ll actually love.
Small Sea Shells Craft Ideas DIY
Small Sea Shells Craft Ideas DIY is a creative and fun way to repurpose seashells into beautiful handmade items.
Sea Shell Jewelry
I still remember the first time I made a seashell necklace—I was maybe 14, sitting on the floor after a trip to the beach, with sand still stuck to my hair. Honestly, I didn’t know what I was doing, but threading those tiny shells onto a string felt so calming. It’s funny how something so simple can turn into a piece of jewelry that actually looks like it belongs in a boutique. The trick I’ve found is to pick shells that already have small natural holes, or if you’re a little braver, carefully drill tiny ones yourself.
In my opinion, the best part about seashell jewelry is that no two pieces ever look the same. A bracelet made from smaller shells feels dainty and light, while mixing bigger ones gives it a bolder look. I sometimes even wrap a bit of wire around the shell edges to make pendants. If you’re like me, you’ll end up keeping one piece for yourself and gifting the rest—it’s just that hard to let them go!
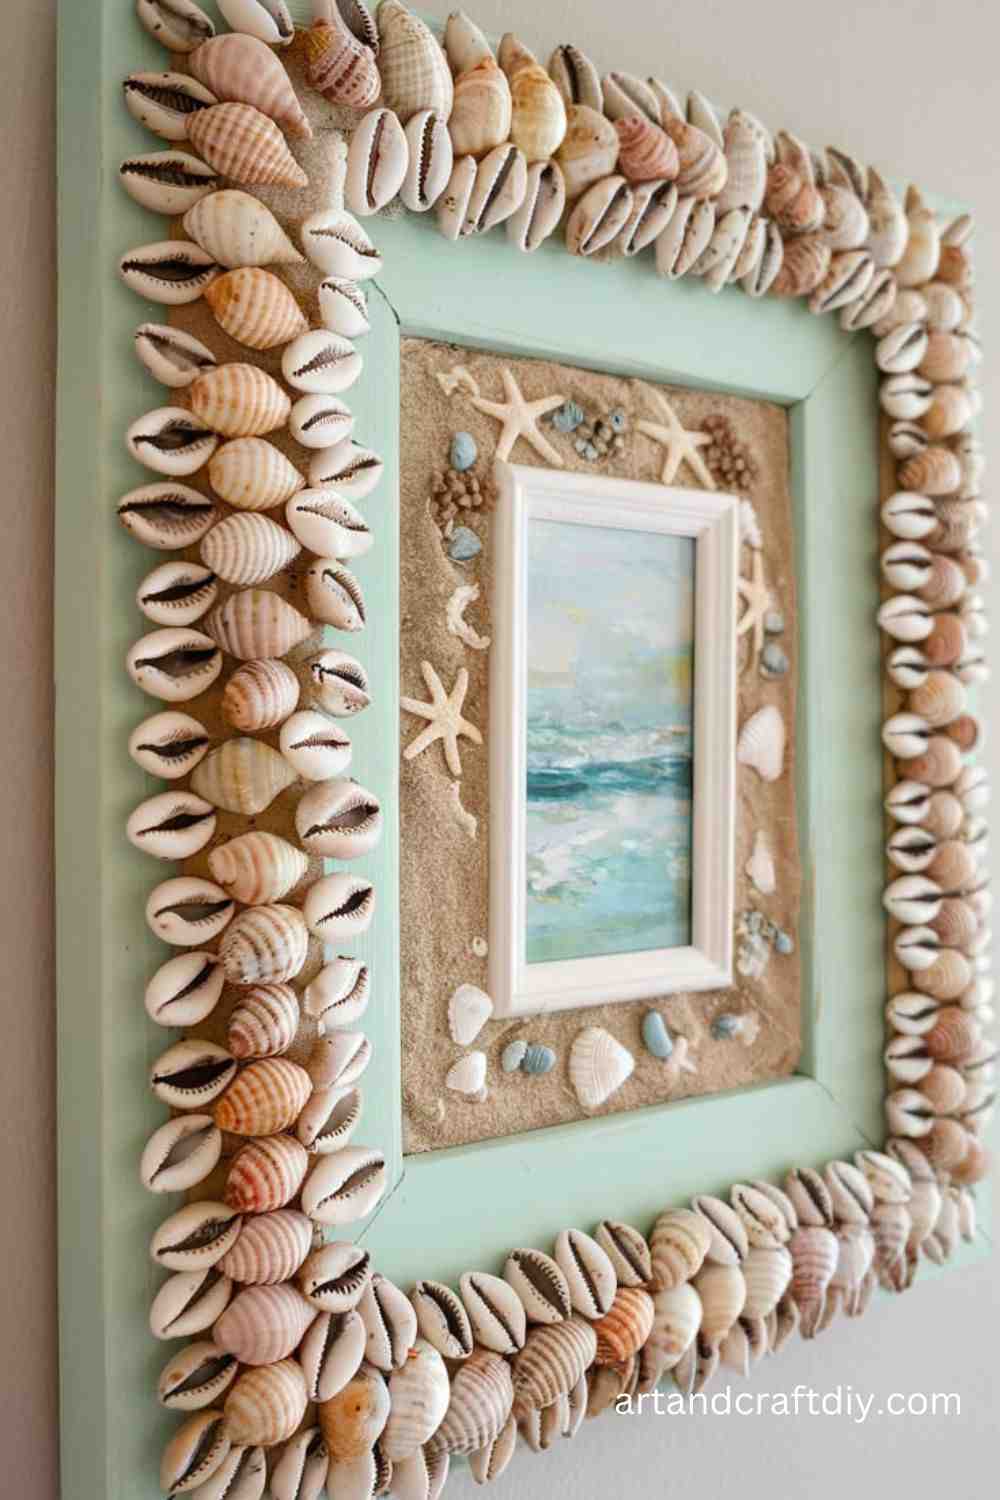
Seashell Picture Frame
One of my favorite projects has to be covering a plain wooden photo frame with seashells. To be fair, it’s one of those crafts where you don’t need fancy skills, just patience (and maybe a hot glue gun that doesn’t burn your fingers, unlike mine). I usually start by laying the shells out around the frame before sticking them down—kind of like solving a puzzle. There’s something oddly satisfying about finding the “perfect” spot for each little shell.
What I love most about this is how personal it feels. A frame covered with shells from a particular beach trip makes that memory even more special. I once made one with shells from a vacation with my best friend, and now that frame holds a goofy photo of us with ice cream all over our faces. Honestly, every time I look at it, it feels like I brought the beach home.
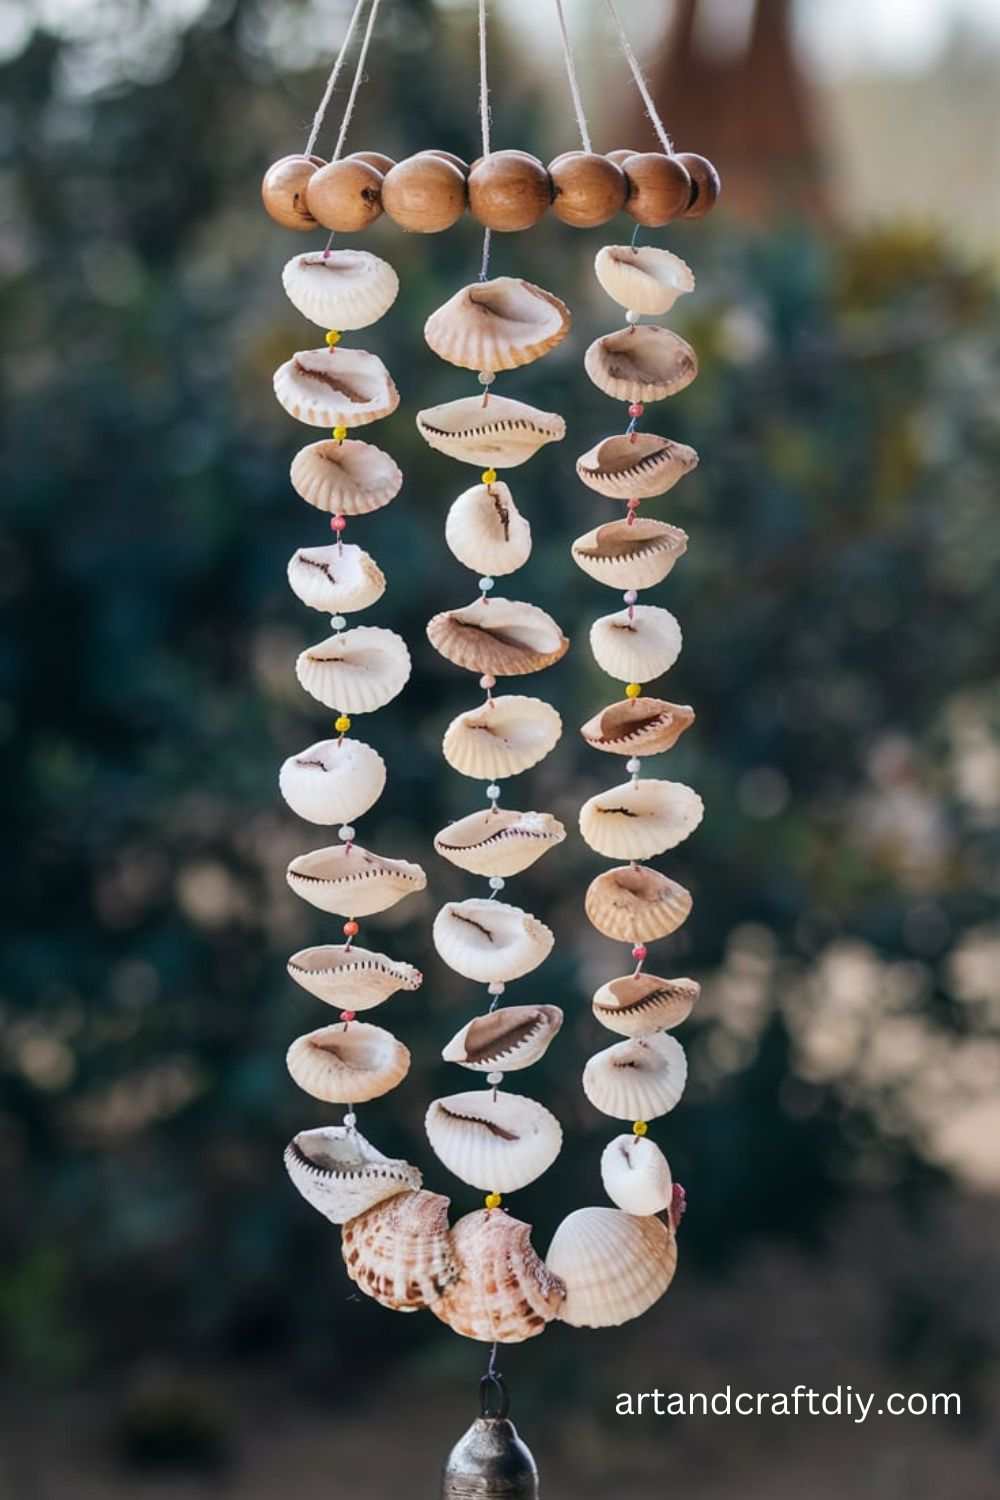
Seashell Wind Chime
Now, this one is a bit magical for me. I’ve always loved the sound of wind chimes, but making one out of seashells? That’s another level of charm. The first time I tried, I tied shells to pieces of fishing line and hung them from a driftwood stick I picked up during a walk. It wasn’t perfect—some shells clinked beautifully, others just dangled awkwardly—but the whole thing had character, you know?
Over time, I figured out that mixing shell sizes makes the sound more interesting. Tiny shells add a soft tinkling, while larger ones give a deeper, more hollow clink. In my opinion, the uneven, natural sound is what makes it so relaxing. Whenever the wind picks up, it feels like the beach is right outside my window. I can’t help but smile every time I hear it—it’s like a tiny soundtrack to my summer memories.
Seashell Candles
Seashell candles make for a unique and ocean-inspired decoration or gift. These small, charming candles add a touch of coastal beauty to your home.
Materials Used:
Large seashells (preferably those with a deeper cavity)
Wax (paraffin, soy, or beeswax)
Wick
Double boiler
Hot glue gun
Steps:
Clean the seashells and dry them thoroughly.
Using a double boiler, melt the wax until it’s in liquid form.
Attach the wick to the bottom of the shell using a small dot of hot glue.
Carefully pour the melted wax into the seashell, ensuring the wick remains centered.
Allow the wax to cool and harden completely before trimming the wick and using your new shell candle.
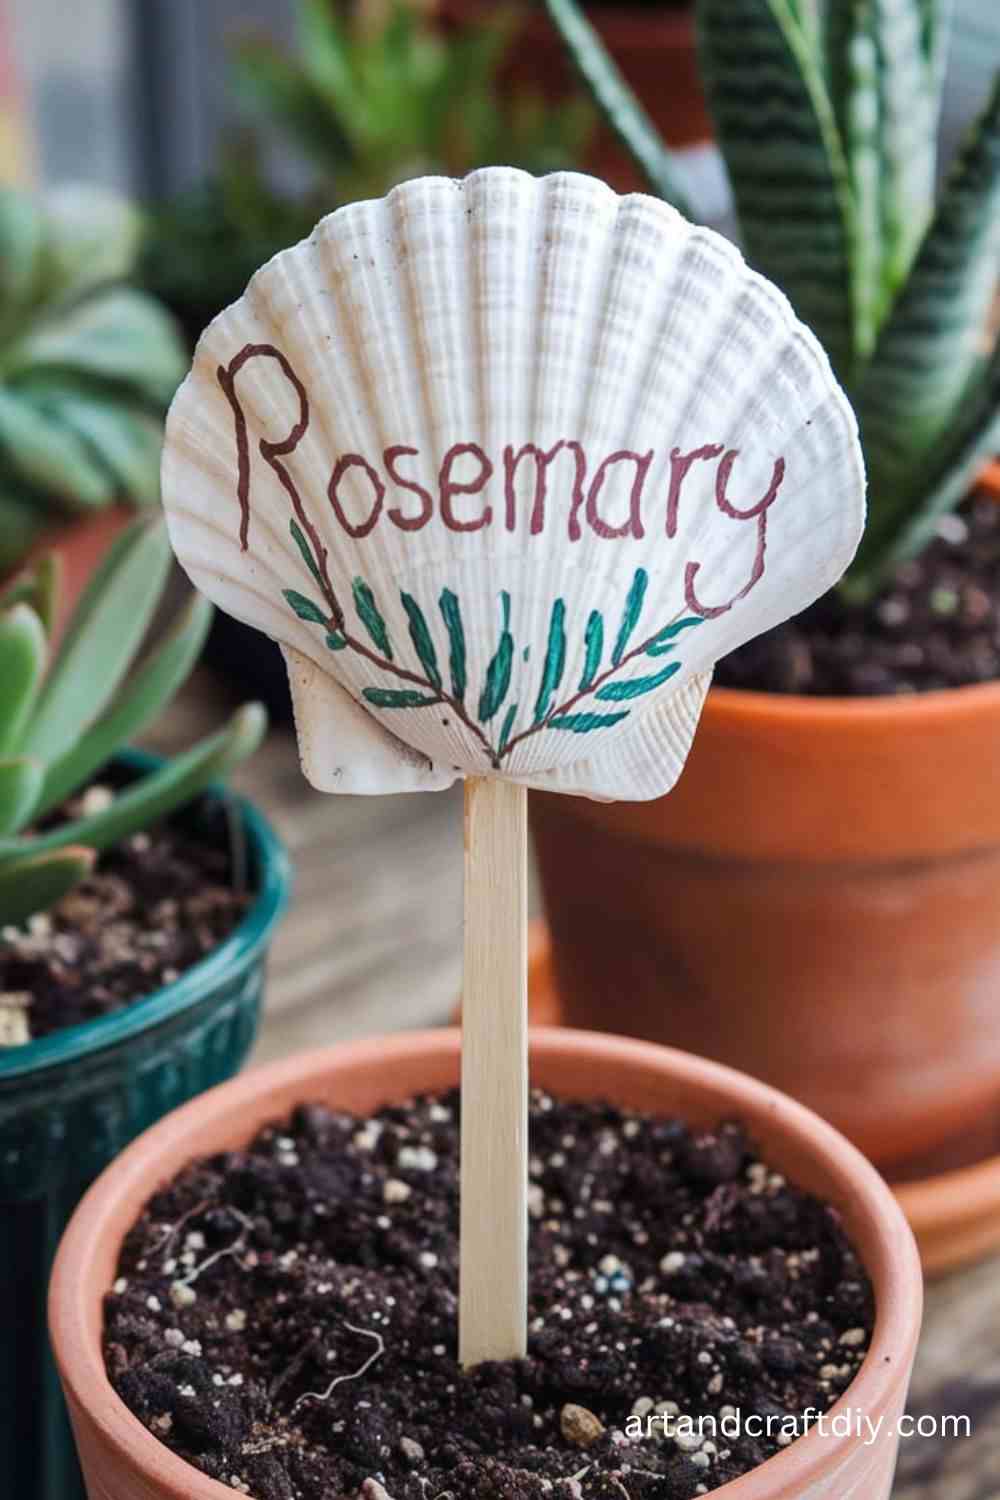
Seashell Garden Markers
Use seashells as decorative garden markers to label your plants in a unique and natural way. This project is perfect for beach lovers with a green thumb.
Materials Used:
Large seashells
Permanent marker or paint
Small wooden sticks or popsicle sticks
Hot glue gun
Steps:
Choose seashells that are large enough to write on.
Clean the shells and let them dry.
Write the name of the plant on each shell using a permanent marker or paint.
Attach a small stick to the back of each shell using hot glue.
Stick these markers into your garden to add both function and a decorative touch.
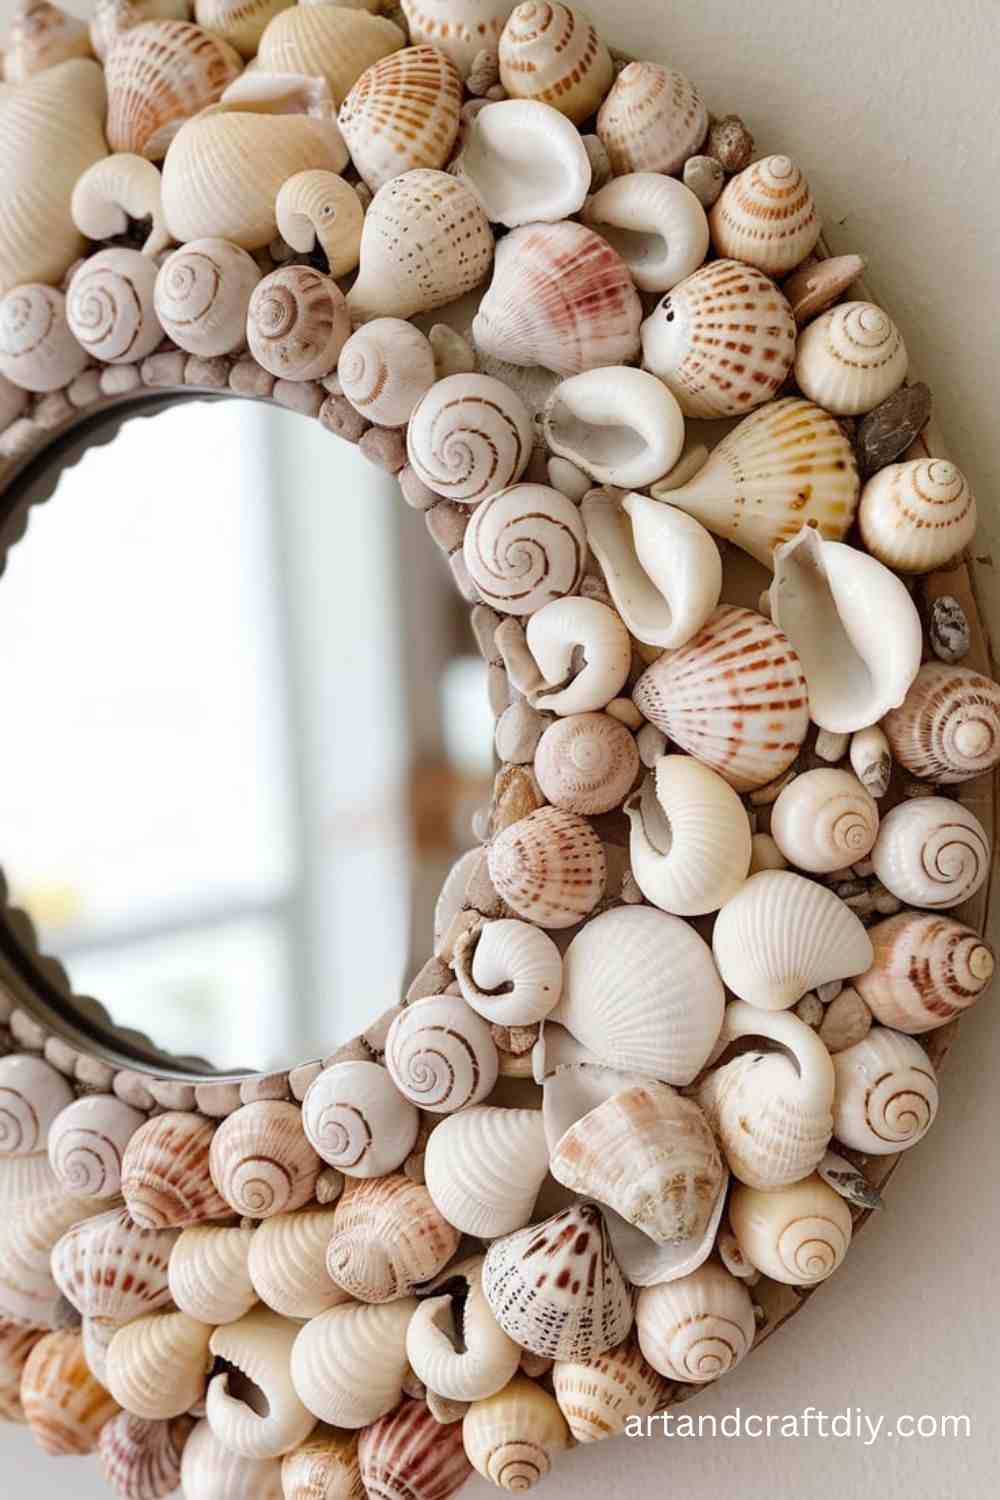
Seashell Mirror
A seashell mirror is a gorgeous way to bring the beauty of the beach into your home. This craft transforms a plain mirror into a coastal masterpiece.
Materials Used:
A circular mirror
Seashells
Hot glue gun
Scissors
Paint (optional)
Steps:
Start with a plain circular mirror and paint the edges in a color that complements the shells, like light blue or sand.
Clean the seashells and arrange them around the edge of the mirror.
Use the hot glue gun to attach the seashells in a pattern, covering the entire perimeter of the mirror.
Allow the glue to dry before hanging your new seashell mirror on the wall.
Seashell Coasters
Seashell coasters are practical yet beautiful items to make. They’re perfect for protecting surfaces while adding a bit of the ocean’s charm to your home decor.
Materials Used:
Cork coasters
Seashells
Hot glue gun
Paint or Mod Podge (optional)
Steps:
Start with plain cork coasters.
Arrange the seashells on the coasters in a pattern or design you like.
Use the hot glue gun to attach the seashells securely to the cork.
Optionally, coat the shells and the entire coaster with Mod Podge for added durability.
Allow to dry completely, then use them to add a coastal vibe to your home.
Seashell Magnets
Transform seashells into cute, functional magnets for your fridge or bulletin board. This simple craft can be a great gift idea or a way to organize notes.
Materials Used:
Small seashells
Strong magnets
Hot glue gun
Paint or markers (optional)
Steps:
Clean the seashells and let them dry.
Attach a strong magnet to the back of each shell using hot glue.
You can also decorate the shells by painting or drawing on them for extra flair.
Once the glue has dried, use your new seashell magnets to hold up pictures or reminders on your fridge.
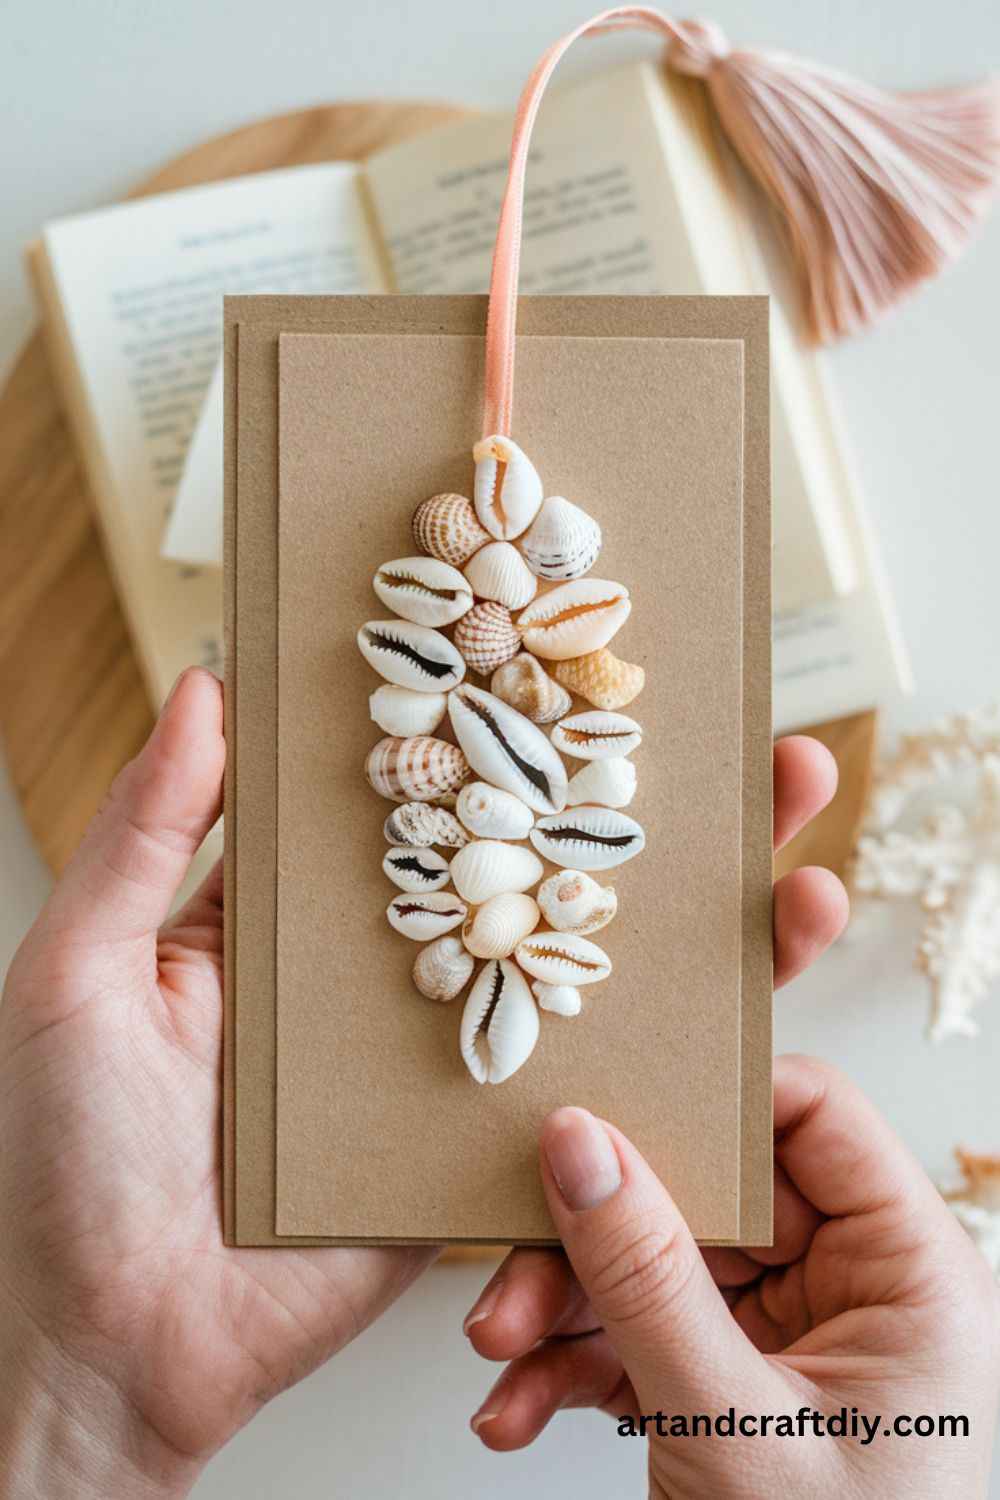
Seashell Bookmark
A seashell bookmark is a wonderful way to bring a little piece of the beach with you wherever you go. It’s both functional and a beautiful reminder of the ocean.
Materials Used:
A thin, flexible piece of cardstock or craft paper
Seashells
Glue or double-sided tape
Ribbon (optional)
Steps:
Cut the cardstock into the shape of a bookmark (about 6 inches long).
Attach a seashell to the top of the bookmark using glue or double-sided tape.
If you’d like, tie a piece of ribbon at the top for extra decoration.
Let the glue dry completely before using your new seashell bookmark.
Seashell Soap Dish
Create a decorative yet functional soap dish using seashells. This is a beautiful addition to any bathroom, evoking the feeling of being at the beach.
Materials Used:
A shallow dish or plate
Assorted seashells
Hot glue gun
Steps:
Select a shallow dish or plate as the base for your soap dish.
Clean the seashells and dry them thoroughly.
Arrange the seashells along the edges of the dish to form a border.
Use hot glue to secure the shells in place.
Allow the glue to dry, and place your soap in the middle of the dish.
Seashell Photo Holder
Use seashells to create a charming photo holder that can showcase your favorite snapshots with a beach-inspired touch.
Materials Used:
A large seashell
A thin wire
Small beads (optional)
Hot glue gun
Steps:
Take a large seashell with a sturdy base.
Cut a small piece of wire and bend it into a stand shape.
Attach one end of the wire to the top of the seashell with hot glue.
If desired, decorate the wire with small beads.
Place your photo between the wire and use the seashell as a holder.
Seashell Paperweight
A seashell paperweight is a practical and decorative item for your desk. This project combines functionality with coastal charm.
Materials Used:
A large, flat seashell
A small stone or marble (for weight)
Hot glue gun
Steps:
Choose a large flat seashell that will sit comfortably on your desk.
Attach a small stone or marble to the back of the shell using hot glue.
Let the glue dry completely.
Place your new seashell paperweight on your desk to keep papers in place.
Seashell Mosaic Art
Create a stunning piece of art by arranging seashells into a mosaic. This craft allows you to express your creativity while using the natural beauty of shells.
Materials Used:
Various seashells
A canvas or wooden board
Hot glue gun
Paint (optional)
Steps:
Arrange seashells on the canvas or wooden board to create your design.
Once you’re satisfied with the layout, begin gluing the shells down with the hot glue gun.
Optionally, paint the background or certain shells for added contrast.
Let the glue dry, and display your artwork in a prominent place.
Seashell Votive Holder
Make a beautiful votive holder from seashells to add a soft, warm glow to your home. Perfect for beach-themed parties or as a table centerpiece.
Materials Used:
A glass votive holder
Small seashells
Hot glue gun
Steps:
Begin with a plain glass votive holder.
Clean the seashells and arrange them around the outside of the glass.
Use the hot glue gun to attach the shells to the glass.
Once all the shells are attached, let the glue dry.
Place a candle inside the holder to enjoy the coastal ambiance.
Seashell Garland
A seashell garland is a versatile decoration that can be used for any occasion. It’s perfect for parties, weddings, or just for adding a coastal touch to your home.
Materials Used:
Assorted seashells
Twine or string
Needle
Hot glue gun
Steps:
Thread a needle with twine or string.
Carefully thread each seashell onto the twine, spacing them out as desired.
Tie knots between the shells to secure them in place.
If needed, glue a few shells for extra stability.
Hang the garland on a wall, mantle, or as part of a centerpiece.
Seashell Bowl
Turn seashells into a beautiful decorative bowl that’s perfect for holding trinkets, jewelry, or other small items.
Materials Used:
A bowl (plastic or glass)
Small seashells
Hot glue gun
Steps:
Choose a bowl that will serve as the base for your seashell bowl.
Begin gluing seashells around the outer edges of the bowl.
Continue gluing the shells around the entire bowl, layering them if necessary.
Allow the glue to dry completely before using the seashell bowl to hold your items.
Seashell Embellished Bag
Add a coastal touch to a plain bag by gluing seashells to the surface. This is a simple way to create a beach-inspired accessory.
Materials Used:
A plain canvas or fabric bag
Small seashells
Hot glue gun
Steps:
Clean the seashells and dry them thoroughly.
Arrange the shells on your bag in a pattern that you like.
Use the hot glue gun to attach the seashells to the fabric.
Let the glue dry completely before using your new beachy bag.
Seashell Napkin Rings
Seashell napkin rings make a wonderful table decoration for a beach-themed event or casual dining experience. They’re simple to make and add a unique touch to your table setting.
Materials Used:
Small seashells
A cardboard tube (or wooden ring)
Hot glue gun
Paint (optional)
Steps:
Cut a cardboard tube into rings or use a ready-made napkin ring.
Clean and arrange the seashells on the ring.
Attach the shells with hot glue, covering the entire ring.
Optionally, paint the ring to enhance the look.
Let the glue dry before using them to hold your napkins.
Seashell Plant Pot Decor
Decorate a plain flower pot with seashells to bring a beachy vibe to your plants. This craft is simple and effective for adding a coastal touch to any plant.
Materials Used:
A plain flower pot
Seashells
Hot glue gun
Paint (optional)
Steps:
Begin with a plain terracotta or ceramic pot.
Clean the seashells and arrange them around the pot.
Use hot glue to attach the shells in place, covering the pot as desired.
Optionally, paint the pot for a more polished finish.
Once the glue has dried, place a plant in the pot for a coastal-inspired display.
Seashell Wall Art
Create unique wall art by arranging seashells into a design or pattern on canvas or wood. This simple craft adds a personal touch to your home decor.
Materials Used:
A canvas or wooden board
Seashells
Hot glue gun
Paint (optional)
Steps:
Clean and arrange the seashells on the canvas or wooden board.
Once satisfied with the layout, glue the seashells down with hot glue.
Optionally, paint the background to complement the shells.
Let everything dry before hanging your new seashell wall art.
Seashell Necklace
Create a one-of-a-kind necklace by attaching a beautiful seashell to a chain. This craft is a great way to keep the beach close to you wherever you go.
Materials Used:
A large seashell
Necklace chain
Jewelry wire
Jewelry pliers
Jump ring
Steps:
Clean and dry the seashell.
Use jewelry wire to attach a jump ring to the top of the shell.
Slide the jump ring onto a necklace chain.
Close the jump ring with pliers to secure it.
Wear your beautiful seashell necklace!
Seashell Bottle Cap Magnets
Combine seashells and bottle caps to create unique magnets for your fridge or locker. This easy craft is great for using up leftover bottle caps and shells.
Materials Used:
Bottle caps
Small seashells
Magnets
Hot glue gun
Steps:
Attach a small seashell to the inside of each bottle cap with hot glue.
Glue a magnet to the back of each bottle cap.
Allow the glue to dry completely before sticking them to your fridge.
Seashell Hairpin
Make a beautiful hairpin adorned with seashells. This simple accessory is perfect for adding a beach-inspired touch to your hairstyle.
Materials Used:
A plain hairpin
Small seashells
Hot glue gun
Steps:
Clean and dry the seashells.
Attach them to a plain hairpin using hot glue.
Let the glue dry before using the pin to style your hair.
Seashell Treasure Box
A small wooden box covered with seashells creates a beautiful treasure chest. This craft is perfect for storing jewelry or small keepsakes.
Materials Used:
A small wooden box
Seashells
Hot glue gun
Steps:
Clean and arrange the seashells on the wooden box.
Attach each shell securely with hot glue.
Allow everything to dry completely before using your new seashell treasure box.
Seashell Ornament
A seashell ornament can brighten up your Christmas tree or serve as a year-round coastal decoration.
Materials Used:
Small seashells
A plain ornament (clear or white)
Hot glue gun
Ribbon (optional)
Steps:
Arrange small seashells on a plain ornament.
Attach them securely using hot glue.
Add a ribbon to hang the ornament if desired.
Let the glue dry completely before displaying your ornament.
Seashell Tray
Decorate a tray with seashells to create a beach-inspired piece of functional decor. This tray can be used for serving or simply as a beautiful display piece.
Materials Used:
A wooden or metal tray
Seashells
Hot glue gun
Paint (optional)
Steps:
Clean and arrange the seashells on the tray.
Glue them down with hot glue.
Optionally, paint the tray for a more polished look.
Allow the glue to dry, and use the tray for serving or display.
Seashell Lamp
Add a coastal glow to your room by decorating a lampshade with seashells. This craft brings a beachy ambiance to any space.
Materials Used:
A plain lampshade
Seashells
Hot glue gun
Steps:
Arrange the seashells on the lampshade.
Attach each shell with hot glue.
Let the glue dry completely before turning on the lamp.
Seashell Bookmark Holder
Create a functional and cute bookmark holder with seashells. This holder will keep your place in books while adding some coastal style to your bookshelf.
Materials Used:
A small wooden box or block
Seashells
Hot glue gun
Steps:
Attach seashells to the small box or block with hot glue.
Allow everything to dry before placing your bookmarks in the holder.
Seashell Sculpture
Sculpting with seashells allows for endless creativity. You can make intricate designs or simple shapes for decorative purposes.
Materials Used:
A variety of seashells
Hot glue gun
Steps:
Start by selecting the seashells you want to use.
Arrange them to form a design or shape, using hot glue to attach them together.
Let the glue dry and display your seashell sculpture as a centerpiece.
Seashell Keychain
A seashell keychain is a simple but charming craft that will keep a piece of the beach with you wherever you go.
Materials Used:
Small seashell
Keychain ring
Jewelry wire
Pliers
Steps:
Clean the seashell and make a small hole in it.
Attach the seashell to the keychain ring using jewelry wire.
Use pliers to securely fasten the wire.
Attach the keychain to your keys for a coastal touch.
Small Sea Shells Craft Ideas DIY Home Decor (Vases, Bowls)
Using Small Sea Shells Craft Ideas DIY in home decor is a fantastic way to bring a touch of the beach into your living space. Whether you’re decorating a vase or bowl, sea shells add texture, color, and a natural vibe. Here are some ideas and steps for using Small Sea Shells Craft Ideas DIY to decorate vases and bowls:
Ideas for Decorating Vases or Bowls Using Small Sea Shells
Coastal Elegance: Arrange small shells in a single layer around the vase or bowl, creating a clean and uniform look. This works especially well with transparent glass vases.
Textured Patterns: Glue shells in a spiral pattern or staggered rows for a more textured, eye-catching effect.
Mixed Shells and Stones: Combine shells with pebbles or beach stones for a natural, eclectic feel.
Minimalist Shells: Use a few strategically placed shells for a more subtle and refined appearance, leaving some space between them to show off the base.
Seashell Bouquet Holder: If you have a vase, fill the inside with smaller shells or a combination of shells and sand, perfect for holding dried flowers or creating a decorative display.
Step-by-Step Process for Gluing Shells to the Outside of a Vase or Bowl
Gather Supplies:
Sea shells (small and medium-sized)
A vase or bowl (glass, ceramic, or wood)
Hot glue gun and glue sticks or strong adhesive
Scissors (if needed for trimming)
Optional: Paint, glitter, or sand for extra decoration
Prepare the Vase or Bowl:
Clean the surface of the vase or bowl to ensure the glue will adhere properly. Wipe it down with a damp cloth and allow it to dry.
Arrange the Shells:
Before gluing, lay out the shells on the surface of the vase or bowl to determine the arrangement. You can use a pattern, random scattering, or a more intricate design.
Experiment with layering different sizes of shells to create dimension.
Glue the Shells:
Begin applying the glue to the back of each shell. Use small dabs of glue to avoid excess mess.
Press each shell firmly onto the surface of the vase or bowl, holding it in place for a few seconds until the glue sets.
Continue gluing shells around the vase or bowl, leaving space if you want a more open look, or filling the entire surface for a dense shell pattern.
Allow Drying Time:
Let the glue dry completely before moving or using the vase or bowl.
Additional Decoration Options (Painting or Glitter)
Painting:
Shells: For a more colorful look, paint the shells with acrylic paints. You can opt for metallics, pastels, or bright hues depending on your aesthetic.
Vase/Bowl: You can also paint the vase or bowl itself before applying the shells. Consider using a color that complements the shells, such as a light blue or sandy beige for a coastal theme.
Glitter:
Add sparkle by applying a layer of glue to certain shells or areas of the vase/bowl and sprinkling glitter on top. This adds a magical, beachy shimmer.
You could also mix glitter into the paint or glue for a more uniform sparkly effect.
Sanding:
For a more rustic look, add sand to the glue before attaching the shells. This will give your vase or bowl a more textured appearance, perfect for a beach house or natural coastal decor.
By using sea shells, you can create unique and beautiful home decor pieces that remind you of the ocean, making your space feel calm and serene.
Additional Tips and Ideas for Small Sea Shells Craft Ideas DIY
1. Best Places to Find Small Sea Shells for Crafting:
Beachcombing: The best way to find small sea shells is by visiting local beaches, especially after a storm or during low tide. Areas with rocky shorelines or tidal pools often yield a variety of small and interesting shells.
Tidal Flats: These areas, which are exposed during low tide, are often abundant in small shells and marine debris, making them perfect for crafting materials.
Shell Shops or Online Marketplaces: If you’re unable to find shells locally, consider buying them from specialized stores or online marketplaces like Etsy. Many sellers offer curated collections of small shells specifically for crafting.
Nature Reserves: Certain protected beaches and nature reserves may have regulations regarding collecting shells, so be sure to check local guidelines. These areas may offer untouched and diverse shells.
Scuba Diving and Snorkeling: If you’re an avid diver, consider collecting shells while diving or snorkeling in shallow waters. This can be a rewarding way to gather unique and rare shells.
2. Storage and Organization Tips for Small Shells:
Clear Storage Containers: Use clear plastic or glass containers to store your shells. This allows you to see all your shells at a glance and helps keep them organized. Opt for small boxes or tackle boxes with compartments for easy sorting.
Labeling: If you’re working with different types of shells, it’s helpful to label your storage containers. Label by type (e.g., conch, scallop, etc.) or by color to make selection easier when crafting.
Drawer Organizers: For smaller shells, consider using drawer organizers or small trays to keep them separated. These can fit easily into craft rooms or shelves.
Ziplock Bags: If you have many small shells, you can store them in labeled ziplock bags. You can organize them by size, shape, or color, making it simple to locate the perfect shell when you start a project.
Display Trays: If you want to show off your shells while they are stored, consider using decorative trays or shadow boxes. Not only does this make your collection easily accessible, but it also serves as a part of your home decor.
3. Ideas for Personalizing Each Craft Based on Style or Theme:
Coastal Theme: For a beach-inspired look, use a combination of different types of shells (like starfish, scallops, and conchs) along with light, airy colors like soft blues, sand tones, and whites. Incorporate elements like driftwood or sand to complete the look. Use shells to decorate picture frames, mirrors, or create coastal wreaths.
Rustic Style: If you’re aiming for a rustic aesthetic, opt for shells with a weathered or matte finish. Pair them with natural materials like jute twine, burlap, and wood for a charming, earthy feel. Use them to embellish mason jars, candle holders, or rustic centerpieces.
Modern or Minimalist: For a sleek, modern look, focus on clean lines and simple shapes. You can paint small shells in monochrome colors like black, white, or metallics (gold, silver) to match minimalist home decor. Use shells as subtle accents in geometric designs or create simple shell mobiles or wall art.
Boho Style: Incorporate colorful shells, beads, and feathers for a fun, free-spirited craft project. A shell garland or dreamcatcher with colorful shells and intricate details would perfectly match a bohemian vibe. Think about using brightly dyed shells and combining them with macramé for texture and interest.
Holiday or Seasonal Crafts: You can also personalize shell crafts for specific holidays. For instance, use shells to create a nautical Christmas tree ornament or Easter egg holder by gluing shells in a pattern or design that fits the season’s theme.
Personalized Gifts: Use shells as part of personalized gifts. You can add a name or initial to a shell and incorporate it into a bracelet, necklace, or keychain. This works especially well for beach weddings, where guests can receive a personalized shell token or keepsake.
By considering the style and theme of the space or occasion, you can transform Small Sea Shells Craft Ideas DIY into customized pieces that reflect your personality or the atmosphere you want to create.
FAQ
How do I clean small sea shells before using them in Small Sea Shells Craft Ideas DIY?
To clean small sea shells, rinse them thoroughly with water to remove sand and debris. Soak the shells in a solution of warm water and mild soap for 15-20 minutes, and then use a soft brush (like an old toothbrush) to scrub them clean. Afterward, let them dry completely before using them in your crafts.
Can I use Small Sea Shells Craft Ideas DIY for home decor projects?
Yes, small sea shells can be used in a variety of home decor projects. You can add them to vases, mirrors, tables, or even create a shell-themed shadow box or wall art.
How do I attach small sea shells to other materials for crafting?
For most projects, you can use strong craft glue (like hot glue or E6000) to attach small sea shells to materials such as wood, glass, or fabric. Make sure to hold the shells in place for a few seconds to ensure they stick properly.
Are Small Sea Shells Craft Ideas DIY safe to use in kids’ crafts?
Yes, small sea shells are generally safe for kids’ crafts, but make sure they are free of sharp edges. Younger children may need adult supervision when handling the shells or when using hot glue guns.
Can I paint small sea shells for Small Sea Shells Craft Ideas DIY?
Absolutely! Small sea shells can be painted with acrylic paints for a personalized touch. You can create designs, patterns, or simply paint them in bright colors for a playful look.
Hi, I’m Victoria, an art and craft teacher at Newark City Schools, where I have the joy of working with middle school students to help them explore their creativity and develop their artistic talents. I believe that art is a powerful way for students to express themselves, and I strive to make every lesson a fun, engaging, and inspiring experience.
I created this website to share the art and craft projects, techniques, and resources that I use in my classroom, hoping to inspire both educators and young artists alike. Whether you’re a teacher looking for new ideas or a student eager to try something new, I’m excited to provide creative tools and projects that anyone can enjoy.
When I’m not in the classroom, I love experimenting with different art forms and learning new crafting techniques. My goal is to help others discover the joy of making things with their hands, and I hope my website serves as a space for everyone to explore their creative potential.