Last summer, I came home from the beach with a little bag full of shells. Honestly, I didn’t even know why I picked up so many—I just couldn’t leave those pretty shapes behind. When I got home, they sat on my table for days. Then one afternoon I thought, why not turn them into something fun? That’s how I fell in love with making summer crafts with shells.
If you’ve ever collected shells during a beach trip and wondered what to do with them later, you’re definitely not alone. It feels a bit wasteful to just let them sit in a jar, right? The good news is that there are so many simple and creative ways to use them. From cute home decor to fun DIY projects, shell crafts can bring a little beachy summer vibe into your home. In this article, I’ll share some easy and creative ideas for summer crafts with shells that anyone can try.
Summer Crafts with Shells
Summer is the perfect time to turn beautiful beach finds into fun and creative projects. Summer crafts with shells are a simple way to bring a little seaside charm into your home while enjoying relaxing DIY time.
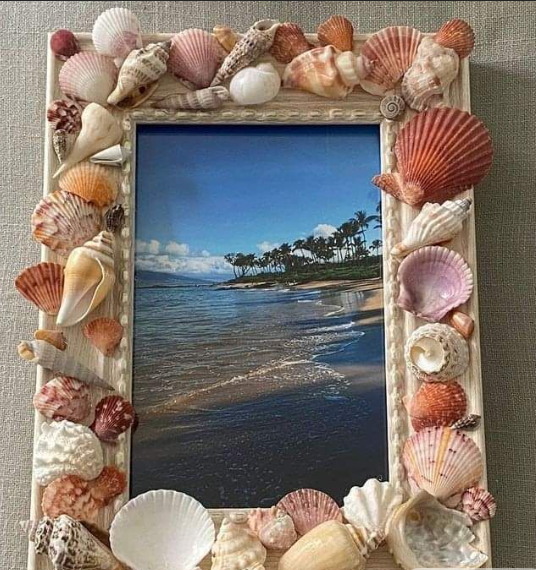
Honestly, one of the first shell crafts I ever tried was decorating a simple picture frame. I had a handful of shells from a beach trip, and instead of letting them sit in a jar forever, I decided to glue them around an old wooden frame. It instantly made the photo feel more special. In my opinion, this is one of the easiest ways to bring beach memories into your home without spending much money.
What I usually do is pick a plain frame and start arranging the shells before gluing anything. I’ve found that mixing small and medium shells makes the frame look more natural. Once the layout feels right, I glue them down with strong craft glue. Sometimes I add tiny pearls or bits of sand for texture. When it’s done, I place a summer photo inside, and it honestly feels like a little piece of the beach sitting on my shelf.
Seashell Wind Chimes
Seashell wind chimes are one of those crafts that look fancy but are actually pretty simple to make. I remember the first time I hung one outside on the porch. The soft clinking sound when the wind blew felt so relaxing. To be fair, it wasn’t perfect at first, but that handmade charm is what made it special.
I usually start with a piece of driftwood or a small wooden ring as the base. Then I tie fishing line or strong thread to different shells. Some shells already have holes, but if not, I gently drill tiny holes in them. I’ve found that using shells of different sizes creates a nicer sound when they move. After tying several strands, I attach them to the base and hang the whole thing up. When the breeze hits it on a summer evening, it honestly feels like a tiny beach soundtrack.
Seashell Candle Holders
Seashell candle holders are one of those crafts that look beautiful but take very little effort. I tried this idea one summer evening when I wanted my patio table to feel a bit more coastal. I placed shells around a simple glass candle holder, and honestly, the soft candlelight reflecting off the shells looked magical.
Usually, I start with a small glass jar or tea light holder. Then I arrange shells around the outside or glue them around the base. I’ve found that flatter shells work best because they sit nicely without tipping. Sometimes I add a bit of twine or rope around the jar to give it that beachy vibe. When the candle is lit, the shells catch the light in a really pretty way. In my opinion, it’s one of those small decorations that makes summer evenings feel extra cozy.
Seashell Jewelry (Necklaces and Bracelets)
Making seashell jewelry always takes me back to childhood beach trips. I remember picking up tiny shells and imagining them as little treasures. Honestly, turning them into necklaces or bracelets makes those finds feel even more special.
What I usually do is choose smaller shells that already have holes or can be gently drilled. Then I thread them onto jewelry wire, string, or even simple cotton cord. I’ve found that adding a few beads between shells makes the design look more balanced. For bracelets, I keep the shells small so they feel comfortable to wear. Sometimes I also add a small charm just for fun. In my opinion, seashell jewelry isn’t about perfection. It’s about wearing a tiny reminder of the beach, and that personal touch makes it really meaningful.
Seashell Flower Pots
Seashell flower pots are one of my favorite ways to combine plants with beach decor. I tried this craft after bringing home a bunch of shells that didn’t quite fit anywhere else. Instead of storing them away, I glued them onto a small terracotta pot, and honestly, it turned out better than I expected.
I usually start with a plain flower pot and clean the shells first. Then I slowly glue them around the pot, starting from the bottom and working upward. I’ve found that mixing shell shapes makes the pot look more natural and interesting. Sometimes I leave tiny gaps so the terracotta color still peeks through. Once everything dries, I plant something small like succulents or herbs. In my opinion, the combination of greenery and shells gives off such a relaxed summer vibe.
Seashell Wall Art
Seashell wall art is something I started experimenting with when I wanted a beach-themed corner in my room. Honestly, I didn’t want to buy expensive decor, so I just used shells I already had. The result felt much more personal than store-bought pieces.
What I usually do is start with a canvas or wooden board. Then I arrange the shells into simple patterns like hearts, waves, or even a rough star shape. I’ve found that laying everything out before gluing helps avoid messy mistakes. Sometimes I paint the background in soft blues or sandy colors to match the shells. Once the design feels right, I glue everything down carefully. In my opinion, seashell wall art works best when you keep it simple and let the natural shapes of the shells stand out.
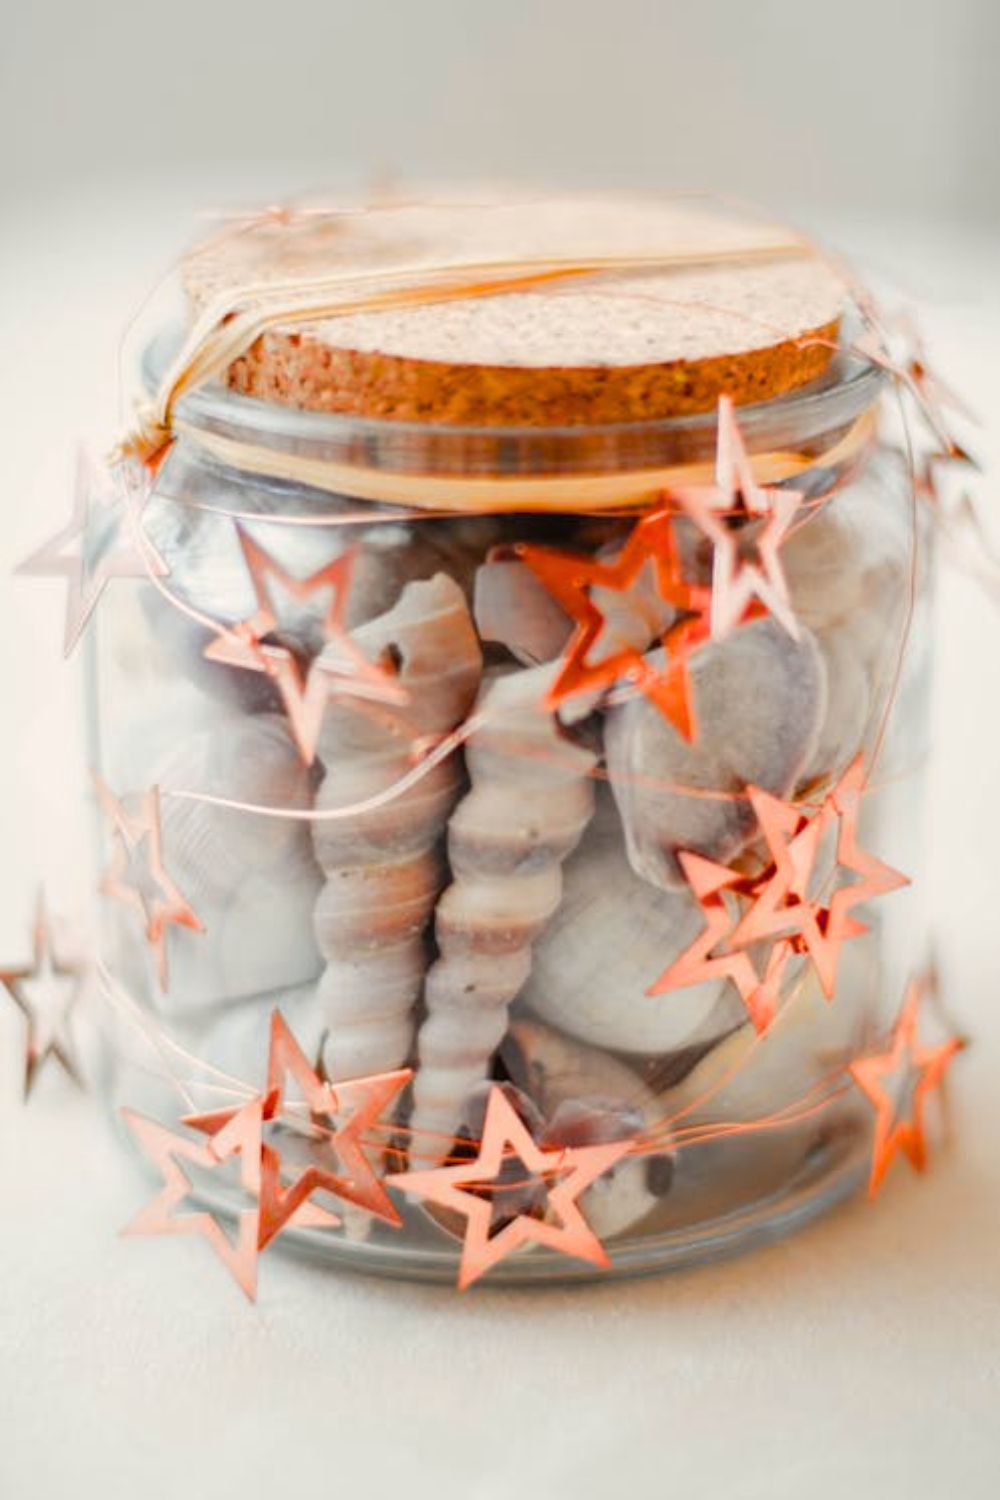
Decorative Seashell Jars
Decorative seashell jars are honestly one of the simplest summer crafts you can make. I remember filling a glass jar with shells after a beach walk, and it instantly looked like a cute little display piece. Sometimes the easiest ideas turn out to be the most charming.
Usually, I start with a clear jar and layer sand at the bottom. Then I add shells of different sizes, arranging them so they’re visible from the outside. I’ve found that adding tiny bits of sea glass or small pebbles makes the jar look even more interesting. Sometimes I tie a piece of twine or ribbon around the lid for a rustic look. In my opinion, these jars are perfect for shelves or coffee tables because they quietly bring a bit of summer indoors.
Seashell Hair Accessories
Seashell hair accessories are such a fun little craft, especially during summer. I once made a few shell hair clips before a beach trip, and honestly, they became my favorite accessories for the whole season. There’s just something playful about wearing shells in your hair.
I usually start with simple hair clips, pins, or headbands. Then I choose smaller, lightweight shells so the accessory stays comfortable. I’ve found that using strong glue works best to keep everything secure. Sometimes I add tiny pearls or beads alongside the shells for extra detail. Once everything dries, the clips are ready to wear. In my opinion, seashell hair accessories are perfect for beach days, summer parties, or even casual outings when you want a subtle coastal touch.
Seashell Mirror Frames
Seashell mirror frames can completely change the look of a simple mirror. I tried this craft once with an old mirror that felt a bit boring. After adding shells around the frame, it suddenly looked like something you’d find in a beach house.
What I usually do is start with a plain wooden mirror frame. Then I arrange shells around the edges before gluing anything down. I’ve found that placing larger shells first and filling gaps with smaller ones creates a balanced look. Sometimes I add tiny starfish or bits of rope for extra texture. Once everything is glued and dried, the mirror becomes a real statement piece. Honestly, every time I look at it, it reminds me of sunny beach days.
Seashell Coasters
Seashell coasters are one of those crafts that are both decorative and practical. I remember making a set one summer afternoon, mostly just for fun, but they ended up being surprisingly useful. Guests always notice them on the table.
Usually, I start with plain cork or wooden coasters. Then I glue small flat shells onto the surface, arranging them like a little mosaic. I’ve found that sealing the finished coaster with clear resin or varnish helps protect it from water. It also gives the shells a glossy finish that looks really nice. In my opinion, these coasters are perfect for summer drinks on the patio because they feel cheerful and beachy.
Seashell Keychains
Seashell keychains are tiny crafts, but they’re honestly one of my favorite ways to use leftover shells. I once made a few as small gifts for friends after a beach trip, and everyone loved having a little piece of the ocean with them.
I usually pick small sturdy shells and attach them to a metal keychain ring. Sometimes I drill a tiny hole through the shell, or I wrap thin wire around it to secure it. I’ve found that adding beads or colorful threads makes the keychain look more fun and unique. It’s a quick project that doesn’t take much time at all. In my opinion, seashell keychains are perfect little keepsakes that remind you of summer adventures every time you grab your keys.
Seashell Garland
Seashell garlands are one of my favorite decorations when I want a room to feel bright and summery. The first time I made one, I hung it across a window, and honestly, it made the whole space feel like a beach cottage.
I usually start with a long piece of twine or string. Then I attach shells along the length using small knots or glue. I’ve found that spacing the shells evenly keeps the garland looking neat, but sometimes I mix in starfish or beads for variety. Once finished, I hang it across a mantel, window frame, or even along a wall shelf. In my opinion, seashell garlands are such a simple way to bring coastal charm into your home without doing anything too complicated.
Tips for Cleaning and Preparing Seashells
Before using seashells for crafts, it’s important to clean and prepare them properly. Shells collected from the beach may have sand, salt, or a strong smell. A little cleaning helps them look brighter and makes your summer crafts with shells more beautiful and safe to use.
Washing shells properly Start by rinsing the shells under clean running water to remove sand and dirt. You can also soak them in a bowl of water for a few minutes and gently scrub them with a small brush or an old toothbrush. This helps clean small spaces and makes the shells look fresh.
Removing odor Sometimes seashells have a strong smell because of saltwater or leftover organic material. To remove this odor, soak the shells in a mixture of water and a little vinegar or mild soap for a few hours. After soaking, rinse them again with clean water so they smell fresh.
Drying and polishing shells After cleaning, place the shells on a towel and let them dry completely in the sun or at room temperature. Once dry, you can gently polish them with a little baby oil or mineral oil using a soft cloth. This gives the shells a shiny look and makes them perfect for your summer craft projects.
Hi, I’m Victoria, an art and craft teacher at Newark City Schools, where I have the joy of working with middle school students to help them explore their creativity and develop their artistic talents. I believe that art is a powerful way for students to express themselves, and I strive to make every lesson a fun, engaging, and inspiring experience.
I created this website to share the art and craft projects, techniques, and resources that I use in my classroom, hoping to inspire both educators and young artists alike. Whether you’re a teacher looking for new ideas or a student eager to try something new, I’m excited to provide creative tools and projects that anyone can enjoy.
When I’m not in the classroom, I love experimenting with different art forms and learning new crafting techniques. My goal is to help others discover the joy of making things with their hands, and I hope my website serves as a space for everyone to explore their creative potential.