
Last month, I stood in a store staring at a shelf of candles, totally clueless. I needed a small thank you gift for a friend who helped me during a really stressful week. Nothing huge, nothing dramatic — just something that said, “Hey, I see you. I appreciate you.” And honestly? It was harder than I thought. Have you ever felt that way too? You want it to feel meaningful, not rushed or generic.
That’s exactly why I wanted to put together these thank you gift ideas. Sometimes we overthink it, right? But the best gifts aren’t about price tags — they’re about thought and intention. Whether it’s for a friend, teacher, coworker, or someone who simply showed up when you needed them, I’ll share simple, heartfelt ideas that actually feel special. By the end, you’ll have easy, thoughtful options that make saying “thank you” feel natural and sincere — not awkward or last-minute.
Thank you Gift Ideas
Sometimes a simple “thank you” doesn’t feel like enough, especially when someone has truly shown up for you. That’s where thoughtful thank you gift ideas come in — small gestures that speak from the heart and make appreciation feel extra special.

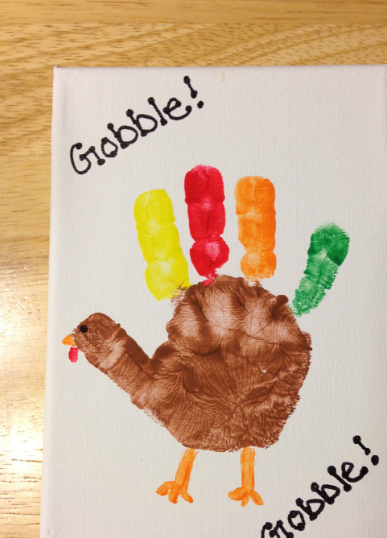
Handprint Turkey
This craft is perfect for children to create and share their handprints as part of a fun Thanksgiving keepsake. It’s simple, creative, and a great way to decorate your home for the holiday.
Materials Used:
- Construction paper (various colors)
- Markers
- Glue
- Scissors
- A pencil
- Googly eyes (optional)
Steps:
- Trace both of your hands on a piece of construction paper.
- Cut out the handprint shapes.
- Glue the handprints on a larger sheet of construction paper, positioning them with the fingers spread out, resembling turkey feathers.
- On a separate piece of construction paper, cut out a small circle for the turkey’s head and glue it to the bottom of the handprints.
- Draw a beak and wattle using markers, then add googly eyes for a fun look.
- Finish by writing “Happy Thanksgiving” or the year for a memorable touch.
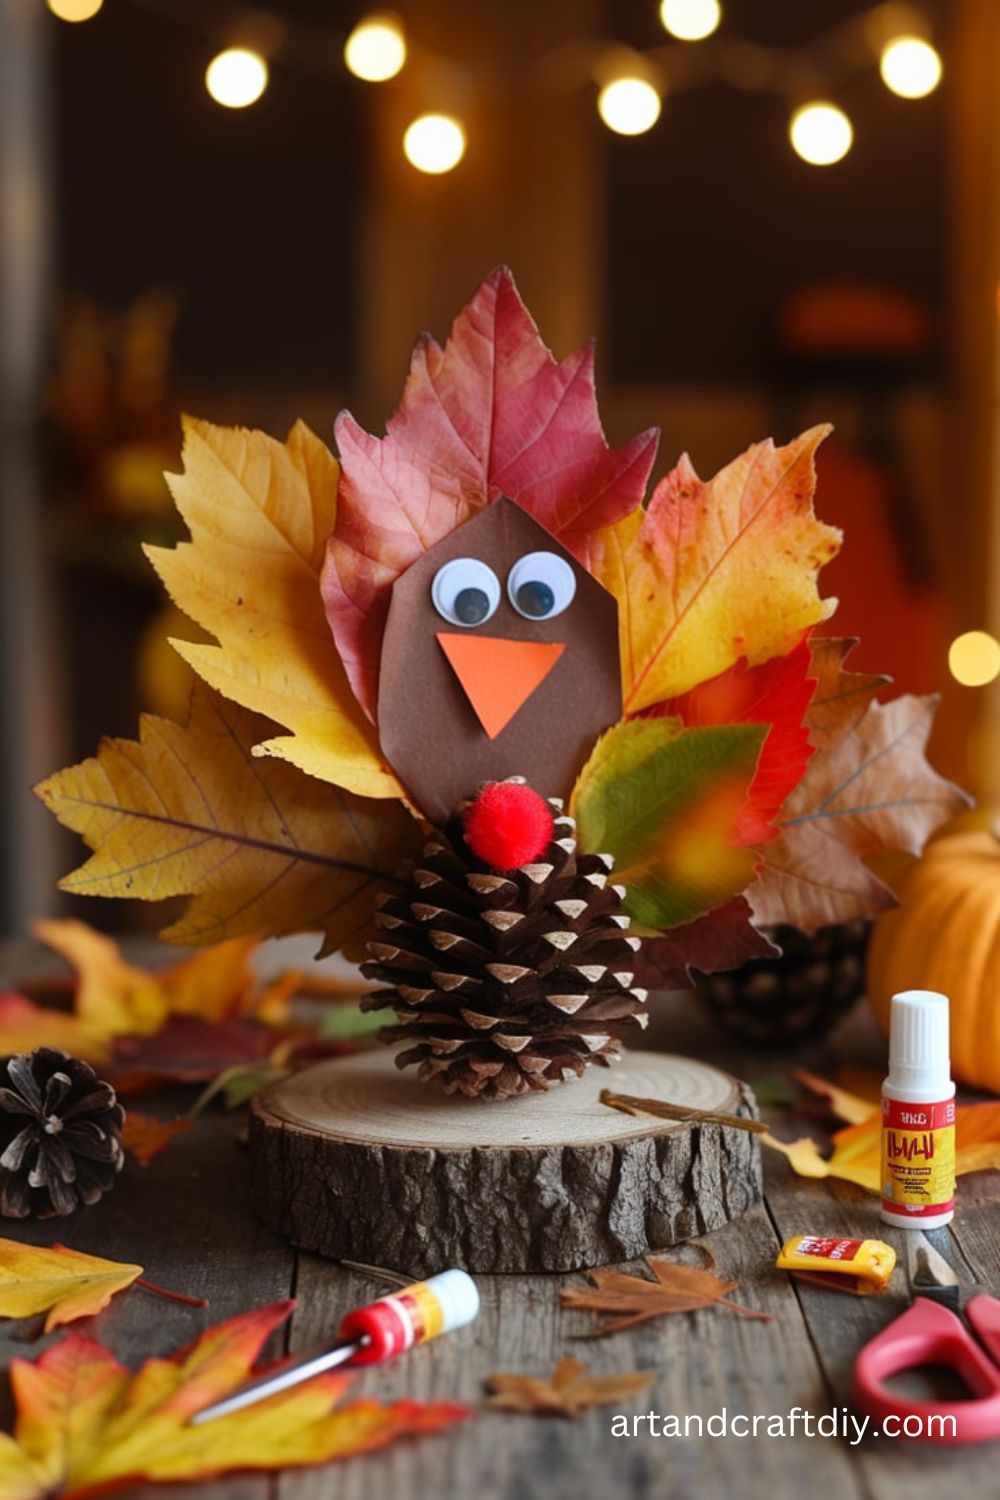
Thanksgiving Leaf Turkey
Celebrate the beauty of fall with this craft that uses real leaves to create a turkey’s feathers, making it a great nature-based craft project.
Materials Used:
- Various colorful leaves
- Glue
- Construction paper (brown and other colors)
- Scissors
- Markers
- Googly eyes
Steps:
- Collect a variety of leaves from outside in shades of red, orange, yellow, and green.
- Cut out a large turkey body shape from brown construction paper.
- Arrange the leaves around the body to form a full set of feathers. Glue them in place.
- Use markers to draw the turkey’s beak, legs, and feet.
- Glue googly eyes onto the turkey’s head.
- Write a Thanksgiving message or the year on the bottom for a personal touch.
Pom-Pom Turkey Art
A fun and fluffy craft, this turkey uses pom-poms for a soft texture, making it perfect for kids to handle and create with.

Materials Used:
- Pom-poms (red, yellow, orange, brown)
- Construction paper
- Glue
- Googly eyes
- Scissors
- Marker
Steps:
- Start by cutting out a turkey’s body from brown construction paper.
- Use glue to attach several colorful pom-poms to the back of the turkey for its feathers.
- Glue a smaller pom-pom onto the body for the turkey’s head.
- Add googly eyes and use a marker to draw the turkey’s beak and wattle.
- Decorate the craft with fun messages or designs for extra flair.
Thanksgiving Place Cards Craft
These adorable place cards make your Thanksgiving dinner extra special, allowing each guest to have their own personalized seating space.
Materials Used:
- Small craft paper (for cards)
- Markers
- Stickers (optional)
- Scissors
- Ribbon (optional)
Steps:
- Cut the craft paper into small rectangles, about the size of a standard place card.
- Write the name of each guest on the card with a marker.
- Add a small Thanksgiving-related drawing or stickers to personalize each place card.
- If desired, add a ribbon to the top of the card for extra decoration.
- Set these place cards on the dinner table to make your Thanksgiving meal feel even more festive.
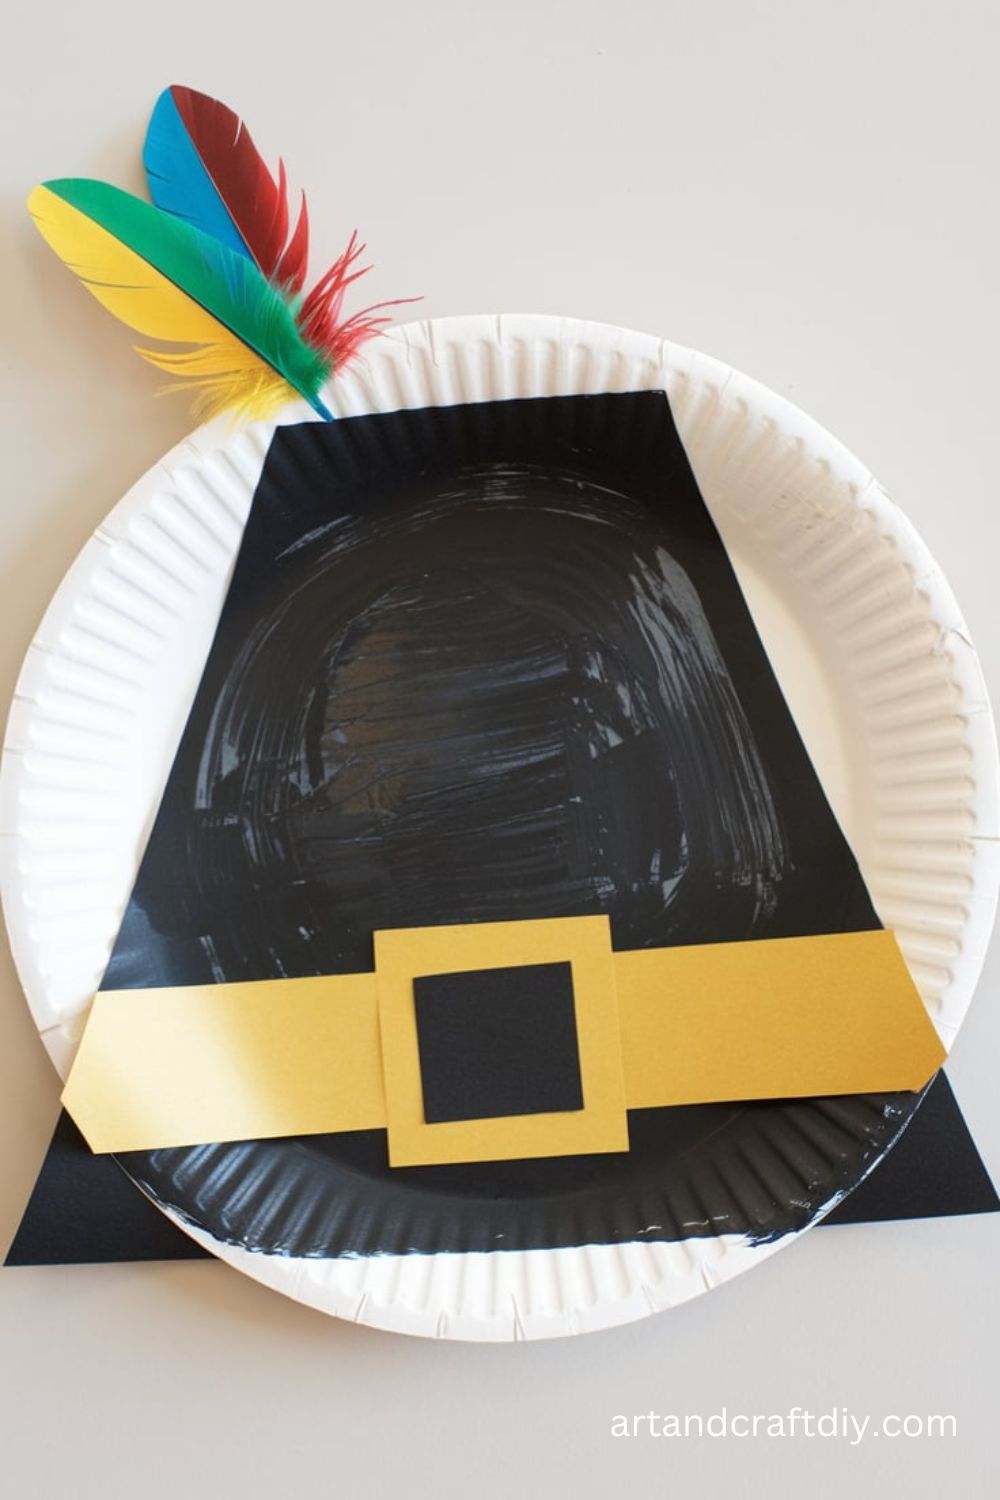
Paper Plate Pilgrim Hats craft
Crafting these charming Pilgrim hats is a perfect way to bring the story of the first Thanksgiving to life for children.
Materials Used:
- Paper plates
- Black construction paper
- Yellow construction paper
- Glue
- Scissors
Steps:
- Begin by cutting a paper plate in half to form the brim of the hat.
- Cut a strip of black construction paper and glue it around the rim of the plate, securing the sides.
- Cut out a square from the yellow construction paper to make a buckle, then glue it onto the black strip.
- Optional: You can color the rest of the paper plate to resemble the top of the Pilgrim’s hat.
- Let the hats dry, then wear them during your Thanksgiving celebration!
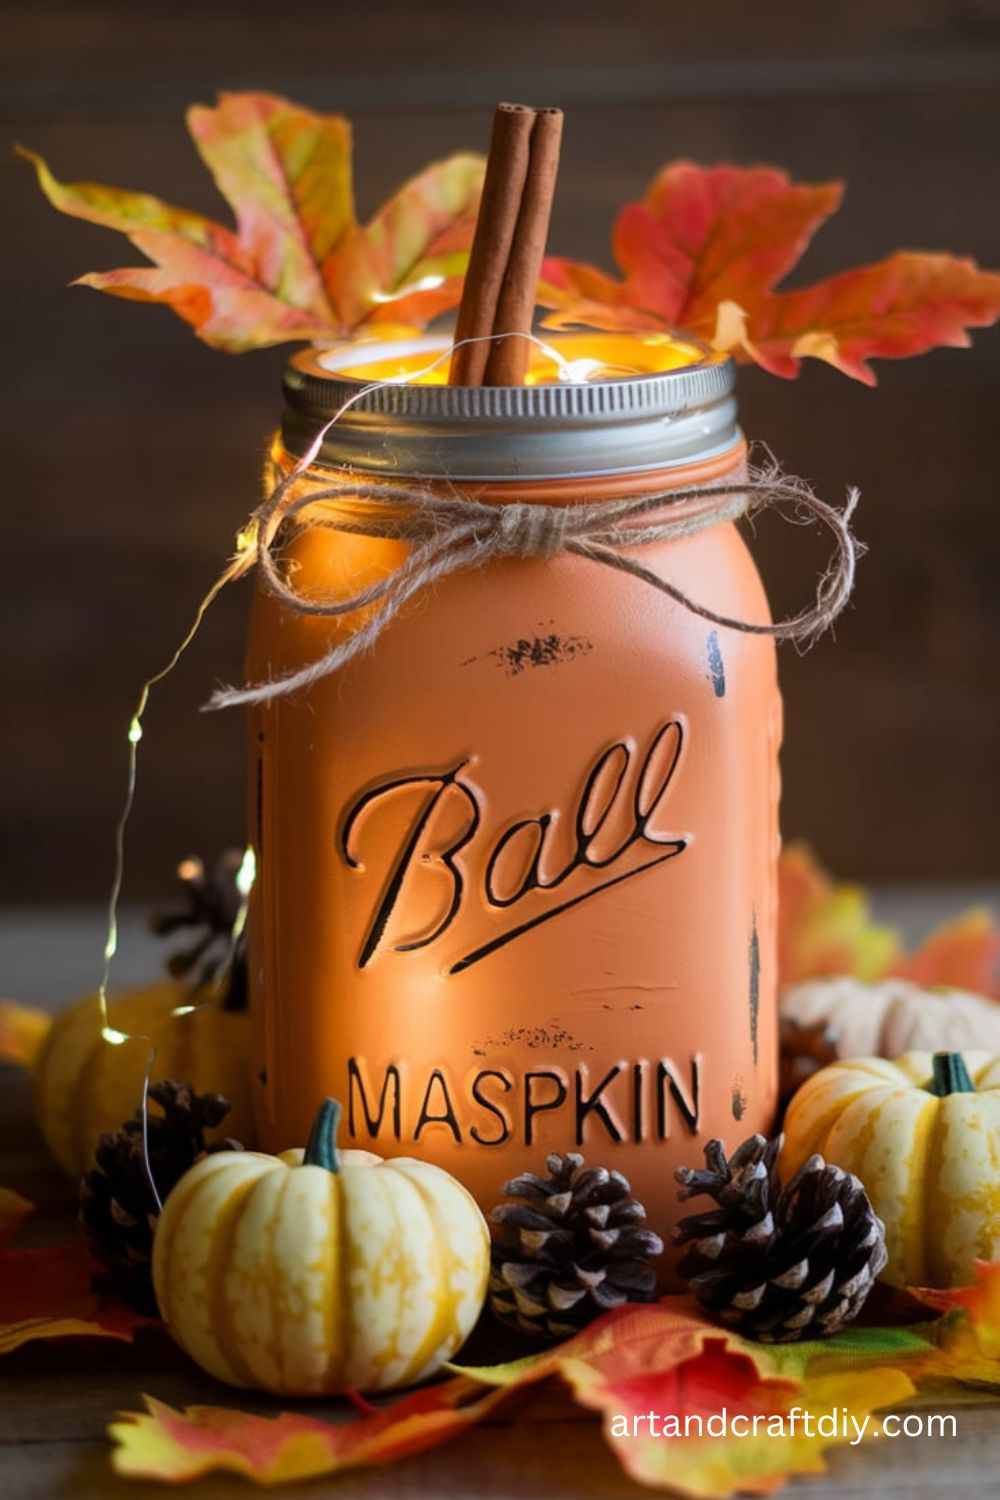
Mason Jar Pumpkin Centerpiece craft
Mason jars make the perfect base for creating a charming Thanksgiving centerpiece that will brighten up any table.
Materials Used:
- Mason jars
- Orange paint or orange tissue paper
- Green pipe cleaners
- Scissors
- Hot glue gun
Steps:
- If using paint, coat the mason jar with orange paint and let it dry completely. If using tissue paper, glue it around the jar.
- Twist a green pipe cleaner into a curly stem shape and glue it to the top of the mason jar.
- Create additional leaves from green paper and attach them to the jar with glue.
- Place a small candle inside the jar (battery-operated is best) or use the jar as a holder for Thanksgiving flowers.
- Use it as a centerpiece on your Thanksgiving dinner table.
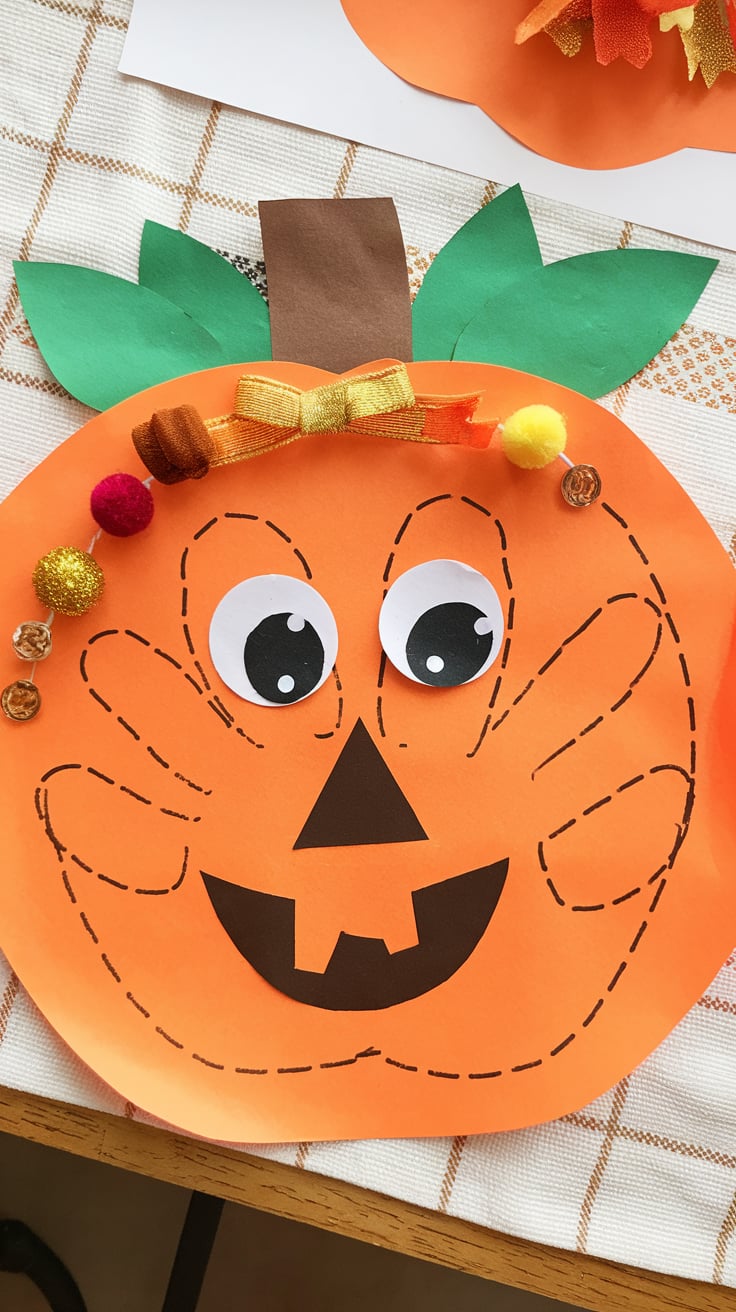
Handprint Pumpkin
A fun craft for young children, this handprint pumpkin is a great way to celebrate the fall season and Thanksgiving.
Materials Used:
- Orange paint
- Green construction paper
- Scissors
- Glue
- Markers
Steps:
- Paint your child’s hand with orange paint and press it onto a piece of white paper, forming the shape of a pumpkin.
- Once the paint is dry, cut out a small rectangle from green construction paper to create the pumpkin’s stem and glue it at the top of the handprint.
- Use markers to add additional details like pumpkin lines or vines on the green stem.
- Display this craft in your home as a reminder of the fall season.
Thanksgiving Wreath
This craft will help you create a beautiful wreath that you can hang on your door or wall for Thanksgiving.

Materials Used:
- Cardboard or paper plate
- Construction paper (orange, yellow, red, and green)
- Glue
- Scissors
- Ribbons or other decorations (optional)
Steps:
- Start by cutting the center out of a paper plate to form the wreath base.
- Cut the construction paper into leaf shapes in various colors.
- Glue the leaves onto the wreath base, overlapping them slightly to form a full circle.
- Add additional decorations such as ribbons, small pumpkins, or mini pinecones for extra detail.
- Hang the wreath on your door or around the house to celebrate Thanksgiving.
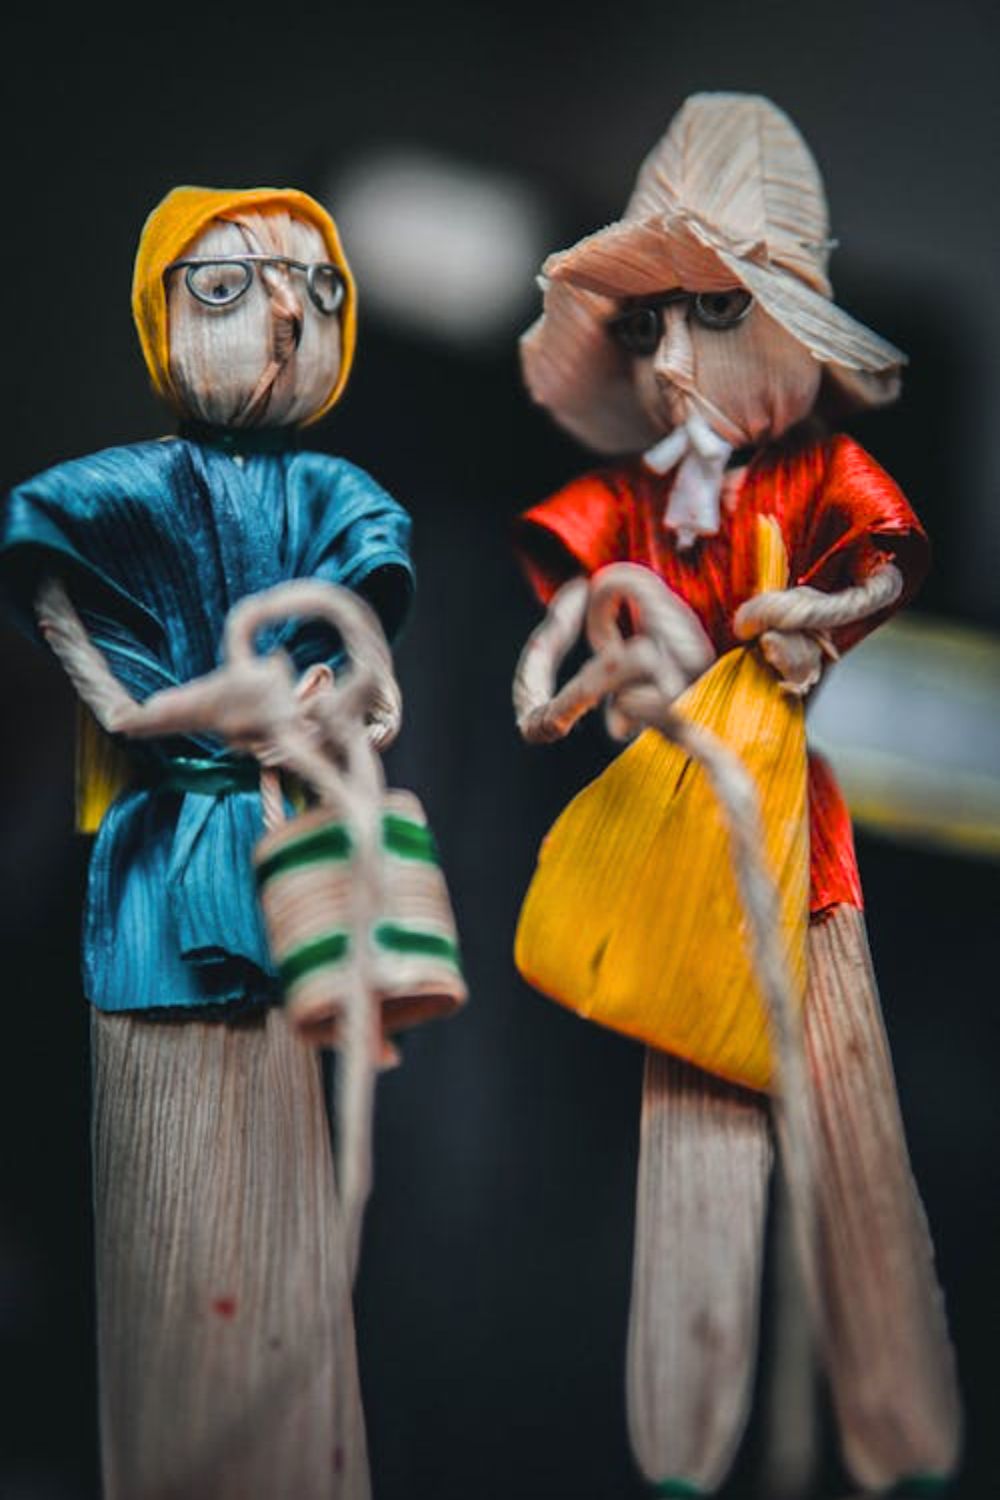
Corn Husk Dolls craft
These traditional Thanksgiving crafts are great for teaching children about the harvest and early American traditions.
Materials Used:
- Corn husks
- String or twine
- Scissors
- Markers or paint
Steps:
- Soak the corn husks in water for about an hour to soften them.
- Lay three to four corn husks flat and tie them together at the top with string.
- Fold the bottom ends of the husks upward to form the skirt of the doll and tie them with string.
- Use markers or paint to add a face and hair to your corn husk doll.
- Display these dolls as part of your Thanksgiving decorations.
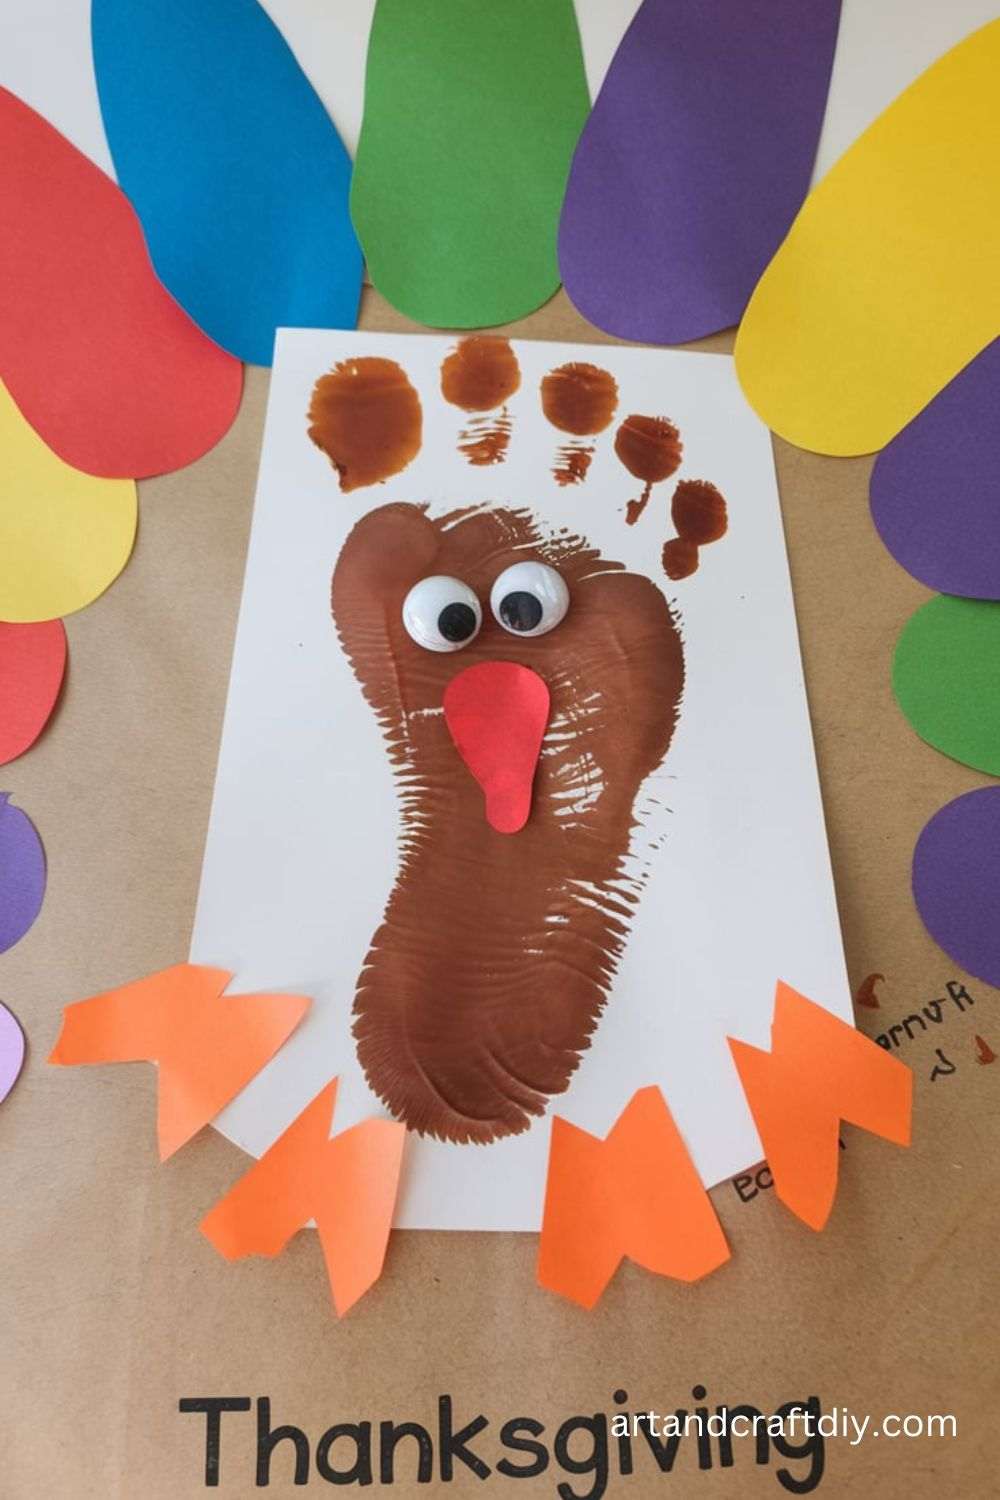
Turkey Footprint
A heartwarming Thanksgiving craft for children, this project turns their footprints into adorable turkey feathers.
Materials Used:
- Brown paint
- Colorful construction paper
- Googly eyes
- Scissors
- Glue
- Marker
Steps:
- Paint the bottom of your child’s feet with brown paint and have them stamp their feet on a piece of white paper.
- Once dry, cut out colorful feathers from construction paper and glue them around the footprint to create the turkey’s tail.
- Add googly eyes to the footprint and draw a beak and wattle with a marker.
- Write a Thanksgiving message or the year at the bottom of the craft for a special memory.
Acorn Crafts
Using acorns collected from outside, these tiny treasures can be turned into adorable Thanksgiving crafts.
Materials Used:
- Acorns
- Paint (acrylic or tempera)
- Glue
- Small paper shapes or googly eyes
- Scissors
Steps:
- Paint the acorns with bright colors like gold, red, or orange.
- Once dry, glue small paper shapes or googly eyes to turn the acorn into a turkey, owl, or other fall-themed character.
- Display your acorn creations as part of your Thanksgiving decor.
Pinecone Turkey Craft
This is a great way to repurpose nature finds into a fun Thanksgiving decoration.
Materials Used:
- Pinecones
- Construction paper
- Googly eyes
- Feathers (real or paper)
- Glue
Steps:
- Start by gluing googly eyes onto the pinecone.
- Cut out a small turkey beak and wattle from construction paper and glue them below the eyes.
- Glue colorful feathers to the back of the pinecone to form the turkey’s tail.
- Place these pinecone turkeys on the table or hang them as ornaments.
Thanksgiving Tree
Create a “Thanksgiving Tree” where you can add thankful notes from family and guests, making it a meaningful centerpiece.
Materials Used:
- Branches
- Small tags or pieces of paper
- Markers
- Ribbon
- Vase or pot
Steps:
- Collect some small branches and arrange them in a vase or pot.
- Cut out small tags from paper and write things you’re thankful for on each one.
- Attach the tags to the branches using ribbons or string.
- Display the Thanksgiving Tree in your home as a centerpiece or on the table during your holiday meal.
Popcorn Garland
This simple yet festive craft adds a rustic touch to your Thanksgiving decorations.
Materials Used:
- Popcorn (freshly popped)
- Needle and thread
- Scissors
Steps:
- Pop a batch of popcorn and let it cool.
- Thread a needle with strong thread or twine.
- Carefully string the popcorn onto the thread, creating a garland of popcorn.
- Drape the garland across your Thanksgiving table or use it to decorate your home for the holiday.
Cinnamon Stick Candles
Create a simple and fragrant candle holder using cinnamon sticks that will add a warm scent to your Thanksgiving dinner.
Materials Used:
- Cinnamon sticks
- Glue
- Small candle
- Ribbon
Steps:
- Glue cinnamon sticks vertically around the outside of a small jar or candle holder.
- Secure them in place with a ribbon around the middle of the jar.
- Place a candle inside the jar and light it up to create a warm, cozy atmosphere for your Thanksgiving celebration.
Felt Pumpkin Coasters
These coasters not only protect your table but also add a festive touch to your Thanksgiving gathering.
Materials Used:
- Orange felt
- Green felt
- Scissors
- Glue or fabric glue
Steps:
- Cut out circular shapes from orange felt for the coaster base.
- Cut out smaller shapes from green felt to create pumpkin leaves and vines.
- Glue the leaves and vines onto the orange felt circle to create a pumpkin design.
- Let the glue dry completely before using them to protect your table during Thanksgiving.
Felt Autumn Leaves
Crafting felt leaves can bring a bit of fall color into your home, perfect for Thanksgiving decor.
Materials Used:
- Felt in various autumn colors
- Scissors
- Glue
Steps:
- Cut leaf shapes out of different colors of felt.
- Layer the leaves to form a decorative arrangement.
- You can glue them onto the table runner or as part of a centerpiece.
- Use the leaves to create garlands, wreaths, or place settings for the holiday.
Thanksgiving Pom-Pom Garland
A cheerful addition to your Thanksgiving decor, this pom-pom garland can be hung up anywhere in your home.
Materials Used:
- Pom-poms in autumn colors
- Needle and thread
Steps:
- Thread a needle with strong thread.
- String a series of colorful pom-poms along the thread to create a garland.
- Hang the garland above the table, along the mantel, or across a wall to add festive charm.
Pinecone Pumpkin Centerpiece
Using natural materials like pinecones, this craft is perfect for an elegant Thanksgiving centerpiece.
Materials Used:
- Pinecones
- Orange paint
- Green construction paper
- Glue
Steps:
- Paint the pinecones with orange paint to resemble pumpkins.
- Once the paint has dried, cut out small leaves and vines from green construction paper.
- Glue the leaves and vines to the top of each pinecone to complete the pumpkin look.
- Display the pinecone pumpkins on your Thanksgiving table as a centerpiece.
Thanksgiving Banner
A simple yet effective way to add a festive touch to your home is by creating a Thanksgiving banner.
Materials Used:
- Burlap or fabric
- Markers or paint
- Scissors
- String or ribbon
Steps:
- Cut pieces of burlap or fabric into rectangles.
- Use markers or paint to spell out “Happy Thanksgiving” on each piece.
- Attach the fabric pieces to a string or ribbon, spacing them out evenly.
- Hang the banner on your wall or across the fireplace to set a festive mood for your celebration

Hi, I’m Victoria, an art and craft teacher at Newark City Schools, where I have the joy of working with middle school students to help them explore their creativity and develop their artistic talents. I believe that art is a powerful way for students to express themselves, and I strive to make every lesson a fun, engaging, and inspiring experience.
I created this website to share the art and craft projects, techniques, and resources that I use in my classroom, hoping to inspire both educators and young artists alike. Whether you’re a teacher looking for new ideas or a student eager to try something new, I’m excited to provide creative tools and projects that anyone can enjoy.
When I’m not in the classroom, I love experimenting with different art forms and learning new crafting techniques. My goal is to help others discover the joy of making things with their hands, and I hope my website serves as a space for everyone to explore their creative potential.