
Celebrating Independence Day with young children is a wonderful way to introduce them to the spirit of the holiday while having lots of hands-on fun. 4th of July Daycare Crafts are the perfect way to combine creativity, learning, and celebration all in one! Through colorful, simple activities, kids not only enjoy the excitement of the day but also begin to understand the meaning behind it in a way that’s accessible to them.
4th of July Daycare Crafts
4th of July Daycare Crafts are a fun and festive way for little ones to celebrate Independence Day through creativity. These simple, colorful projects help build fine motor skills while fostering a sense of patriotism.
Handprint American Flag
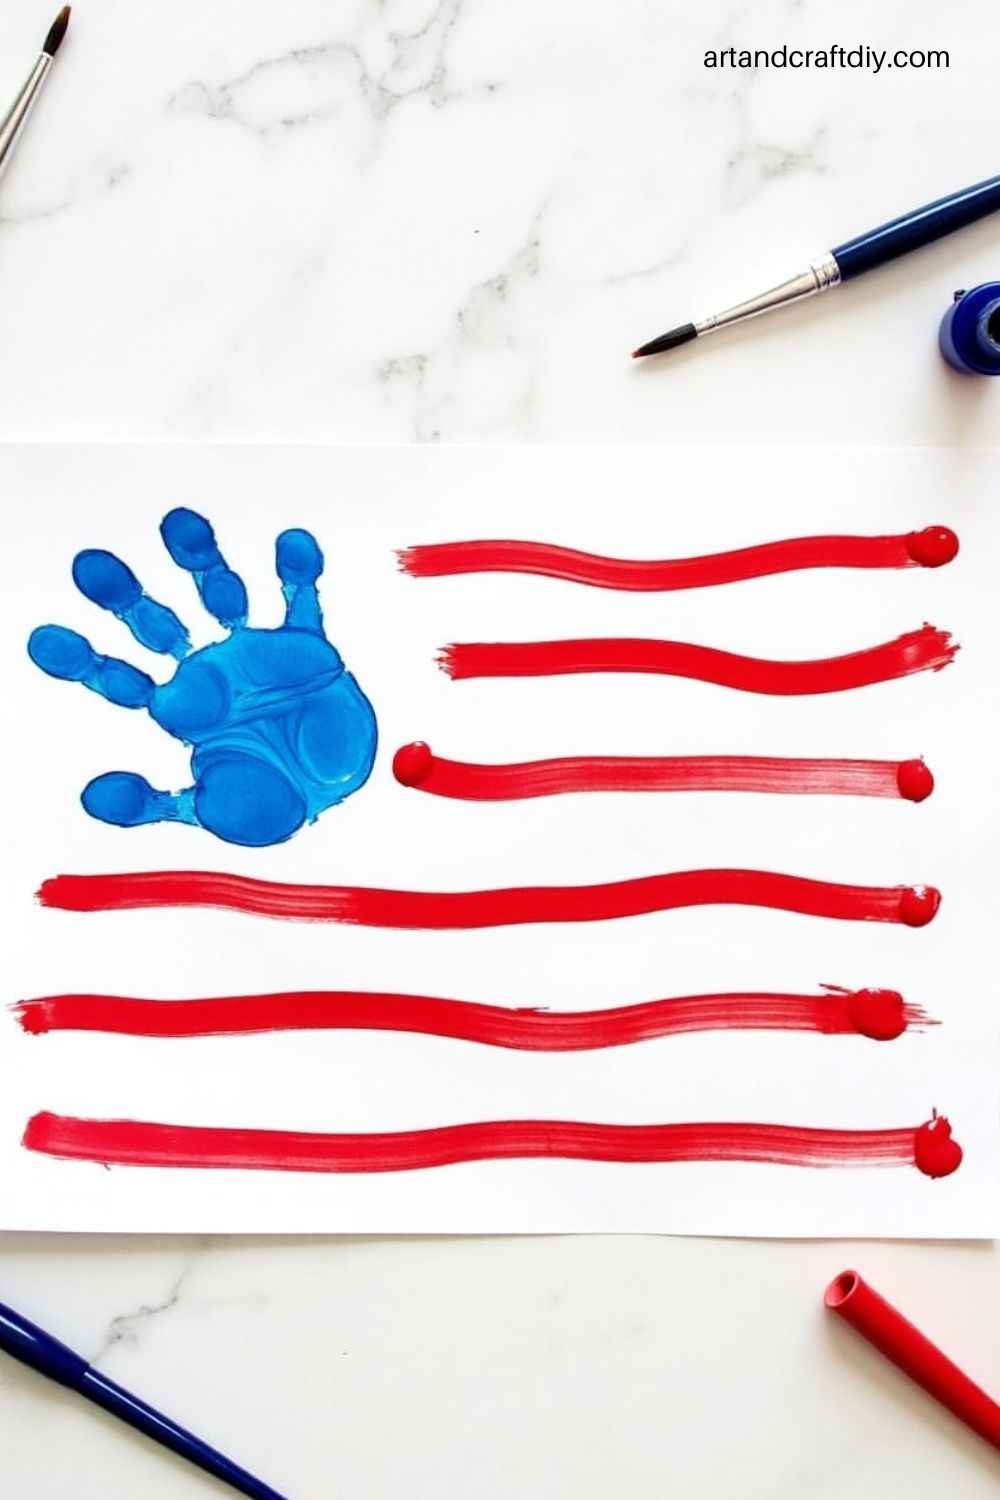
Materials:
-
White construction paper
-
Red, white, and blue washable paint
-
Paintbrushes
Steps:
Paint the child’s palm blue and their fingers alternating red and white. Press their hand down on the paper to create a “flag.” Add little white dots (stars) onto the blue area once dry.
Paper Plate Fireworks
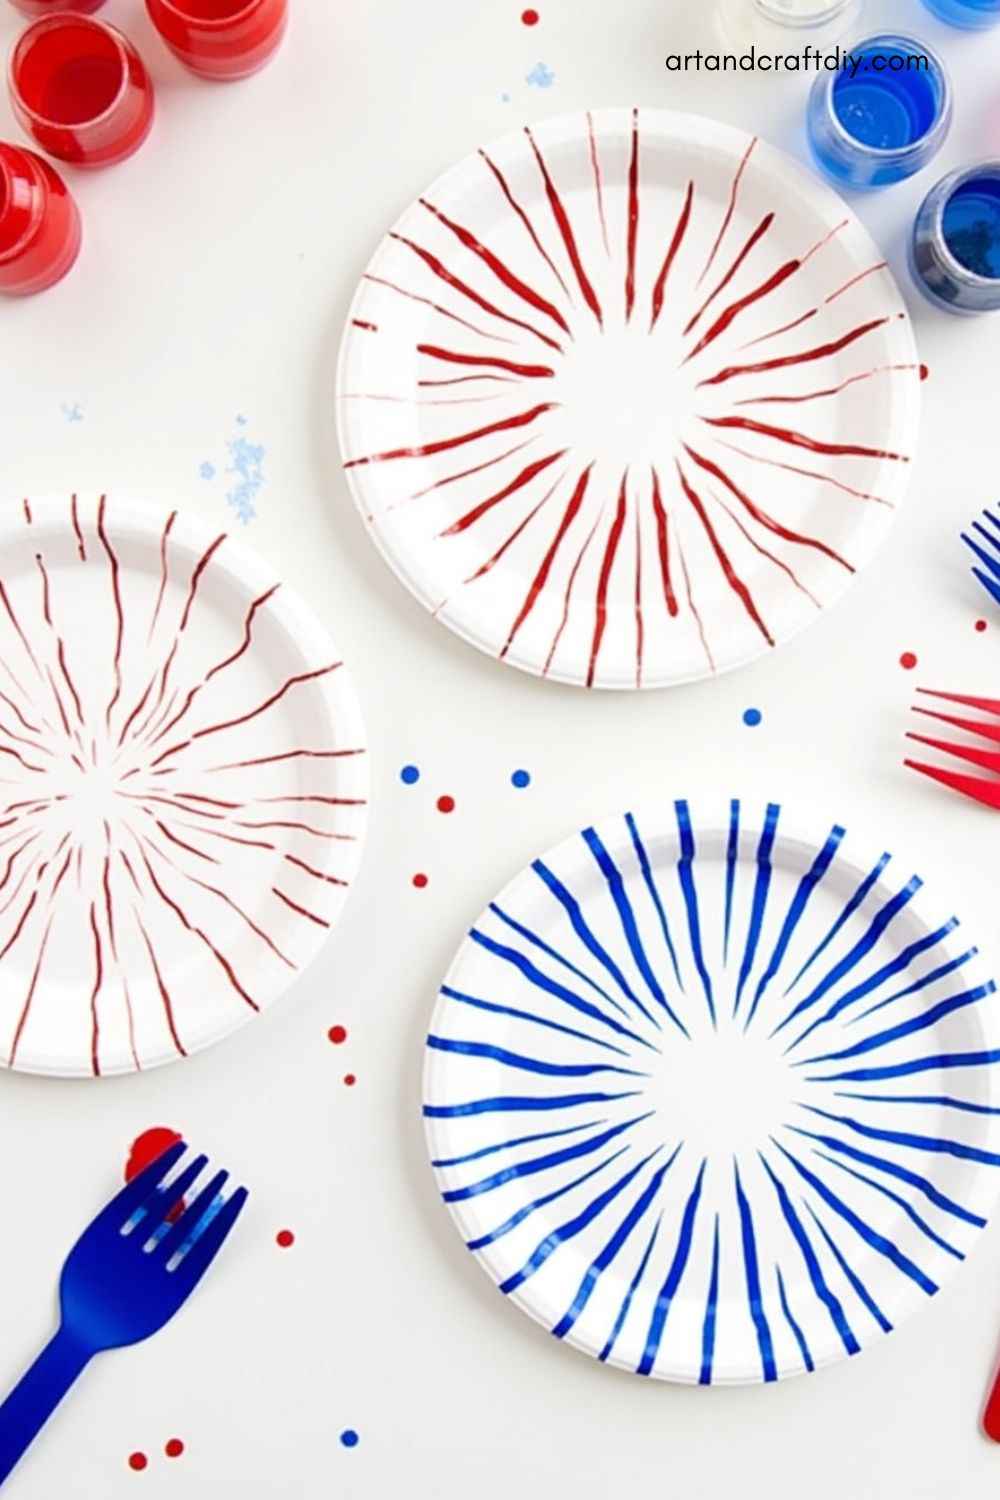
Materials:
-
Paper plates
-
Red, white, and blue paint
-
Paintbrushes or forks
Steps:
Let children dip brushes or forks into paint and streak them out from the center of the plate to make colorful “fireworks” bursting.
Patriotic Star Wands

Materials:
-
Foam stars or cardstock
-
Popsicle sticks
-
Red, white, and blue ribbon
-
Glue
Steps:
Glue stars onto the popsicle stick tops. Tie ribbons underneath the stars and let the children wave their patriotic wands.
Confetti Firework Art
Materials:
-
Black construction paper
-
Red, white, and blue tissue paper (cut into small squares)
-
Glue sticks
Steps:
Kids glue colorful tissue pieces onto black paper in a circular, firework-like burst for a bright, night-sky effect.
Red, White, and Blue Bead Bracelets

Materials:
-
Red, white, and blue beads
-
Elastic string
Steps:
Pre-cut string to bracelet size. Help children thread beads in a pattern or random design and tie the ends securely.
Star Spangled Windsocks
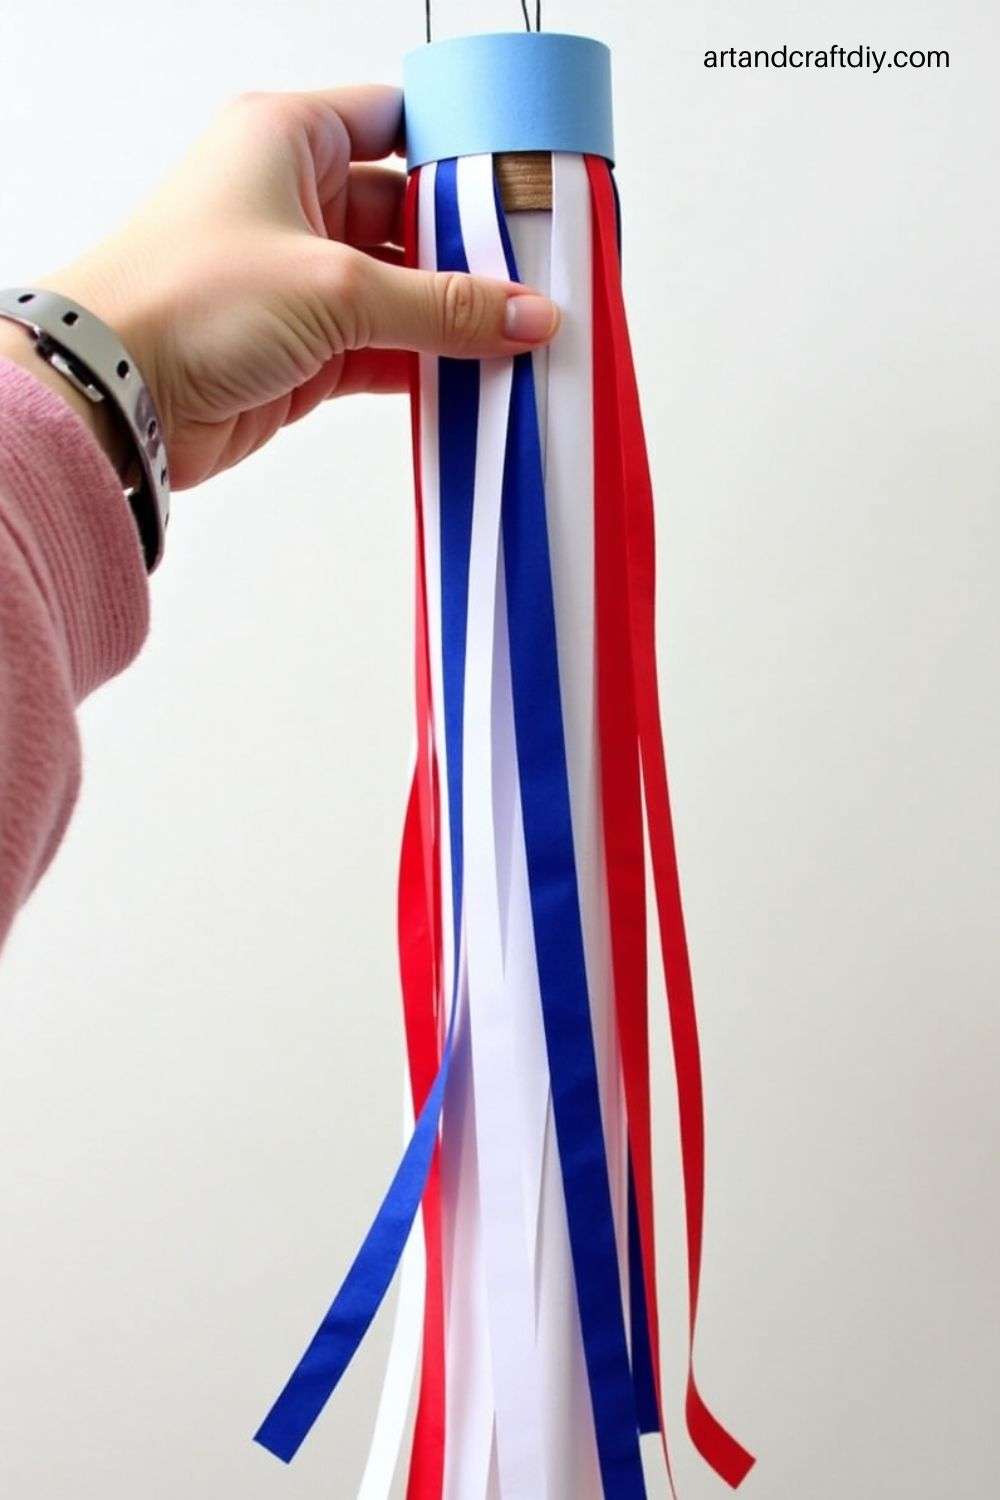
Materials:
-
Toilet paper rolls
-
Red, white, and blue paint
-
Star stickers
-
Ribbon or streamers
Steps:
Paint the rolls and decorate with stars. Attach streamers to one end and hang with yarn.
Sponge Painted Flags

Materials:
-
Sponges
-
Red, white, and blue paint
-
White paper
Steps:
Cut sponges into rectangles. Let kids dip them in paint and press them onto paper to create a flag design.
Cotton Ball Fireworks

Materials:
-
Cotton balls
-
Clothespins
-
Paint (red, white, blue)
-
Black paper
Steps:
Clip a cotton ball into a clothespin to make a dabber. Let kids dip and stamp fireworks patterns on black paper.
Footprint Bald Eagles

Materials:
-
Brown and white washable paint
-
Orange marker
-
White paper
Steps:
Paint the child’s foot brown and stamp it onto paper. Once dry, add a white “head” at the heel and orange beak and feet with marker.
4th of July Crowns
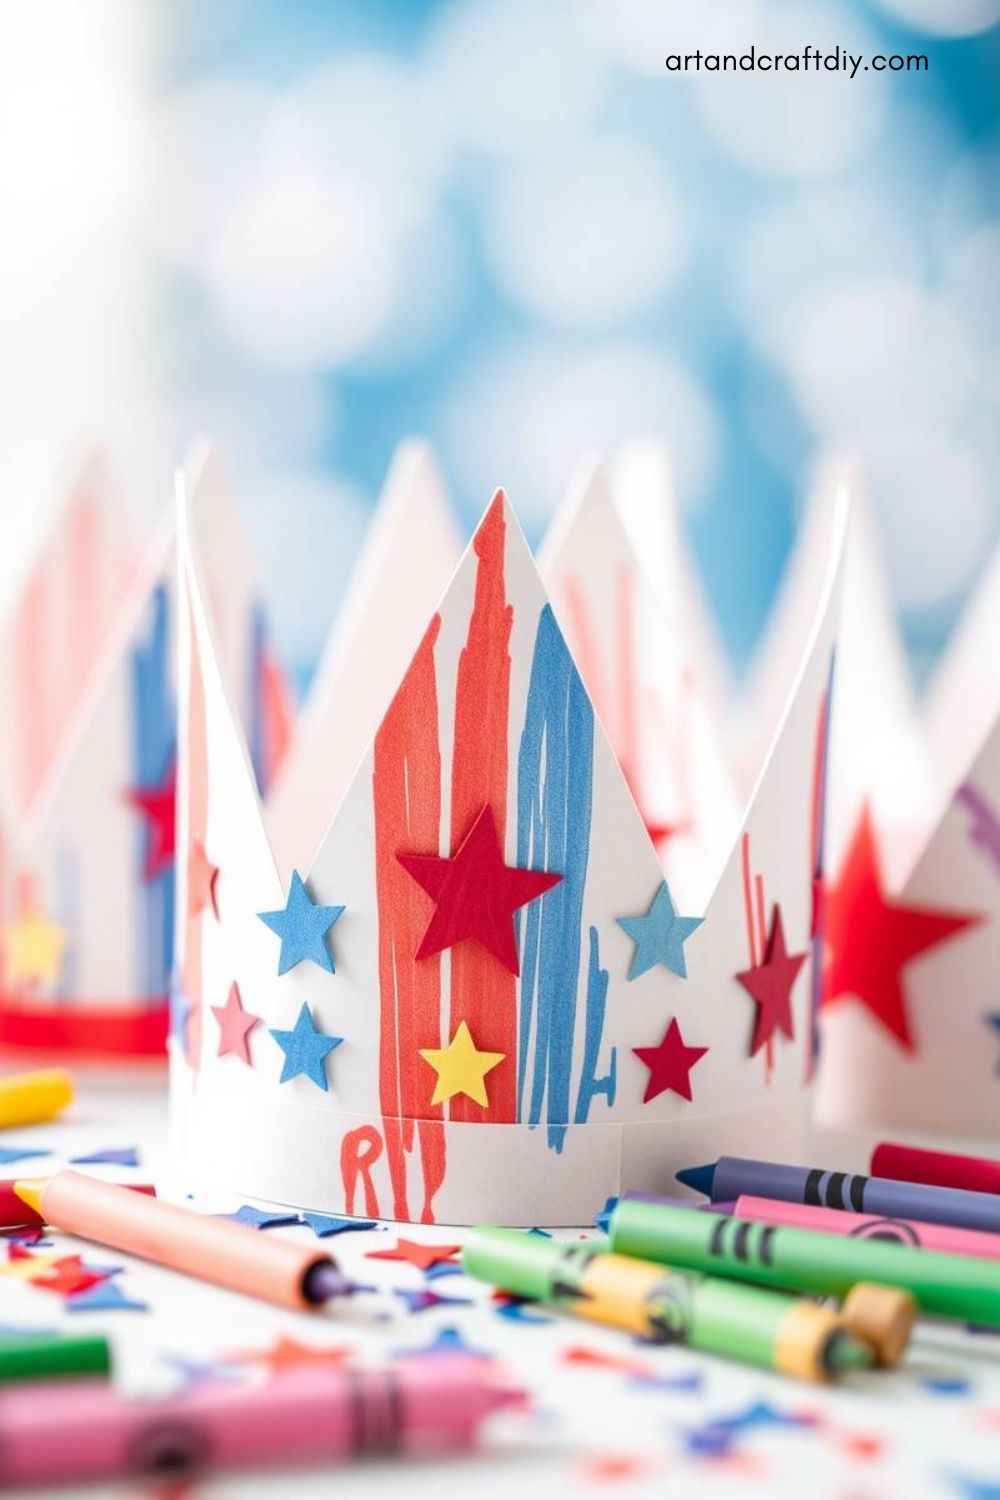
Materials:
-
Construction paper
-
Star stickers
-
Markers or crayons
-
Stapler or tape
Steps:
Cut strips of paper to fit around each child’s head. Let them decorate with stars and markers, then staple or tape into crowns.
Glittery Firework Salt Paintings
Materials:
-
Glue
-
Salt
-
Watercolors or diluted food coloring
-
Black construction paper
Steps:
Kids draw fireworks with glue on black paper. Sprinkle salt onto the glue, shake off the excess, and gently paint the salt with colorful watercolors.
Star Suncatchers
Materials:
-
Wax paper
-
Crayons (peeled and grated)
-
Iron (for adult use)
-
Star stencil
Steps:
Sprinkle crayon shavings between wax paper sheets. Adults lightly iron to melt. Once cool, trace and cut out star shapes for hanging.
Pom-Pom Fireworks Painting
Materials:
-
Pom-poms
-
Clothespins
-
Paint
-
Black paper
Steps:
Clip pom-poms into clothespins and dip into red, white, and blue paint. Dab onto black paper to create puffy fireworks art.
Patriotic Paper Chains
Materials:
-
Red, white, and blue construction paper
-
Scissors
-
Glue sticks or tape
Steps:
Cut paper into strips. Children loop and glue each strip into a chain, alternating colors, to create festive decorations.
Uncle Sam Paper Plate Craft
Materials:
-
Paper plates
-
Cotton balls
-
Red, white, and blue construction paper
-
Glue
-
Markers
Steps:
Decorate plates to look like Uncle Sam’s face: cotton ball beard, red-and-white striped hat with blue star band, and marker details for the face.
Tips for a Successful Crafting Day
A fun 4th of July crafting day at daycare becomes even more magical with a little planning and preparation! Making sure everything runs smoothly helps keep little hands busy, big imaginations growing, and creates a safe, joyful environment for everyone. Here are some simple tips to make your crafting day a success:
• Prepare materials ahead of time
Have all supplies ready before craft time begins. Pre-cut shapes, organize paints, and set out glue and tools to keep activities flowing easily.
• Offer non-toxic, washable supplies
Use child-safe, non-toxic, and washable paints, markers, and glues to ensure the crafting experience is safe and easy to clean up.
• Allow plenty of drying time
Make space for crafts to dry properly without being touched or smudged. Plan a “drying station” where kids can proudly leave their artwork.
• Create “stations” for different crafts
Set up different tables or areas for each craft. This helps manage groups better and gives children options to move between activities without waiting.
• Keep projects short and simple
Choose easy crafts with just a few steps that young children can complete quickly. Short projects hold their attention and create a sense of accomplishment.
• Encourage creativity over perfection
Focus on letting kids express their own ideas instead of aiming for perfect-looking crafts. Celebrate their unique creations and make them feel proud!
FAQ
What are some easy 4th of July crafts for toddlers and preschoolers?
Simple projects like handprint flags, paper plate fireworks, patriotic bead bracelets, and cotton ball fireworks are perfect for little hands. Choose crafts with just a few steps to keep them engaged.
How can I keep 4th of July crafts safe for young children?
Always use non-toxic, washable supplies. Avoid small items that could be choking hazards and supervise closely, especially when using scissors, glue, or paint.
How far in advance should I prepare the craft materials?
It’s best to prepare all materials the day before the crafting session. Pre-cut shapes, pour out paints, and set up stations so everything is organized when the children are ready to begin.
What if a child wants to do the craft differently than shown?
That’s encouraged! Crafting is all about creativity and expression. Let children explore different colors, shapes, and ideas to make their artwork truly their own.

Hi, I’m Victoria, an art and craft teacher at Newark City Schools, where I have the joy of working with middle school students to help them explore their creativity and develop their artistic talents. I believe that art is a powerful way for students to express themselves, and I strive to make every lesson a fun, engaging, and inspiring experience.
I created this website to share the art and craft projects, techniques, and resources that I use in my classroom, hoping to inspire both educators and young artists alike. Whether you’re a teacher looking for new ideas or a student eager to try something new, I’m excited to provide creative tools and projects that anyone can enjoy.
When I’m not in the classroom, I love experimenting with different art forms and learning new crafting techniques. My goal is to help others discover the joy of making things with their hands, and I hope my website serves as a space for everyone to explore their creative potential.