Homemade Slime Recipe has become an incredibly popular activity for kids and even adults, offering a fun and engaging way to explore sensory play, creativity, and simple science experiments. It is a stretchy, squishy, and often colorful substance that can be customized in many ways. From basic Homemade Slime Recipe to fluffy, glittery, and even edible versions, there are countless ways to make and enjoy it. Making Homemade Slime Recipe is easy and requires just a few simple ingredients, such as glue, borax or contact lens solution, and water. Some recipes use alternatives like cornstarch or baking soda for a safer, non-toxic experience.
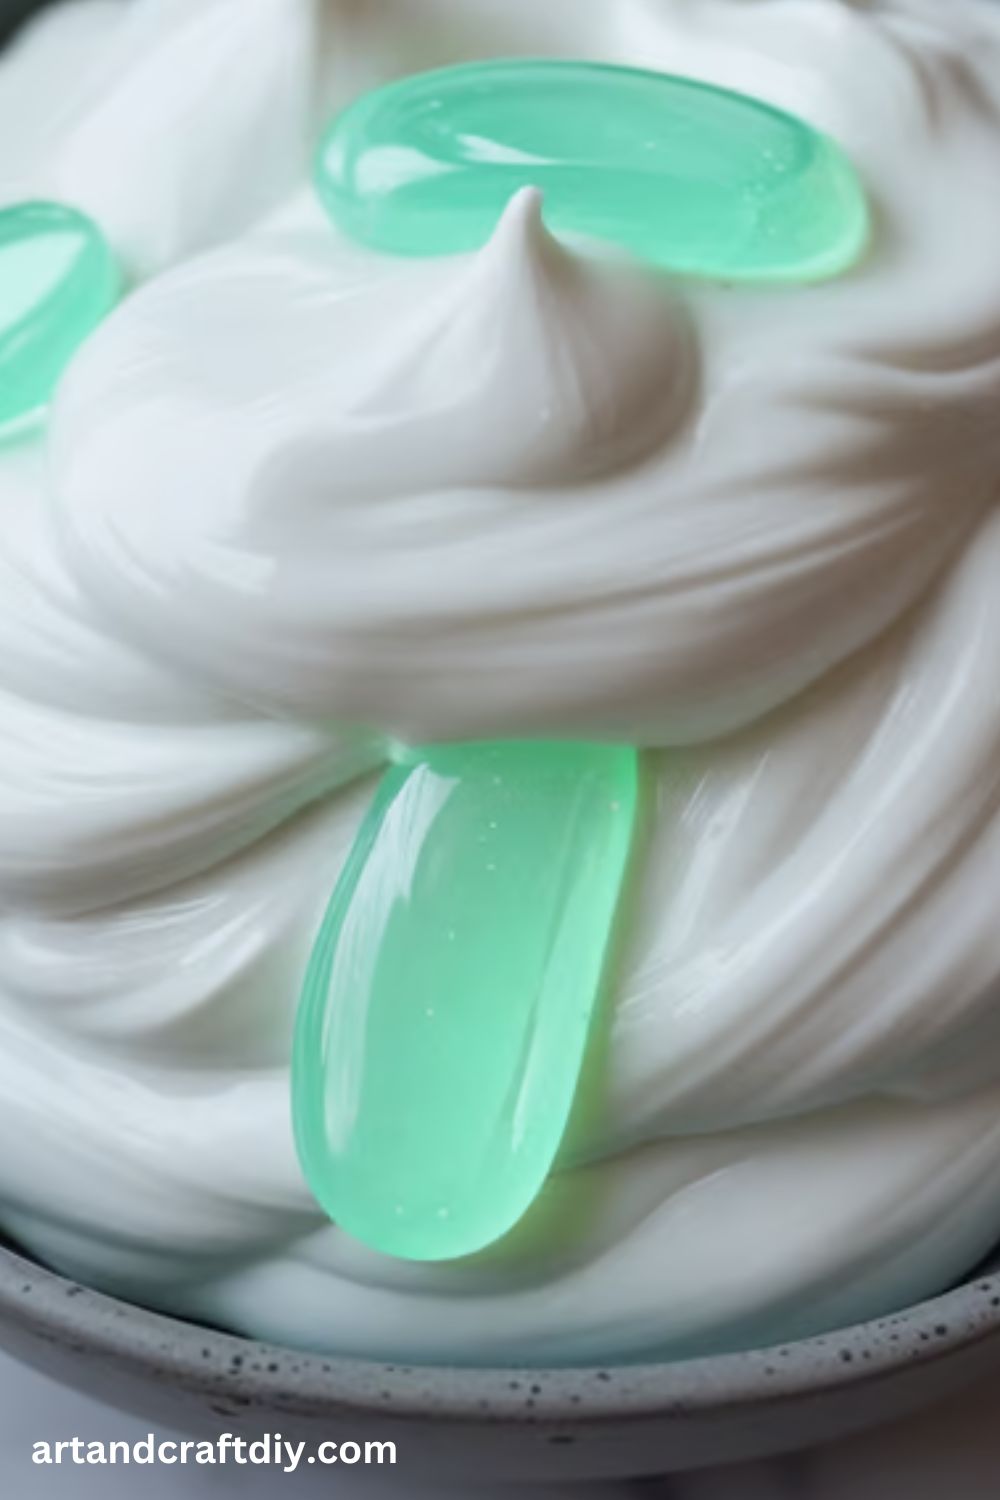
There are many types of slime, each with unique textures and properties. Basic slime is smooth and stretchy, while fluffy slime has a lighter, airier feel due to shaving cream or foam. Glitter slime adds a sparkly effect, making it visually appealing, while edible slime is made with safe, food-grade ingredients like marshmallows or gummy bears. Each variation offers a different sensory experience and can be a fun way to experiment with textures and colors.
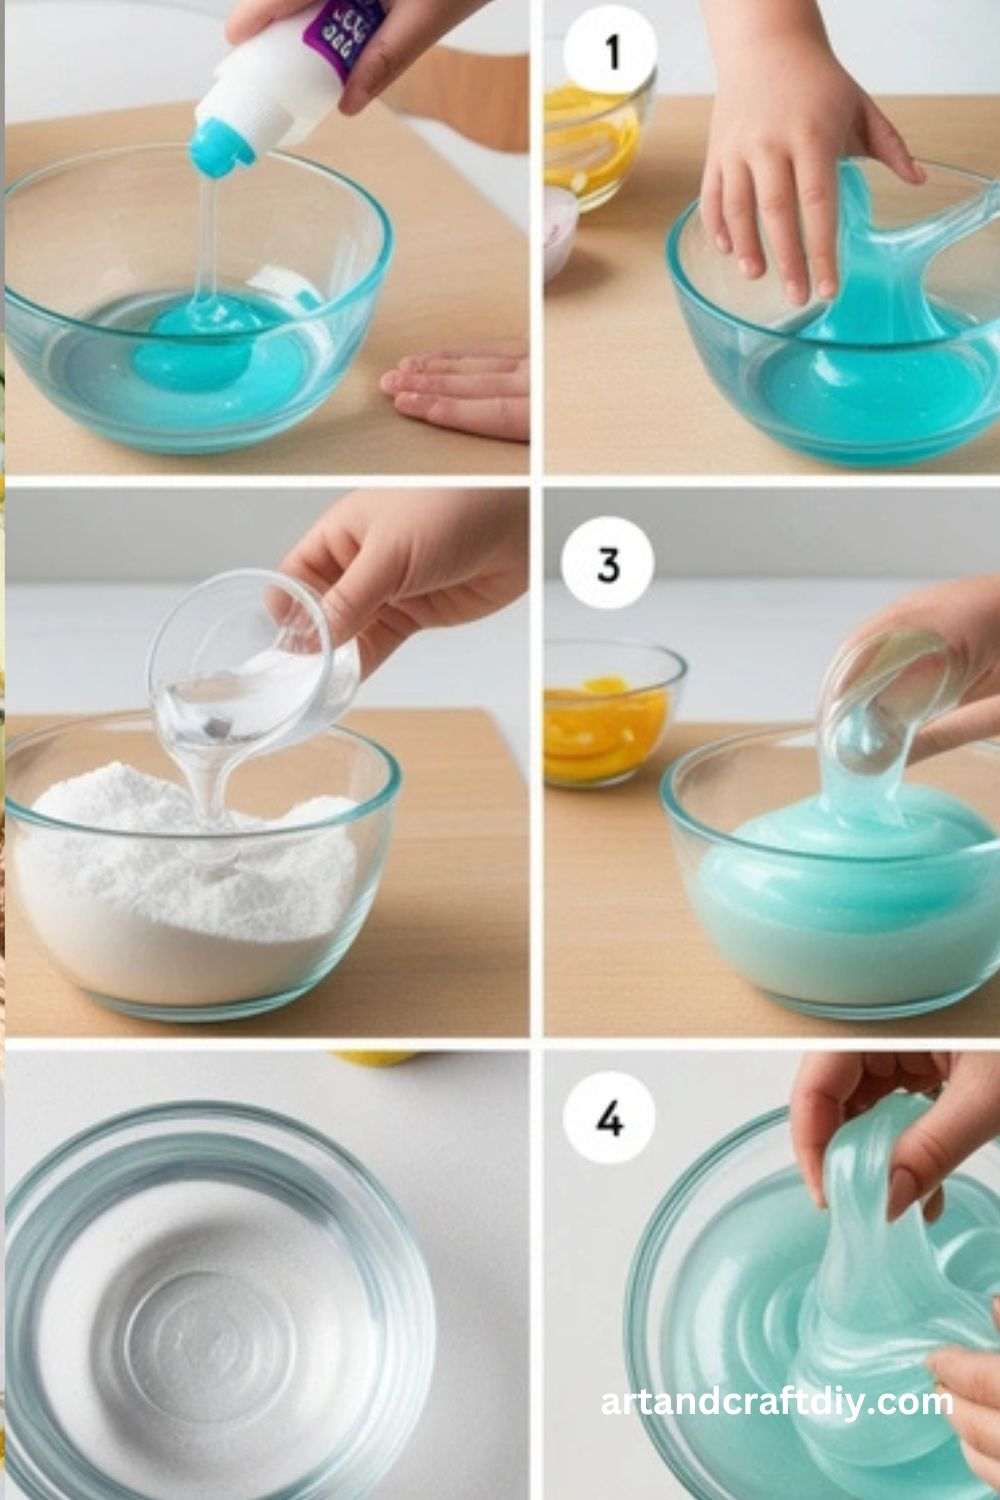
How to Make Homemade Slime Recipe
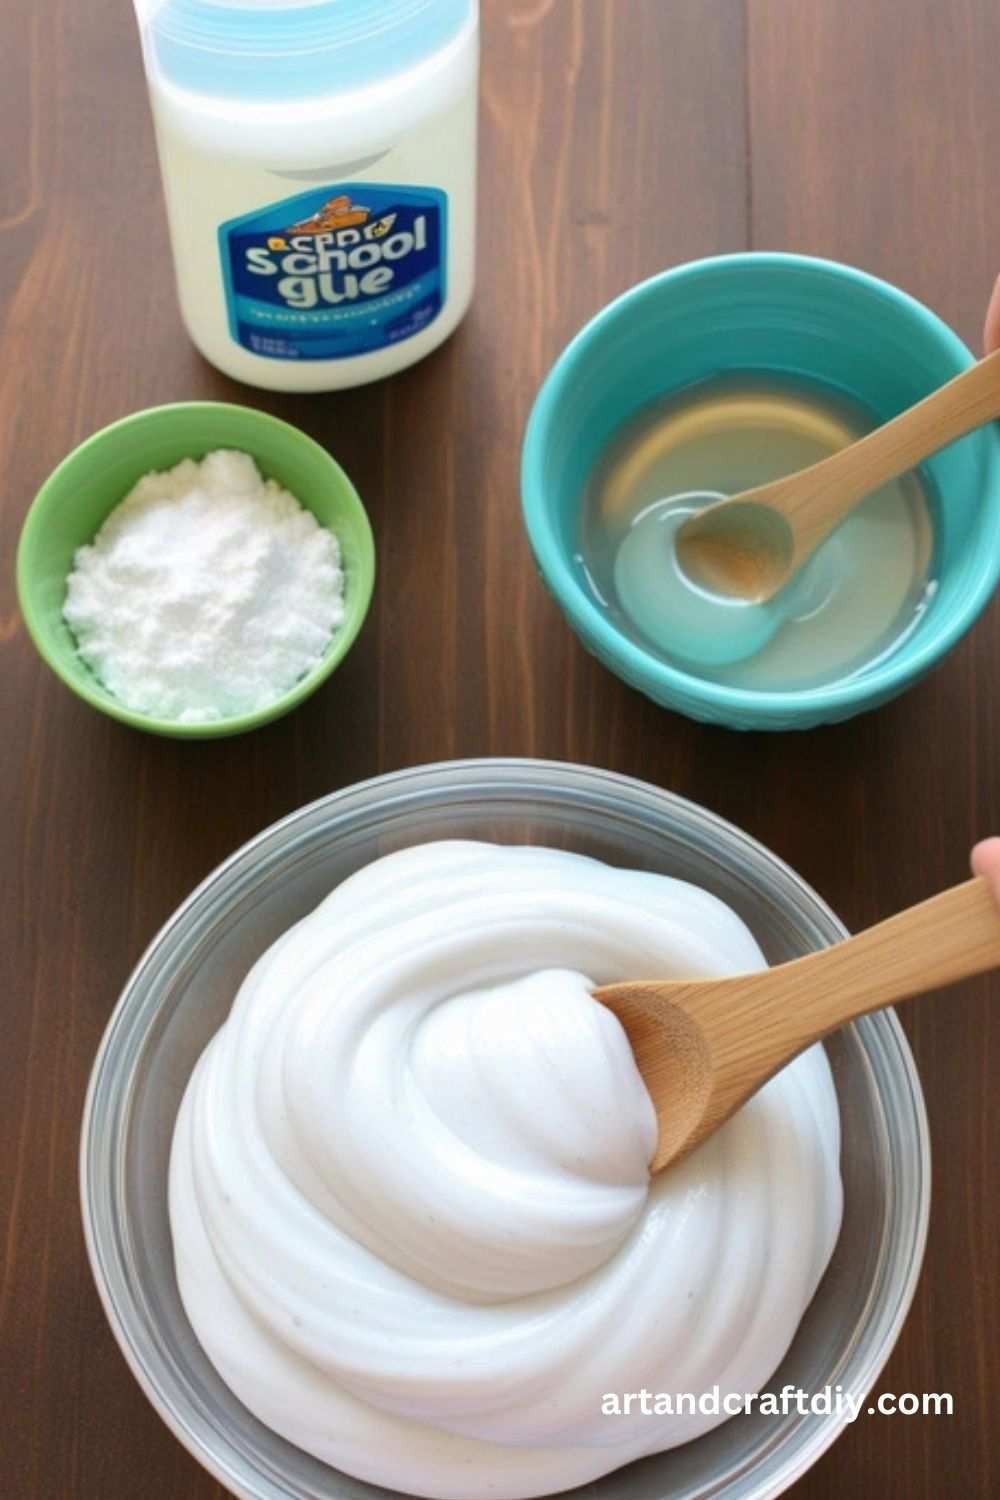
Homemade Slime Recipe is a fun and easy DIY project that kids and adults can enjoy! With just a few simple ingredients like glue, baking soda, and contact lens solution, you can create stretchy, gooey Homemade Slime Recipe in minutes. You can also customize it with colors, glitter, or scents for extra fun. Follow a simple step-by-step recipe to mix and knead your slime until you get the perfect texture. It’s a great hands-on activity for playtime or science experiments!
Classic Slime
Classic slime is the foundation of all slime recipes. It’s stretchy, gooey, and fun to play with.
Materials:
1 cup of white school glue
1 tablespoon of baking soda
2 tablespoons of contact lens solution
Food coloring (optional)
Steps:
Pour the glue into a mixing bowl.
Add food coloring to customize your slime color.
Stir in the baking soda until fully dissolved.
Gradually add the contact lens solution while stirring continuously.
Knead the slime with your hands until it reaches the desired consistency.
Fluffy Slime
Fluffy slime adds a soft, airy texture for a unique sensory experience.
Materials:
2/3 cup of white school glue
1/2 cup of shaving cream
1/4 teaspoon of baking soda
2 tablespoons of contact lens solution
Food coloring (optional)
Steps:
In a bowl, mix glue and shaving cream until fluffy.
Add your chosen food coloring and mix thoroughly.
Sprinkle in the baking soda and stir well.
Slowly pour in the contact lens solution while stirring.
Knead until the slime becomes stretchy and airy.
Glow-in-the-Dark Slime DIY
This glowing slime is perfect for nighttime fun.
Materials:
1 cup of clear glue
1/4 cup of liquid starch
Glow-in-the-dark paint or powder
Food coloring (optional)
Steps:
Combine glue and glow-in-the-dark paint in a bowl.
Add a few drops of food coloring if desired.
Slowly mix in liquid starch until the slime forms.
Knead the mixture until it’s smooth and stretchy.
Charge under a light to see it glow!
How to Make Edible Slime
This safe, edible slime is ideal for younger kids.
Materials:
1 can of sweetened condensed milk
1 tablespoon of cornstarch
Food coloring
Steps:
Heat the condensed milk in a saucepan over low heat.
Stir in cornstarch and continue to mix until thickened.
Add food coloring and stir well.
Let it cool before playing.
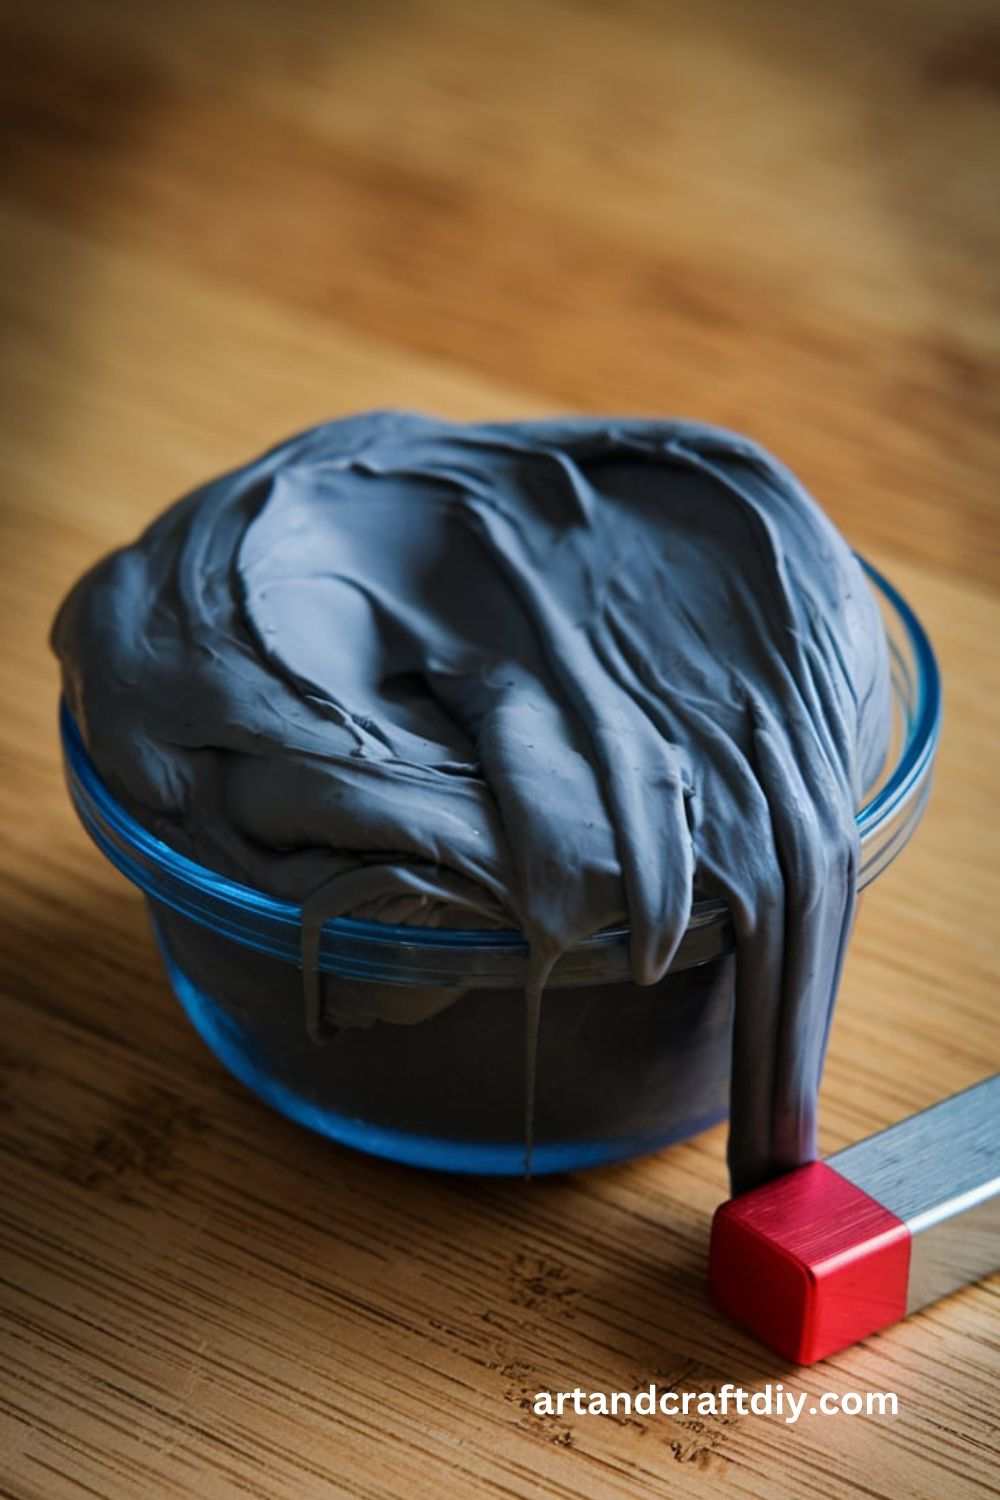
DIY Magnetic Slime
Magnetic slime adds a scientific twist to your slime-making adventure.
Materials:
1/2 cup of white glue
1/4 cup of liquid starch
2 tablespoons of iron oxide powder
Strong magnets
Steps:
Mix the glue and iron oxide powder in a bowl.
Gradually add liquid starch while stirring.
Knead the mixture until it’s pliable.
Use magnets to make your slime move and stretch.
How to Make Clear Slime
Clear slime has a glossy, glass-like appearance that’s mesmerizing.
Materials:
1 cup of clear glue
1 tablespoon of baking soda
2 tablespoons of contact lens solution
Steps:
Combine clear glue and baking soda in a bowl.
Stir until fully dissolved.
Add contact lens solution while mixing.
Knead until the slime is transparent and stretchy.
DIY Crunchy Slime
Crunchy slime includes a satisfying texture from added beads.
Materials:
1 cup of white glue
1 tablespoon of baking soda
2 tablespoons of contact lens solution
Foam beads
Steps:
Mix glue and baking soda in a bowl.
Add contact lens solution gradually while stirring.
Fold in foam beads until evenly distributed.
Knead until the slime is stretchy and textured.
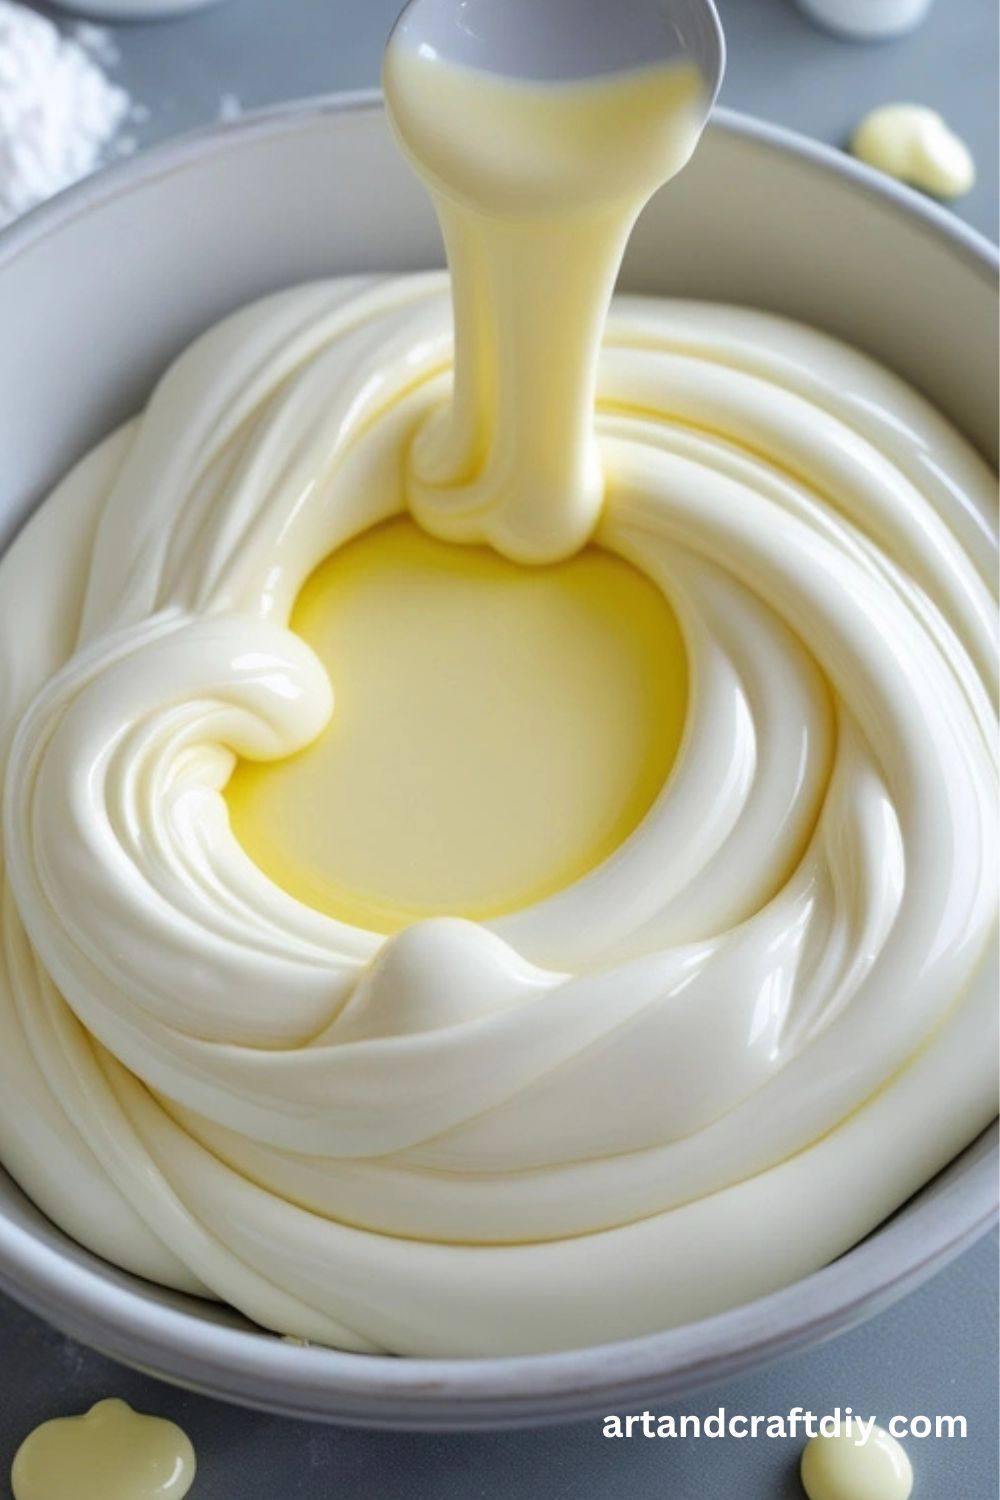
Butter Slime DIY
Butter slime is smooth and spreadable, much like actual butter.
Materials:
1/2 cup of white glue
1/4 cup of shaving cream
1 tablespoon of cornstarch
1 tablespoon of contact lens solution
2 tablespoons of soft clay
Steps:
Combine glue, shaving cream, and cornstarch in a bowl.
Stir until smooth.
Gradually add contact lens solution.
Mix in soft clay and knead until smooth and buttery.
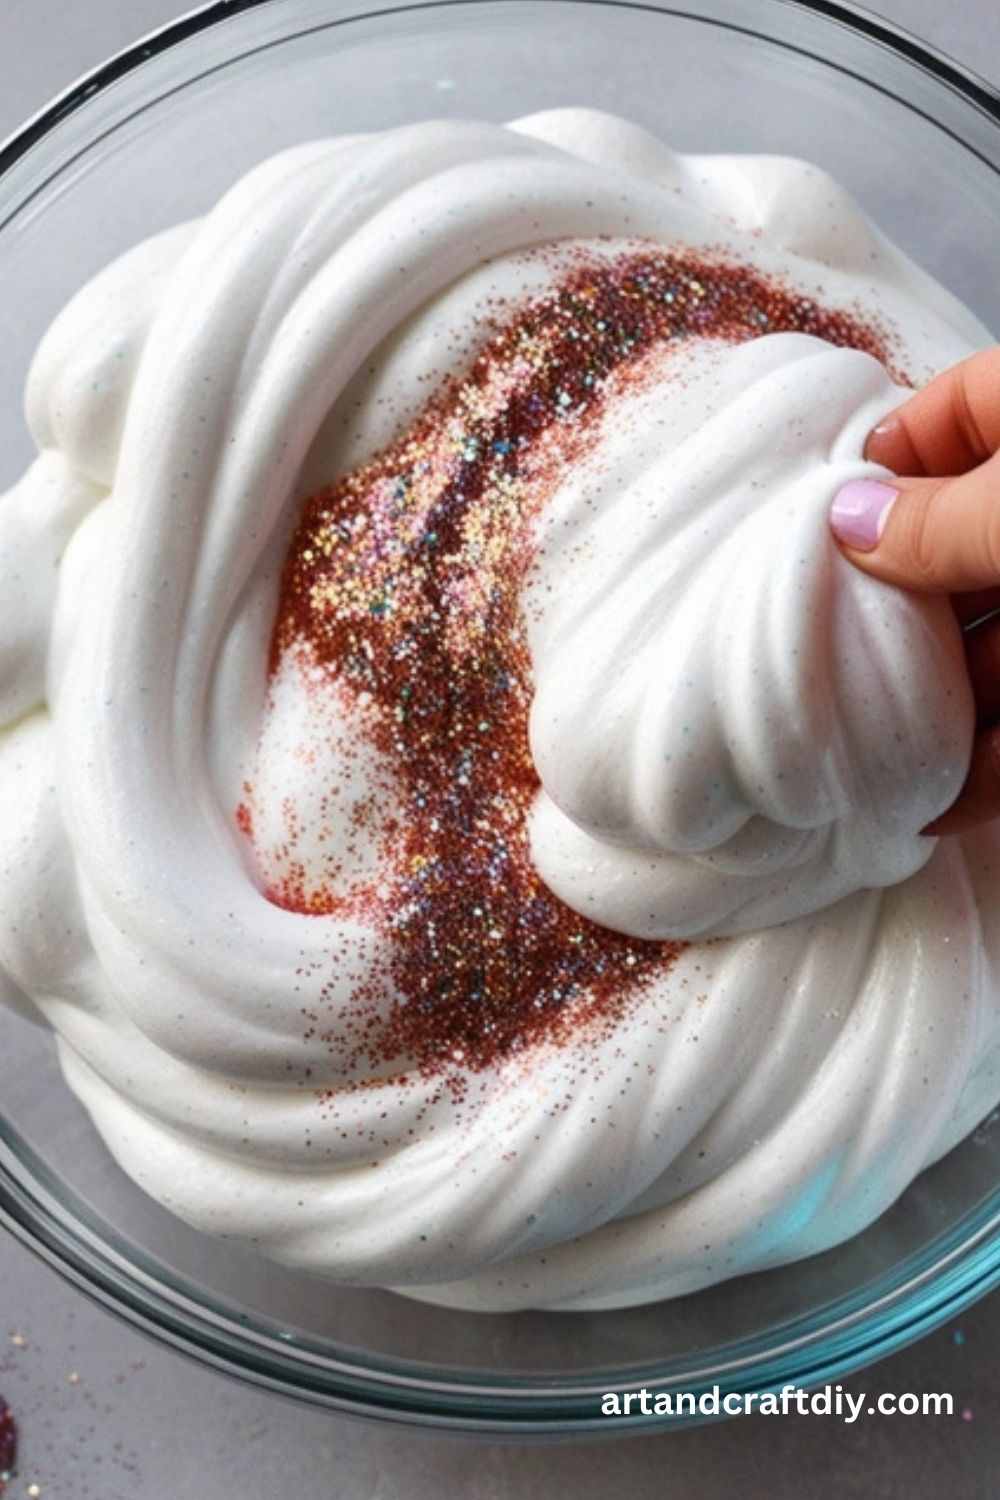
Glitter Slime DIY
Add sparkle to your slime for a dazzling effect.
Materials:
1 cup of clear glue
1 tablespoon of baking soda
2 tablespoons of contact lens solution
Glitter
Steps:
Mix clear glue and baking soda in a bowl.
Add glitter and stir thoroughly.
Pour in contact lens solution gradually while mixing.
Knead until smooth and stretchy.
Snow Slime
Snow slime feels cool and fluffy, perfect for winter vibes.
Materials:
1 cup of white glue
1 tablespoon of baking soda
2 tablespoons of contact lens solution
Instant snow powder
Steps:
Combine glue and baking soda in a mixing bowl.
Add contact lens solution and mix well.
Activate instant snow powder with water according to package instructions.
Gradually fold the snow into the slime until evenly incorporated.
How to Make Galaxy Slime
Galaxy slime combines stunning colors for a cosmic effect. Materials:
1 cup of clear glue
1 tablespoon of baking soda
2 tablespoons of contact lens solution
Purple, blue, and black food coloring
Fine glitter
Steps:
Divide the clear glue into three bowls.
Color each bowl with purple, blue, or black food coloring.
Add baking soda and contact lens solution to each bowl to create separate slimes.
Layer the slimes together and add glitter for a galactic effect.
How to Make Soap Slime
Soap slime is simple, safe, and has a pleasant scent. Materials:
1/2 cup of liquid soap or body wash
2 tablespoons of cornstarch
Food coloring (optional)
Steps:
Pour the liquid soap into a bowl.
Add food coloring if desired.
Gradually mix in cornstarch until the slime thickens.
Knead until smooth and stretchy.
How to Make Jiggly Slime
Jiggly slime has a bouncy, watery texture that’s unique and fun. Materials:
1 cup of clear glue
1/2 cup of water
1 tablespoon of baking soda
2 tablespoons of contact lens solution
Steps:
Mix clear glue and water in a bowl.
Add baking soda and stir thoroughly.
Slowly pour in contact lens solution while mixing.
Knead until the slime becomes jiggly and stretchy.
How to Make Scented Slime
Scented slime is perfect for adding an aromatic twist to playtime. Materials:
1 cup of white glue
1 tablespoon of baking soda
2 tablespoons of contact lens solution
A few drops of essential oil
Steps:
Mix glue and baking soda in a bowl.
Add essential oil and stir thoroughly.
Gradually pour in contact lens solution while mixing.
Knead until the slime is stretchy and aromatic.
How to Make Edible Marshmallow Slime
This sticky, sweet slime is made from marshmallows and is safe to eat. Materials:
1 cup of marshmallows
1 tablespoon of coconut oil
2 tablespoons of cornstarch
Steps:
Melt marshmallows and coconut oil in a microwave-safe bowl.
Stir in cornstarch gradually until thickened.
Let the mixture cool before playing and eating.
How to Make Sand Slime
Sand slime adds a grainy texture for a beachy feel. Materials:
1 cup of white glue
1 tablespoon of baking soda
2 tablespoons of contact lens solution
1/2 cup of craft sand
Steps:
Combine glue and baking soda in a bowl.
Add contact lens solution while mixing.
Fold in the sand until fully incorporated.
Knead until the slime is stretchy with a sandy texture.
How to Make Cotton Candy Slime
This pastel-colored slime is inspired by the softness of cotton candy. Materials:
1 cup of white glue
1/2 cup of shaving cream
1 tablespoon of baking soda
2 tablespoons of contact lens solution
Pink and blue food coloring
Steps:
Mix glue and shaving cream in a bowl.
Add baking soda and stir well.
Divide the mixture into two parts and color one pink and the other blue.
Add contact lens solution to each part and knead.
Swirl the colors together for a cotton candy effect.
How to Make Watermelon Slime
Watermelon slime has a fun theme with pink, green, and black accents. Materials:
1 cup of white glue
1 tablespoon of baking soda
2 tablespoons of contact lens solution
Pink and green food coloring
Black foam beads
Steps:
Divide the glue mixture into two parts.
Color one part pink and the other green.
Add baking soda and contact lens solution to both mixtures.
Mix in black foam beads to the pink slime for watermelon seeds.
Combine the pink and green slimes for a watermelon theme.
How to Make Cloud Slime
Cloud slime has a fluffy, drizzly texture that’s mesmerizing to watch. Materials:
1 cup of white glue
1 tablespoon of baking soda
2 tablespoons of contact lens solution
Instant snow powder
Steps:
Mix glue and baking soda in a bowl.
Add contact lens solution and stir until the slime forms.
Activate instant snow with water and fold it into the slime.
Knead until the slime achieves a fluffy, cloud-like texture.
How to Make Unicorn Slime
Unicorn slime features pastel colors swirled together for a magical look. Materials:
1 cup of white glue
1 tablespoon of baking soda
2 tablespoons of contact lens solution
Pink, purple, and blue food coloring
Fine glitter
Steps:
Divide the glue mixture into three bowls.
Color each bowl with pink, purple, or blue food coloring.
Add baking soda and contact lens solution to each bowl, mixing until slime forms.
Knead each slime separately, then swirl them together without fully mixing.
Add glitter for a sparkly, unicorn-like finish.
How to Make Gold Slime
Gold slime has a shimmering, royal look that’s irresistible. Materials:
1 cup of clear glue
1 tablespoon of baking soda
2 tablespoons of contact lens solution
Gold pigment powder or gold glitter
Steps:
Mix clear glue and baking soda in a bowl.
Add gold pigment powder or glitter and mix thoroughly.
Gradually pour in contact lens solution while stirring.
Knead until the slime is smooth and shiny like gold.
How to Make Iceberg Slime
Iceberg slime has a crunchy top layer with a soft, gooey interior. Materials:
1 cup of white glue
1/4 cup of shaving cream
1 tablespoon of baking soda
2 tablespoons of contact lens solution
Steps:
Mix glue and shaving cream in a bowl until fluffy.
Add baking soda and stir well.
Slowly add contact lens solution while mixing.
Let the slime sit uncovered for 24 hours to create a crunchy surface.
How to Make Neon Slime
Neon slime is bright and vibrant, perfect for a fun pop of color. Materials:
1 cup of clear glue
1 tablespoon of baking soda
2 tablespoons of contact lens solution
Neon food coloring
Steps:
Combine clear glue and baking soda in a bowl.
Add a few drops of neon food coloring and mix well.
Gradually pour in contact lens solution while stirring.
Knead until the slime is bright and stretchy.
How to Make Bubblegum Slime
Bubblegum slime is soft, pink, and stretchy, just like bubblegum. Materials:
1 cup of white glue
1 tablespoon of baking soda
2 tablespoons of contact lens solution
Pink food coloring
Bubblegum-scented essential oil
Steps:
Mix glue and baking soda in a bowl.
Add pink food coloring and a few drops of bubblegum essential oil.
Gradually add contact lens solution while mixing.
Knead until the slime is smooth and stretchy.
How to Make Metallic Slime
Metallic slime has a shiny, reflective surface for a futuristic feel. Materials:
1 cup of clear glue
1 tablespoon of baking soda
2 tablespoons of contact lens solution
Metallic pigment powder
Steps:
Mix clear glue and baking soda in a bowl.
Add metallic pigment powder and mix thoroughly.
Slowly pour in contact lens solution while stirring.
Knead until the slime becomes shiny and metallic.
How to Make Foam Slime
Foam slime is light and squishy with added foam beads for texture. Materials:
1 cup of white glue
1 tablespoon of baking soda
2 tablespoons of contact lens solution
Foam beads
Steps:
Combine glue and baking soda in a bowl.
Gradually add contact lens solution while stirring.
Fold in foam beads until evenly distributed.
Knead until the slime is stretchy and textured.
How to Make Rainbow Slime
Rainbow slime layers multiple colors for a bright and cheerful look. Materials:
1 cup of clear glue
1 tablespoon of baking soda
2 tablespoons of contact lens solution
Red, orange, yellow, green, blue, and purple food coloring
Steps:
Divide the glue mixture into six bowls.
Color each bowl with a different color of food coloring.
Add baking soda and contact lens solution to each bowl, mixing until slime forms.
Layer the slimes together in rainbow order.
Stretch gently to preserve the layered effect.
How to Make Stretchy Slime
Stretchy slime is perfect for pulling, twisting, and playing without breaking. Materials:
1 cup of white glue
1/4 cup of water
1 tablespoon of baking soda
2 tablespoons of contact lens solution
Steps:
Mix glue and water in a bowl until smooth.
Add baking soda and stir thoroughly.
Gradually pour in contact lens solution while mixing.
Knead until the slime becomes stretchy and elastic.
How to Make Spiderweb Slime
Spiderweb slime is perfect for Halloween or spooky-themed fun. Materials:
1 cup of clear glue
1 tablespoon of baking soda
2 tablespoons of contact lens solution
White yarn or stretchy spiderweb material
Plastic spiders (optional)
Steps:
Mix clear glue and baking soda in a bowl.
Add contact lens solution gradually while stirring.
Stretch and pull small strands of white yarn or spiderweb material into the slime.
Add plastic spiders for a creepy effect.
Fun Ways to Use and Play with Slime
Slime has taken the world by storm as a versatile, sensory activity that appeals to kids, teens, and adults alike. Not only is it a fantastic stress-relief tool, but it also encourages creativity and provides hours of fun. Here are some exciting and creative ways to use and play with slime, from sensory play to themed customization.
1. Sensory Play and Stress Relief
Stress Ball Alternative: Squeeze, stretch, and pull slime as a tactile stress reliever. The soft, squishy texture is satisfying and calming.
Mindful Play: Use slime during mindfulness exercises to focus on its texture, movement, and sound, helping to reduce anxiety.
Add Sensory Boosters: Mix in beads, glitter, or foam balls to add new textures and enhance sensory stimulation.
ASMR Fun: Record the satisfying crackling, popping, and stretching sounds of slime for your own relaxation or to share online.
2. Customizing Slime for Themed Events
Seasonal Colors: Create red, white, and green slime for Christmas, or pastel-colored slime for Easter. Use glitter and food coloring to match the season.
Holiday-Themed Designs: Add mini pumpkins for Halloween, heart confetti for Valentine’s Day, or gold stars for New Year’s Eve slime.
Party Favors: Personalize slime jars with names, labels, or decorations as unique party favors for birthdays or celebrations.
Educational Themes: Make galaxy slime with glitter and dark hues for a space-themed event or dinosaur slime with tiny figures embedded.
3. Creative Play Ideas
Role-Playing Games: Use slime as lava, quicksand, or alien goo during imaginative play sessions.
Slime Art: Combine different colors of slime to create marbled patterns or try “painting” with slime on a flat surface.
Hidden Treasure Hunt: Hide small trinkets or toys inside slime for kids to dig out, making playtime a fun challenge.
Glow-in-the-Dark Fun: Add glow powder or glow-in-the-dark paint to slime for nighttime play.
Storage Tips for Slime: Keep It Fresh and Fun!
Slime is a fun and satisfying sensory activity, but proper storage is key to maintaining its texture, stretch, and overall quality. Whether it’s homemade or store-bought, slime can last for weeks or even months if stored correctly. Here’s how to store your slime properly and recognize when it’s time to toss it.
How to Store Slime Properly
Use an Airtight Container
Keep your slime in a clean, airtight container to prevent it from drying out or absorbing dust and debris. Plastic containers with snug lids or resealable bags work well.
Store in a Cool, Dry Place
Heat and humidity can cause slime to melt or lose its consistency. Keep it away from direct sunlight, heaters, or damp areas to preserve its stretchy texture.
Separate Colors
If you have multiple colors of slime, store each in its own container to prevent them from mixing and creating a muddy appearance.
Avoid Exposure to Water
Excess water can ruin the slime’s texture, making it sticky or gooey. Ensure your hands are dry when handling slime.
Keep It Clean
To avoid contamination, wash your hands before playing with slime and keep it away from dirt, crumbs, or pet hair.
FAQ
What ingredients do I need to Homemade Slime Recipe?
To make basic Homemade Slime Recipe, you’ll need:
Glue (white or clear PVA glue)
Activator (borax solution, liquid starch, or contact lens solution with baking soda)
Optional Add-ins (food coloring, glitter, foam beads, or scents)
How do I make basic Homemade Slime Recipe?
Pour ½ cup of glue into a bowl.
Add food coloring (if desired) and mix.
Slowly add activator (1 teaspoon at a time), stirring continuously until the slime forms.
Knead the slime with your hands until it’s stretchy and smooth.
What can I use as a Homemade Slime Recipe activator?
Common slime activators include:
Borax solution (1 tsp of borax dissolved in 1 cup of warm water)
Liquid starch
Contact lens solution (must contain boric acid) + baking soda
Why is my Homemade Slime Recipe too sticky?
If your slime is too sticky, add a few drops of activator and knead until it becomes less sticky.
Hi, I’m Victoria, an art and craft teacher at Newark City Schools, where I have the joy of working with middle school students to help them explore their creativity and develop their artistic talents. I believe that art is a powerful way for students to express themselves, and I strive to make every lesson a fun, engaging, and inspiring experience.
I created this website to share the art and craft projects, techniques, and resources that I use in my classroom, hoping to inspire both educators and young artists alike. Whether you’re a teacher looking for new ideas or a student eager to try something new, I’m excited to provide creative tools and projects that anyone can enjoy.
When I’m not in the classroom, I love experimenting with different art forms and learning new crafting techniques. My goal is to help others discover the joy of making things with their hands, and I hope my website serves as a space for everyone to explore their creative potential.