
Oh, I remember the first time I tried making Christmas crafts with cardboard—it was a total mess. Glue everywhere, pieces sticking where they shouldn’t, and somehow glitter ended up in places I didn’t even know existed. But you know what? That’s part of the fun, right? There’s something so cozy and satisfying about turning simple cardboard into cute little holiday decorations. If you’ve ever felt a bit overwhelmed by the thought of DIY Christmas projects, trust me, you’re not alone. I’ve been there, staring at a pile of cardboard wondering where to even start. That’s why I wanted to share some Christmas cardboard craft ideas that are actually doable, fun, and even a little magical. From easy ornaments to festive table décor, these ideas are perfect whether you’re crafting alone with a cup of cocoa or making memories with the kids. Ready to get your hands a little messy and your holiday spirit soaring? Let’s dive in!
Christmas Cardboard Craft Ideas
Christmas Cardboard Craft Ideas are fun and creative ways to make holiday decorations using simple cardboard. They are budget-friendly, eco-friendly, and perfect for kids and adults to enjoy together.

Cardboard Christmas Tree

Honestly, I’ve always loved the idea of making a Christmas tree from cardboard. There’s something so satisfying about taking plain sheets of cardboard and turning them into a mini forest centerpiece. I usually start by cutting triangle shapes of different sizes, then layer them to make a 3D effect. Painting it green is optional, but I personally like to leave some of the corrugated texture showing—it gives it a rustic vibe.
Once the tree is assembled, I add little ornaments made from buttons, beads, or scraps of colored paper. To be fair, it’s a bit fiddly, especially if your cardboard is thick, but seeing it standing proudly on my table always makes me smile. Kids love helping with this, too—they’re obsessed with gluing things wherever they want!
Reindeer Ornaments

I’ve found that cardboard reindeer ornaments are such a charming way to decorate the tree. I usually sketch a simple reindeer silhouette, cut it out, and then add details like googly eyes, a pom-pom nose, or glitter antlers. Honestly, they don’t have to be perfect—sometimes the wonky ones are the cutest.
Hanging them on the tree feels special because each one has its own personality. One year, my niece insisted hers had to have a rainbow nose, and honestly, it stole the show. You can also thread them with ribbon or yarn, making them easy to hang. It’s fun, hands-on, and feels so personal.
Snowflake Window Hangings
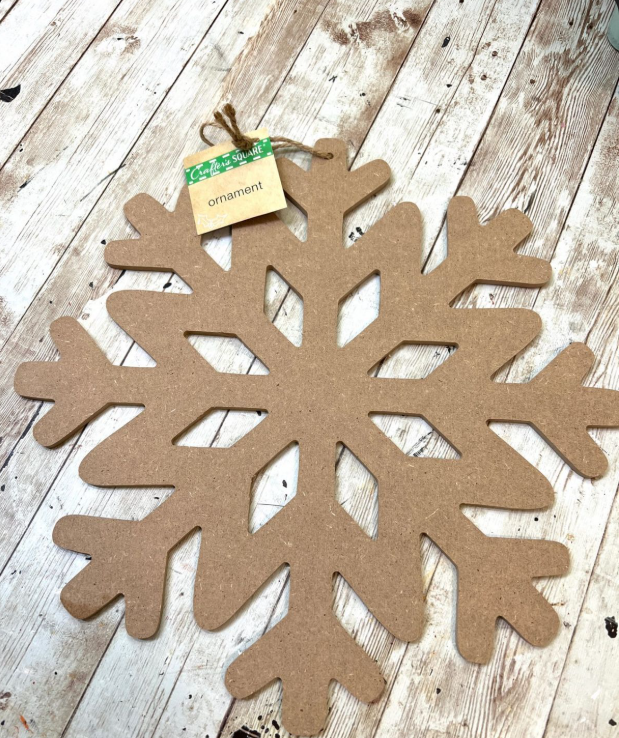
Snowflake window hangings are one of my all-time favorites because they’re delicate but super easy to make from cardboard. I usually fold a small square and cut out geometric shapes. Honestly, I often mess up on the first few tries, but that just makes them look more ‘handmade’ and cozy.
I like taping them to my windows so the light catches the edges. To be fair, I’ve noticed my cat loves batting at them, which is both hilarious and a tiny disaster. Adding glitter or metallic paint gives them a magical frosty vibe. Kids can join in, and the mess is totally worth the cheerful results.
Santa Claus Mask
Making a cardboard Santa Claus mask is surprisingly fun. I start by drawing Santa’s face on a cardboard sheet, cutting it out, and adding features with markers, cotton balls, or small felt pieces. Honestly, my first attempt looked hilarious—more like a jolly alien—but my kids loved it!
I’ve found that punching holes on the sides and tying string works better than elastic. Wearing it while pretending to deliver gifts is such a laugh. To be fair, you’ll get glitter everywhere, but the giggles are worth it. It’s one of those crafts that’s as fun to make as it is to play with afterward.
Gingerbread House

Making a gingerbread house from cardboard is my go-to when I want something that lasts longer than the edible kind. I cut out walls, a roof, and a chimney, then paint them with brown acrylic and add white for the ‘icing’. Honestly, I’ve ruined a few roofs along the way, but that’s half the fun.
I like decorating with small beads, candy, or paper cutouts. My kids get obsessed with adding every piece of “candy” they can find. To be fair, it’s not edible, but the satisfaction of creating a whole little house that survives till New Year is unmatched. Displaying it on the mantel always draws compliments.
Cardboard Advent Calendar
Honestly, cardboard advent calendars are a lifesaver for me when I want to do something special for the kids. I usually make small envelopes or boxes, number them, and fill each with tiny treats or notes. The thrill on their faces when they open a new one is priceless.
I’ve found it works best if you attach the boxes to a larger cardboard backing so everything stays neat. You can paint or decorate each day differently. To be fair, it takes a bit of prep, but watching the countdown excitement grow makes all those tiny boxes totally worth it.
Holiday Wreath
I’ve made cardboard wreaths a bunch of times, and honestly, I love how customizable they are. I cut a circular base and then layer on paper leaves, glittery stars, or mini pom-poms. Kids can help with gluing, which is messy but fun.
Hanging it on the door or above the fireplace instantly adds holiday cheer. I’ve found that combining textures—like matte and metallic paper—gives the wreath a more festive feel. To be fair, it’s not as durable as store-bought, but it has a handmade charm that’s impossible to beat.
Festive Gift Boxes
I love turning plain cardboard into festive gift boxes because they feel personal and creative. I usually cut, fold, and glue the boxes myself, then paint or wrap them in patterned paper. Honestly, store-bought boxes are fine, but making your own gives me way more joy.
Adding little decorations like ribbons, mini ornaments, or hand-drawn doodles makes them extra special. I’ve found that even adults notice and appreciate the effort. To be fair, sometimes my boxes are lopsided, but I think that charm just adds character. Giving gifts in these boxes makes the whole exchange feel warmer.
Elf Shoes
Cardboard elf shoes are surprisingly fun and silly. I usually trace a basic shoe shape, then add curled toes and paint them bright green or red. Honestly, the first time I wore a pair, my kids couldn’t stop laughing.
Adding jingle bells at the tips is optional but hilarious. I’ve found they’re perfect for decorating corners or even wearing for a photo. To be fair, they’re not the comfiest shoes ever, but the whimsy makes up for it. Crafting them is one of those projects that feels festive the moment you start.
Christmas Star
Making a cardboard Christmas star is honestly a bit addictive. I cut out a simple five-point star and then layer another for a 3D effect. Painting it gold or silver and adding glitter makes it pop. I’ve found that tiny sequins glued on top make it look magical.
Hanging it above the tree or on a wall instantly transforms the space. To be fair, it’s tricky to make the points perfectly even, but honestly, a slightly wonky star has personality. Kids love helping with glitter, even if it’s everywhere afterward. It’s simple, fun, and festive all at once.
Candy Cane Decorations
Candy cane decorations from cardboard are one of those things I keep coming back to. I cut a basic candy cane shape, then paint red and white stripes. Honestly, the first ones I made were crooked, but they still looked cute.
You can hang them on the tree or string them into garlands. I’ve found that layering smaller candy canes on top of bigger ones creates a fun 3D effect. To be fair, painting stripes takes patience, but I love how cheerful they look. It’s an easy way to add color and holiday spirit to any room.
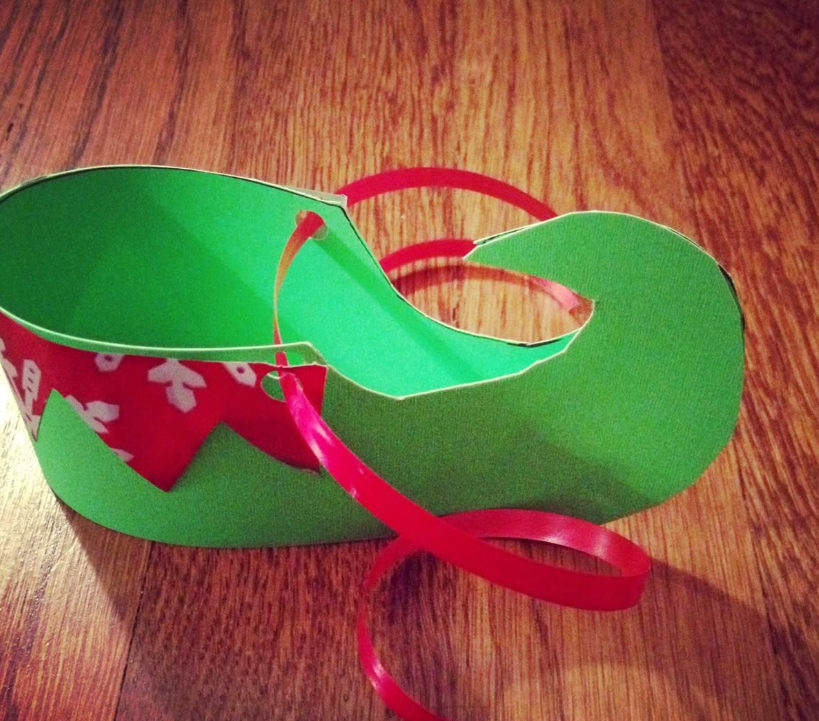
Mini Sleigh
I love making mini cardboard sleighs—they’re perfect for table decor or as gift holders. I usually cut a base and sides, then curve the runners at the bottom. Honestly, my first attempt looked like a wobbly sled, but that added charm.
I’ve found painting it red with gold accents gives it that classic holiday feel. Filling it with mini gifts or pinecones makes it look complete. To be fair, it’s a bit fiddly getting the curves right, but watching it sit proudly on a mantel is such a win. Kids love pretending it’s Santa’s sleigh too!
Christmas Village Houses
I’ve made cardboard Christmas village houses for years, and honestly, it’s one of my favorite projects. I cut simple house shapes, fold them, and add little windows and doors. Painting them in bright colors instantly brings them to life.
Adding tiny decorations like paper wreaths, snow, or glitter rooftops makes each house unique. I’ve found that arranging them together on a table gives a magical little scene. To be fair, the cutting can be tedious, but seeing my kids’ faces light up at the village display makes it totally worth it. It’s one of those crafts that creates instant holiday charm.
Christmas Stocking
Making a cardboard Christmas stocking is fun, and honestly, it’s easier than sewing one. I cut a stocking shape, decorate it with paint, felt, or glitter, and sometimes even add a little cardboard cuff. I’ve found that layering pieces gives it depth and dimension.
Hanging it by the fireplace or on a wall instantly adds cheer. To be fair, it won’t hold heavy gifts, but it’s perfect for tiny treats or notes. Kids love personalizing them with their names or stickers. Honestly, I always make a few each year, and they become part of our holiday tradition.
3D Snowman
I’ve found cardboard snowmen are such a playful addition to holiday decor. I cut three circles of different sizes, stack them, and secure them together. Adding a hat, scarf, buttons, and a carrot nose (usually made from paper) brings them to life. Honestly, the first snowman I made was a little lopsided, but my kids thought it was hilarious.
You can place them on a table, shelf, or even the porch. To be fair, balancing the top circle can be tricky, but a little glue or tape fixes it. I love how customizable they are—you can make tiny snowmen for desks or giant ones for the floor. Honestly, every time I see them, I can’t help but smile.
Tips for Best Results
To make your Christmas cardboard crafts look great and last longer, follow these simple tips. They will help you craft safely and creatively while having fun.
-
Use thick cardboard for sturdier crafts.
-
Always work on a protected surface to avoid messes.
-
Let paint or glue dry completely before handling.
-
Mix textures and materials for a more creative and festive look.
-
Involve kids for a fun family activity and shared holiday memories.
FAQ
Can kids make these cardboard crafts safely?
Yes, most crafts are safe for kids. Supervise them when using scissors, craft knives, or hot glue.
How long does each craft take to complete?
Crafting time varies. Simple ornaments may take 15–30 minutes, while bigger projects like cardboard houses can take 1–2 hours.
Can I reuse cardboard crafts next year?
Yes, if stored carefully in a dry place, many cardboard crafts like ornaments and decorations can be reused for several Christmas seasons.
Are there alternatives to paint for decorating?
Yes, you can use colored paper, markers, stickers, ribbons, or glitter to decorate cardboard crafts instead of paint.

Hi, I’m Victoria, an art and craft teacher at Newark City Schools, where I have the joy of working with middle school students to help them explore their creativity and develop their artistic talents. I believe that art is a powerful way for students to express themselves, and I strive to make every lesson a fun, engaging, and inspiring experience.
I created this website to share the art and craft projects, techniques, and resources that I use in my classroom, hoping to inspire both educators and young artists alike. Whether you’re a teacher looking for new ideas or a student eager to try something new, I’m excited to provide creative tools and projects that anyone can enjoy.
When I’m not in the classroom, I love experimenting with different art forms and learning new crafting techniques. My goal is to help others discover the joy of making things with their hands, and I hope my website serves as a space for everyone to explore their creative potential.