
The other night, I was sitting at my kitchen table surrounded by scraps of paper, bits of twine, and a half-finished candle holder that honestly looked more like a science experiment gone wrong. But you know what? I felt completely relaxed. That’s the magic of DIY crafts for adults—it’s not about being perfect, it’s about getting your hands busy and your mind to slow down for a while. I know a lot of us get stuck in that “I’m not creative” loop, or we think crafting is just for kids. But trust me, there’s something so satisfying about making something with your own hands, even if it turns out a little wonky (sometimes those projects end up being my favorites). In this article, I’m gonna walk you through some fun, doable ideas that’ll spark your creativity, help you de-stress, and maybe even give you a few pieces you’ll be proud to show off.
DIY Crafts For Adults
DIY crafts for adults are creative projects that allow individuals to express their artistic side, develop new skills, and personalize their surroundings.

DIY Hand-Painted Flower Pots

I don’t know what it is about flower pots, but every time I see a plain terracotta one, my hands start itching to grab some paint. Honestly, they’re like little blank canvases sitting around, begging for a splash of personality. I once spent an entire Sunday afternoon painting tiny daisies all over three pots—and I can’t lie, it felt like therapy. The fun part is, you don’t need to be “an artist” to make them look good. Even simple stripes or polka dots make a pot look chic and intentional.
To be fair, I’ve messed up plenty of times—paint dripping where I didn’t want it, or colors blending awkwardly—but here’s the thing: imperfections make them look unique. I always seal them with a clear spray afterward, so they last outdoors too. The next time you feel like refreshing a corner of your balcony, grab a pot, some acrylics, and just let your mood decide the design.
Homemade Scented Candles
I never thought I’d be the kind of person who made candles at home, but oh boy, once you try it, you’re hooked. The first time I tried, I spilled melted wax on the counter (rookie mistake, don’t be me), but the smell of lavender that lingered for days made up for it. I like using old mason jars or quirky teacups as containers—it gives them this rustic, cozy vibe. The best part? You get to pick your own scents. Some days it’s vanilla, other times I go bold with eucalyptus.
In my opinion, making your own candle is less about the result and more about the ritual. Melting, stirring, pouring—it’s oddly calming. And when I light one of my homemade candles after a long day, it feels extra rewarding because I know I made it. Plus, they make super thoughtful gifts. I mean, who doesn’t love receiving a candle that smells like pure comfort?
Customizable Tote Bags
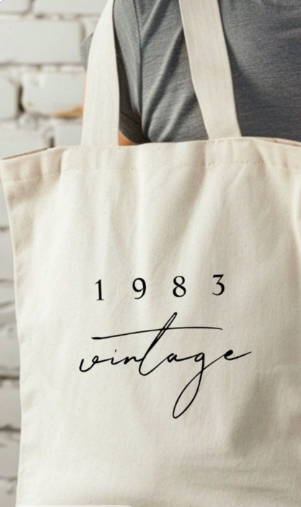
Now, tote bags—these are the craft projects I swear by. I carry one everywhere, so customizing them just feels practical and fun rolled into one. I once painted a giant sunflower on a plain canvas bag, and it instantly became my “farmer’s market tote.” People actually asked me where I bought it, and I had this little smug smile like, “Oh, this old thing? I made it.” Honestly, it’s such a confidence boost.
What I love is that tote bags are basically wearable art. You can go wild with fabric markers, paint, or even iron-on patches. Sometimes I sew on little fabric scraps if I want a textured look. To be fair, not every attempt has been a masterpiece—my attempt at hand lettering looked like a toddler did it—but hey, that’s part of the charm. Every bag ends up telling its own story, and that’s exactly what makes them feel personal.
DIY Embroidered Hoop Art
Create decorative hoop art that adds charm to your walls.

Materials Needed:
- Embroidery hoop
- Fabric (cotton or linen)
- Embroidery thread
- Needle
- Scissors
- Pencil or washable fabric marker
Steps:
- Place the fabric in the embroidery hoop, tightening the outer ring.
- Lightly sketch your design on the fabric with a pencil or fabric marker.
- Thread your needle and knot the end of the thread.
- Begin stitching along your design using basic embroidery stitches like backstitch, satin stitch, or French knots.
- Once complete, trim excess fabric from the back and hang your hoop art on a wall.
Handwoven Wall Hanging
Add a boho touch to your decor with a handmade wall hanging.

Materials Needed:
- Wooden dowel or branch
- Yarn in various colors and textures
- Scissors
- Comb or brush
Steps:
- Cut yarn into equal lengths, approximately twice the desired hanging length.
- Tie each strand of yarn to the dowel using a lark’s head knot.
- Arrange the yarn strands in patterns, alternating colors and textures.
- Use a comb to straighten and smooth the strands.
- Trim the bottom into a straight line, V-shape, or diagonal pattern, and hang on the wall.
Handmade Clay Jewelry
Design unique earrings, necklaces, or bracelets using polymer clay.
Materials Needed:
- Polymer clay in various colors
- Rolling pin or smooth surface
- Jewelry findings (earring hooks, jump rings, chains)
- Craft knife or cookie cutters
- Oven
Steps:
- Roll out the polymer clay to a consistent thickness (around 1/8 inch).
- Use a knife or cutters to shape the clay into desired designs.
- Make holes for hooks or jump rings using a toothpick.
- Bake the clay pieces in the oven according to the manufacturer’s instructions.
- Once cooled, assemble the jewelry using pliers and findings.
Macrame Plant Hanger
Elevate your indoor plants with a handmade macrame hanger.

Materials Needed:
- Cotton cord
- Metal or wooden ring
- Scissors
- Measuring tape
Steps:
- Cut four equal lengths of cord, each about 6 feet long.
- Fold the cords in half and thread them through the ring, securing with a lark’s head knot.
- Divide the cords into pairs and knot them together about 12 inches down.
- Create a basket by tying adjacent cords together.
- Trim and knot the ends securely to hold the plant pot.
Painted Wooden Coasters
Personalize wooden coasters with artistic designs.

Materials Needed:
- Wooden slices or plain wooden coasters
- Acrylic paint
- Paintbrushes
- Sandpaper
- Clear sealant
Steps:
- Sand the wooden coasters to create a smooth surface.
- Paint designs such as mandalas, abstract art, or nature-inspired patterns.
- Allow the paint to dry completely before applying a clear sealant.
- Let the sealant dry for 24 hours, and enjoy your unique coasters.
Upcycled Wine Bottle Vases
Turn empty wine bottles into elegant vases or decor pieces.
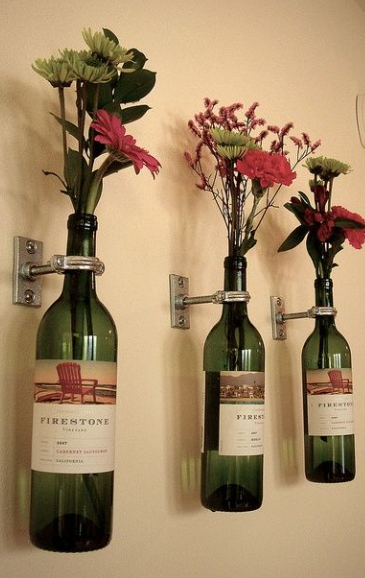
Materials Needed:
- Wine bottles (cleaned and label-free)
- Acrylic paint or spray paint
- Twine or ribbon (optional)
- Fresh or faux flowers
Steps:
- Clean the bottles thoroughly and remove any labels.
- Paint the bottles with acrylic or spray paint, applying multiple thin coats.
- Wrap the neck of the bottle with twine or ribbon for added detail.
- Insert flowers and display your upcycled vase proudly
DIY Decorative Mason Jars
Transform ordinary mason jars into versatile decorative pieces.
Materials Needed:
- Mason jars
- Acrylic paint or spray paint
- Burlap, lace, or twine
- Hot glue gun
- Scissors
Steps:
- Clean the jars thoroughly and let them dry.
- Paint the jars with a base coat of acrylic or spray paint. Let them dry completely.
- Wrap the jars with burlap, lace, or twine, securing it with hot glue.
- Add embellishments like buttons, beads, or ribbons to enhance the design.
- Use the jars as candle holders, vases, or storage containers.
DIY Photo Frame Collage
Personalize your walls with a unique photo frame collage.
Materials Needed:
- Old or plain photo frames
- Spray paint or acrylic paint
- Photos or prints
- Glue or tape
- Nails and a hammer
Steps:
- Remove any glass or backing from the frames.
- Paint the frames with your chosen color and let them dry completely.
- Attach your photos to the backing or directly onto the wall.
- Arrange the frames in a pattern on the wall before securing them with nails.
- Step back and admire your personalized collage.
DIY Pressed Flower Bookmarks
Preserve nature’s beauty in elegant handmade bookmarks.
Materials Needed:
- Fresh flowers or leaves
- Heavy books or a flower press
- Cardstock or thick paper
- Clear adhesive laminate sheets
- Scissors
Steps:
- Press flowers or leaves between the pages of a book for 1–2 weeks until completely dry.
- Cut cardstock into bookmark-sized strips.
- Arrange pressed flowers on the cardstock and cover with a laminate sheet.
- Trim excess laminate, leaving a small border for durability.
- Punch a hole at the top and tie a ribbon if desired.
DIY Cork Board Organizer
Make an attractive and functional cork board for your workspace.
Materials Needed:
- Cork board
- Acrylic paint or fabric
- Push pins
- Ruler
- Scissors
Steps:
- Measure and mark sections of the cork board for painting or covering with fabric.
- Paint patterns or attach fabric using a hot glue gun.
- Let everything dry before adding push pins or decorative tacks.
- Mount the board on the wall to display notes, photos, or reminders.
DIY Terrarium
Bring greenery indoors with a beautiful DIY terrarium.
Materials Needed:
- Glass container (jar, bowl, or terrarium case)
- Small rocks or pebbles
- Activated charcoal
- Potting soil
- Succulents or small plants
Steps:
- Layer the bottom of the container with rocks for drainage.
- Add a thin layer of activated charcoal to keep the soil fresh.
- Add potting soil, leaving space for plants.
- Arrange the succulents or plants in the soil and gently press them in place.
- Add decorative pebbles or moss on top for a finished look.
DIY Painted Rock Garden Markers
Label your garden with creative painted rocks.
Materials Needed:
- Smooth flat rocks
- Acrylic paint
- Paintbrushes
- Clear sealant spray
Steps:
- Wash and dry the rocks to ensure the paint adheres well.
- Paint the base color on each rock and let it dry.
- Use a fine brush to write plant names or draw decorative designs.
- Seal the painted rocks with a clear spray to make them weatherproof.
- Place the rocks in your garden for a charming touch.
DIY Paper Flower Wreath
Add a pop of color to your home with a handmade paper flower wreath.
Materials Needed:
- Cardstock or colored paper
- Hot glue gun
- Wreath base (foam or wire)
- Scissors
- Ribbon
Steps:
- Cut out flower shapes from the paper in various sizes.
- Layer and glue petals together to create 3D flowers.
- Attach the paper flowers to the wreath base using hot glue.
- Fill in gaps with leaves or smaller flowers.
- Add a ribbon to hang your wreath on a door or wall.
DIY Driftwood Wind Chime
Combine nature and sound with a driftwood wind chime.
Materials Needed:
- Driftwood pieces
- Twine or fishing line
- Beads or small shells
- Drill
- Scissors
Steps:
- Drill small holes into the driftwood pieces.
- String beads or shells onto twine or fishing line.
- Tie the strings to the driftwood, spacing them evenly.
- Attach a larger piece of driftwood or a branch as the top base.
- Hang the wind chime outdoors and enjoy the gentle sound.
DIY Personalized Keychains
Craft stylish and practical keychains as gifts or for yourself.
Materials Needed:
- Shrink plastic sheets
- Permanent markers
- Keyring hardware
- Hole punch
- Oven
Steps:
- Draw or trace a design onto the shrink plastic with permanent markers.
- Cut out the shape and punch a hole at the top for the keyring.
- Bake the plastic according to package instructions to shrink it.
- Once cooled, attach the keyring hardware.
- Use or gift your personalized keychain.
DIY Bath Bombs
Pamper yourself with soothing, homemade bath bombs.
Materials Needed:
- Baking soda (1 cup)
- Citric acid (1/2 cup)
- Cornstarch (1/2 cup)
- Epsom salt (1/2 cup)
- Essential oils (10–15 drops)
- Food coloring (optional)
- Water (a few teaspoons)
- Bath bomb molds
Steps:
- Mix baking soda, citric acid, cornstarch, and Epsom salt in a large bowl.
- Add a few drops of food coloring and essential oils to the dry mixture.
- Gradually spritz water into the mixture while stirring until it holds its shape when pressed.
- Pack the mixture firmly into bath bomb molds.
- Let the bath bombs dry in the molds for 24 hours before removing them.
DIY Scrapbook Memory Pages
Create a keepsake scrapbook to cherish your memories.
Materials Needed:
- Scrapbook album
- Decorative papers
- Photos
- Stickers, washi tape, and embellishments
- Glue or double-sided tape
- Pens and markers
Steps:
- Select a theme for your scrapbook, such as vacations, family, or special events.
- Arrange your photos and decorative papers on the pages to create layouts.
- Use stickers, washi tape, and embellishments to add personality.
- Write captions, dates, or notes next to your photos for a personal touch.
- Secure all items with glue or tape and assemble your scrapbook.
DIY Fabric-Covered Notebooks
Upgrade plain notebooks with stylish fabric covers.
Materials Needed:
- Plain notebooks
- Fabric of your choice
- Scissors
- Fabric glue or hot glue gun
- Ribbon or decorative trim (optional)
Steps:
- Cut the fabric to fit your notebook, leaving an extra inch on all sides.
- Apply fabric glue to the notebook cover and smooth the fabric over it.
- Fold the edges of the fabric over the cover’s inside and glue them down.
- Add ribbon or trim for decoration if desired.
- Let the glue dry completely before using the notebook.
DIY Decorative Storage Boxes
Organize your space with beautiful, customized storage boxes.
Materials Needed:
- Cardboard or wooden boxes
- Decorative wrapping paper or fabric
- Scissors
- Glue or adhesive spray
- Ribbon, buttons, or other embellishments
Steps:
- Cut wrapping paper or fabric to fit the exterior of the box.
- Apply glue or adhesive spray to the box and attach the covering.
- Smooth out any bubbles or wrinkles for a neat finish.
- Decorate the box with ribbons, buttons, or other embellishments.
- Let it dry completely before using for storage.
DIY Jewelry Holder
Organize your accessories with a handmade jewelry holder.
Materials Needed:
- Picture frame
- Decorative fabric or mesh
- Scissors
- Hot glue gun
- Hooks or push pins
Steps:
- Remove the backing and glass from the picture frame.
- Cut the fabric or mesh to fit the frame’s opening.
- Attach the fabric or mesh to the back of the frame with hot glue.
- Insert hooks or pins into the frame for additional hanging space.
- Mount the jewelry holder on the wall and arrange your accessories.
DIY Felt Coasters
Add charm to your table settings with felt coasters.
Materials Needed:
- Felt sheets in various colors
- Scissors
- Fabric glue
- Stencils or templates (optional)
Steps:
- Cut out shapes like circles, squares, or themed designs from felt sheets.
- Layer and glue different felt pieces together for a thicker coaster.
- Use stencils to create intricate patterns or unique designs.
- Let the glue dry completely before using your coasters.
- Place them under glasses to protect your surfaces.
DIY Painted Umbrellas
Turn a plain umbrella into a stylish rain accessory.
Materials Needed:
- Plain umbrella
- Fabric paint or markers
- Paintbrushes or sponges
- Stencils (optional)
Steps:
- Open the umbrella and lay it flat on a clean surface.
- Use stencils or freehand designs to paint patterns on the fabric.
- Allow the paint to dry for several hours.
- Repeat for additional layers if needed for brighter colors.
- Seal with a fabric paint sealant if recommended by the paint brand.
DIY Decorative Light Garland
Brighten your space with a unique string light garland.
Materials Needed:
- String lights
- Artificial flowers, paper lanterns, or fabric strips
- Hot glue gun
- Scissors
Steps:
- Decorate each bulb or section of the string lights with artificial flowers, lanterns, or fabric.
- Secure decorations with hot glue, ensuring they are evenly spaced.
- Test the lights to ensure functionality.
- Hang the garland along walls, windows, or furniture for a warm glow.
DIY Quilted Pillow Covers
Add a cozy touch to your home with quilted pillow covers.
Materials Needed:
- Fabric scraps
- Sewing machine or needle and thread
- Pillow insert
- Scissors
- Pins
Steps:
- Cut fabric scraps into squares or desired shapes.
- Sew the scraps together to create a quilted pattern.
- Measure and cut backing fabric to match the size of the quilted front.
- Sew the front and back together, leaving an opening for the pillow insert.
- Insert the pillow and sew the opening closed.
DIY Photo Transfer Canvas
Transform your favorite photos into artwork.
Materials Needed:
- Canvas
- Printed photo (laser printer)
- Gel medium
- Paintbrush
- Damp cloth
Steps:
- Apply a thick layer of gel medium to the canvas.
- Place the photo face-down on the canvas and smooth out any bubbles.
- Let it dry overnight.
- Dampen the paper with a cloth and gently rub to remove it, leaving the image behind.
- Seal with a layer of gel medium for protection.
DIY Stamped Tea Towels
Personalize your kitchen with handmade tea towels.
Materials Needed:
- Plain tea towels
- Fabric paint
- Stamps or carved potatoes
- Paintbrushes
Steps:
- Dip the stamp or potato into fabric paint.
- Press it onto the towel to create a design.
- Repeat for desired patterns, letting each section dry before moving to the next.
- Allow the towels to dry completely before using or washing them.
Advanced DIY Crafts: Unleashing Your Creative Potential
Engaging in advanced DIY crafts is not just a hobby but an excellent way to personalize your home and accessories while celebrating your creativity. Whether you’re looking to revamp your living space, design unique personal accessories, or create festive decorations, these advanced crafts can elevate your skills and bring your artistic vision to life. Here’s a breakdown of exciting project ideas across different categories:
Home Décor Projects
- Macramé Wall Hangings
- Create intricate patterns using cotton cords or jute to design bohemian-style wall hangings.
- Experiment with techniques like square knots and lark’s head knots for unique textures.
- Resin Art Creations
- Craft vibrant coasters, trays, or decorative plates by pouring resin mixed with pigments, glitter, or dried flowers.
- Customize each piece with bold colors or translucent layers for a sleek finish.
- Upholstered Furniture Updates
- Breathe new life into old chairs, stools, or ottomans by reupholstering them with bold or textured fabrics.
- Add tufting or nailhead trim for a professional touch.
Personal Accessories
- Handmade Jewelry
- Design custom beaded necklaces, bracelets, or clay earrings using intricate patterns and materials.
- Experiment with polymer clay to mold trendy shapes and add metallic finishes.
- Leatherworking Projects
- Craft sophisticated wallets, belts, or keychains by cutting, stitching, and embossing leather.
- Use tools like edge bevelers and stamping kits for a polished look.
- Crocheted or Knitted Accessories
- Create functional and stylish items like tote bags, hats, or cozy scarves using advanced crochet or knitting techniques.
- Play with colorful yarns and textured stitches for added flair.
Seasonal and Festive Crafts
- DIY Holiday Decorations
- Make wreaths using natural elements like pinecones, dried fruits, and ribbons.
- Design unique ornaments with felt, wood slices, or embroidery hoops.
- Personalized Party Favors
- Assemble customized favors like candles, mini succulent pots, or treat bags that match your party theme.
- Add handwritten tags or packaging for a personal touch.
- Seasonal Table Centerpieces
- Craft stunning centerpieces with candles, floral arrangements, or themed decorative items like pumpkins or seashells.
- Use layered designs to create depth and interest.
Tips for DIY Success: A Guide to Crafting with Confidence
Whether you’re new to DIY projects or an experienced crafter looking to enhance your skills, there are plenty of ways to improve your crafting journey. From finding inspiration to overcoming challenges, and even turning your hobby into a business, here are some practical tips to help you succeed.
Where to Find Inspiration
- Online Platforms: Pinterest, Instagram, YouTube Tutorials
- Pinterest is a goldmine for discovering a variety of DIY ideas, from home decor to fashion. Create boards to organize your favorite projects.
- Instagram allows you to connect with other crafters, follow influencers in your niche, and get fresh ideas. Use hashtags to find projects that inspire you.
- YouTube tutorials are perfect for visual learners, offering step-by-step guides for all types of crafts, from beginner to advanced.
- Crafting Communities and Workshops
- Join local or online crafting communities (e.g., Facebook groups, Reddit forums) to connect with others, exchange ideas, and ask for advice.
- Participating in workshops, whether in person or virtually, can give you hands-on experience and introduce you to new techniques you may not have tried before.
Overcoming Challenges
- Learning from Mistakes
- Mistakes are part of the process! Instead of feeling discouraged, view them as learning opportunities. Analyze what went wrong and adjust your approach for next time.
- Experimenting with New Techniques
- Don’t be afraid to try new materials or methods. Experimenting with new techniques can open up creative possibilities and make your projects more unique.
- Time Management for Long-Term Projects
- Break your project into manageable steps to avoid feeling overwhelmed. Set realistic deadlines for each stage, and remember, it’s okay to take breaks when needed.
How to Turn Your Hobby into a Business
- Selling Your Crafts Online or at Local Markets
- Start by selling on platforms like Etsy, eBay, or Shopify. These sites allow you to easily set up an online store to reach a global audience.
- For a more personal touch, try selling your creations at local craft fairs or markets. This gives you the chance to interact with customers face-to-face.
- Branding and Packaging Your Creations
- Create a unique brand that reflects your style and vision. Develop a logo, choose a cohesive color scheme, and create attractive packaging that enhances the experience of your customers.
- Invest in professional-looking business cards or thank-you notes to accompany each order, which can help build customer loyalty.
- Building a Customer Base Through Social Media
- Social media platforms like Instagram, Facebook, and TikTok are great for showcasing your work, building a following, and attracting potential customers.
- Share behind-the-scenes content, tutorials, or sneak peeks of upcoming products. Consistent engagement with your audience can turn followers into customers.
FAQ
What are some easy DIY Crafts For Adults?
Some simple DIY Crafts For Adults include making greeting cards, painted mason jars, photo frames, or knitted scarves. You can also try scrapbooking or creating decorative wall art using basic materials.
What materials do I need to start DIY Crafts For Adults?
The basic materials for most DIY Crafts For Adults include scissors, glue, tape, paints, brushes, fabric, thread, yarn, and various types of paper (construction, cardstock, or scrapbook). For more advanced projects, you might need tools like a hot glue gun, cutting machine, or sewing kit.
How can DIY crafts help reduce stress?
Crafting has been shown to improve mental health by promoting mindfulness and creativity. Engaging in DIY projects helps reduce anxiety, improves focus, and allows for relaxation through repetitive actions, like knitting or painting.
Can I make gifts with DIY Crafts For Adults?
Absolutely! DIY Crafts For Adults make thoughtful and personalized gifts. Handmade candles, custom mugs, knitted scarves, or photo albums are great examples of gifts that add a personal touch to any occasion.
How much time do DIY projects usually take?
The time required for a DIY project depends on its complexity. Simple projects like making bookmarks or painting small items can take an hour or two, while more intricate crafts like furniture upcycling or crochet can take several hours or days.

Hi, I’m Victoria, an art and craft teacher at Newark City Schools, where I have the joy of working with middle school students to help them explore their creativity and develop their artistic talents. I believe that art is a powerful way for students to express themselves, and I strive to make every lesson a fun, engaging, and inspiring experience.
I created this website to share the art and craft projects, techniques, and resources that I use in my classroom, hoping to inspire both educators and young artists alike. Whether you’re a teacher looking for new ideas or a student eager to try something new, I’m excited to provide creative tools and projects that anyone can enjoy.
When I’m not in the classroom, I love experimenting with different art forms and learning new crafting techniques. My goal is to help others discover the joy of making things with their hands, and I hope my website serves as a space for everyone to explore their creative potential.