Oh, hey! So, the other day I found myself staring at a pile of random stuff in my living room—old jars, scraps of paper, some leftover yarn—and I thought, “Why not make something fun out of this?” Honestly, I’ve always loved little Fun DIY crafts, but sometimes it feels like I don’t have the time or energy, you know? And I totally get it if you’ve ever looked at a tutorial and felt completely overwhelmed. That’s exactly why I wanted to put together this little guide. I’m talking about fun, simple DIY crafts that don’t require a ton of fancy supplies or hours of work. Stuff that actually makes you feel proud when it’s done. Think of it as your little creative escape—a way to unwind, make something beautiful, and maybe even laugh at your own messy masterpiece along the way. Trust me, by the end, you’ll be itching to start crafting!
Fun DIY Crafts
Fun DIY crafts are creative and enjoyable activities that you can make at home with simple materials.
DIY Dreamcatcher
Materials Used:
Embroidery hoop
String or yarn
Beads
Feathers
Steps:
Wrap the embroidery hoop with string or yarn.
Create a web inside the hoop using additional string or yarn.
Decorate the dreamcatcher with beads and feathers for a boho touch.
Hang your dreamcatcher in your bedroom to catch all your dreams!
Leaf Print Art
Create stunning art with leaves, turning them into natural stamps for your artwork.
Materials Used:
Fresh leaves
Paint
Paper or canvas
Steps:
Gather fresh leaves with interesting shapes.
Coat the leaves with paint using a brush.
Press the painted side of the leaves onto paper or canvas to create prints.
Let the prints dry and display your beautiful nature-inspired art.
Balloon Stamped Art
Create unique and colorful artwork by using balloons to stamp patterns and shapes onto paper or canvas.
Materials Used:
Balloons
Paint
Paper or canvas
String (optional)
Steps:
Inflate a balloon and dip it into paint.
Stamp the balloon onto the paper or canvas to create circular prints.
Repeat with different colors and sizes to create patterns.
Once the paint is dry, you can hang your balloon-stamped artwork or give it as a gift!
Seashell Wind Chimes
Craft your own seashell wind chimes for a lovely addition to your outdoor space.
Materials Used:
Seashells
String or fishing wire
Wooden dowel
Glue gun
Steps:
Clean and sort your seashells.
Cut pieces of string or fishing wire and thread them through the holes in the seashells.
Tie the strings to a wooden dowel to hang the seashells.
Arrange the seashells at varying lengths to create a wind chime effect.
Hang your wind chime outside where it will catch the wind
Tin Can Lanterns Art
Transform an old tin can into a lovely lantern. These lanterns can add a cozy touch to your home or garden.
Materials Used:
Empty tin can
Hammer and nail
Spray paint or acrylic paint
Tea light candle or LED light
Steps:
Clean the tin can and remove any labels.
Fill the can with water and freeze it to prevent it from collapsing during the next steps.
Use a hammer and nail to punch holes in the tin can, creating a pattern or design of your choice.
Once the water is frozen, take the can out of the freezer and allow it to thaw slightly.
Paint the can with your desired color.
Once the paint is dry, place a tea light or LED light inside the can for a beautiful glow.
T-Shirt Tote Bag
Repurpose an old t-shirt into a useful tote bag.
Materials Used:
Old t-shirt
Scissors
Sewing machine (optional)
Steps:
Cut the sleeves and collar off the t-shirt.
Turn the shirt inside out and sew the bottom hem closed.
Flip the shirt back to the right side and use it as a stylish tote bag.
DIY Friendship Bracelets
Friendship bracelets are a timeless craft project and make great gifts or keepsakes for friends. You can experiment with various designs and colors.
Materials Used:
Embroidery floss or string
Scissors
Tape or a clipboard (optional)
Steps:
Cut several lengths of embroidery floss (about 24 inches each).
Tie the strands together at one end and secure them to a surface using tape or a clipboard.
Start braiding, knotting, or creating patterns such as chevrons or spirals.
Continue until the bracelet reaches your desired length.
Tie the ends together and trim the excess thread.
Give your completed bracelet to a friend or wear it yourself!
DIY Pom-Pom Garland Art
This simple, colorful decoration can brighten up any room! Pom-poms are easy to make and can be turned into a beautiful garland.
Materials Used:
Yarn (various colors)
Scissors
Needle and thread or string
Steps:
To make a pom-pom, wrap yarn around your fingers 40-50 times.
Slide the yarn off your fingers and tie it tightly in the center with another piece of yarn.
Cut the loops at both ends to create the pom-pom shape.
Trim the pom-pom to your desired size and shape.
Repeat until you have a string of colorful pom-poms.
Thread the pom-poms onto a string using a needle, spacing them evenly along the string.
Hang your pom-pom garland anywhere you want to add some vibrant flair!
Paper Bag Puppets Art
Create fun paper bag puppets for storytelling or performances.
Materials Used:
Paper bags
Markers, googly eyes, and craft materials
Glue
Steps:
Take a brown paper bag and decorate it with markers, glue, and googly eyes to create a puppet face.
Add additional features like ears, hair, or clothes using craft materials.
Put your hand inside and use it as a puppet for imaginative play!
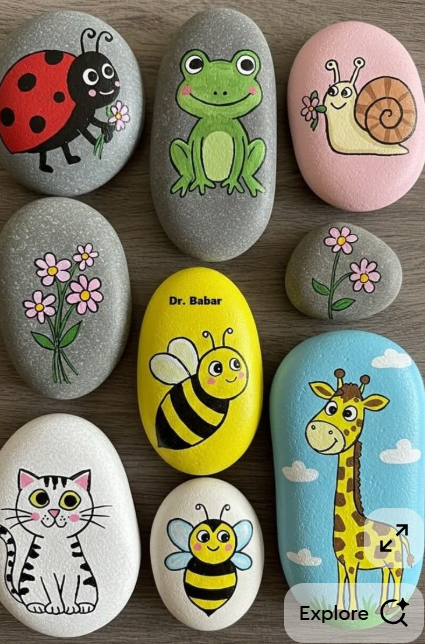
Painted Rock Animals
Introduce a fun and creative way to create cute animal figurines using painted rocks! This simple craft is perfect for kids and adults alike and can be done with minimal supplies.
Clean the rocks thoroughly with soap and water. Let them dry.
Choose your animal design and sketch it lightly with a pencil.
Paint the base color of your animal (e.g., brown for a bear or gray for an elephant).
Once dry, add the details like eyes, nose, and mouth using a permanent marker or paint.
Seal your painted rocks with a coat of Mod Podge or varnish for durability.
Allow everything to dry completely before displaying your painted rock animals.
Paper Plate Jellyfish
Make a charming sea creature with simple materials like paper plates and colorful streamers! This is a great project for younger crafters.
Materials Used:
Paper plate
Ribbon or streamers
Paint (optional)
Glue
Scissors
Steps:
Take a paper plate and cut out a small portion from the center to form a ring shape.
Paint the top of the plate, if desired, with your favorite colors or designs.
Cut various lengths of ribbon or streamers to create the jellyfish’s tentacles.
Glue the ribbon pieces along the bottom edge of the plate.
For added detail, draw a cute face or add googly eyes to the top of the plate.
Allow everything to dry completely before hanging your jellyfish for display.
Popsicle Stick Bird Feeder
This DIY craft allows you to make a fun bird feeder that can help local wildlife while giving kids a chance to build something practical.
Materials Used:
Popsicle sticks
Glue gun or white glue
String (optional)
Peanut butter
Birdseed
Steps:
Lay out 6-8 popsicle sticks in a square shape for the base of your feeder.
Attach the sticks together with glue to form a simple box or frame.
Create two holes in opposite sides of the frame and thread a string through them for hanging.
Spread peanut butter generously on the sides of your popsicle stick frame.
Roll the peanut butter-coated frame in birdseed until it’s fully covered.
Let the glue dry and hang the feeder in a tree for birds to enjoy.
Toilet Paper Roll Binoculars
Transform toilet paper rolls into fun, functional binoculars for outdoor adventures! This is a great way to recycle and create something useful.
Materials Used:
2 toilet paper rolls
Glue gun or white glue
String or yarn
Paint or markers
Steps:
Paint or decorate your toilet paper rolls with your favorite designs.
Once dry, glue the two toilet paper rolls together side by side to form the binocular shape.
Cut a piece of string or yarn and attach it to the sides of the rolls for a strap.
Let everything dry completely, and now you’re ready to use your new binoculars!
Salt Dough Keychains
Salt dough is a fun and easy material to work with, and you can create personalized keychains that make perfect gifts or accessories.
Materials Used:
1 cup of flour
1/2 cup of salt
1/2 cup of water
Rolling pin
Cookie cutters or shapes to carve
Keychain rings
Paint and brushes
Steps:
In a bowl, mix flour, salt, and water to create the dough.
Knead the dough until smooth and roll it out with a rolling pin.
Use cookie cutters or freehand shapes to cut out keychain shapes like hearts or stars.
Make a small hole at the top of each shape with a straw for the keychain ring.
Bake the shapes at 250°F (120°C) for 2-3 hours until they harden.
Paint and decorate the keychains after they’ve cooled, then add the keychain ring to complete them.
Paper Mâché Bowls
Crafting with paper mâché is a fun and creative way to make unique decorative bowls. These bowls can be customized with colors and designs to fit any space.
Materials Used:
Newspaper strips
Flour and water (or glue)
Balloon or bowl (for shaping)
Paint and brushes
Steps:
Inflate a balloon or use an existing bowl to form the shape of your paper mâché bowl.
Mix equal parts flour and water to create a paste (or use glue).
Dip the newspaper strips into the paste and layer them over the balloon or bowl.
Allow the layers to dry completely (about 24 hours).
Once dried, pop the balloon (if using) and remove the paper mâché from the bowl.
Paint and decorate your new bowl however you like!
Button Art Canvas
This project allows you to create a stunning piece of art by gluing buttons to a canvas. It’s a simple yet visually striking way to decorate a room.
Materials Used:
Canvas
Buttons (various sizes and colors)
Hot glue gun
Steps:
Choose a design or shape to create with buttons (flowers, animals, abstract designs, etc.).
Arrange the buttons on the canvas to outline your design.
Once you’re satisfied with the arrangement, glue the buttons onto the canvas one by one.
Let the glue dry completely before hanging or framing your new piece of button art.
Paper Flower Bouquets
Create a beautiful bouquet of paper flowers that can be used as home decor or given as gifts for special occasions.
Materials Used:
Colored paper
Scissors
Glue
Green pipe cleaners or floral wire
Steps:
Cut petal shapes from the colored paper, making sure they are all the same size.
Fold the petals to create texture, then glue them together to form flowers.
Add a pipe cleaner or floral wire as the stem by gluing it to the base of the flower.
Arrange your flowers into a bouquet and wrap the stems together with floral tape.
Display your paper flower bouquet in a vase or give it as a gift!
DIY Bath Bombs
Making bath bombs is a relaxing and fun craft that can also be used for self-care or given as thoughtful gifts.
Materials Used:
Baking soda
Citric acid
Epsom salt
Cornstarch
Essential oils
Coconut oil or olive oil
Water
Molds
Steps:
In a bowl, combine 1 cup of baking soda, 1/2 cup of citric acid, 1/2 cup of Epsom salt, and 1/2 cup of cornstarch.
In a separate bowl, mix 2 teaspoons of essential oil, 1 tablespoon of coconut oil, and a small amount of water.
Slowly pour the wet ingredients into the dry mixture, stirring continuously.
Once the mixture holds together, press it into molds and let it dry for 24-48 hours.
Once dried, carefully remove the bath bombs from the molds and store them for future use.
Clothespin Butterflies
Create colorful and whimsical butterflies using clothespins. This craft is fun and easy, making it perfect for kids.
Materials Used:
Wooden clothespins
Paint and brushes
Pipe cleaners
Googly eyes
Glue
Steps:
Paint your clothespins with vibrant colors.
After the paint dries, attach two pipe cleaners at the top of the clothespin to form the butterfly’s antennae.
Add googly eyes and any other details you like to personalize your butterfly.
Let everything dry and display your beautiful clothespin butterflies around the house.
Tin Can Planters
Recycling tin cans into charming plant pots is an eco-friendly way to grow herbs, flowers, or succulents.
Materials Used:
Empty tin cans
Paint
Soil
Small plants or seeds
Drill or nail for holes
Steps:
Clean the tin can thoroughly.
Drill small drainage holes at the bottom of the can.
Paint the outside of the can with your chosen colors or designs.
Once dry, fill the can with soil and plant your favorite flowers or herbs.
Place your tin can planter in a sunny spot and water the plants regularly.
Button Bookmark
Make a charming button bookmark to keep track of your place in your favorite book.
Materials Used:
Ribbon or string
Buttons (small)
Glue gun
Steps:
Cut a length of ribbon or string to your desired bookmark size.
Glue a button to one end of the ribbon to create a decorative top.
Use the bookmark to mark your page and add a fun touch to your reading!
DIY Candle Holders
Transform simple materials into elegant candle holders for your home.
Materials Used:
Empty toilet paper rolls
Hot glue gun
Paint or decorative paper
Candle
Steps:
Wrap a toilet paper roll in decorative paper or paint it with your desired color.
Glue the roll in place to secure the paper.
Place a small candle inside the roll to create a DIY candle holder.
Paper Mâché Pinatas
A fun and festive craft perfect for parties or special occasions, creating pinatas from paper mâché can be an exciting project.
Materials Used:
Balloon
Paper mâché paste
Newspaper strips
Paint and decorations
Steps:
Inflate a balloon to your desired size.
Dip strips of newspaper into paper mâché paste and layer them over the balloon.
Let the layers dry completely.
Once dry, pop the balloon and cut an opening in the pinata to fill it with candy or treats.
Paint and decorate the pinata to your liking.
Clay Handprint Keepsakes
Create personalized keepsakes by molding clay into handprints for a sentimental craft project.
Materials Used:
Air-dry clay
Rolling pin
Paint (optional)
Cookie cutter (optional)
Steps:
Roll out a thin layer of air-dry clay.
Press your hand into the clay to create a handprint impression.
Let the clay dry and, if desired, paint it to enhance the handprint.
Display the handprint keepsake on your desk or give it as a gift.!
Fingerprint Tree
Create a sentimental tree artwork using your fingerprints as leaves.
Materials Used:
Paper or canvas
Paint (green and brown)
Markers
Steps:
Use brown paint to create the trunk and branches of a tree on your canvas.
Dip your fingers in green paint and press them onto the canvas to form the leaves.
Once dry, use markers to add additional details, such as the tree’s roots or names for a personalized touch.
Rock Planters
Create unique planters using painted rocks, perfect for small plants or succulents.
Materials Used:
Large rocks
Paint
Small plants or succulents
Potting soil
Steps:
Clean the rocks thoroughly and paint them with vibrant colors.
Once dry, use them as planters by placing small plants or succulents in them.
Display your rock planters around your home or garden!
Painted Wooden Spoons
Personalize wooden spoons by painting them to match your kitchen decor.
Materials Used:
Wooden spoons
Paint
Brushes
Steps:
Clean and dry the wooden spoons.
Paint the handles with your favorite colors or patterns.
Let the paint dry, and enjoy your unique, hand-painted spoons!
Bead Necklaces
Craft your own jewelry by creating personalized bead necklaces.
Materials Used:
Beads
String or wire
Clasp
Steps:
Thread beads onto string or wire, creating your desired pattern.
Once you’re happy with the length, add a clasp to the ends.
Wear your new bead necklace with pride!
Wooden Frame Decor
Turn plain wooden frames into stunning, personalized decor.
Materials Used:
Wooden frames
Paint, glitter, or fabric
Glue or Mod Podge
Steps:
Paint or decorate the wooden frame with your chosen materials.
Add glitter, fabric, or other embellishments to personalize the frame.
Place your favorite photo inside and display your decorated frame!
Yarn-Wrapped Vases
Turn simple vases into vibrant, yarn-wrapped creations that can brighten any space.
Materials Used:
Empty glass bottles or vases
Yarn (various colors)
Hot glue gun
Steps:
Apply hot glue along the base of the vase.
Start wrapping the yarn around the vase, gluing it in place as you go.
Continue wrapping until the vase is covered to your liking.
Display your new yarn-wrapped vase with fresh
Tips and Tricks for DIY Success
Embarking on a DIY project can be a fulfilling and creative experience. Whether you’re crafting as a hobby or creating personalized gifts, it’s important to approach each project with the right tools, inspiration, and organization. Below are some tips and tricks to ensure your DIY ventures are a success.
1. Essential Tools Every Crafter Should Have
Having the right tools is the foundation of any DIY project. Whether you’re into sewing, paper crafting, painting, or woodworking, certain tools will make your crafting experience smoother and more enjoyable.
Cutting Tools: A sharp pair of scissors or a craft knife is a must. For precision, a rotary cutter or a paper trimmer works wonders for cutting clean lines.
Adhesives: Stock up on different types of glue, such as a hot glue gun, glue sticks, or liquid glue, depending on the material you’re working with.
Measuring Tools: A ruler, measuring tape, and a compass will help you get the right dimensions and precise measurements.
Markers and Pens: Various markers (paint, fabric, or permanent) will allow you to add details and personalize your crafts.
Storage Containers: Invest in bins, drawers, or organizers to keep all your supplies in order.
Cutting Mat and Safety Gear: A self-healing cutting mat is essential to protect surfaces. Don’t forget safety glasses or gloves for handling certain tools.
2. How to Find Craft Inspiration
Inspiration can strike at any time, and there are countless resources to help fuel your creative ideas. Here’s how you can tap into your creativity:
Online Platforms: Websites like Pinterest, Instagram, and Etsy are full of DIY tutorials and project ideas. You can search for specific techniques or browse through various categories like home decor, upcycling, or seasonal crafts.
Books and Magazines: Craft books provide detailed instructions for both beginners and experts. Magazines like Martha Stewart Living or Crafts Beautiful feature seasonal projects and trendy DIY ideas.
Blogs and YouTube Channels: Many crafters share their experiences, tips, and tutorials through blogs and YouTube channels. Following these can inspire you with step-by-step instructions and real-time demos.
Nature and Everyday Life: Sometimes the best ideas come from simply observing your surroundings—nature, architecture, fashion, or even vintage items. Let your environment inspire your next project.
Craft Fairs and Community Events: Visiting local craft fairs can expose you to new materials and techniques that you may not have considered before.
3. Organizing Your Craft Space for Maximum Creativity
A well-organized craft space can do wonders for your productivity and creativity. Here are some tips to keep your space neat and inspiring:
Create a Dedicated Space: If possible, designate a specific area for your crafting. Whether it’s a corner of a room or a whole room, having a set place helps you stay focused and keeps your materials handy.
Use Storage Solutions: Invest in clear bins, labeled boxes, and wall-mounted organizers to keep your supplies visible and easy to access. This helps reduce clutter and saves time searching for materials.
Work Surface: Make sure you have a comfortable, flat surface where you can spread out your projects. This could be a sturdy table or a folding desk.
Lighting: Good lighting is essential. Natural light is ideal, but task lighting like adjustable desk lamps can help you work efficiently and avoid eye strain.
Inspirational Display: Set up a mood board or a corkboard to pin ideas, color schemes, or designs you’re inspired by. This keeps your creativity flowing while working on current and future projects.
FAQ
What are some easy Fun DIY Crafts ideas for beginners?
Some beginner-friendly Fun DIY Crafts include making paper flowers, painting rocks, creating friendship bracelets, or assembling simple scrapbook pages. Fun DIY Crafts require minimal supplies and are a great way to start crafting.
What materials do I need for Fun DIY Crafts?
Basic materials for most Fun DIY Crafts include scissors, glue, paper, fabric, markers, paints, and brushes. Depending on the project, you may also need additional items like beads, string, clay, or cardboard.
Can I create Fun DIY Crafts with recycled materials?
Absolutely! Many Fun DIY Crafts can be made using recycled materials like old magazines, cardboard boxes, plastic bottles, and fabric scraps. These eco-friendly projects are not only creative but also reduce waste.
How can I get inspiration for my Fun DIY Crafts projects?
Inspiration can come from many sources, including Pinterest, craft blogs, Instagram, or even nature. Visiting craft stores or looking through old books and magazines can also spark new ideas for Fun DIY Crafts.
Hi, I’m Victoria, an art and craft teacher at Newark City Schools, where I have the joy of working with middle school students to help them explore their creativity and develop their artistic talents. I believe that art is a powerful way for students to express themselves, and I strive to make every lesson a fun, engaging, and inspiring experience.
I created this website to share the art and craft projects, techniques, and resources that I use in my classroom, hoping to inspire both educators and young artists alike. Whether you’re a teacher looking for new ideas or a student eager to try something new, I’m excited to provide creative tools and projects that anyone can enjoy.
When I’m not in the classroom, I love experimenting with different art forms and learning new crafting techniques. My goal is to help others discover the joy of making things with their hands, and I hope my website serves as a space for everyone to explore their creative potential.